Post Game Guide: Things to Do After Beating DQ2
★ Interactive Map and Locations
┗ Secret Spots | Sparkly Spots | Mini Medals
☆ 100% Walkthrough Guide
┗Post Game Guide
☆ Trophy Guide: How to Get Platinum
★ Playing the first game? DQ1 Wiki here!
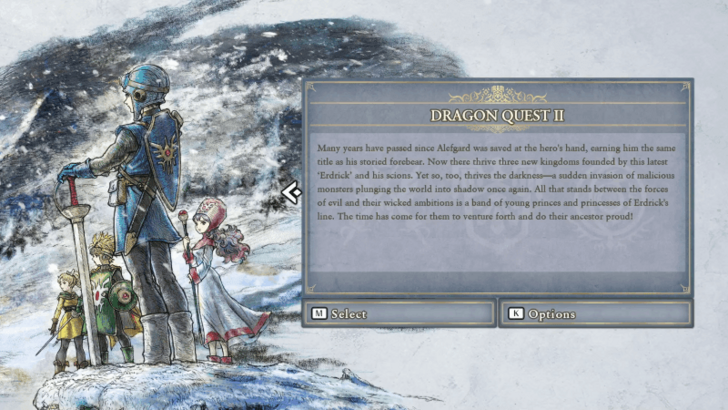
This is a guide to the post-game content of Dragon Quest 2 HD-2D Remake (DQ2). Learn what players can do after defeating the final boss and a walkthrough for the post-game content here!
| ◀ Previous Guide |
|---|
| Rendarak Shrine to Hall of Hargon |
List of Contents
 Attention! Attention! |
This page contains major spoliers for Dragon Quest 2 HD-2D Remake! Continue reading on at your own risk. |
|---|
List of Post-Game Content
- Defeat Xenlon to Have Wishes Granted
- Clear the Cave of Confusion
- Defeat the Dragonlord's Great-Grandson
- Experience the True Ending
- Start A New Game At Level 48
Defeat Xenlon to Have Wishes Granted
| Wish | Priority |
|---|---|
| Tombola Location | ★★★★★ |
| Rubiss's Sword | ★★★★☆ |
| Damage-Dealing Ability | ★★★★☆ |
| Magic-Magnifying Ability | ★★★☆☆ |
| Secrets of Puff-Puff | ★☆☆☆☆ |
Once you've cleared the game once, the Cloudsgate Citadel teleportal in the Faerie Palace will be unlocked. This then leads you to the Citadel Tower, where you can beat Xenlon to have one of five powerful wishes granted.
Clear the Cave of Confusion
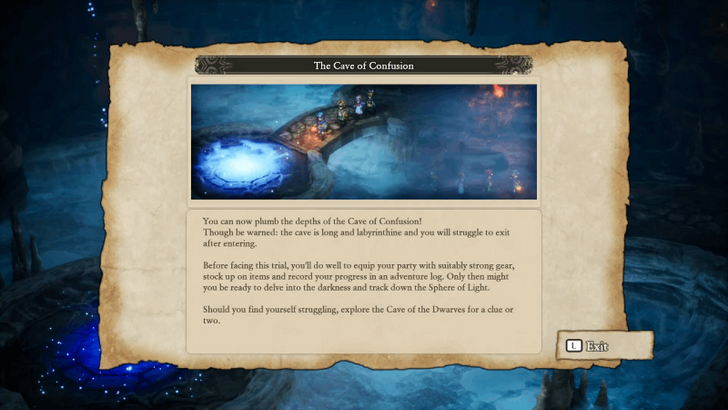
Another post-game exclusive dungeon is the Cave of Confusion, which is unlocked after collecting all 7 Living Memories and taking on the respective Side Quest. This is an extremely difficult dungeon where you can't teleport out, so you should only take it once the party's levels are around the high 80s or low 90s.
Cave of Confusion Dungeon Guide
Defeat the Dragonlord's Great-Grandson
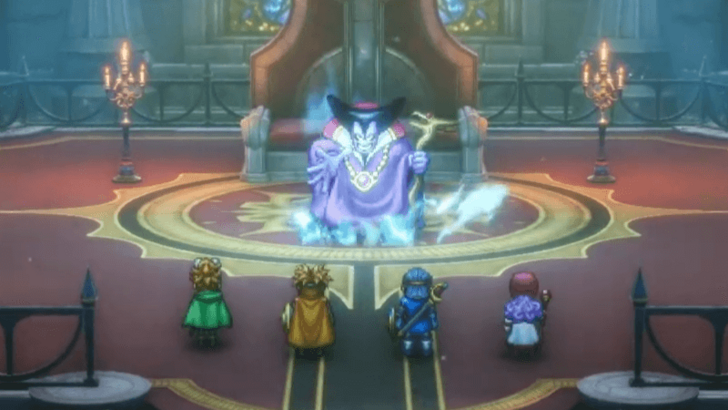
After clearing the Cave of Confusion and grabbing the key item at the end, you will be able to talk to the Dragonlord's Great-Grandson and challenge him to a fight. He will largely be the same as the final boss of Dragon Quest 1, except he will be more powerful, especially in his second phase.
How to Beat the Dragonlord's Great-Grandson
Experience the True Ending
Once the Dragonlord's Great-Grandson has been defeated, you will unlock the true ending of the game. To see this, you will need to defeat Hargon and Malroth again so that you can face the new final boss.
Endings Guide: List of All Endings
Start A New Game At Level 48
After beating the game once, you can start a new game and be at Level 48 immediately. This is done by switching your language to Japanese, and entering もょもと as your character's name. It’s a fast way to jump straight into tougher challenges without grinding through the early game.
Post-Game Walkthrough
- Cloudsgate Citadel
- Citadel Tower
- Cave of the Dwarves
- Cave of Confusion
- Dragonlord's Castle
- True Ending
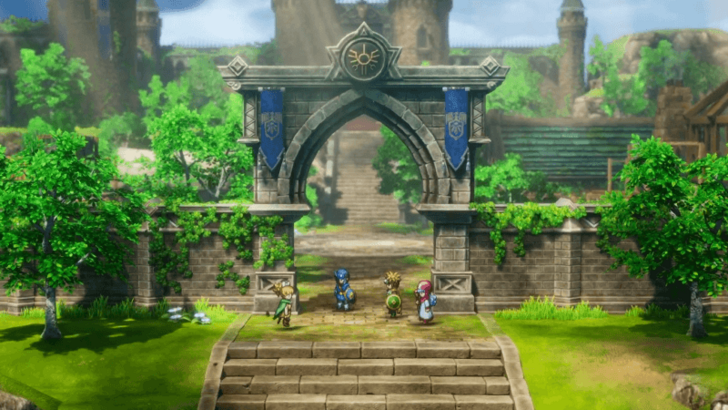
Cloudsgate Citadel
| 1 | 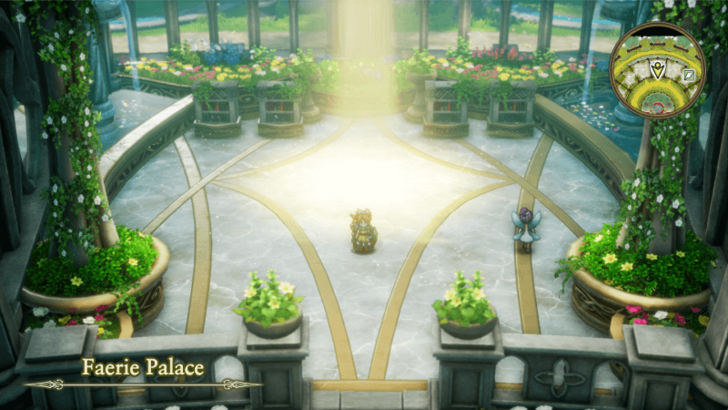 Once you've reloaded your cleared game save, you will load back at the Faerie Palace. Go to the back of the 1st Floor to find a new teleportal that will bring you to the Cloudsgate Citadel. ▶︎ Cloudsgate Citadel Location Guide |
|---|---|
| 2 | 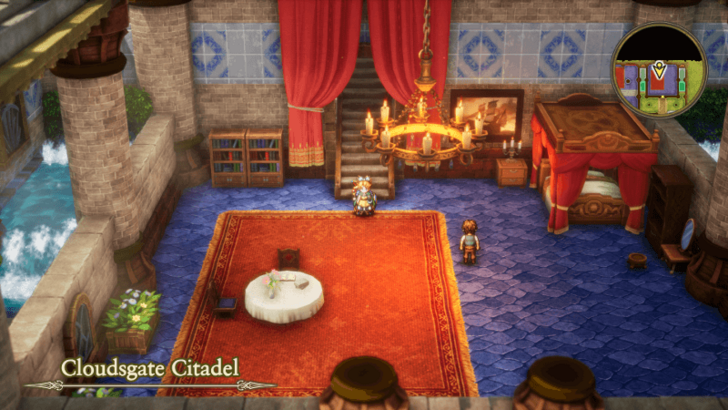 Explore the area first for new treasures and scrolls, and then stock up at the new item shop afterwards. From there, you can head out the exit at the back to get to the Citadel Tower. ▶︎ Citadel Tower Dungeon Guide |
| 3 | Before proceeding any further, it's recommended to farm some EXP at the entrance since Liquid Metal Slimes have an increased chance of spawning in this dungeon. It's recommended to be at least around level 80 before you go through the dungeon and reach the boss at the end. ▶︎ Metal Slime Location and Farming Guide |
Citadel Tower
| 1 | The Citadel Tower is a very short and straightforward dungeon. Just make sure that you take the time to explore each floor so that you don't miss any treasures on the way up. |
|---|---|
| 2 | 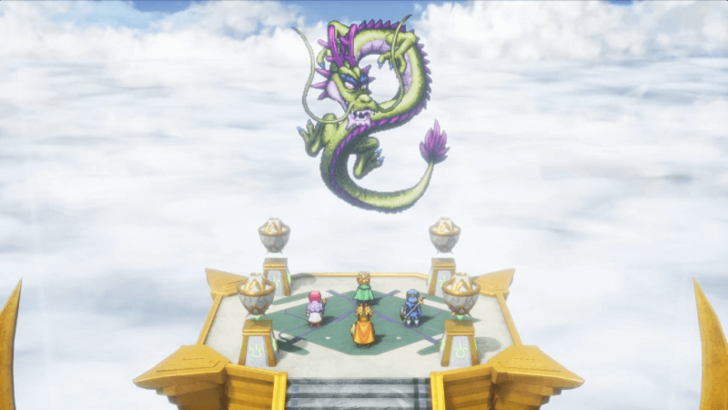 When you're ready, go up to the top of the 6th Floor to face Xenlon. This can be a tough fight, and the recommended strategy to defeat this boss is to constantly put Xenlon to sleep and have the Prince of Midenhall spam boosted Dragon Slashes. ▶︎ How to Beat Xenlon and Best Wishes |
| 3 | 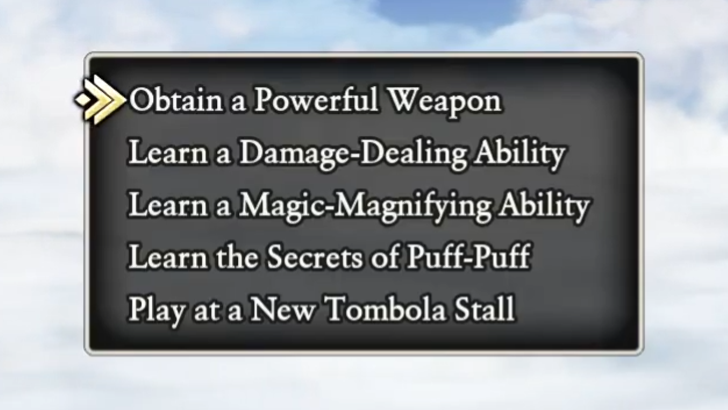 After you defeat Xenlon in at least 25 turns, he will grant you one of five wishes. You can repeat this boss fight as many times as you want to have every wish granted, but the turn requirement to defeat him will go down every time, up to a minimum of 15 turns. |
| 4 |
For each wish, it's recommended to go in the following order, starting with the new Tombola Stall since it provides some of the best equipment in the game. 1. Play at a New Tombola Stall 2. Obtain a Powerful Weapon 3. Learn a Damage-Dealing Ability 4. Learn a Magic-Magnifying Ability 5. Learn the Secrets of Puff-Puff Although, as a note, you can also go with the Damage-Dealing Ability first since it will give you more Critical Claims to make Metal Slime farming a lot easier. ▶︎ Best Weapons and Armor |
| 5 | 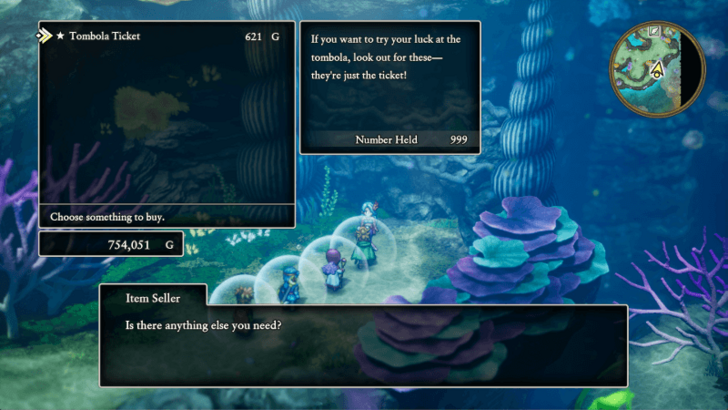 Also, as a note, you'll now be able to purchase Tombola Tickets from a mermaid in Mersea. Make sure to farm a ton of gold so you can buy tickets to get the new equipment from the Cloudsgate Tombola Stall. ▶︎ Money Farming Guide |
Cave of the Dwarves
| 1 | 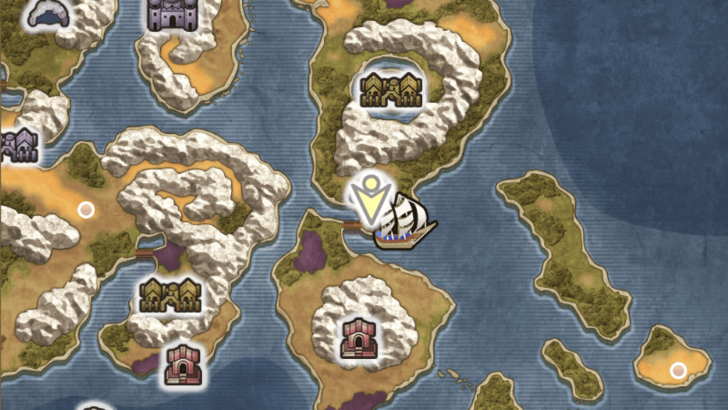 Once you've obtained all of the wishes that you want, you can head to the Cave of the Dwarves next, which is unlocked after collecting all 7 Living Memories. The area is largely the same as in Dragon Quest 1, so make sure to explore each floor so you don't miss any treasures. ▶︎ List of All 7 Living Memory Locations |
|---|---|
| 2 | 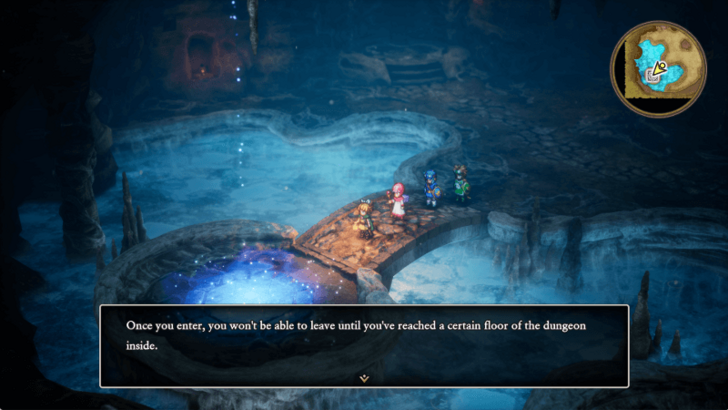 When you're ready, head down to B4 so that you can access the teleportal that leads to the Cave of Confusion. This is by far the hardest dungeon in the game, since it's long, confusing, and you can't leave using Zoom or Evac. ▶︎ Cave of Confusion Dungeon Guide |
| 3 | When taking on this dungeon, it's recommended to stock up on a ton of healing items, so that you'll be able to get through without running low on HP and MP. Feel free to enter the cave and leave immediately so that you can buy supplies and teleport back after. |
Cave of Confusion
| 1 | Before you start exploring the dungeon, it's recommended to grind levels here since the EXP that you get is on par with farming Liquid Metal Slimes, without the difficulty of dealing with their sky-high defense stat. Ideally, the party's level should be around the high 80s to low 90s so that you have enough HP and MP to get through the dungeon. ▶︎ EXP Farm: How to Level Up Fast |
|---|---|
| 2 | When you're ready, you can start going through the Cave of Confusion. Aside from the inability to teleport out or the sheer length of the dungeon, it's very confusing to navigate since it's not apparent which exit will lead you to the next floor. |
| 3 | 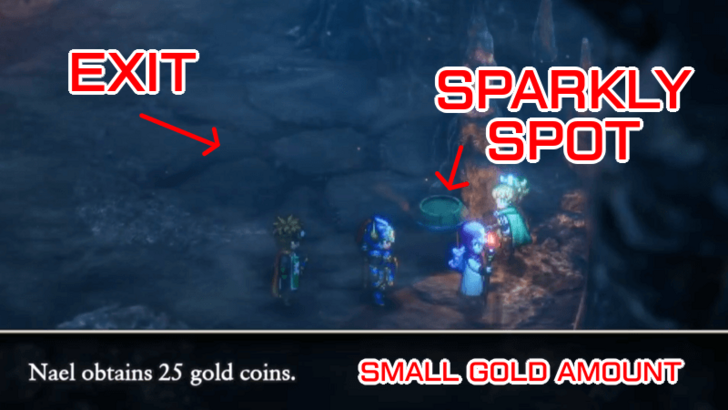 To navigate through this dungeon, you will need to use the Snoop ability and look for a Sparkly Spot next to an exit. This will always signify the correct way to go, and you can double-check if it's the right way by picking up the Sparkly Spot and seeing if it only grants a small amount of gold. ▶︎ Snoop Effect and How to Learn |
| 4 | While going through the dungeon, make sure that you're also using Nose for Treasure and picking up all the items that you can find. You won't get any useful healing items to help you stay topped up, but there are a bunch of seeds, Mini Medals, equipment, and even Scrolls that you don't want to miss out on. ▶︎ Nose for Treasure Effect and How to Learn |
| 5 | 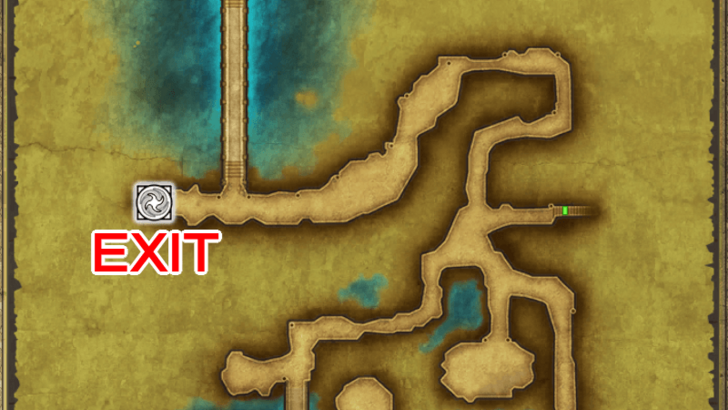 At some point, you'll come across floors that have a teleportal that allows you to leave the dungeon. Unless you're low on supplies, it's not recommended to take these, since you'll need to go through the whole dungeon again if you leave. |
| 6 | 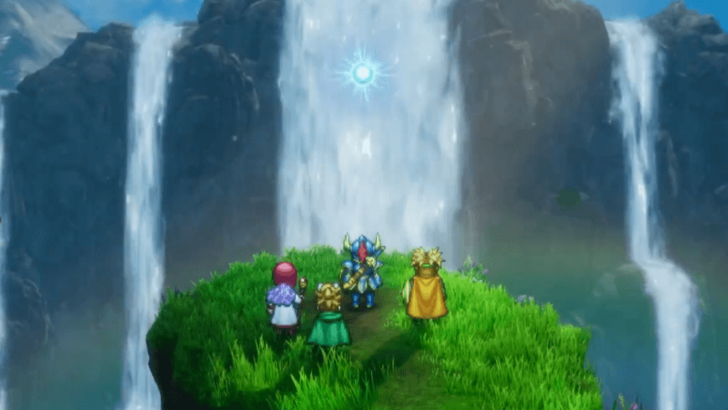 At the end of the dungeon, you'll wind up at the beginning area of DQ3, and you can pick up the Sphere of Light when you approach the cliff's edge. This is also the only floor where you can teleport out, so feel free to leave once you're done here. ▶︎ How to Get Sphere of Light and Effects |
Dragonlord's Castle
| 1 | Before proceeding, it should be mentioned that finishing this section of the post-game will prevent you from seeing the Normal Ending again, and you'll be locked to the True Ending. ▶︎ Endings Guide: List of All Endings |
|---|---|
| 2 | Now that you have the Sphere of Light, you can head back to the Dragonlord's Castle to talk to the Dragonlord's Great-Grandson. You will also need the entire Erdrick's Equipment set to progress to the next part of the story, so make sure that you have all 5 pieces as well. |
| 3 | Once you've gotten all the items you need, talk to the Dragonlord's Great-Grandson again to challenge him to a battle. This fight is essentially a harder version of DQ1's final boss, so make sure you set up defensive buffs and spam Dragon Slashes when you can. ▶︎ How to Beat the Dragonlord's Great-Grandson |
| 4 |  After they've been defeated, he will upgrade Erdrick's Sword and Shield to their Supreme versions, granting you the strongest weapon and shield in the game. ▶︎ Best Weapons and Armor |
True Ending
| 1 | Now that you have Erdrick's Supreme Sword and Shield, you can head back to the Hall of Hargon to experience the true ending. Make sure that you're fully prepared since the final boss fight will drastically change, and it'll be much harder than before. |
|---|---|
| 2 | Also, as a note, it's recommended to farm a ton of gold since the true ending will have an exclusive area and shop that can't be accessed unless you defeat the final boss again. ▶︎ Money Farming Guide |
| 3 |  When you're ready, defeat Hargon and Malroth again to summon the new true ending final boss, Malwrath. Similar to Zoma in DQ3, you will need to use Erdrick's Supreme Sword as an item to dispel their shadow shield, allowing you to damage them once it's gone. ▶︎ How to Beat Malwrath |
| 4 | After the boss has been defeated, you will be able to roam the world and speak to NPCs similar to the normal ending. Make sure that you visit the Dragonlord's Great-Grandson at least, since he's the only one with new dialogue. |
| 5 | Once you're done, head back to Midenhall to experience the new true ending. After the credits and cutscenes end, you will be free to explore the true ending exclusive town. |
| 6 | While you're here, feel free to purchase any items and equipment that you wish, and head to the castle to talk to the king. From there, you're free to head to the bottom left house to play the final cutscene and complete Dragon Quest 2, as well as the entire Erdrick Trilogy! |
Dragon Quest 2 HD-2D Remake (DQ2) Related Guide

List of All Story Walkthroughs
Comment
Level 90!? I did the entire cave of confusion around level 58 in draconian mode, just used padfoot to reduce encounters in the super long dungeon to conserve mp. The boss afterwards was tough but strategic around level 61-62. Grinding never hurts of course, but those levels seem a bit much unless you really want to wreck everything in your path
Author

Post Game Guide: Things to Do After Beating DQ2
Rankings
- We could not find the message board you were looking for.
Gaming News

![Star Savior Review [First Impressions] | Engaging, Entertaining, and Expensive](https://img.game8.co/4447603/8f500e9bf666bdb8adb1af478e9dfdbd.png/show)


Popular Games

Genshin Impact Walkthrough & Guides Wiki
Umamusume: Pretty Derby Walkthrough & Guides Wiki
Crimson Desert Walkthrough & Guides Wiki
Monster Hunter Stories 3: Twisted Reflection Walkthrough & Guides Wiki
Honkai: Star Rail Walkthrough & Guides Wiki
Pokemon Pokopia Walkthrough & Guides Wiki
The Seven Deadly Sins: Origin Walkthrough & Guides Wiki
Wuthering Waves Walkthrough & Guides Wiki
Zenless Zone Zero Walkthrough & Guides Wiki
Arknights: Endfield Walkthrough & Guides Wiki


Recommended Games
Fire Emblem Heroes (FEH) Walkthrough & Guides Wiki
Diablo 4: Vessel of Hatred Walkthrough & Guides Wiki
Cyberpunk 2077: Ultimate Edition Walkthrough & Guides Wiki
Yu-Gi-Oh! Master Duel Walkthrough & Guides Wiki
Super Smash Bros. Ultimate Walkthrough & Guides Wiki
Pokemon Brilliant Diamond and Shining Pearl (BDSP) Walkthrough & Guides Wiki
Elden Ring Shadow of the Erdtree Walkthrough & Guides Wiki
Monster Hunter World Walkthrough & Guides Wiki
The Legend of Zelda: Tears of the Kingdom Walkthrough & Guides Wiki
Persona 3 Reload Walkthrough & Guides Wiki


All rights reserved
© ARMOR PROJECT/BIRD STUDIO/SPIKE CHUNSOFT/SQUARE ENIX
© SUGIYAMA KOBO ℗ SUGIYAMA KOBO
The copyrights of videos of games used in our content and other intellectual property rights belong to the provider of the game.
The contents we provide on this site were created personally by members of the Game8 editorial department.
We refuse the right to reuse or repost content taken without our permission such as data or images to other sites.
Rubis has some new dialog also.