This survey will take about 1 minute.
Your answers will help us to improve our website.
Fire Emblem: Three Houses (FE3H)
Chapter 13: Hunting by Daybreak (Golden Deers) Walkthrough
This is the battle walkthrough for the mission Hunting by Daybreak from Fire Emblem: Three Houses (FETH, FE3H). Read on to find out about map features, what enemies you will encounter, and tips for winning!
| Previous Battle | Story Walkthrough | Next Battle |
|---|---|---|
| Chapter 12: Battle at Garreg Mach | Chapter 13: Reunion at Dawn | Chapter 14: Protecting Garreg Mach |
List of Contents
Map and Overview
| Victory Conditions | |
|---|---|
| Defeat the enemy commander. |
|
| Defeat Conditions | |
| All of your units fall in battle. ↓ All your units fall in battle, or the enemy commander reaches a target of destination. |
|
| # of Player Units | 2 + 2 + 2 + 3 |
| # of Enemies | Normal: 31 + 3 Hard: 36 + 3 |
Enemies
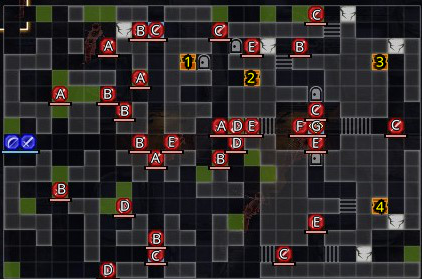
You will be facing Bandits, and most of them have dropped items. Pallardo will be on an elevated area, and will not move from the Heal Tile+ on the first phase of the battle.
Do not get overwhelmed by the number of enemies as you will get reinforcements soon.

| Pos | Enemy |
|---|---|
| A | Bandit (Mercenary) |
| B | Bandit (Thief) |
| C | Bandit (Assassin) |
| D | Bandit (Brawler) |
| E | Bandit (Archer) |
| F | Bandit (Sniper) |
| G | Pallardo |
Enemy Stats
Pallardo - Normal
| Level | HP | Mov. | Class |
|---|---|---|---|
| 27 | 36 | - | Thief |
| Mt. | Spd | Hit | Crit |
| 26 | 14 | 112 | 12 |
| Range | Prt | Res | Avd |
| 1 | 12 | 3 | 27 |
| Weapon | Dropped Items | ||
| Silver Sword | Speed Ring | ||
| Battalion | |||
| Pallardo Bodyguards | |||
| Level | Endurance | Gambit | Uses |
| 1 | 75 | Poison Tactic | 1 |
Pallardo - Hard
| Level | HP | Mov. | Class |
|---|---|---|---|
| 28 | 41 | - | Thief |
| Mt. | Spd | Hit | Crit |
| 30 | 19 | 116 | 16 |
| Range | Prt | Res | Avd |
| 1 | 16 | 7 | 32 |
| Weapon | Dropped Items | ||
| Silver Sword | N/A | ||
| Battalion | |||
| Pallardo Bodyguards | |||
| Level | Endurance | Gambit | Uses |
| 1 | 75 | Poison Tactic | 1 |
Loot

| Loot Dropped | Enemy Location |
|---|---|
| Concoction | A, B, E, F |
| Antitoxin | C, L |
| Door Key | D, M, O |
| Hexlock Shield | G |
| Silver Sword | H |
| Chest Key | I, N, S, T |
| Leather Shield | J |
| Blessed Bow | K |
| Bullion | O, P, Q, R |
Chests
These four chest contain the items below. There are four enemies holding chest keys that they drop upon defeat, marked with an X in the map.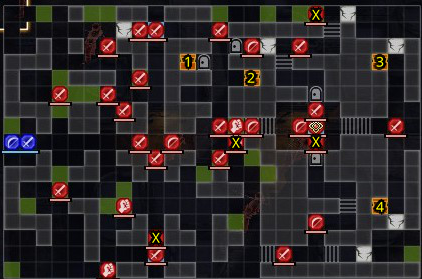
| Pos | Item |
|---|---|
| 1 | Armorslayer |
| 2 | Silver Lance |
| 3 | Cursed Ashiya Sword |
| 4 | Axe of Ukonvasara |
Armorslayer
A sword that is effective against armor. Because it's behind a locked door and it is buyable, it isn't worth getting unless you rely on your swordsman for damage. However, if you do have a flier and it's easy to get this, by all means go ahead and get it.
Silver Lance
While you can buy silver lances and it isn't urgent to get if you're not hurting on cash, the fact that it's reasonably in the main route and not behind a locked door makes it worth getting if you have the spare key. If you can only get two keys, it is recomended to save them for the latter two.
Cursed Ashiya Sword
A cursed sword with below average Hit that damages you when you use it in combat. In exchange, it has high Mt and a higher chance of doing critical hits. This is the only place you can find this weapon, so worth getting.
Axe of Ukonvasara
A blessed axe associated with the Crest of Gloucester that is effective against armor and regenerates HP every turn. Worth going out of your way to get this, as this is the only way to obtain this item.
Map Features
You will traverse through the huge map of the chapel. Some parts are closed off by locked doors, and you will be surrounded by walls and edifices which are only navigable by fliers.
Terrain Types
| Tiles | Description |
|---|---|
| Wall (Breakable) | HP 20, Impassable until destroyed |
| Wall Edifice Rampart Rubble Mountain |
Navigable only by fliers |
| Forest | 1 Prt, +30% Avo, except for fliers |
| Heal Tile+ | 1 Prt, 1 Res, +30% HP each turn for non-fliers |
Reinforcements
Although you start out with 2 allies, your former students will enter the battle sequentially as you progress the battle. If any of them fell before this mission and you are playing in Normal mode, they will not appear.
| Character | Location in map |
|---|---|
| Lorenz, Ignatz | Top left |
| Hilda, Leonie | Bottom left |
| Raphael, Lysithea, Marianne | Top right |
Tips and Tricks
Watch Out for Pallardo!
After defeating Pallardo for the first time, he will try to escape. It will be hard to get around without fliers nearby. Have units on the upper left area from Pallardo's base position to take him down.
Do Not Rush One by One
The enemies are in groups and it may be tempting to rush head-on with a flier, but doing so will get your ally killed. Try to go in groups as well to distribute the damage dealt.
Use Heal Tiles+ and Forest Tiles
The number of enemies can be overwhelming at the start, but if you use the map features to your advantage, you can evade and withstand enemy attacks.
Use the Walls to Your Advantage
The Golden Deer house has a lot of archers, and you can easily defeat enemies without them getting near you. You can also opt not to destroy the walls and attack them from the opposite side.
Use Fliers to Open the Chests
If you want to open the chests without finding door keys, you can use fliers to go beside the chest, over the wall. They'll still be able to open the chests.
Fire Emblem: Three Houses - Related Links
Part 2 - Verdant Wind Battle Walkthroughs
Comment
Author
Chapter 13: Hunting by Daybreak (Golden Deers) Walkthrough
Please participate in our site
improvement survey
03/2026
improvement survey
03/2026
Would you assist in
improving Game8's site?
improving Game8's site?

×
We are listening to our users' valuable opinions and discussing how to act on them.
The information collected through this survey will be used for the purpose of improving our services. In addition, the information will only be disclosed a part of a statistic in a format that will not allow identification of personal information.
Begin Survey
Not Now
×
Please rate each item regarding Game8.co's Advertisements.
Amount of Ads
Very Dissatisfied
Somewhat Dissatisfied
Fine
Somewhat Satisfied
Highly Satisfied
Placement of Ads
Timing of Ad Display
Ad Loading Speed
Safeness of Ads
Content of Ads
×
Please rate each item regarding Game8.co's Quality of Articles.
Amount of information
Very Dissatisfied
Somewhat Dissatisfied
Fine
Somewhat Satisfied
Highly Satisfied
Frequency of updates
Speed of new information
Accuracy of articles
Understandibility of articles
Readability of sentences
×
Please rate each item regarding Game8.co's Usability of the Site.
Ease of finding information
Very Dissatisfied
Somewhat Dissatisfied
Fine
Somewhat Satisfied
Highly Satisfied
Loading Speed
Use of Color
Font Size
Visibility of Images
Easy to Understand Layout
×
Please rate each item regarding Game8.co's Message Boards, Comments.
Ease of Writing
Very Dissatisfied
Somewhat Dissatisfied
Fine
Somewhat Satisfied
Highly Satisfied
Readability
Ease in Finding Information
Comment Quality
Comment Quantity
Admin Response
×
Please rate each item regarding Game8.co's Site's new design.
Please rate our site's new design
Very Dissatisfied
Somewhat Dissatisfied
Fine
Somewhat Satisfied
Highly Satisfied
Do you think that the website's design change makes the site easier to use?
Has the new design made it easier for you to find information on the site?
Has the new design improved the overall visual appeal of the site?
How would you rate your overall satisfaction with the new design of the site?
×
How likely are you to recommend Game8 to someone you know?
Very Unlikely
0
1
2
3
4
5
6
7
8
9
10
Very Likely
If you have other opinions regarding potential improvement to the website, please share them with us. We would appreciate your honest opinion.
Note: This is a free response section, so you can proceed without entering anything.
Note: Please be sure not to enter any kind of personal information into your response.
Note: Please be sure not to enter any kind of personal information into your response.
×
Thank You
×
Thank you for participating in our survey! Your answers will help us to improve the quality of our website and services.
We hope you continue to make use of Game8.
We hope you continue to make use of Game8.
Close
Rankings
- We could not find the message board you were looking for.
Gaming News


![Monster Hunter Stories 3 Review [First Impressions] | Simply Rejuvenating](https://img.game8.co/4438641/2a31b7702bd70e78ec8efd24661dacda.jpeg/thumb)
Popular Games

Genshin Impact Walkthrough & Guides Wiki
Honkai: Star Rail Walkthrough & Guides Wiki
Umamusume: Pretty Derby Walkthrough & Guides Wiki
Pokemon Pokopia Walkthrough & Guides Wiki
Resident Evil Requiem (RE9) Walkthrough & Guides Wiki
Monster Hunter Wilds Walkthrough & Guides Wiki
Wuthering Waves Walkthrough & Guides Wiki
Arknights: Endfield Walkthrough & Guides Wiki
Pokemon FireRed and LeafGreen (FRLG) Walkthrough & Guides Wiki
Pokemon TCG Pocket (PTCGP) Strategies & Guides Wiki


Recommended Games
Diablo 4: Vessel of Hatred Walkthrough & Guides Wiki
Cyberpunk 2077: Ultimate Edition Walkthrough & Guides Wiki
Fire Emblem Heroes (FEH) Walkthrough & Guides Wiki
Yu-Gi-Oh! Master Duel Walkthrough & Guides Wiki
Super Smash Bros. Ultimate Walkthrough & Guides Wiki
Pokemon Brilliant Diamond and Shining Pearl (BDSP) Walkthrough & Guides Wiki
Elden Ring Shadow of the Erdtree Walkthrough & Guides Wiki
Monster Hunter World Walkthrough & Guides Wiki
The Legend of Zelda: Tears of the Kingdom Walkthrough & Guides Wiki
Persona 3 Reload Walkthrough & Guides Wiki


All rights reserved
©2019 Nintendo / INTELLIGENT SYSTEMS. Co-developed by KOEI TECMO GAMES CO., LTD. Fire Emblem and Nintendo Switch are trademarks of Nintendo. © 2019 Nintendo.
The copyrights of videos of games used in our content and other intellectual property rights belong to the provider of the game.
The contents we provide on this site were created personally by members of the Game8 editorial department.
We refuse the right to reuse or repost content taken without our permission such as data or images to other sites.