Chapter 18: The Fight for Fhirdiad (Black Eagles) Walkthrough
This is a battle walkthrough for the mission The Fight for Fhirdiad from Fire Emblem: Three Houses (FETH, FE3H). Read on to find out about map features, what enemies you will encounter, and tips for winning!
List of Contents
| Previous Battle | Story Walkthrough | Next Battle |
|---|---|---|
| Chapter 17: Combat at Tailtean Plains | Chapter 18: To the End of a Dream | - |
Chapter 18 (Black Eagles) - Map and Overview
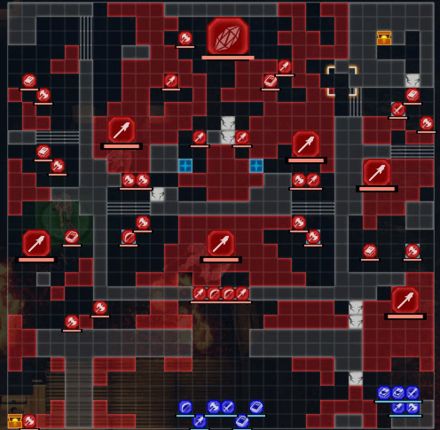
| Victory Conditions | |
|---|---|
| Defeat the enemy commander. | |
| Defeat Conditions | |
| Your character or Edelgard falls in battle. | |
| # of Player Units | 12 |
| # of Enemies | 38 |
Chapter 18 (Black Eagles) - Enemies
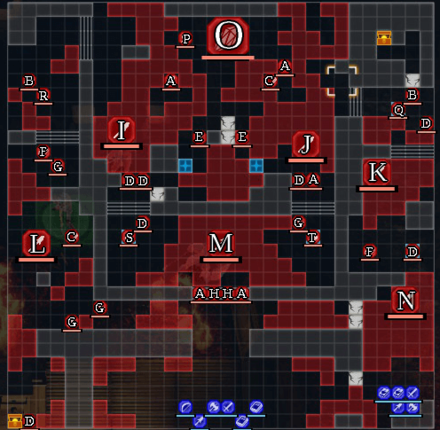
| Pos | Enemy | Pos | Enemy |
|---|---|---|---|
| A | Church Soldier (Paladin) | K | Bernhard (Golem) |
| B | Church Soldier (Bishop) | L | Iris (Golem) |
| C | Church Soldier (Warlock) | M | Wilhelm (Golem) |
| D | Church/Kingdom Soldier (Fortress Knight) | N | Chevalier (Golem) |
| E | Church Soldier (Falcon Knight) | O | Immaculate One |
| F | Church Soldier (Holy Knight) | P | Cyril |
| G | Church/Kingdom Soldier (Great Knight) | Q | Catherine |
| H | Kingdom Soldier (Sniper) | R | Annette |
| I | Gajus (Golem) | S | Ashe |
| J | Luca (Golem) | T | Gilbert |
The Immaculate One
| Level | HP | Mov. | Class |
|---|---|---|---|
| 39 | 57(x4) | - | The Immaculate One |
| Mt. | Spd | Hit | Crit |
| 35 | 16 | 96 | 22 |
| Range | Prt | Res | Avd |
| 1-5 | 16 | 17 | 16 |
| Weapon | Dropped Items | ||
| Crest Stone of Seiros | N/A | ||
Cyril
| Level | HP | Mov. | Class |
|---|---|---|---|
| 38 | 56 | 8 | Wyvern Lord |
| Mt. | Spd | Hit | Crit |
| 54 | 22 | 104 | 31 |
| Range | Prt | Res | Avd |
| 1 | 32 | 17 | 67 |
| Weapon | Dropped Items | ||
| Brave Axe | N/A | ||
| Battalion | |||
| Seiros Pegasus Co. | |||
| Level | Endurance | Gambit | Uses |
| 1 | 60 | Assembly | 2 |
Catherine
| Level | HP | Mov. | Class |
|---|---|---|---|
| 38 | 56 | 5 | Swordmaster |
| Mt. | Spd | Hit | Crit |
| 56 | 36 | 120 | 46 |
| Range | Prt | Res | Avd |
| 1 | 25 | 8 | 76 |
| Weapon | Dropped Items | ||
| Thunderbrand | N/A | ||
| Battalion | |||
| Indech Sword Fighters | |||
| Level | Endurance | Gambit | Uses |
| 1 | 105 | Retribution | 2 |
Annette
| Level | HP | Mov. | Class |
|---|---|---|---|
| 38 | 38 | 4 | Warlock |
| Mt. | Spd | Hit | Crit |
| 55 | 6 | 137 | 17 |
| Range | Prt | Res | Avd |
| 1 | 12 | 34 | 16 |
| Weapon | Dropped Items | ||
| Crusher | N/A | ||
| Battalion | |||
| School of Sorcery SOldiers | |||
| Level | Endurance | Gambit | Uses |
| 1 | 75 | Resonant Flames | 1 |
Ashe
| Level | HP | Mov. | Class |
|---|---|---|---|
| 38 | 42 | - | Sniper |
| Mt. | Spd | Hit | Crit |
| 42 | 13 | 129 | 28 |
| Range | Prt | Res | Avd |
| 2-3 | 19 | 13 | 23 |
| Weapon | Dropped Items | ||
| Brave Bow | N/A | ||
| Battalion | |||
| Gaspard Knights | |||
| Level | Endurance | Gambit | Uses |
| 2-3 | 105 | Assault Troop | 2 |
Gilbert
| Level | HP | Mov. | Class |
|---|---|---|---|
| 38 | 68 | - | Fortress Knight |
| Mt. | Spd | Hit | Crit |
| 49 | 0 | 97 | 13 |
| Range | Prt | Res | Avd |
| 1-2 | 40 | 10 | 15 |
| Weapon | Dropped Items | ||
| Tomahawk | N/A | ||
| Battalion | |||
| Knights of Seiros | |||
| Level | Endurance | Gambit | Uses |
| 1-2 | 60 | Blaze | 1 |
The Immaculate One
Enemy data will be gathered soon.
Cyril
Enemy data will be gathered soon.
Catherine
Enemy data will be gathered soon.
Annette
Enemy data will be gathered soon.
Ashe
Enemy data will be gathered soon.
Gilbert
Enemy data will be gathered soon.
Loot
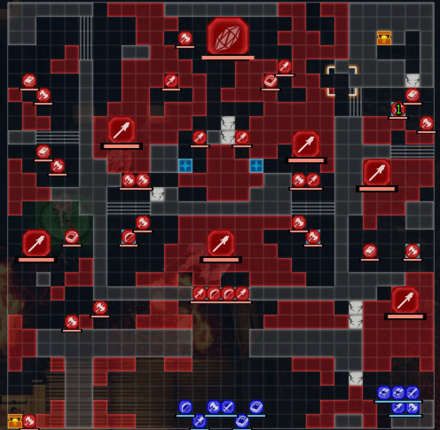
The only loot is the Thunderbrand, dropped by Catherine upon defeat.
| Location | Loot Dropped |
|---|---|
| 1 | Thunderbrand |
Thunderbrand
This Sword is a Hero's Relic. Well worth it, and required drop anyway. Consider giving it to Jeritza or any sword user with a Crest, as the damage it will do to the Immaculate One will greatly help.
Chapter 18 (Black Eagles) - Chests
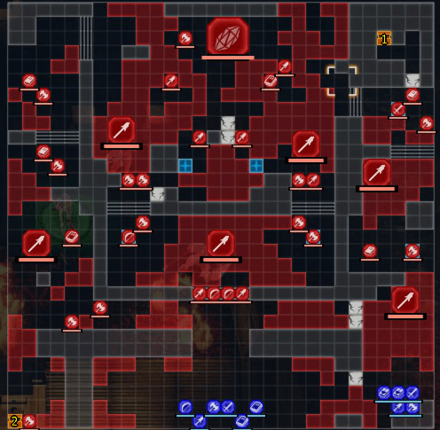
| Location | Chest Contents |
|---|---|
| 1 | Prayer Ring |
| 2 | Speedwing |
Chapter 18 (Black Eagles) - Map Features
Tiles
| Tiles | Description |
|---|---|
| Edifice | Navigable only by fliers |
| Rampart | Navigable only by fliers |
| Stairs | Difficult for cavalry to traverse |
| Heal Tile+ | 1 Prt, 1 Res, +30% HP each turn for non-fliers |
Fiery Floors
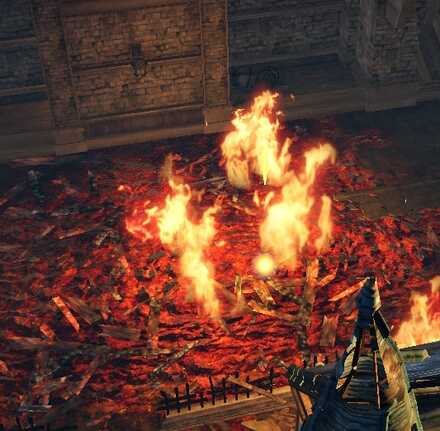
The area is covered in Fiery Floor tiles, which cause damage to a unit each turn if a unit is standing on it at the start of the turn. Be careful to avoid these.
Reinforcements
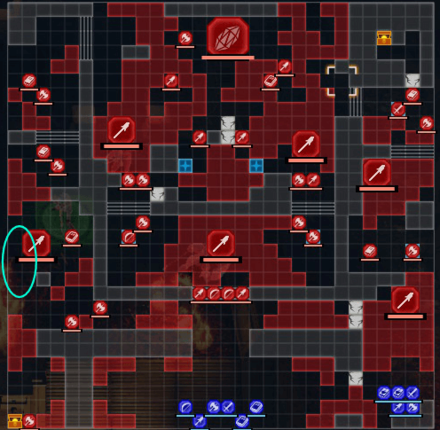
Two Falcon Knights will appear here as your units cross.
Chapter 18 (Black Eagles) - Tips and Tricks
Defeat the Golems as Soon as Possible
The more the Immaculate One roars, the stronger the Golems get. Do not allow them to get stronger and destroy your units by defeating them before the Immaculate One roars.
Use the Heal Tiles
This is a rough, long, and slow battle, so make sure to heal up at any chance. There are a multitude of heal tiles you can stay on to keep the fight going for your units!
Avoid the Fiery Floors
The damage may not be a lot, but it stacks up quicker than you realize and that little bit of health you lose could help you survive a near-fatal attack by the strong units here.
Use Fliers
Fliers are unaffected by the fiery floors, and thus ideal in this level.
Use Stride to Cross Them
To ensure that you don't stay in the fiery floors, use the Stride gambit to increase movement range so that you can cross them in a single turn.
Split Your Healers and Stock Up on Elixirs
Both your main force are side force will be under heavy fire, so it's good to have a healer per side and Concoctions for those who can't be healed.
Do Not Engage Catherine With Melee
Catherine wielding the Thunderbrand is legendary for a reason, and she can destroy anything less than your tankiest units. Make sure to engage her with magic and bows before trying to melee attack her, and even attacking to finish her off in melee is dangerous because she has high avoidance.
Lure Her Away From Her Heal Tile+
Even without the Heal Tile, Catherine is a strong foe. Lure her away by putting your units right outside her attack range. You can determine this by putting your cursor over her and pressing A to keep the range highlighted.
Conserve Battalions
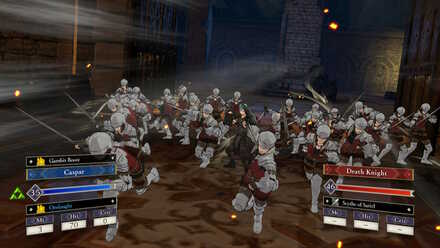
The Immaculate One has armor tiles like regular demon beasts. Use Battalions to destroy The Immaculate One's armor to beat her.
Do Not Rush the Battle

There is no limit to the number of turns you have in this fight. Take it slowly to ensure that you can still have enough power to battle The Immaculate One after dispatching all the other enemies.
Fire Emblem: Three Houses - Related Links
Part 2 - Crimson Flower Battle Walkthroughs
 |
||
| Part 2 - Azure Moon | ||
|---|---|---|
| Chapter 13: The Great Bridge Coup | Chapter 14: Capturing Derdriu | Chapter 15: Protecting Garreg Mach |
| Chapter 16: The Siege of Arianrhod | Chapter 17: Combat at Tailtean Plains | Chapter 18: The Fight for Fhirdiad |
Comment
Author
Chapter 18: The Fight for Fhirdiad (Black Eagles) Walkthrough
improvement survey
03/2026
improving Game8's site?

Your answers will help us to improve our website.
Note: Please be sure not to enter any kind of personal information into your response.

We hope you continue to make use of Game8.
Rankings
- We could not find the message board you were looking for.
Gaming News
Popular Games

Genshin Impact Walkthrough & Guides Wiki

Honkai: Star Rail Walkthrough & Guides Wiki

Umamusume: Pretty Derby Walkthrough & Guides Wiki

Pokemon Pokopia Walkthrough & Guides Wiki

Resident Evil Requiem (RE9) Walkthrough & Guides Wiki

Monster Hunter Wilds Walkthrough & Guides Wiki

Wuthering Waves Walkthrough & Guides Wiki

Arknights: Endfield Walkthrough & Guides Wiki

Pokemon FireRed and LeafGreen (FRLG) Walkthrough & Guides Wiki

Pokemon TCG Pocket (PTCGP) Strategies & Guides Wiki
Recommended Games

Diablo 4: Vessel of Hatred Walkthrough & Guides Wiki

Fire Emblem Heroes (FEH) Walkthrough & Guides Wiki

Yu-Gi-Oh! Master Duel Walkthrough & Guides Wiki

Super Smash Bros. Ultimate Walkthrough & Guides Wiki

Pokemon Brilliant Diamond and Shining Pearl (BDSP) Walkthrough & Guides Wiki

Elden Ring Shadow of the Erdtree Walkthrough & Guides Wiki

Monster Hunter World Walkthrough & Guides Wiki

The Legend of Zelda: Tears of the Kingdom Walkthrough & Guides Wiki

Persona 3 Reload Walkthrough & Guides Wiki

Cyberpunk 2077: Ultimate Edition Walkthrough & Guides Wiki
All rights reserved
©2019 Nintendo / INTELLIGENT SYSTEMS. Co-developed by KOEI TECMO GAMES CO., LTD. Fire Emblem and Nintendo Switch are trademarks of Nintendo. © 2019 Nintendo.
The copyrights of videos of games used in our content and other intellectual property rights belong to the provider of the game.
The contents we provide on this site were created personally by members of the Game8 editorial department.
We refuse the right to reuse or repost content taken without our permission such as data or images to other sites.


![Everwind Review [Early Access] | The Shaky First Step to A Very Long Journey](https://img.game8.co/4440226/ab079b1153298a042633dd1ef51e878e.png/thumb)

![Monster Hunter Stories 3 Review [First Impressions] | Simply Rejuvenating](https://img.game8.co/4438641/2a31b7702bd70e78ec8efd24661dacda.jpeg/thumb)


