Chapter 14: Protecting Garreg Mach (Church) Walkthrough
This is the battle walkthrough for the mission Protecting Garreg Mach from Fire Emblem: Three Houses (FETH, FE3H). Read on to find out about map features, what enemies you will encounter, and tips for winning!
| Previous Battle | Story Walkthrough | Next Battle |
|---|---|---|
| Chapter 13: Hunting at Daybreak | Chapter 14: A King Without a Kingdom | Chapter 15: Ambush at Ailell |
Map and Overview
| Victory Conditions | |
|---|---|
| Rout the Enemy | |
| Defeat Conditions | |
| Byleth falls in battle, or either defended location is captured. | |
| # of Player Units | 10 |
| # of Enemies | 35 (2 Reinforcements per turn) |

Enemies

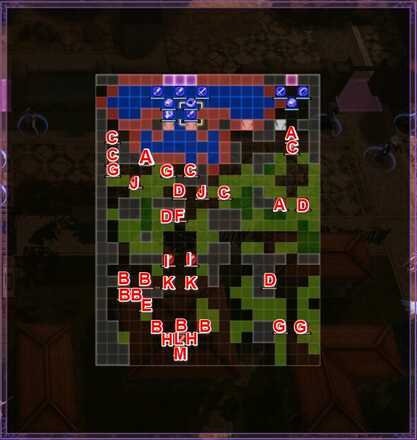
| A | Imperial Soldier (Armored Knight) | B | Imperial Soldier(Fortress Knight) |
|---|---|---|---|
| C | Imperial Soldier (Cavalier) | D | Imperial Soldier (Archer) |
| E | Imperial Soldier (Sniper) | F | Imperial Soldier (Mercenary) |
| G | Imperial Soldier (Pegasus Knight) | H | Imperial Soldier (Warrior) |
| I | Imperial Soldier (Paladin) | J | Imperial Soldier (Mage) |
| K | Imperial Soldier (Dark Bishop) | L | Imperial Soldier (Warlock) |
| M | Randolph | - | - |
Randolph - Hard
| Level | HP | Mov. | Class |
|---|---|---|---|
| 30 | 57 | - | Warrior |
| Mt. | Spd | Hit | Crit |
| 57 | 16 | 101 | 26 |
| Range | Prt | Res | Avd |
| 1 | 26 | 13 | 31 |
| Weapon | Dropped Items | ||
| Silver Axe | N/A | ||
| Battalion | |||
| Empire Raiders | |||
| Level | Endurance | Gambit | Uses |
| 1 | 75 | Absorption | 1 |
Map Features
Tiles
| Tiles | Description |
|---|---|
| Thicket | 20% Avo, 1 Prt to all non-fliers |
| Forest | 20% Avo, 1 Prt to all non-fliers |
| Edifice | Navigable only by fliers |
| Rampart | Navigable only by fliers |
| Rampart | Navigable only by fliers |
| Onager | 10 Mt, 15 Durability, 3-10 Rng, Cannot be used by mounted or magic units |
| Heal Tile+ | 1 Prt, 1 Res, +30% HP each turn for non-fliers |
Two Points to Defend

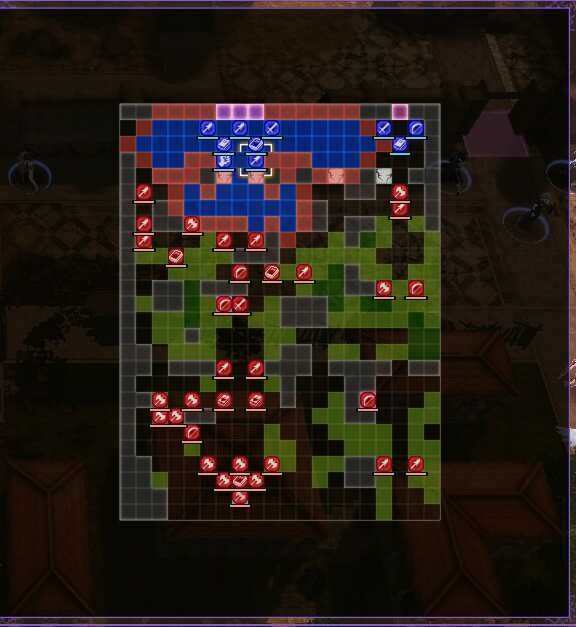
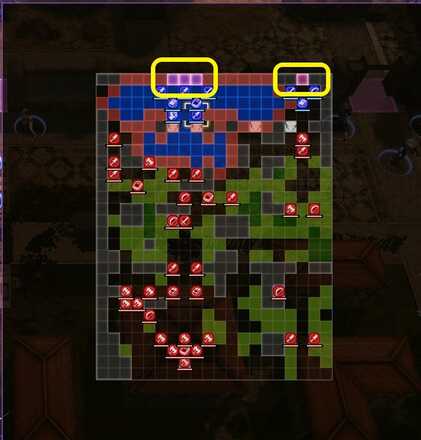
There are two points in the area that the enemy must not reach. This requires you to divide your army into two to successfully cover to points of the map.
Mini Quest

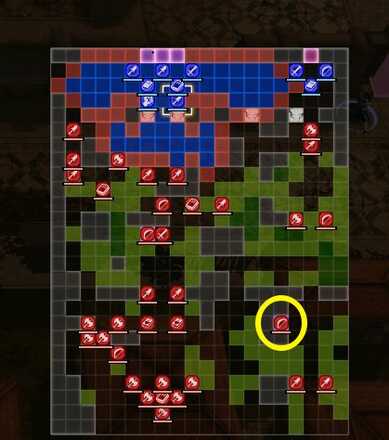
You must escort a church unit to a certain destination. Doing so will gurantee you victory. (Unless you send Byleth to their own death).
Reinforcements
There are Pegasus Knights that will continually appear as reinforcement on the enemy's left side.
Tips and Tricks
Strongest Unit as an Escort
Minimizing the amount of unit you deploy to the right side of the map will allow you to focus more units on the left. More units on the left means more man power allowing you to defend the area with ease.
Deploy Archers
The Pegasus Knights will be tough to deal with without an archer. Mounted units are vulnerable to bows so having archers is recommended to battle these knights.
Use the Stride Gambit
Later on, after successfully escorting the church unit, the battlefield with several forests will be set ablaze. This will force the enemy unit to flee. Some enemies carry valuable items so having high mobility will allow you to hunt and defeat these enemies.
Fire Emblem: Three Houses - Related Links
Part 2 - Silver Snow Battle Walkthroughs
Comment
Author
Chapter 14: Protecting Garreg Mach (Church) Walkthrough
improvement survey
03/2026
improving Game8's site?

Your answers will help us to improve our website.
Note: Please be sure not to enter any kind of personal information into your response.

We hope you continue to make use of Game8.
Rankings
- We could not find the message board you were looking for.
Gaming News
Popular Games

Genshin Impact Walkthrough & Guides Wiki

Honkai: Star Rail Walkthrough & Guides Wiki

Umamusume: Pretty Derby Walkthrough & Guides Wiki

Pokemon Pokopia Walkthrough & Guides Wiki

Resident Evil Requiem (RE9) Walkthrough & Guides Wiki

Monster Hunter Wilds Walkthrough & Guides Wiki

Wuthering Waves Walkthrough & Guides Wiki

Arknights: Endfield Walkthrough & Guides Wiki

Pokemon FireRed and LeafGreen (FRLG) Walkthrough & Guides Wiki

Pokemon TCG Pocket (PTCGP) Strategies & Guides Wiki
Recommended Games

Diablo 4: Vessel of Hatred Walkthrough & Guides Wiki

Fire Emblem Heroes (FEH) Walkthrough & Guides Wiki

Yu-Gi-Oh! Master Duel Walkthrough & Guides Wiki

Super Smash Bros. Ultimate Walkthrough & Guides Wiki

Pokemon Brilliant Diamond and Shining Pearl (BDSP) Walkthrough & Guides Wiki

Elden Ring Shadow of the Erdtree Walkthrough & Guides Wiki

Monster Hunter World Walkthrough & Guides Wiki

The Legend of Zelda: Tears of the Kingdom Walkthrough & Guides Wiki

Persona 3 Reload Walkthrough & Guides Wiki

Cyberpunk 2077: Ultimate Edition Walkthrough & Guides Wiki
All rights reserved
©2019 Nintendo / INTELLIGENT SYSTEMS. Co-developed by KOEI TECMO GAMES CO., LTD. Fire Emblem and Nintendo Switch are trademarks of Nintendo. © 2019 Nintendo.
The copyrights of videos of games used in our content and other intellectual property rights belong to the provider of the game.
The contents we provide on this site were created personally by members of the Game8 editorial department.
We refuse the right to reuse or repost content taken without our permission such as data or images to other sites.


![Everwind Review [Early Access] | The Shaky First Step to A Very Long Journey](https://img.game8.co/4440226/ab079b1153298a042633dd1ef51e878e.png/thumb)

![Monster Hunter Stories 3 Review [First Impressions] | Simply Rejuvenating](https://img.game8.co/4438641/2a31b7702bd70e78ec8efd24661dacda.jpeg/thumb)


