How to Beat Smithy Final Boss and Rewards
This is a guide for Smithy, the Final Boss of Super Mario RPG Remake. Read on to learn how you can beat Smithy, its stats, rewards, location, weaknesses, and best party setup!
List of Contents
Smithy Weaknesses and Recommended Level
Smithy Final Boss Overview
Smithy First Phase
| Recommended Level | HP | ||
|---|---|---|---|
| 20 | 2000 | ||
| Attacks | |||
| Sledge, Meteor Swarm, Fire Saber | |||
| Weaknesses and Resistances | |||
Smithy Second Phase
| Recommended Level | |||
|---|---|---|---|
| 20 | |||
| Part | HP | ||
| Main Body | 1000 |
-
|
|
| Tank | 8000 | ||
| Wizard |
-
|
||
| Treasure Chest | |||
| Casket | |||
Smithy Final Boss Rewards
| Smithy Rewards | ||
|---|---|---|
| Coins | EXP | Item Drops |
| 0 | 0 | - |
| Thought Peek Quote | ||
| Eh?! Not bad! | ||
Best Party for Smithy Final Boss
Best Party Setup
| Beginning Active Party | |||
|---|---|---|---|
| Character | Role | ||
|
|
・Uses normal attacks to deal damage
・Uses the special move Ultra Flame to exploit Treasure Chest weakness |
||
|
|
・Serves as a healer ・Uses Group Hug for group healing, and Come Back for reviving party members ・Equip with a Safety Ring to protect from instant death attacks |
||
|
|
・Raises power and defense using Geno Boost ・Support party with items whenever possible |
||
| Standby Party | |||
|
|
・Attacker and support role ・Deal damage with normal attacks |
||
|
|
・Supporting attacker ・Deals damage with normal attacks |
||
Smithy is capable of dealing lots of damage every turn, so it is essential to have Peach maintain your party's overall health.
Geno is recommended both for further increasing the attack and defenses of your members!
Recommended Equipment and Level
| Active Party | |||
|---|---|---|---|
| Character/Level | Equipment | ||
|
Level: 20 |
Weapon:
Armor: Accessory: |
||
|
Level: 20 |
Weapon:
Armor: Accessory: |
||
|
Level: 20 |
Weapon:
Armor: Accessory: |
||
| Standby Party | |||
|
Level: 20 |
Weapon:
Armor: Accessory: |
||
|
Level: 20 |
Weapon:
Armor: Accessory: |
||
How to Beat Smithy Final Boss and Strategy
|
|
Equip Peach with the Safety Ring
| Safety Ring | ||||
| Effects | ||||
|---|---|---|---|---|
| Prevents instant death attacks and negative status effects. | ||||
| Attack | Defense | M. Atk | M. Def | Speed |
| - | +5 | - | +5 | +5 |
| How to Get Safety Ring | ||||
| Get in the underwater room behind barrels at the Sunken Ship. | ||||
The Safety Ring is extremely valuable in this fight since it can protect a member from a lot of Smithy's elemental attacks, status ailments, and instant death attacks.
It is best that this accessory is equipped to Peach, who will be able to safely heal and revive allies in the fight!
Best Equipment for Each Character
Have Peach Heal and Revive Allies

| Special Move | Effect |
|---|---|
| Group Hug (Peach) |
・Heals the party and nullifies any status ailment. ・Press the button a little after the sparkles start to increase the Special Move's healing effect.. |
| Come Back (Peach) |
・Revives an ally. ・Press the button just as the star hits the body to restore an ally's health completely. |
Smithy is capable of dealing a lot of damage every turn, so it is recommended you heall regularly with Group Hug. When needed, you can revive allies with Come Back.
Keep in mind that Smithy's Tank special move Magnum is an instant death attack, so make sure you can use Peach's Come Back move by then!
Best Special Moves for Each Character
Use Items as Substitutes
In case Peach cannot recover enough HP or revive your party members in time, it is good to stock up on items such as Croaka Cols and Pick Me Ups!
Buff Your Team with Geno Boost
| Special Move | Effect |
|---|---|
| Geno Boost (Geno) |
・Increases a member's attack power. ・Timing your button press just before the arrow disappears will also increase your defense. |
Use Geno Boost to keep your members' attacks and defense up at all times. Considering that Smithy deals a lot of damage, it is best that you regularly get the increased defense effect from using the special move's timed bonus!
Reapply Buff from Smithy's Shredder
In Smithy's second form, his Casket uses the special move Shredder which nullifies any attack and defense buffs your party members have. Make sure to apply Geno Boost boost again to ensure that your high damage and defense boosts are maintained.
Defeat the Smelter First
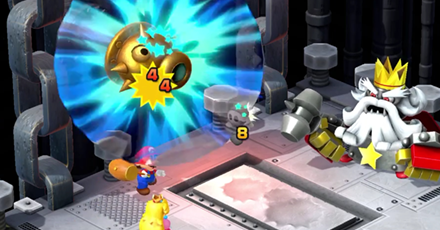
It is recommended to defeat the Smelter first since it continuously manufactures Shypers to help out Smithy. Shypers deal a great deal of damage to your party. Make sure they do not overwhelm you!
Once the Smelter has been taken out, prioritize Smithy. Dealing enough damage will send him into his second phase.
Use Rock Candy for High Defense Enemies
| Item | Where to Get |
|---|---|
| Rock Candy |
・Can be sometimes obtained by trading Mushrooms to Mushroom Boy in Seaside Town. ・Rarely drops from Jawfuls, Tub-O-Troopas, Puppoxes, and Machine Made Speardoviches. |
The Smelter has high defense, so it would be a good idea to use Rock Candy which deals 200 damage to all enemies!
Focus on Smithy's Head
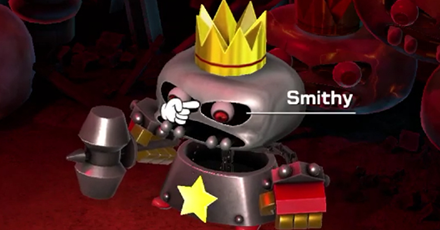
Smithy's second phase is split into two parts: his body and his head. Focus only in his head since his body is capable of respawning.
Smithy will start changing his head throughout the battle. The order in which they change is random.
He starts of with his regular head on the first few turns, and will start changing to others. However, he will never return his head's original form after.
Use Ultra Flame on the Treasure Chest
| Special Move | Effect |
|---|---|
| Ultra Flame (Mario) |
・Press the button repeatedly to increase the damage dealt by the Special Move. |
Among Smithy's special heads, the Treasure Chest is notably weak to fire. It is recommended to use Mario's Ultra Flame when he is using this head to deal lots of damage.
Be careful when dealing with Smithy's Wizard, prioritize using physical attacks since this head is resistant to all elements!
Dangerous Boss Attacks
First Phase Attacks
Watch out for Smithy's party-wide special attacks like Sledge and Meteor Swarm.
His single target fire special unblockable move Mega Drain will deal damage but can be nullified by equipment like Safety Ring, Lazy Shell (Armor), and Super Suit.
Second Phase Attacks
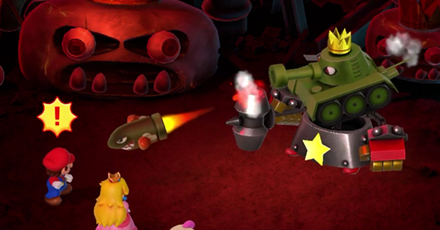
Of all the heads, only the Tank is capable of dealing a Mortal Blow to a single party member with the special move Magnum. This can be countered with any equipment that nullifies mortal blows.
His Wizard has the strongest and largest arsenal of special moves like Dark Star. Keep your healing options ready during this time.
Watch out for his Shredder move when his using his Casket, since this will clear your party of any buffs!
Smithy Attacks
Smithy Final Boss Special Attacks
| Attack | Attack Type/Effect |
|---|---|
| Fire Saber |
Blockable?: Yes Additional Effect: N/A |
| Meteor Swarm |
Blockable?: No Additional Effect: N/A |
| Sledge |
Blockable?: No Additional Effect: N/A |
Smithy Heads Special Attacks
Wizard
| Attack | Attack Type/Effect |
|---|---|
| Arrow Rain |
Blockable?: No Additional Effect: N/A |
| Boulder |
Blockable?: No Additional Effect: N/A |
| Dark Star |
Blockable?: Yes Additional Effect: N/A |
| Meteor Swarm |
Blockable?: No Additional Effect: N/A |
| Spear Rain |
Blockable?: No Additional Effect: N/A |
| Sword Rain |
Blockable?: No Additional Effect: N/A |
Casket
| Attack | Attack Type/Effect |
|---|---|
| Recover | Additional Effect: Heals the target |
| Shredder |
Blockable?: No Additional Effect: Nullifies Attack Up and Defense Up |
Tank
| Attack | Attack Type/Effect |
|---|---|
| Magnum |
Blockable?: Yes Additional Effect: Causes Mortal Blow |
Super Mario RPG Remake Related Guides

All Bosses
| 1st Star Piece Bosses | ||
|---|---|---|
| Bowser | Hammer Bros. | Croco (1st Fight) |
| Claymorton | - | - |
| 2nd Star Piece Bosses | ||
| Belome (1st Fight) |
Bowyer | - |
| 3rd Star Piece Bosses | ||
| Croco (2nd Fight) |
Punchinello | - |
| 4th Star Piece Bosses | ||
| Booster | Knife Guy and Grate Guy | Bundt and Raspberry |
| 5th Star Piece Bosses | ||
| King Calamari | Johnny | - |
| 6th Star Piece Bosses | ||
| Speardovich | Belome (2nd Fight) |
Megasmilax |
| Birdo | Dodo | Valentina |
| Czar Dragon | Zombone | Axem Rangers | 7th Star Piece Bosses |
| Wizakoopa | Boomer | Exor |
| Count Down and Ding-a-Ling | Cloaker and Domino | Clerk |
| Manager | Director | Gunyolk and Factory Chief |
| Smithy (Final Boss) |
- | - |
Non-Story Bosses
| Non-Story Bosses | ||
|---|---|---|
| Jinx | Jagger | Culex |
Post-Game Rematch Bosses
| Post-Game Rematch Bosses | ||
|---|---|---|
| Mario-Style Jinx | Scratchy-Throat Belome | Leveled-Up Punchinello |
| Engine 023 Booster | Extra Fancy Bundt & Raspberry |
Duel-Ready Johnny |
| Culex 3D | - | - |
Comment
Author
How to Beat Smithy Final Boss and Rewards
Rankings
- We could not find the message board you were looking for.
Gaming News
Popular Games

Genshin Impact Walkthrough & Guides Wiki

Umamusume: Pretty Derby Walkthrough & Guides Wiki

Crimson Desert Walkthrough & Guides Wiki

Monster Hunter Stories 3: Twisted Reflection Walkthrough & Guides Wiki

Honkai: Star Rail Walkthrough & Guides Wiki

Pokemon Pokopia Walkthrough & Guides Wiki

The Seven Deadly Sins: Origin Walkthrough & Guides Wiki

Wuthering Waves Walkthrough & Guides Wiki

Zenless Zone Zero Walkthrough & Guides Wiki

Arknights: Endfield Walkthrough & Guides Wiki
Recommended Games

Fire Emblem Heroes (FEH) Walkthrough & Guides Wiki

Diablo 4: Vessel of Hatred Walkthrough & Guides Wiki

Cyberpunk 2077: Ultimate Edition Walkthrough & Guides Wiki

Yu-Gi-Oh! Master Duel Walkthrough & Guides Wiki

Super Smash Bros. Ultimate Walkthrough & Guides Wiki

Pokemon Brilliant Diamond and Shining Pearl (BDSP) Walkthrough & Guides Wiki

Elden Ring Shadow of the Erdtree Walkthrough & Guides Wiki

Monster Hunter World Walkthrough & Guides Wiki

The Legend of Zelda: Tears of the Kingdom Walkthrough & Guides Wiki

Persona 3 Reload Walkthrough & Guides Wiki
All rights reserved
© Nintendo/SQUARE ENIX Characters: © Nintendo, © SQUARE ENIX
The copyrights of videos of games used in our content and other intellectual property rights belong to the provider of the game.
The contents we provide on this site were created personally by members of the Game8 editorial department.
We refuse the right to reuse or repost content taken without our permission such as data or images to other sites.


