
This survey will take about 1 minute.
Your answers will help us to improve our website.
Mario + Rabbids Sparks of Hope
A Friend in Need Main Quest Walkthrough and Guide
A Friend in Need is a Main Quest in The Last Spark Hunter, the 2nd DLC for Mario + Rabbids Sparks of Hope. Read on for the quest guide which includes rewards, battle quests, recommended heroes and Sparks as well as how to complete it.
List of Contents
A Friend in Need Walkthrough
Quest Objectives
| Objectives |
|---|
|
1. Go through the secret passage.
2. Catch up with Allegra. 3. Defeat the Proto Mecha King Bob-omb. (Embuscade!) 4. Go after Allegra. 5. Use the boat to traverse the Swamp. 6. Search for the Melospheres. 7. Rescue the two missing Melospheres from the cages. 8. Free the last Melosphere from its cage. 9. Hurry to the Sweeping Tree and save the Melospheres 10. Rescue the Melospheres from the Darkmess Puddle (Melosphere Melodrama) 11. Go to the open gate and reunite with Allegra 12. Help Allegra rescue her friend (The Mecha King Bob-omb, Part 1) 13. Defeat Kanya (The Mecha King Bob-omb, Part 2) |
Quest Walkthrough
| Step-by-Step Guide | |
|---|---|
| 1 | 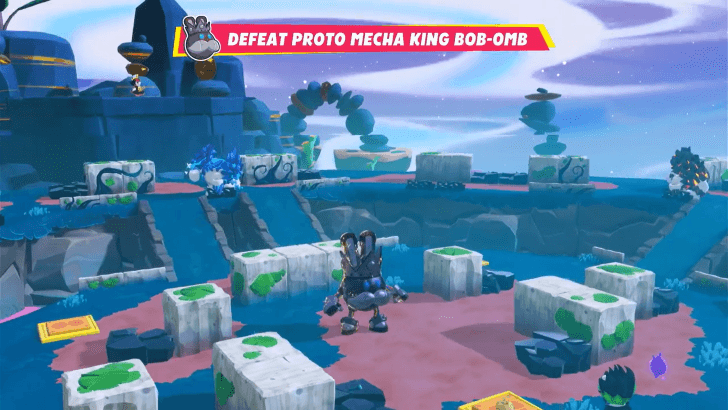 Embuscade! (Battle Quest) After beating the challenge and completing the objective to catch up with Allegra, the next cutscene introducing Kanya will play. This will lead into the Battle Quest Embuscade! |
| 2 |  After completing the battle and heading to the next area to finish the next few objectives, players will have to drive the boat to get to the next two areas. You’ll eventually come across the objective, search for the Melospheres free 3 Melospheres in cages. Jump to the guide below for more details. |
| 3 | 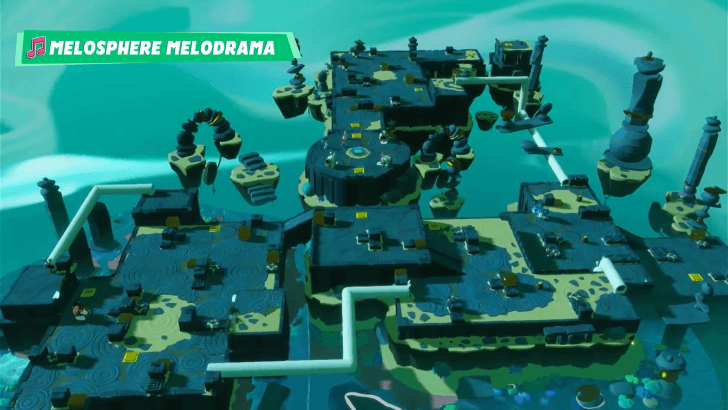 Melosphere Melodrama (Battle Quest) Head back to the central area with the teleport flag and salesbot. The challenge Melosphere Melodrama, will be nearby. |
| 4 | 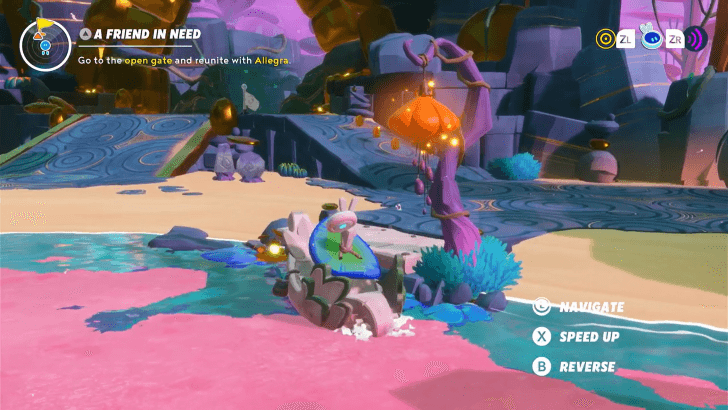 After beating the challenge, the gate will be open to head to Allegra and her friend. Go through the gate and down the path to activate the cutscene which will lead to the next challenge. |
| 5 | 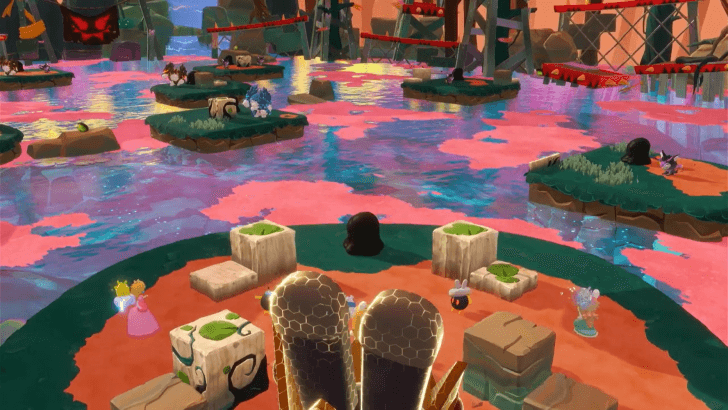 The Mecha King Bob-omb Part 1 In this battle you have to save The Dorrie at the other end by activating the buttons and opening up the next paths. You can choose between two paths to take with Golems being easier to keep distance from. The boss will release Bob-ombs each turn. Make sure to be far enough that they don’t activate but close enough to dash through one and throw to a button. |
| 6 |  The Mecha King Bob-omb Part 2 Like in the last battle, the boss will be invulnerable. You have to throw Bob-ombs and activate all the buttons for the boss to lose its invulnerable state. Be carefule as well since the boss has a wide range of attacking. The damage your hero will receive will be high. |
Where to Find the 3 Melospheres
First Melosphere Guide
| 1 |  Head to the dock in the southwest area of the map. Once there use the cannon on the right to transport you to a beach with a Darkmess Egg in the middle of it. |
|---|---|
| 2 |  Head to the nearby ramp with a trail of coins leading to a cannon. Use it to get to an elevated platform. Use the scan ability to reveal an orange circle. |
| 3 | 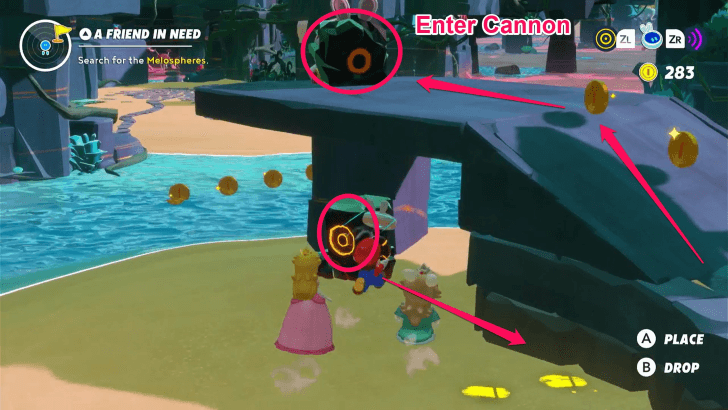 Pick up the circle and place it in its slot under a nearby rock structure with a cannon. The cannon will be unlocked. Use the cannon to transport you to the beach on the other side. |
| 4 | 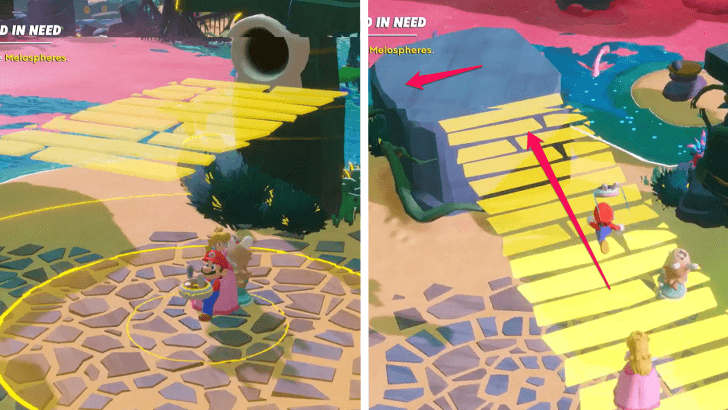 On this beach there will be a closed pipe on the upper level. Use the scan ability to reveal a bridge and unlock the pipe. Take this pipe and cross the bridge to lead you to a rock platform. |
| 5 | 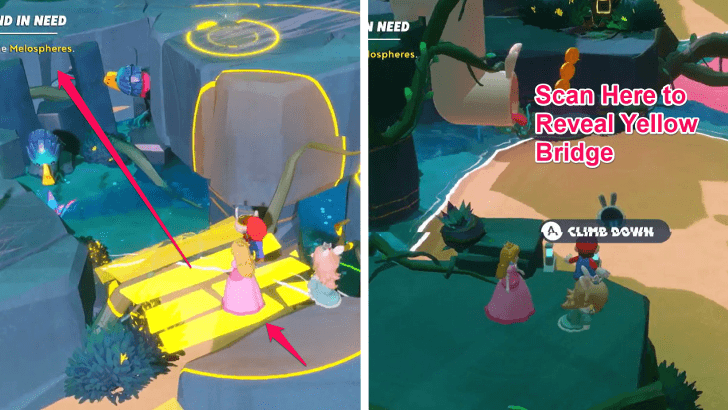 Use the scan ability again to make another bridge leading to a larger rock platform. On the other side of this platform climb down and use the scan ability to reveal another bridge coming from a pipe that leads to a slot for a cube. |
| 6 | 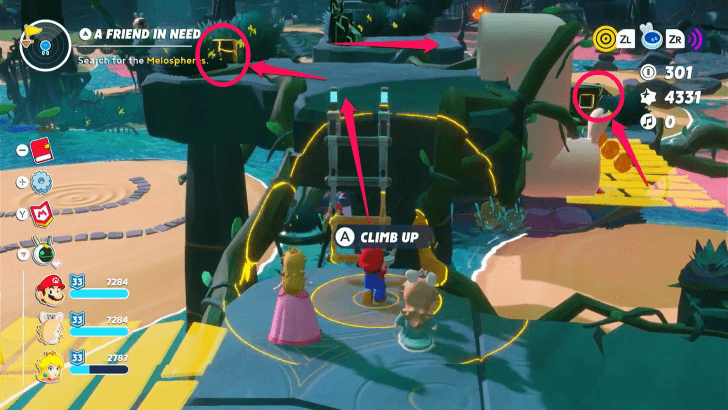 Go back up the ladder and use the scan ability next to the bridge. This will lead you to the cube next to some bushes. Pick it up and go through the pipe to place it in the slot. |
| 7 |  Use the scan ability again to reveal a ladder to the area that just opened up. Climb the ladder and use the scan ability again to walk across a long bridge back to the area where you first landed on the beach. Keep walking and scanning until you reach a cannon. Use the cannon. |
| 8 | 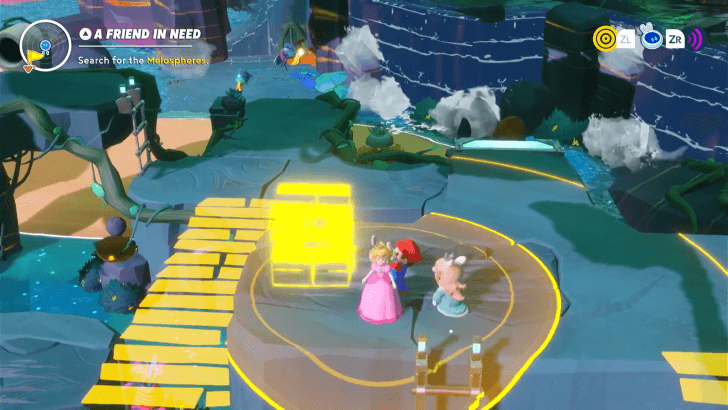 Use the scan ability to reveal a ladder and the crate on top. Move the crate off the ledges to activate the switch on the beach. |
| 9 | 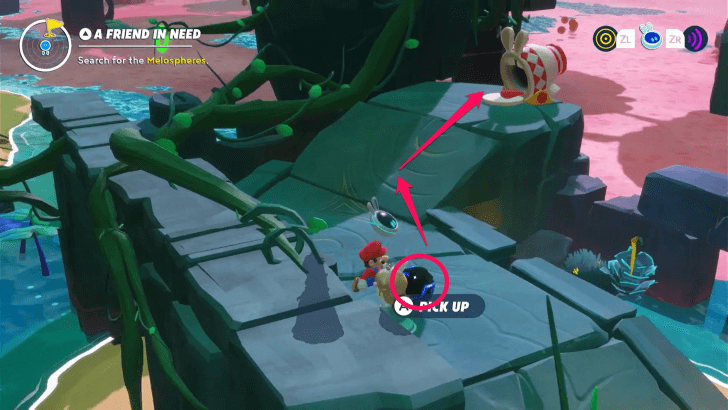 With the path open you can take the blue sphere through the cannon back to the beach with the Darkmess egg. Place the blue sphere in its slot. |
| 10 | 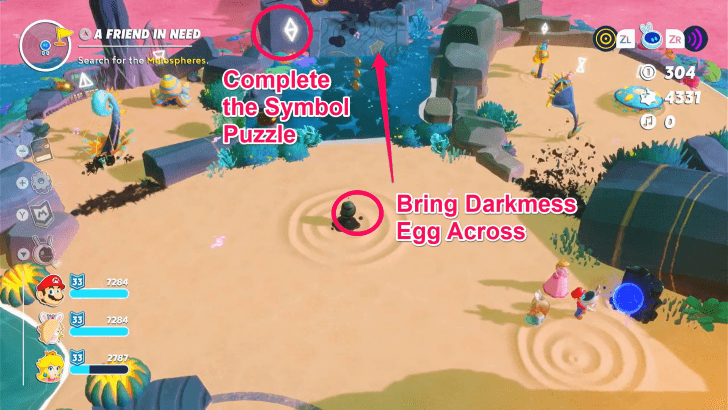 This will open up the area to the same plant instruments symbol puzzle you encountered in the forest. Activate the correct ones to raise the stone path leading to the Melosphere. Remember to bring the Darkmess Egg over the stone path to open the cage. |
Second Melosphere Guide
| 1 | 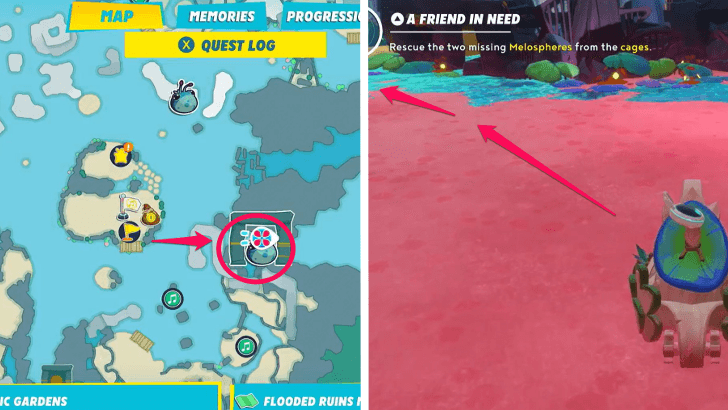 Use the boat to travel to the gate on the east side. Once in the area, take the path on the left then keep going straight until you see a dock you can get off of. |
|---|---|
| 2 |  The mechanic here is that rock walls will raise once you get near them so it will be a maze to get through them. Go straight then right then right again to head around the blocks. This will take you to a slot that needs a yellow cube. |
| 3 | 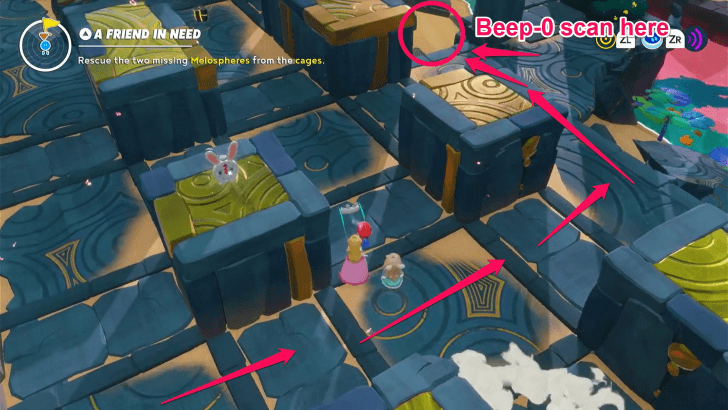 With the slot to the cube on your left take the path on your right all the way to the ledge. Then, head straight to another ledge. Use the scan ability here then take the bridge. |
| 4 | 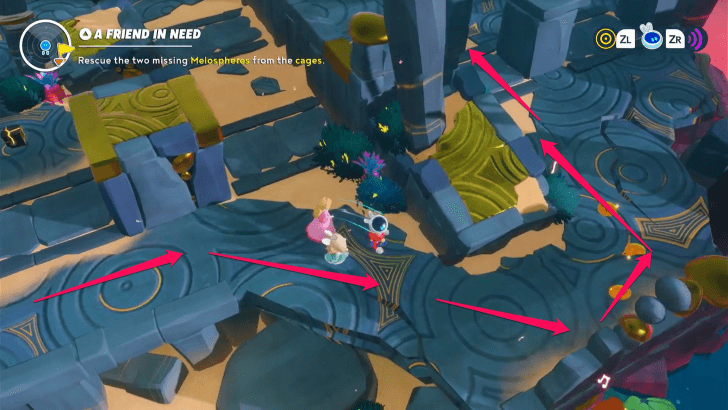 Keep using the path on the side nearest the beach until you see a large pillar to your right. Take a left after this pillar to head up a ramp. |
| 5 |  Once up the ramp, walk on the blocks that are getting raised. Walk straight for two golden blocks then turn to right and head straight to a pipe. |
| 6 | 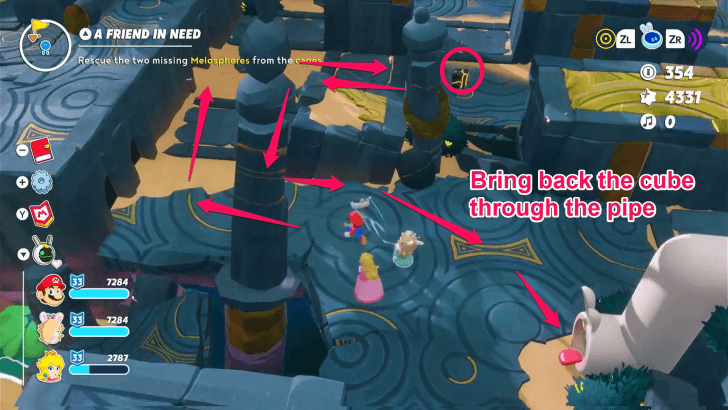 Head down the pipe and around the blocks to retrieve the yellow cube. Head back up the same pipe and jump down the blue ledge to place the yellow cube in its correct slot. |
| 7 | 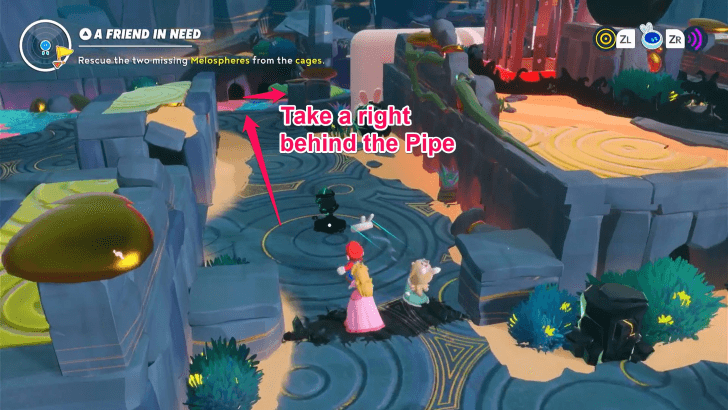 The area to a Darkmess Egg will open up. Head straight past the blocked pipe with the blue circle then to the right. Take this path until you see another maze with raising blocks. |
| 8 | 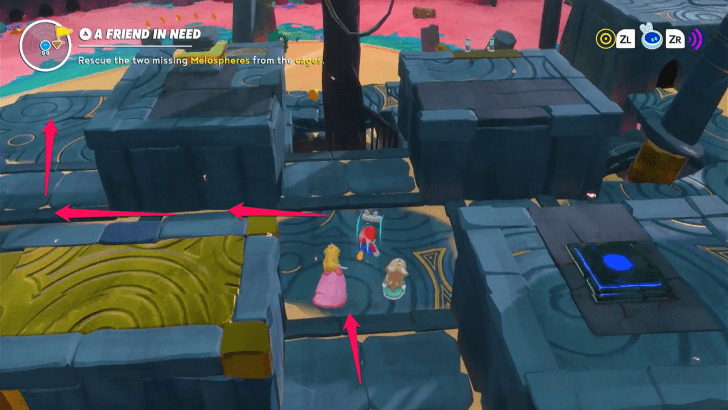 Take a right, left, left, right until you arrive at a ledge with a ladder leading to a beach. |
| 9 | 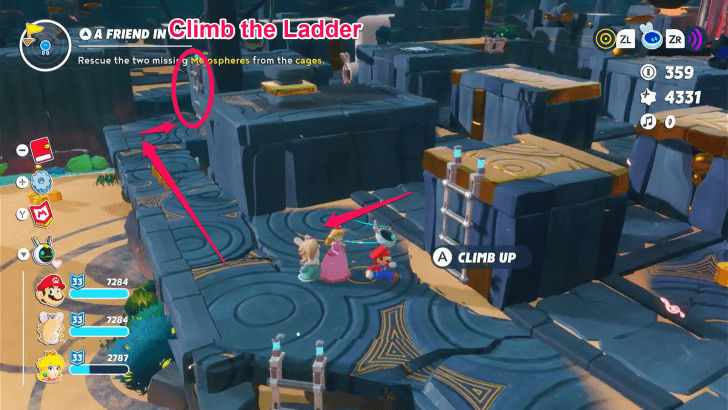 Take the path on the ledge across the ladder right beside the beach. Then take the ladder at the other end. |
| 10 | 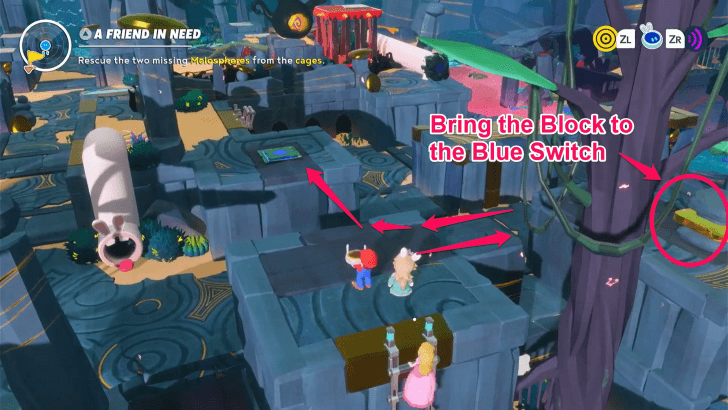 Head to the right and move the block to the blue switch to open the pipe you saw earlier. You can head back to that area by lowering a ladder that’s next to the blue switch. |
| 11 |  Remember to take the Darkmess Egg with you when you enter the pipe. Use it to free the Melosphere from the cage. |
Third Melosphere Guide
| 1 | 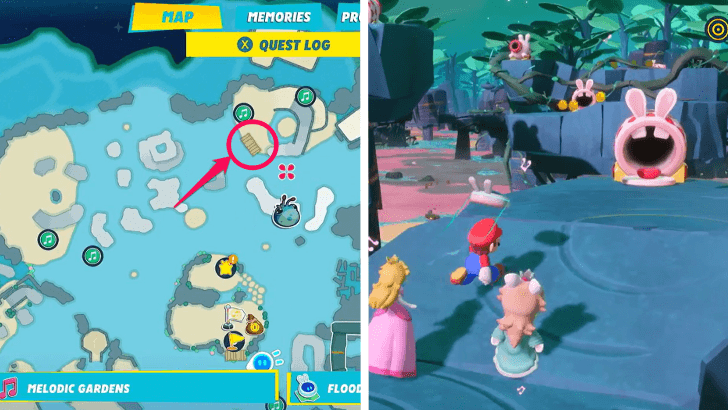 Head to the dock that’s in the north. Climb up the ramp and take the cannon at the edge. |
|---|---|
| 2 |  The cannon will lead you to a purple switch on the floor, two purple bridges (one straight ahead and one to the right with large vines surrounding the purple bridge). First take the bridge ahead and use the scan ability to activate a yellow bridge to another cannon at the end. |
| 3 |  Head back to the purple switch and take the bridge on the right this time, flipping the purple switch as needed. Follow the path until you see a yellow symbol, which will lead you to scan the ledge and follow the yellow bridge to another cannon on a rock. Take the cannon. This will bring you back to the purple switch. |
| 4 | 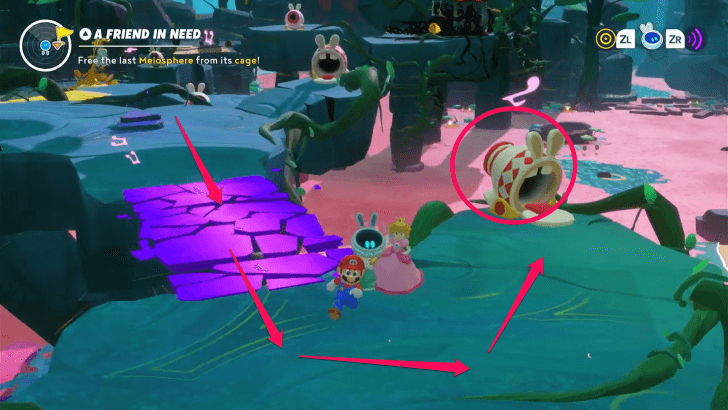 Turn the switch and head down the bridge ahead. Immediately to your right after the bridge there will be a cannon. Take this cannon to bring you to the yellow bridge you just activated. |
| 5 |  Follow the path, this time in reverse, and it will lead you to a purple bridge with a yellow cube on the other side. Take the yellow cube. |
| 6 |  Head back to the area with the purple switch by taking the cannon on the other side of the yellow bridge. Take the purple bridge straight ahead and head down the yellow bridge at the end to use the cannon. This will take you to a beach. |
| 7 | 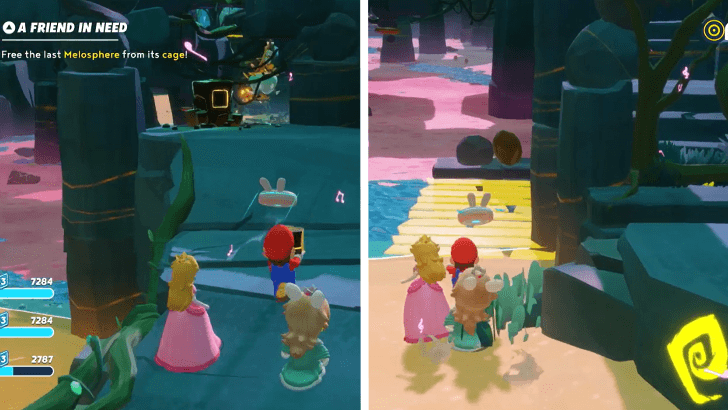
Head up the ramp that’s beside the challenge, Darkmess on the Beach. The slot for the yellow cube will be here. Place it and it will open up the cannon near the purple switch. You can head back to the purple switch by scanning a yellow symbol on the leftmost rock ramp on the beach. This will lead you to a yellow bridge, ladders and a cannon you can use. |
| 8 | 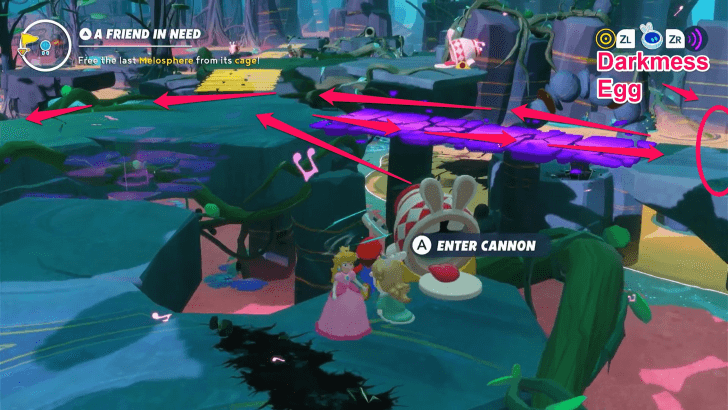 Flip the purple switch and use the cannon that just opened. You can now get the Darkmess Egg. Bring the Darkmess Egg, turn around and use the cannon that’s next to the unactivated purple bridge. This will bring you back to a cannon next to the yellow bridge. Take this cannon to bring you back to the purple switch. |
| 9 | 
Take the cannon on the left side of the purple switch and destroy the Darkmess Eye. |
Previous and Next Guides
| ◀ Previous Quest | Next Quest ▶ | Harmony Disruption | - |
|---|
A Friend in Need Battle Quests and Recommended Teams
| Battle Quest | Overview |
|---|---|
| Embuscade! |
Objectives: Defeat Proto Mecha King Bob-Omb
Rewards: ・
・Skill Prisms ・250 Coins ・1420 Star Bits |
| Melosphere Melodrama |
Objectives: Bring the 3 Melospheres to Their Nest
Rewards: ・Skill Prisms ・251 Coins ・1421 Star Bits |
| The Mecha King Bob-omb, Part 1 | Objectives: Open the Cage and Set The Dorrie Free |
| The Mecha King Bob-omb, Part 2 |
Objectives: Defeat Mecha King Bob-omb
Rewards: ・Skill Prisms ・365 Coins ・2060 Star Bits |
Recommended Heroes and Sparks
Embuscade!
| Embuscade! Recommended Team | ||
|---|---|---|
| Hero 1 |
 Rabbid Mario Rabbid Mario
|
 Ethering Ethering
|
 Pyrogeddon Pyrogeddon
|
||
| Hero 2 |
 Rabbid Rosalina Rabbid Rosalina
|
 Exosphere Exosphere
|
 Glitter Glitter
|
||
| Hero 3 |
 Luigi Luigi
|
 Aquaquake Aquaquake
|
 Pyrostar Pyrostar
|
||
Melosphere Melodrama
| Melosphere Melodrama Recommended Team | ||
|---|---|---|
| Hero 1 |
 Mario Mario
|
 Screech Screech
|
|
Pyrogeddon
|
||
| Hero 2 |
 Rabbid Luigi Rabbid Luigi
|
Aquaquake
|
|
Pyrostar
|
||
| Hero 3 |
Rabbid Rosalina
|
 Gargantu-Fan Gargantu-Fan
|
|
Glitter
|
||
The Mecha King Bob-omb, Part 1
| The Mecha King Bob-omb, Part 1 Recommended Team | ||
|---|---|---|
| Hero 1 |
Mario
|
Pyrostar
|
|
Aquaquake
|
||
| Hero 2 |
 Peach Peach
|
 Aquanox Aquanox
|
 Pulser Pulser
|
||
| Hero 3 |
 Rabbid Peach Rabbid Peach
|
Screech
|
|
Exosphere
|
||
The Mecha King Bob-omb, Part 2
| The Mecha King Bob-omb, Part 2 Recommended Team | ||
|---|---|---|
| Hero 1 |
Mario
|
 Starburst Starburst
|
 Vampgeddon Vampgeddon
|
||
| Hero 2 |
 Edge Edge
|
 Berserk Berserk
|
|
Ethering
|
||
| Hero 3 |
Rabbid Peach
|
Pulser
|
 Regenesis Regenesis
|
||
How to Unlock A Friend in Need
Unlocked after completing the Battle Quest, Missing Musicians.
Mario + Rabbids DLC Related Guides
Comment
Author
A Friend in Need Main Quest Walkthrough and Guide
Please participate in our site
improvement survey
03/2026
improvement survey
03/2026
Would you assist in
improving Game8's site?
improving Game8's site?

×
We are listening to our users' valuable opinions and discussing how to act on them.
The information collected through this survey will be used for the purpose of improving our services. In addition, the information will only be disclosed a part of a statistic in a format that will not allow identification of personal information.
Begin Survey
Not Now
×
Please rate each item regarding Game8.co's Advertisements.
Amount of Ads
Very Dissatisfied
Somewhat Dissatisfied
Fine
Somewhat Satisfied
Highly Satisfied
Placement of Ads
Timing of Ad Display
Ad Loading Speed
Safeness of Ads
Content of Ads
×
Please rate each item regarding Game8.co's Quality of Articles.
Amount of information
Very Dissatisfied
Somewhat Dissatisfied
Fine
Somewhat Satisfied
Highly Satisfied
Frequency of updates
Speed of new information
Accuracy of articles
Understandibility of articles
Readability of sentences
×
Please rate each item regarding Game8.co's Usability of the Site.
Ease of finding information
Very Dissatisfied
Somewhat Dissatisfied
Fine
Somewhat Satisfied
Highly Satisfied
Loading Speed
Use of Color
Font Size
Visibility of Images
Easy to Understand Layout
×
Please rate each item regarding Game8.co's Message Boards, Comments.
Ease of Writing
Very Dissatisfied
Somewhat Dissatisfied
Fine
Somewhat Satisfied
Highly Satisfied
Readability
Ease in Finding Information
Comment Quality
Comment Quantity
Admin Response
×
Please rate each item regarding Game8.co's Site's new design.
Please rate our site's new design
Very Dissatisfied
Somewhat Dissatisfied
Fine
Somewhat Satisfied
Highly Satisfied
Do you think that the website's design change makes the site easier to use?
Has the new design made it easier for you to find information on the site?
Has the new design improved the overall visual appeal of the site?
How would you rate your overall satisfaction with the new design of the site?
×
How likely are you to recommend Game8 to someone you know?
Very Unlikely
0
1
2
3
4
5
6
7
8
9
10
Very Likely
If you have other opinions regarding potential improvement to the website, please share them with us. We would appreciate your honest opinion.
Note: This is a free response section, so you can proceed without entering anything.
Note: Please be sure not to enter any kind of personal information into your response.
Note: Please be sure not to enter any kind of personal information into your response.
×
Thank You
×
Thank you for participating in our survey! Your answers will help us to improve the quality of our website and services.
We hope you continue to make use of Game8.
We hope you continue to make use of Game8.
Close
Rankings
- We could not find the message board you were looking for.
Gaming News


Popular Games

Genshin Impact Walkthrough & Guides Wiki
Resident Evil Requiem (RE9) Walkthrough & Guides Wiki
Honkai: Star Rail Walkthrough & Guides Wiki
Monster Hunter Wilds Walkthrough & Guides Wiki
Umamusume: Pretty Derby Walkthrough & Guides Wiki
Pokemon TCG Pocket (PTCGP) Strategies & Guides Wiki
Arknights: Endfield Walkthrough & Guides Wiki
Wuthering Waves Walkthrough & Guides Wiki
Zenless Zone Zero Walkthrough & Guides Wiki
Digimon Story: Time Stranger Walkthrough & Guides Wiki


Recommended Games
Fire Emblem Heroes (FEH) Walkthrough & Guides Wiki
Yu-Gi-Oh! Master Duel Walkthrough & Guides Wiki
Super Smash Bros. Ultimate Walkthrough & Guides Wiki
Diablo 4: Vessel of Hatred Walkthrough & Guides Wiki
Pokemon Brilliant Diamond and Shining Pearl (BDSP) Walkthrough & Guides Wiki
Elden Ring Shadow of the Erdtree Walkthrough & Guides Wiki
Monster Hunter World Walkthrough & Guides Wiki
The Legend of Zelda: Tears of the Kingdom Walkthrough & Guides Wiki
Persona 3 Reload Walkthrough & Guides Wiki
Cyberpunk 2077: Ultimate Edition Walkthrough & Guides Wiki


All rights reserved
MARIO + RABBIDS SPARKS OF HOPE © 2022 Ubisoft Entertainment. All Rights Reserved. Rabbids, Sparks of Hope, Ubisoft and the Ubisoft logo are registered or unregistered trademarks of Ubisoft Entertainment in the U.S. and/or other countries. Nintendo properties are licensed to Ubisoft Entertainment by Nintendo. SUPER MARIO characters © Nintendo. Trademarks are property of their respective owners. Nintendo Switch is a trademark of Nintendo.
The copyrights of videos of games used in our content and other intellectual property rights belong to the provider of the game.
The contents we provide on this site were created personally by members of the Game8 editorial department.
We refuse the right to reuse or repost content taken without our permission such as data or images to other sites.