Combat Techniques Guide

This is a guide on Combat in Assassin's Creed Valhalla (AC Valhalla). Read on to learn the different types of attacks, how to parry and block, and how to take advantage of an enemy's weak points during combat!
List of Contents
Combat Tips and Guides
Light Melee Attacks

Light Melee Attacks are low damaging, yet fast strikes you perform against enemies. They are best used in conjunction with dodging or parrying, as they allow you to deal some damage coming out of an attempted enemy attack. However, Light Attacks cannot break through enemies equipped with shields.
| Function | Control |
|---|---|
| Light Attack |
Heavy Melee Attacks

Heavy Melee Attacks inflict more damage against enemies at the cost of slower strikes.
These attacks are extremely useful when battling opponents equipped with shields. Your strikes will break through much of their shield's defenses, and will often knock them defensless to the ground.
| Function | Control |
|---|---|
| Heavy Attack |
Parrying & Blocking

Both Parrying and Blocking are useful moves that provide you additional safety. Successfully parrying against an enemy's attack creates a small window of opportunity for you to counter-attack against them.
You may also fight more defensively and simply block an opponent's attack with your shield. Take note that not all attacks can be parried or blocked.
| Function | Control |
|---|---|
| Parry | |
| Block |
Watch Your Stamina

Stamina is what allows you do combat actions. It is represented by a meter in the game that depletes every time you roll, dodge, and block. The meter also depletes when you perform unsuccessful heavy, special, and light attacks.
Your stamina meter gradually regenerates over time, and also recovers faster the more enemies you defeat. Successful Light Attacks also replenish the Stamina faster, making aggressive combat more rewarding.
Dual Wielding

Rather than equipping a shield to your secondary hand, you can equip most One-handed weapons as sidearms that allow you to Dual Wield. This allows you to deal more damage to your opponents in quick succession and also perform Special Attacks at the cost of some Stamina.
| Function | Control |
|---|---|
| Dual-Wield Special Attack |
Check out our Dual Wielding guide here!
Dual Wielding Heavy Weapons
Dodging & Rolling

Being able to dodge successfuly is a great way to remove yourself from tight situations. Dodging is extremely useful against enemies that focus on dealing Heavy Attacks against you, with the slow animation of their attacks often giving you enough time to dodge towards their backs for a quick attack.
Dodging is also useful for when you're trying to move away from a group of enemies surrounding you. Take note that you control where Eivor dodges, so be careful as you may dodge or roll in the way of an incoming attack!
| Function | Control |
|---|---|
| Quick Dodge | |
| Roll |
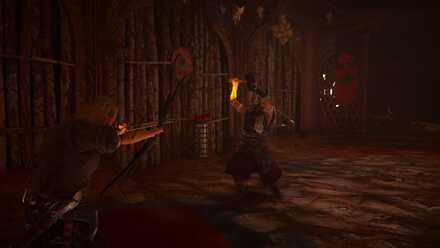
Using your Bows

The Bow and Arrow lets you strike against distant enemies, preferably before they have a chance to see you. Shooting at enemies during active combat also distrupts their attacks, but you need to dodge or roll away more often as the enemy will try their best to get close to you.
Stunning

Stunning enemies lets you unleash potentially combat ending strikes and finishers against enemies. Hitting enemies in the head or while they're charging at you stuns them for a short amount of time, letting you follow up with an attack.
Breaking the enemies' shields also stuns them in addition to knocking them defensless to the ground.
Enemy Locking

Locking on to the enemy is useful in situations where you're fighting against more than one enemy. Knowing where and how enemies are positioned on the field is very useful, and also helps you decide which opponent to prioritize taking out.
When up against groups of enemies, it's advisable to take down Archers first to avoid constantly dodging arrows. Shield carrying enemies are your next priority as their heightened defenses forces you to spend more stamina on your strikes against their shields.
| Function | Control |
|---|---|
| Lock-On |
Unblockable/Unparryable Enemy Attacks

Certain enemies perform attacks that you can't parry or block by any means, but you can easily tell identify these from normal attacks. If an enemy glows red just as they're about to attack, that means you can't parry or block their next move.
Enemy Weak Points
When aiming your bow at an enemy, you will notice that certain parts of their body glow. These are their weak points and hitting them with an arrow takes a good amount of their own stamina/health away.
Shooting at an enemy's weak points also stuns them and is particularly useful when you want to end combat quickly.
Related Guides

Author
Combat Techniques Guide
Rankings
- We could not find the message board you were looking for.
Gaming News


![Monster Hunter Stories 3 Review [First Impressions] | Simply Rejuvenating](https://img.game8.co/4438641/2a31b7702bd70e78ec8efd24661dacda.jpeg/thumb)
![The Seven Deadly Sins: Origin Review [First Impressions] | A Promising Start](https://img.game8.co/4440581/584e0bfb87908f12c4eab6e846eb1afd.png/thumb)

Popular Games

Genshin Impact Walkthrough & Guides Wiki
Umamusume: Pretty Derby Walkthrough & Guides Wiki
Pokemon Pokopia Walkthrough & Guides Wiki
Honkai: Star Rail Walkthrough & Guides Wiki
Monster Hunter Stories 3: Twisted Reflection Walkthrough & Guides Wiki
Arknights: Endfield Walkthrough & Guides Wiki
Wuthering Waves Walkthrough & Guides Wiki
Zenless Zone Zero Walkthrough & Guides Wiki
Pokemon TCG Pocket (PTCGP) Strategies & Guides Wiki
Monster Hunter Wilds Walkthrough & Guides Wiki


Recommended Games
Fire Emblem Heroes (FEH) Walkthrough & Guides Wiki
Diablo 4: Vessel of Hatred Walkthrough & Guides Wiki
Cyberpunk 2077: Ultimate Edition Walkthrough & Guides Wiki
Yu-Gi-Oh! Master Duel Walkthrough & Guides Wiki
Super Smash Bros. Ultimate Walkthrough & Guides Wiki
Pokemon Brilliant Diamond and Shining Pearl (BDSP) Walkthrough & Guides Wiki
Elden Ring Shadow of the Erdtree Walkthrough & Guides Wiki
Monster Hunter World Walkthrough & Guides Wiki
The Legend of Zelda: Tears of the Kingdom Walkthrough & Guides Wiki
Persona 3 Reload Walkthrough & Guides Wiki


All rights reserved
© 2020 Ubisoft Entertainment. All Rights Reserved. Assassin's Creed, Ubisoft and the Ubisoft logo are registered or unregistered trademarks of Ubisoft Entertainment in the U.S. and/or other countries.
The copyrights of videos of games used in our content and other intellectual property rights belong to the provider of the game.
The contents we provide on this site were created personally by members of the Game8 editorial department.
We refuse the right to reuse or repost content taken without our permission such as data or images to other sites.