This survey will take about 1 minute.
Your answers will help us to improve our website.
Fire Emblem: Three Houses (FE3H)
Chapter 18: Taking Fort Merceus (Golden Deers) Walkthrough
This is the battle walkthrough for the mission Taking Fort Merceus from Fire Emblem: Three Houses (FETH, FE3H). Read on to find out about map features, what enemies you will encounter, and tips for winning!
List of Contents
| Previous Battle | Story Walkthrough | Next Battle |
|---|---|---|
| Chapter 17: To War at Gronder | Chapter 18: The Golden Scheme | Chapter 19 |
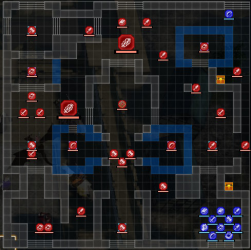
Chapter 18 (Golden Deers) - Map and Overview
| Victory Conditions | |
|---|---|
| Defeat the enemy commander. ↓ Rout the enemy. (if Death Knight successfully flees) |
|
| Defeat Conditions | |
| Your character or Claude falls in battle. | |
| # of Player Units | 11 |
| # of Enemies | Normal: 30 Hard: 37 |
| # of Ally Units | 0 → 5 |
Chapter 18 (Golden Deers) - Enemies
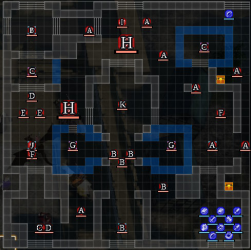
| Pos | Enemy | Pos | Enemy |
|---|---|---|---|
| A | Imperial Soldier (Paladin) | G | Imperial Soldier (Archer) |
| B | Imperial Soldier (Fortress Knight) | H | Demonic Beast |
| C | Imperial Soldier (Dark Mage) | I | Linhardt |
| D | Imperial Soldier (Dark Bishop) | J | Caspar |
| E | Imperial Soldier (Assassin) | K | Death Knight |
| F | Imperial Soldier (Swordmaster) |
Enemy Stats
Linhardt
| Level | HP | Mov. | Class |
|---|---|---|---|
| 36 | 41 | 4 | Bishop |
| Mt. | Spd | Hit | Crit |
| 40 | 6 | 96 | 23 |
| Range | Prt | Res | Avd |
| 1-2 | 15 | 41 | 16 |
| Weapon | Dropped Items | ||
| Seraphim | N/A | ||
| Battalion | |||
| Hevring Prayer Troops | |||
| Level | Endurance | Gambit | Uses |
| 1-2 | 75 | Blessing | 1 |
Death Knight
| Level | HP | Mov. | Class |
|---|---|---|---|
| 45 | 55 | - | Death Knight |
| Mt. | Spd | Hit | Crit |
| 47 | 28 | 126 | 43 |
| Range | Prt | Res | Avd |
| 1 | 27 | 21 | 40 |
| Weapon | Dropped Items | ||
| Scythe of Sariel | Dark Seal | ||
Caspar
| Level | HP | Mov. | Class |
|---|---|---|---|
| 36 | 61 | 5 | Warrior |
| Mt. | Spd | Hit | Crit |
| 57 | 10 | 95 | 27 |
| Range | Prt | Res | Avd |
| 1 | 24 | 8 | 8 |
| Weapon | Dropped Items | ||
| Brave Axe | Brave Axe | ||
| Battalion | |||
| Bergliez War Group | |||
| Level | Endurance | Gambit | Uses |
| 1 | 105 | Onslaught | 2 |
Linhardt
| Level | HP | Mov. | Class |
|---|---|---|---|
| 37 | 47 | 4 | Bishop |
| Mt. | Spd | Hit | Crit |
| 46 | 12 | 102 | 29 |
| Range | Prt | Res | Avd |
| 1-2 | 17 | 42 | 22 |
| Weapon | Dropped Items | ||
| Seraphim | N/A | ||
| Battalion | |||
| Hevring Prayer Troops | |||
| Level | Endurance | Gambit | Uses |
| 1-2 | 75 | Blessing | 1 |
Death Knight
| Level | HP | Mov. | Class |
|---|---|---|---|
| 45 | 61 | - | Death Knight |
| Mt. | Spd | Hit | Crit |
| 57 | 34 | 132 | 49 |
| Range | Prt | Res | Avd |
| 1 | 34 | 28 | 59 |
| Weapon | Dropped Items | ||
| Scythe of Sariel | Dark Seal | ||
| Battalion | |||
| Reaper Knights | |||
| Level | Endurance | Gambit | Uses |
| 1 | 75 | Assault Troop | 2 |
Caspar
| Level | HP | Mov. | Class |
|---|---|---|---|
| 37 | 67 | 5 | Warrior |
| Mt. | Spd | Hit | Crit |
| 63 | 16 | 100 | 32 |
| Range | Prt | Res | Avd |
| 1 | 30 | 9 | 14 |
| Weapon | Dropped Items | ||
| Brave Axe | Brave Axe | ||
| Battalion | |||
| Bergliez War Group | |||
| Level | Endurance | Gambit | Uses |
| 1 | 105 | Onslaught | 2 |
Loot

| Position | Loot Dropped |
|---|---|
| 1 | Brave Axe |
| 2 | Dark Seal |
| 3 | Evasion Ring |
Chapter 18 (Golden Deers) - Chests
There are two chests at the eastern wall. One in the north, and one in the south.
The enemy units do not hold any chest keys. You can purchase keys before battle, or if you have them in the convoy, access them from Byleth. If you have a Thief, of Assassin in your party, you can have them open up the chests using the Locktouch Ability.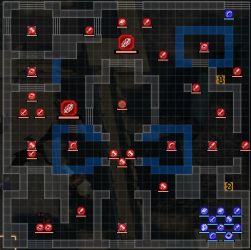
| Pos | Item |
|---|---|
| 1 | Aurora Shield |
| 2 | Speedwing |
Aurora Shield
Gives +3 Protection and negates bonus damage against cavalry when equipped. Even if you do not have any enemies that use Horseslayers or Dark Spikes, it gives the protection bonus of a Steel Shield with zero weight. Definitely worth getting since it isn't out of the way for Claude, especially if he is the Barbossa class.
Speedwing
Permanently increases speed by 2. Useful to have for flying units and quick units like Assassins or Thieves, as it increases dodge and attack speed. Given that it's close, you might as well get it. It can even be gotten on turn 1 if you have Lysithea warp the key bearer into the walls.
Chapter 18 (Golden Deers) - Map Features
Enemies are scattered across the large map which is surrounded by ramparts and channels; suitable for fliers.
Terrain Types
| Tiles | Description |
|---|---|
| Stairs | Difficult for cavalry to traverse |
| Rampart Channel |
Navigable only by fliers |
| Ballista | 5 Mt, 15 Durability, 3-12 Range, Requires Bow Skill of D or higher |
| Fire Orb | 5 Mt, 15 Durability, 3-12 Range, Requires magic users |
| Heal Tile+ | 1 Prt, 1 Res, +30% HP each turn for non-fliers |
Chapter 18 (Golden Deers) - Tips and Tricks
Ally Reinforcements
At the start of the battle, there will be a cutscene which will reveal Nader and the Almyrian troops as they team up with the Alliance. Your ally units will increase to 5.
Enemy Reinforcements
On the first turn enemies will begin to spawn in 4 areas on the map (two in the north, and two in the south). To prevent them from spawning, have an ally move to the space where they are supposed to enter the battefield.
Get Rid of the Ballista and Fire Orb Users
Although each enemy unit is far, those who control the Ballista and Fire Orb, which can target units from across the map, will attack your weaker units one by one. Make sure you defeat them first before moving forward.
Surround the Death Knight
The Death Knight's range is only 1 tile in each direction. If you get near him, however, he will start to escape to the northwestern side of the map.
To prevent him from escaping and ending the battle quickly, have units surround him in every direction and focus all your attacks on him once he starts to escape.
Fire Emblem: Three Houses - Related Links
Part 2 - Verdant Wind Battle Walkthroughs
Comment
Author
Chapter 18: Taking Fort Merceus (Golden Deers) Walkthrough
Please participate in our site
improvement survey
03/2026
improvement survey
03/2026
Would you assist in
improving Game8's site?
improving Game8's site?

×
We are listening to our users' valuable opinions and discussing how to act on them.
The information collected through this survey will be used for the purpose of improving our services. In addition, the information will only be disclosed a part of a statistic in a format that will not allow identification of personal information.
Begin Survey
Not Now
×
Please rate each item regarding Game8.co's Advertisements.
Amount of Ads
Very Dissatisfied
Somewhat Dissatisfied
Fine
Somewhat Satisfied
Highly Satisfied
Placement of Ads
Timing of Ad Display
Ad Loading Speed
Safeness of Ads
Content of Ads
×
Please rate each item regarding Game8.co's Quality of Articles.
Amount of information
Very Dissatisfied
Somewhat Dissatisfied
Fine
Somewhat Satisfied
Highly Satisfied
Frequency of updates
Speed of new information
Accuracy of articles
Understandibility of articles
Readability of sentences
×
Please rate each item regarding Game8.co's Usability of the Site.
Ease of finding information
Very Dissatisfied
Somewhat Dissatisfied
Fine
Somewhat Satisfied
Highly Satisfied
Loading Speed
Use of Color
Font Size
Visibility of Images
Easy to Understand Layout
×
Please rate each item regarding Game8.co's Message Boards, Comments.
Ease of Writing
Very Dissatisfied
Somewhat Dissatisfied
Fine
Somewhat Satisfied
Highly Satisfied
Readability
Ease in Finding Information
Comment Quality
Comment Quantity
Admin Response
×
Please rate each item regarding Game8.co's Site's new design.
Please rate our site's new design
Very Dissatisfied
Somewhat Dissatisfied
Fine
Somewhat Satisfied
Highly Satisfied
Do you think that the website's design change makes the site easier to use?
Has the new design made it easier for you to find information on the site?
Has the new design improved the overall visual appeal of the site?
How would you rate your overall satisfaction with the new design of the site?
×
How likely are you to recommend Game8 to someone you know?
Very Unlikely
0
1
2
3
4
5
6
7
8
9
10
Very Likely
If you have other opinions regarding potential improvement to the website, please share them with us. We would appreciate your honest opinion.
Note: This is a free response section, so you can proceed without entering anything.
Note: Please be sure not to enter any kind of personal information into your response.
Note: Please be sure not to enter any kind of personal information into your response.
×
Thank You
×
Thank you for participating in our survey! Your answers will help us to improve the quality of our website and services.
We hope you continue to make use of Game8.
We hope you continue to make use of Game8.
Close
Rankings
- We could not find the message board you were looking for.
Gaming News


![Everwind Review [Early Access] | The Shaky First Step to A Very Long Journey](https://img.game8.co/4440226/ab079b1153298a042633dd1ef51e878e.png/thumb)

![Monster Hunter Stories 3 Review [First Impressions] | Simply Rejuvenating](https://img.game8.co/4438641/2a31b7702bd70e78ec8efd24661dacda.jpeg/thumb)
Popular Games

Genshin Impact Walkthrough & Guides Wiki
Honkai: Star Rail Walkthrough & Guides Wiki
Umamusume: Pretty Derby Walkthrough & Guides Wiki
Pokemon Pokopia Walkthrough & Guides Wiki
Resident Evil Requiem (RE9) Walkthrough & Guides Wiki
Monster Hunter Wilds Walkthrough & Guides Wiki
Wuthering Waves Walkthrough & Guides Wiki
Arknights: Endfield Walkthrough & Guides Wiki
Pokemon FireRed and LeafGreen (FRLG) Walkthrough & Guides Wiki
Pokemon TCG Pocket (PTCGP) Strategies & Guides Wiki


Recommended Games
Diablo 4: Vessel of Hatred Walkthrough & Guides Wiki
Fire Emblem Heroes (FEH) Walkthrough & Guides Wiki
Yu-Gi-Oh! Master Duel Walkthrough & Guides Wiki
Super Smash Bros. Ultimate Walkthrough & Guides Wiki
Pokemon Brilliant Diamond and Shining Pearl (BDSP) Walkthrough & Guides Wiki
Elden Ring Shadow of the Erdtree Walkthrough & Guides Wiki
Monster Hunter World Walkthrough & Guides Wiki
The Legend of Zelda: Tears of the Kingdom Walkthrough & Guides Wiki
Persona 3 Reload Walkthrough & Guides Wiki
Cyberpunk 2077: Ultimate Edition Walkthrough & Guides Wiki


All rights reserved
©2019 Nintendo / INTELLIGENT SYSTEMS. Co-developed by KOEI TECMO GAMES CO., LTD. Fire Emblem and Nintendo Switch are trademarks of Nintendo. © 2019 Nintendo.
The copyrights of videos of games used in our content and other intellectual property rights belong to the provider of the game.
The contents we provide on this site were created personally by members of the Game8 editorial department.
We refuse the right to reuse or repost content taken without our permission such as data or images to other sites.