Chapter 19: Saving Derdriu (Blue Lions) Walkthrough
This is the battle walkthrough for the mission Saving Derdriu from Fire Emblem: Three Houses (FETH, FE3H). Read on to find out about map features, what enemies you will encounter, and tips for winning!
List of Contents
| Previous Battle | Story Walkthrough | Next Battle |
|---|---|---|
| Chapter 18: Reclaiming the Capital | Chapter 19: The Golden Deer's Plea |
Chapter 20: Taking Fort Merceus |
Chapter 19 (Blue Lions) - Map and Overview
| Victory Conditions | |
|---|---|
| Defeat the Enemy Commander | |
| Defeat Conditions | |
| Your character, Dimitri, or Claude falls in battle | |
| # of Player Units | 11 |
| # of Enemies | 30 |
| # of Ally Units | 5 |
Chapter 19 (Blue Lions) - Enemies
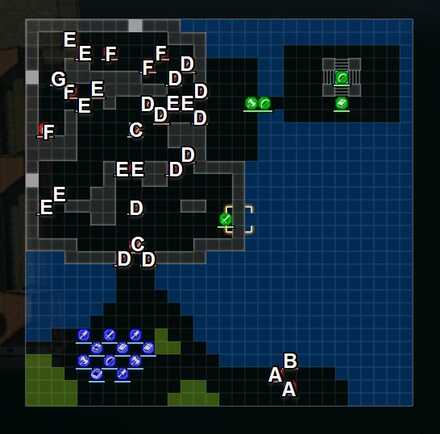
| A | Imperial Soldier (Paladin) | B | Imperial Soldier (Pegasus Knight) |
|---|---|---|---|
| C | Imperial Soldier (Mortal Savant) | D | Imperial Soldier (Hero) |
| E | Imperial Soldier (Fortress Knight) | F | Imperial Soldier (Sniper) |
| G | Lord Arundel | - |
Lord Arundel
| Level | HP | Mov. | Class |
|---|---|---|---|
| 39 | 51 | - | Dark Knight |
| Mt. | Spd | Hit | Crit |
| 50 | 4 | 84 | 29 |
| Range | Prt | Res | Avd |
| 1-2 | 28 | 38 | 4 |
| Weapon | Dropped Items | ||
| Hades Omega | N/A | ||
| Battalion | |||
| Arundel Magic Corps | |||
| Level | Endurance | Gambit | Uses |
| 1-2 | 75 | Resonant Flames | 1 |
Lord Arundel
| Level | HP | Mov. | Class |
|---|---|---|---|
| 40 | 57 | - | Dark Knight |
| Mt. | Spd | Hit | Crit |
| 56 | 11 | 91 | 36 |
| Range | Prt | Res | Avd |
| 1-2 | 34 | 38 | 11 |
| Weapon | Dropped Items | ||
| Hades Omega | N/A | ||
| Battalion | |||
| Arundel Magic Corps | |||
| Level | Endurance | Gambit | Uses |
| 1-2 | 75 | Resonant Flames | 1 |
Loots
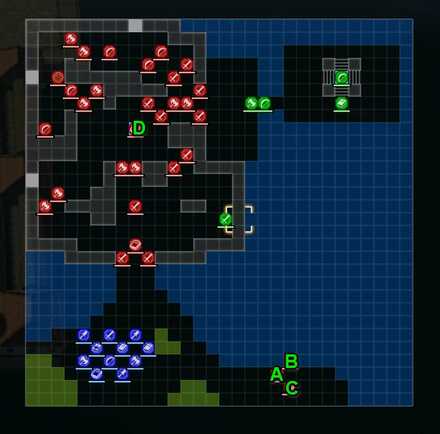
Magic Bow - A
Useful for those mages that has bow proficiency or for your archers that have a high magic stat and wants to demolish fortress knights. It can be obtained from the paladin marked as A on the image above.
Aurora Shield - B
A shield that is extremely useful for combating archer units if you have a flier on your team. Still valuable even if you dont have a flier due to its 0 wt property so securing it is a good option too.
Axe of Zoltan - C
A valuable axe. If you have an axe user on your team, securing this weapon is definitely a must. It can be obtained from the paladin marked as C on the image above.
Concoction - D
Probably the least valuable. It can be obtained from the mortal savant marked as D on the image above.
Chapter 19 (Blue Lions) - Chests
There are no chests in this map.
Chapter 19 (Blue Lions) - Map Features
Tiles
| Tiles | Description |
|---|---|
| Wasteland | Difficult for cavalry to traverse |
| Forest | 1 Prt, +30% Avo, except for fliers |
| Rampart | Navigable only by fliers |
| House | Navigable only by fliers |
| Sea | Navigable only by fliers |
| Heal Tile+ | 1 Prt, 1 Res, +30% HP each turn for non-fliers |
Isolated Allies
You have allies located on the far north east side of the map that is separated by a bridge. It is necessary to advance quickly in this fight.
Chapter 19 (Blue Lions) - Tips and Tricks
Enemy Reinforcements
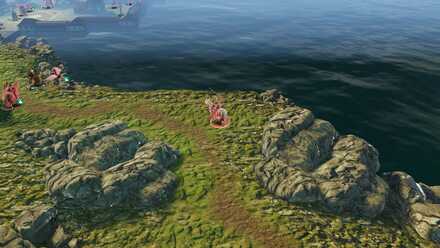
There are three reinforcement points in the town: two on the western side and one on the north. They will spawn an enemy unit at the start of each Enemy Turn. To stop this, have a unit step in the blue square located in front of the gate.
Imperial Supply Corps
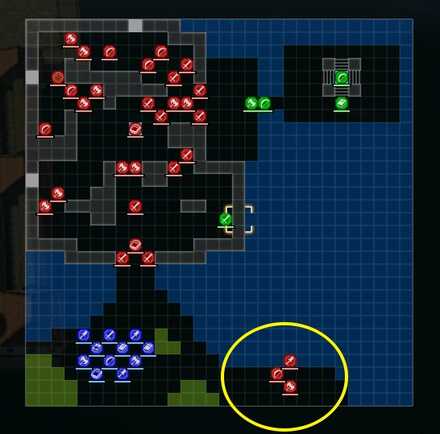
The three units outside the town are the Imperial supply corps. While they are out of the way, they are vulnerable to attack since they are alone. They all drop items that could be useful.
Alliance Priest
Claude is in the island with an Alliance Priest who uses Physic. The priest will heal Hilda and her archer from afar, and if your units are close enough, them as well.
Judith
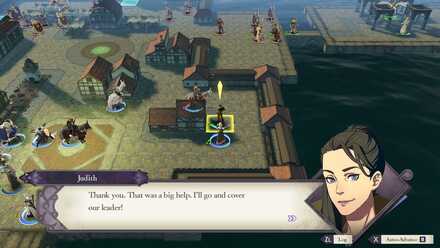
Judith, hero of the Alliance, is in the main town and cannot hold her own. Clearing out the enemies for her will prompt her to move to Hilda's bridge and help you take out any enemies along the way.
Fire Emblem: Three Houses - Related Links
Part 2 - Azure Moon Battle Walkthroughs
Comment
Author
Chapter 19: Saving Derdriu (Blue Lions) Walkthrough
improvement survey
03/2026
improving Game8's site?

Your answers will help us to improve our website.
Note: Please be sure not to enter any kind of personal information into your response.

We hope you continue to make use of Game8.
Rankings
- We could not find the message board you were looking for.
Gaming News
Popular Games

Genshin Impact Walkthrough & Guides Wiki

Honkai: Star Rail Walkthrough & Guides Wiki

Umamusume: Pretty Derby Walkthrough & Guides Wiki

Pokemon Pokopia Walkthrough & Guides Wiki

Resident Evil Requiem (RE9) Walkthrough & Guides Wiki

Monster Hunter Wilds Walkthrough & Guides Wiki

Wuthering Waves Walkthrough & Guides Wiki

Arknights: Endfield Walkthrough & Guides Wiki

Pokemon FireRed and LeafGreen (FRLG) Walkthrough & Guides Wiki

Pokemon TCG Pocket (PTCGP) Strategies & Guides Wiki
Recommended Games

Diablo 4: Vessel of Hatred Walkthrough & Guides Wiki

Cyberpunk 2077: Ultimate Edition Walkthrough & Guides Wiki

Fire Emblem Heroes (FEH) Walkthrough & Guides Wiki

Yu-Gi-Oh! Master Duel Walkthrough & Guides Wiki

Super Smash Bros. Ultimate Walkthrough & Guides Wiki

Pokemon Brilliant Diamond and Shining Pearl (BDSP) Walkthrough & Guides Wiki

Elden Ring Shadow of the Erdtree Walkthrough & Guides Wiki

Monster Hunter World Walkthrough & Guides Wiki

The Legend of Zelda: Tears of the Kingdom Walkthrough & Guides Wiki

Persona 3 Reload Walkthrough & Guides Wiki
All rights reserved
©2019 Nintendo / INTELLIGENT SYSTEMS. Co-developed by KOEI TECMO GAMES CO., LTD. Fire Emblem and Nintendo Switch are trademarks of Nintendo. © 2019 Nintendo.
The copyrights of videos of games used in our content and other intellectual property rights belong to the provider of the game.
The contents we provide on this site were created personally by members of the Game8 editorial department.
We refuse the right to reuse or repost content taken without our permission such as data or images to other sites.


![Monster Hunter Stories 3 Review [First Impressions] | Simply Rejuvenating](https://img.game8.co/4438641/2a31b7702bd70e78ec8efd24661dacda.jpeg/thumb)


