This survey will take about 1 minute.
Your answers will help us to improve our website.
Silent Hill f
Mural Puzzle Solution and Emblem Locations
★ Endings: Normal | Bad | Good | True | UFO
★ Best: Difficulty | Settings | Weapons
┗ Omamori Tier List | Builds
★ Puzzles: My Room | Locker Code | Mural
★ Missables: Door & Box | Ema | Inventory Size
★ Beginner's Guide | Fox Mask | Lore Explained
This is a guide to the Fox Mural puzzle in Silent Hill f. See the Mural Puzzle solution for all endings, where to find the Emblems, and the Mural Puzzle location here!
List of Contents
Silent Hill f Mural Puzzle Solution
All Fox Mural Puzzle Solutions
| ▼ Solutions for All Endings ▼ | |
|---|---|
| First Ending | Second Ending |
| Third Ending | Fourth Ending |
The Fox Mural Puzzle varies significantly based on the ending that's being progressed. The endings are primarily based on the conditions met prior to entering the Shimizu Residence. Once you reach this puzzle, the clues and solutions will differ quite a bit.
Ending Guides and Explanations
Coming Home to Roost Ending Emblem Puzzle Solution
| Mural Arrangement |
|---|
 |
| Journal Entry |
|
Prove your intent with the crests three. Show what lies deep within your heart. Let the line of foxes guide you. Offer the crests and lay bare your soul. The Black Bird wishes to take the White Bird. The White Bird wishes to resist. The Fox brings along his followers in triumph. He notices not the two birds in conflict. |
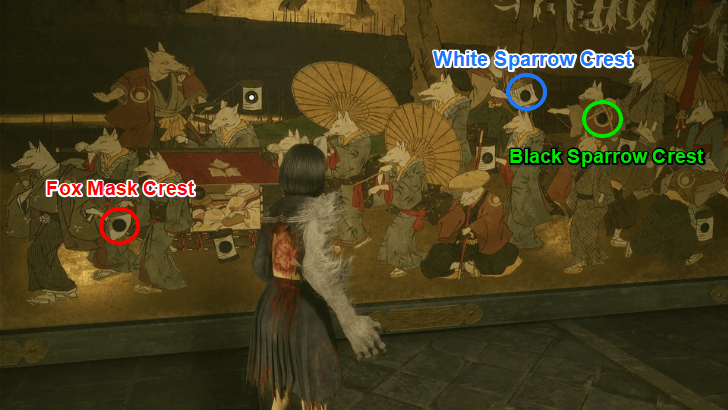
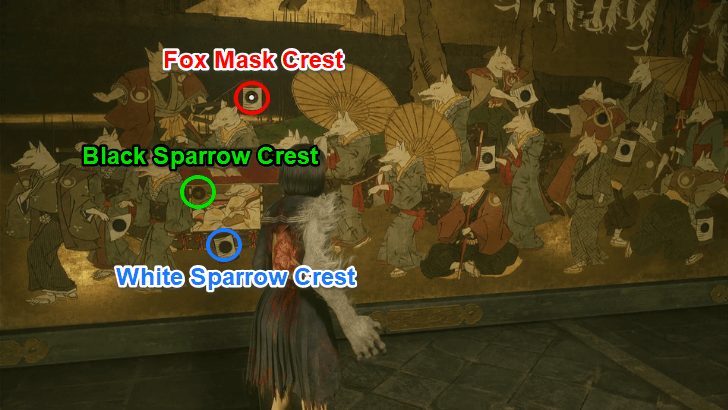
The primary clues can be found in the last two stanzas of the poem. The first clue you must take note of is the last two lines, mentioning that the Fox is leading the group and doesn't notice the two birds in conflict. This indicates that the Fox in the far left is where you must place the Fox Crest.
The second clue is in the third stanza, depicting that the two birds are in tension against one another. Place the White Sparrow in the lantern in the upper middle area, held by the Fox. On the other hand, the Black Sparrow is trying to take the White Bird, similar to the fox pulling the rope of the White Bird's lantern.
Coming Home to Roost (Normal Ending)
Fox's Wedding Ending Emblem Puzzle Solution
| Mural Arrangement |
|---|
 |
| Journal Entry |
|
Prove your intent with the crests three. Show what lies deep within your heart. Let the line of foxes guide you. Offer the crests and lay bare your soul. The Black Bird is in the cage at last. The satisfied Fox spreads his fan. The White Bird remains in a daze. All had been swept away as she slept. |
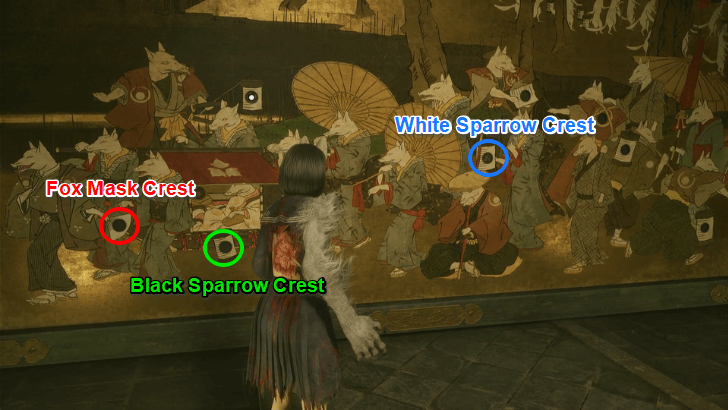
The solution for this ending is based on the last two stanzas of the poem. The easiest clue is in the satisfied Fox with the fan, which is the fox leading the group to the far left. The second clue is the white bird being asleep, similar to the fox sitting down. As it sleeps, the fox behind it is stealing the lantern. Place the White Bird on the middle lantern.
The hardest clue to figure out is about the black bird. While there is no explicit cage in the mural, you can place it inside the lantern held by the fox in the palanquin. This depicts that the bird is entrapped by all to see, fully guarded by the foxes.
The Fox Wets Its Tail Ending Emblem Puzzle Solution
| Mural Arrangement |
|---|
 |
| Journal Entry |
|
Prove your intent with the crests three. Show what lies deep within your heart. Let the line of foxes guide you. Offer the crests and lay bare your soul. The White Bird flies free from her cage. Her shadow follows close behind her. The Fox raises a lantern as he watches them fly away. There is nothing he can do now. |
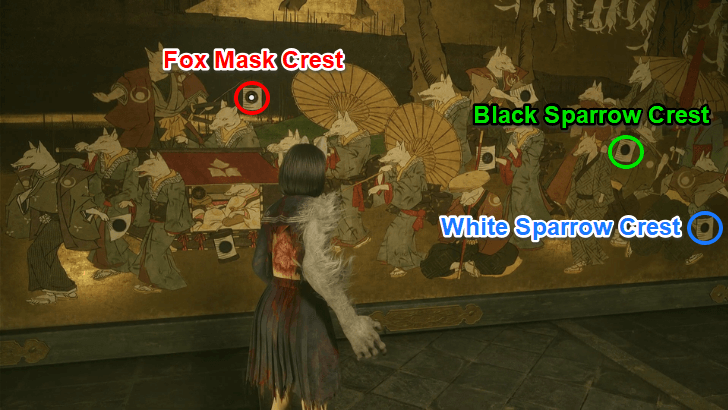
The third ending relies on the last two stanzas of the poem to complete the Mural. The third stanza mentions that the White Bird flies free from her cage with her shadow just behind her, similar to the only two Foxes running away from the group on the far right side. Place the White Sparrow in the lower-right fox and the Black Bird in the closest lantern to her left.
As for the Fox Mask Crest, the fourth stanza mentions that the Fox watches them but can do nothing to stop them. That would be the fox facing them raising the lantern on the left side above the palanquin. Place the Emblem inside the raised lantern.
The Fox Wets Its Tail (Good Ending)
Ebisugaoka in Silence Ending Emblem Puzzle Solution
| Mural Arrangement |
|---|
 |
| Journal Entry |
|
Prove your intent with the crests three. Show what lies deep within your heart. Let the line of foxes guide you. Offer the crests and lay bare your soul. Two chicks confide in one another in their shells. A Fox watches over them in the light of his lantern. Nobody knows when, or even if, the eggs will hatch. Not even the chicks themselves. |
The fourth ending's solution to this puzzle is a bit obscure, as there are no direct clues tied to the chicks in the mural. However, the main points to focus on are that the two birds must be together and the fox watches over them with his lantern.
The best position for the three emblems should be nearby each other, which is situated in the palanquin in the mural. While there are other pairs of foxes, they show no sign relating to the notion that the two chicks confiding in one another.
The fox in the palanquin has two holes near it, one on the ride itself and the other on the lantern, as if guarding the two together. Since the two confide in each other, place the White Sparrow in the lantern and the Black Sparrow in the palanquin so they face each other. Lastly, place the Fox Mask in the lantern above them.
Ebisugaoka in Silence (True Ending)
Fox Mural Emblem Puzzle Locations
| The Treasure Hall does not have any in-game map. Look for the Fox Statues with the Scrolls and Notes to reach the Crests and exit the area. |
1. Black Sparrow Emblem Location

The Black Sparrow Emblem can be found inside the Western Chambers of Dark Shrine Treasure Hall. This is the first accessible Crest and can be found at the end of the hallway upon entering the door the Fox statue with the Ornate Scroll is pointing to.
To open the box, you must defeat all enemies in the area. After retrieving the Emblem, the exit can be found to the east inside a hidden room blocked by an illusory wall. Activate the talisman to exit the area.
How to Use Black Sparrow Crest
2. White Sparrow Emblem Location

The White Sparrow Emblem is located inside the Southern Chambers of Dark Shrine Treasure Hall. Enter through the Southern door and look for notes that lead you to the Crest.
Once you reach the room, a Drum Monster will be defending the area alongside some Blade Legs Monsters. Defeat them to retrieve the White Sparrow Emblem. Do note that some enemies are hidden behind the illusory walls, which is why the box can't be opened.
How to Use White Sparrow Crest
3. Fox Mask Emblem Location
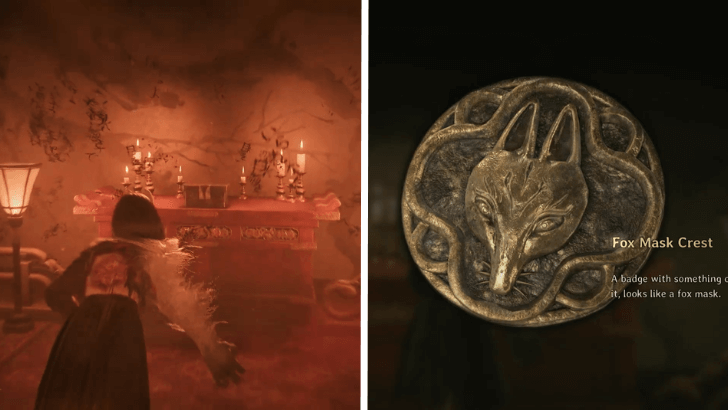
The Fox Mask Emblem is located in the Eastern Chambers of Dark Shrine Treasure Hall. Look for the Fox Statue with an arrow piercing its skin, as it will give you a Scroll of Welcome and point to the door that leads you to the Crest.
Be prepared before entering the room, as you will engage in combat against multiple enemies in a closed arena. Upon defeating the enemies, you can open the Box with a Sealed Talisman to trigger a cutscene and receive the Fox Mask Crest.
Mural Puzzle Location
Located in Dark Shrine Treasure Hall
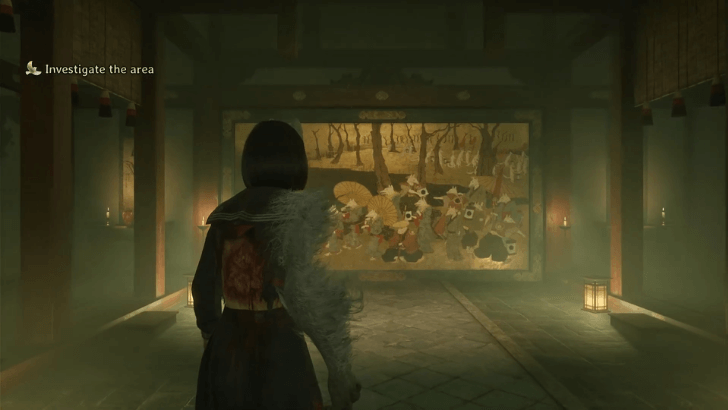
The Fox Mural Puzzle can be found in Dark Shrine Treasure Hall once you defeat your parents in the Shimizu Residence. After making your way through the long hallway, you will immediately encounter the puzzle.
Dark Shrine Treasure Hall Walkthrough
Mural Puzzle Rewards
Access to Ebisugaoka Corrupted (Fog Town)
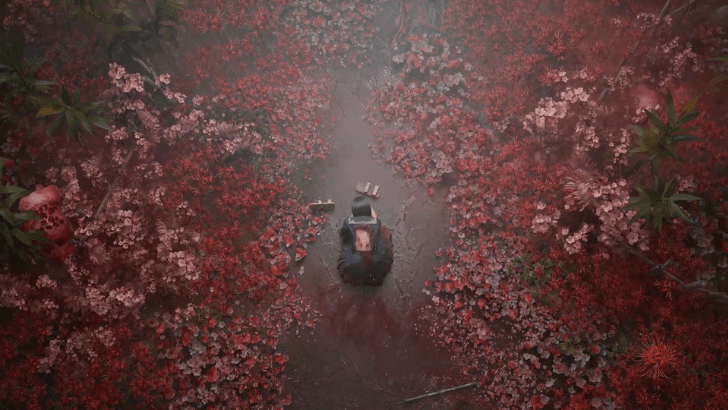
Completing the Fox Mural Puzzle gives you access to Ebisugaoka Corrupted (Fog Town). This is the next chapter of the main story after finishing the Dark Shrine Treasure Hall.
Ebisugaoka Corrupted (Fog Town) Guide
Silent Hill f Related Guides
Puzzle Guides
| All Lost in the Fog Puzzles and Codes |
List of All Puzzles
| Dark Shrine Path | |
|---|---|
| Altar Puzzle | Shrine Vault |
| Fields (Fog Town) | |
| Doctor's House | Field Puzzle |
| Middle School | |
| Stairwell Puzzle | Secret Box |
| Locker Code | |
| Worship Hall | |
| Door Puzzle | Light Puzzle |
| Cage Puzzle | Memories Puzzle |
| Main Hall | |
| Crimson Water Puzzle (New Game+) |
|
| Shimizu Residence | |
| Scales Puzzle | Ominous Photo |
| My Room Puzzle | |
| Treasure Hall | |
| Mural Puzzle | |
Comment
Author
Mural Puzzle Solution and Emblem Locations
Please participate in our site
improvement survey
03/2026
improvement survey
03/2026
Would you assist in
improving Game8's site?
improving Game8's site?

×
We are listening to our users' valuable opinions and discussing how to act on them.
The information collected through this survey will be used for the purpose of improving our services. In addition, the information will only be disclosed a part of a statistic in a format that will not allow identification of personal information.
Begin Survey
Not Now
×
Please rate each item regarding Game8.co's Advertisements.
Amount of Ads
Very Dissatisfied
Somewhat Dissatisfied
Fine
Somewhat Satisfied
Highly Satisfied
Placement of Ads
Timing of Ad Display
Ad Loading Speed
Safeness of Ads
Content of Ads
×
Please rate each item regarding Game8.co's Quality of Articles.
Amount of information
Very Dissatisfied
Somewhat Dissatisfied
Fine
Somewhat Satisfied
Highly Satisfied
Frequency of updates
Speed of new information
Accuracy of articles
Understandibility of articles
Readability of sentences
×
Please rate each item regarding Game8.co's Usability of the Site.
Ease of finding information
Very Dissatisfied
Somewhat Dissatisfied
Fine
Somewhat Satisfied
Highly Satisfied
Loading Speed
Use of Color
Font Size
Visibility of Images
Easy to Understand Layout
×
Please rate each item regarding Game8.co's Message Boards, Comments.
Ease of Writing
Very Dissatisfied
Somewhat Dissatisfied
Fine
Somewhat Satisfied
Highly Satisfied
Readability
Ease in Finding Information
Comment Quality
Comment Quantity
Admin Response
×
Please rate each item regarding Game8.co's Site's new design.
Please rate our site's new design
Very Dissatisfied
Somewhat Dissatisfied
Fine
Somewhat Satisfied
Highly Satisfied
Do you think that the website's design change makes the site easier to use?
Has the new design made it easier for you to find information on the site?
Has the new design improved the overall visual appeal of the site?
How would you rate your overall satisfaction with the new design of the site?
×
How likely are you to recommend Game8 to someone you know?
Very Unlikely
0
1
2
3
4
5
6
7
8
9
10
Very Likely
If you have other opinions regarding potential improvement to the website, please share them with us. We would appreciate your honest opinion.
Note: This is a free response section, so you can proceed without entering anything.
Note: Please be sure not to enter any kind of personal information into your response.
Note: Please be sure not to enter any kind of personal information into your response.
×
Thank You
×
Thank you for participating in our survey! Your answers will help us to improve the quality of our website and services.
We hope you continue to make use of Game8.
We hope you continue to make use of Game8.
Close
Rankings
- We could not find the message board you were looking for.
Gaming News


Popular Games

Genshin Impact Walkthrough & Guides Wiki
Honkai: Star Rail Walkthrough & Guides Wiki
Umamusume: Pretty Derby Walkthrough & Guides Wiki
Pokemon Pokopia Walkthrough & Guides Wiki
Resident Evil Requiem (RE9) Walkthrough & Guides Wiki
Monster Hunter Wilds Walkthrough & Guides Wiki
Wuthering Waves Walkthrough & Guides Wiki
Arknights: Endfield Walkthrough & Guides Wiki
Pokemon FireRed and LeafGreen (FRLG) Walkthrough & Guides Wiki
Pokemon TCG Pocket (PTCGP) Strategies & Guides Wiki


Recommended Games
Diablo 4: Vessel of Hatred Walkthrough & Guides Wiki
Fire Emblem Heroes (FEH) Walkthrough & Guides Wiki
Yu-Gi-Oh! Master Duel Walkthrough & Guides Wiki
Super Smash Bros. Ultimate Walkthrough & Guides Wiki
Pokemon Brilliant Diamond and Shining Pearl (BDSP) Walkthrough & Guides Wiki
Elden Ring Shadow of the Erdtree Walkthrough & Guides Wiki
Monster Hunter World Walkthrough & Guides Wiki
The Legend of Zelda: Tears of the Kingdom Walkthrough & Guides Wiki
Persona 3 Reload Walkthrough & Guides Wiki
Cyberpunk 2077: Ultimate Edition Walkthrough & Guides Wiki


All rights reserved
©2025 Konami Digital Entertainment
The copyrights of videos of games used in our content and other intellectual property rights belong to the provider of the game.
The contents we provide on this site were created personally by members of the Game8 editorial department.
We refuse the right to reuse or repost content taken without our permission such as data or images to other sites.