My Room Puzzle (Crest Puzzle) Guide
★ Endings: Normal | Bad | Good | True | UFO
★ Best: Difficulty | Settings | Weapons
┗ Omamori Tier List | Builds
★ Puzzles: My Room | Locker Code | Mural
★ Missables: Door & Box | Ema | Inventory Size
★ Beginner's Guide | Fox Mask | Lore Explained
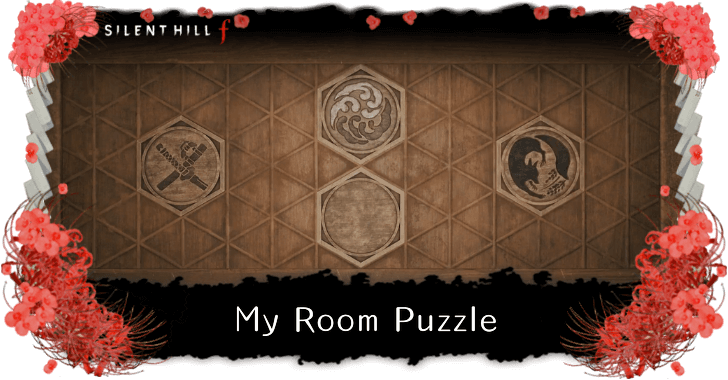
The My Room puzzle requires players to search for Crests around the Shimizu Residence to unlock Hinako's Room in Silent Hill f. Learn how to solve the My Room puzzle for all endings, where to find the Crests, how to unlock the My Room Crest puzzle, and all of its rewards here!
List of Contents
My Room Puzzle Solution
Crest Puzzle Solutions
| ▼ All Endings ▼ | |
|---|---|
| First Ending | Second Ending |
| Third Ending | Fourth Ending |
The My Room puzzle solutions differ based on which ending is being progressed. The Crest locations stay the same, however, regardless of Puzzle Difficulty.
Ending Guides and Explanations
My Room Puzzle Video Guide
While the solutions below provide a written guide on how to solve the Crest puzzle, watch our video above to see a step-by-step visual guide on how solve it for all difficulties!
Coming Home to Roost Ending Crest Puzzle Solution
| Crest Arrangement |
|---|
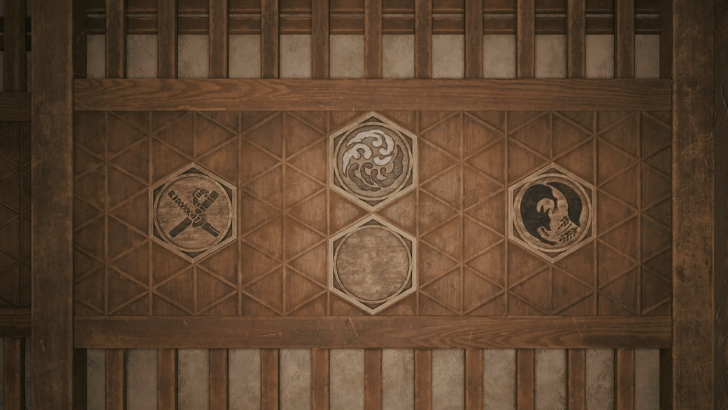 Top: Heavens Left: Swords Right: Fox Bottom: Blank (flip Scales) |
| Journal Entry |
|
The Sword and the Fox fought, battling upon a set of scales.
The heavens themselves shuddered at the ferocity of their struggle. Day after day, the sun rose behind the Fox's back and set behind the Sword's; yet their fight knew no end. The scales upon which they fought, however, were no more, having been destroyed long ago. |
The Journal Entries provide clues to the arrangement of the Crests. The first major clue is that the sun rises behind the Fox's back and sets behind the Sword's. You can set the position of the Heavens at the top, the Fox on the right side, and the Sword on the left side.
The second major clue is the scale, which is said to be no more due to it being destroyed. Flip the scale so it shows a blank tile and place it on the bottom to complete the puzzle.
Coming Home to Roost (Normal Ending)
Fox's Wedding Ending Crest Puzzle Solution
| Crest Arrangement |
|---|
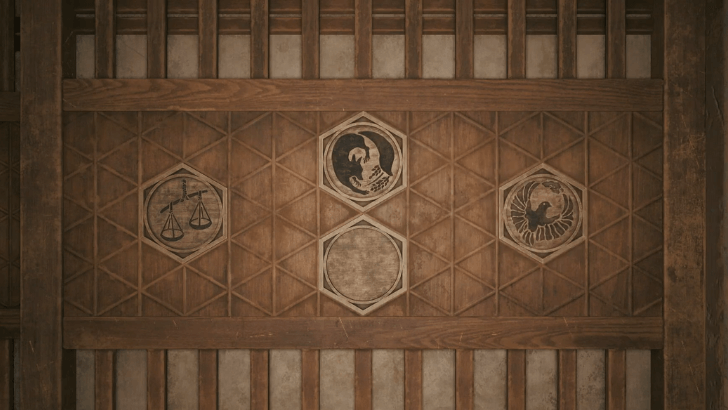 Top: Fox Left: Scales Right: Black Bird (flip Swords) Bottom: Blank (flip Heavens) |
| Journal Entry |
|
The Sword and the Fox fought, battling upon a set of scales.
After a long and vicious fight, the Sword was defeated, and the Fox reigned supreme. Taking the Black Bird's right hand, the Fox showed her the scales in his other hand. "Now, you must choose, Black Bird. Have you made a decision?" Upon one side of the scales was the Fox, and on the other, nothing. |
For the second ending, the positioning of the Crests is even more apparent. The first major clue is that the Fox reigns supreme, indicating it should be placed at the top tile. The second clue mentions that the Fox has a hold on the Black Bird's right hand. Since the Black Bird faces the player, its right hand faces to the left, so you can place it on the right tile.
The third clue states that the scales are in the fox's other hand, so the only spot is the left side. Lastly, the scales weigh the Fox on one side, and the other nothing, so the last Crest should be blank at the bottom.
The Fox Wets Its Tail Ending Crest Puzzle Solution
| Crest Arrangement |
|---|
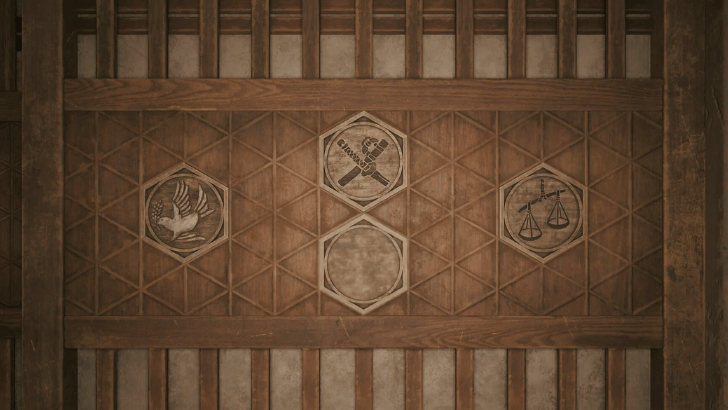 Top: Swords Left: White Bird Right: Scales Bottom: Blank (flip Heavens) |
| Journal Entry |
|
The Sword and the Fox fought, battling upon a set of scales.
After a long and vicious fight, the Fox fell to the Sword. In the aftermath, their seal upon the land vanished without a trace. The Sword raises itself heavenward, the scales now dedicated to the rising sun. "Now go, White Bird. Fly away and never come back!" The White Bird took to the air and flew towards the horizon, becoming a silhouette against the setting sun. Now, nothing remained upon the land. |
For the third ending, the relevant Crests are the Sword, White Bird, and Scales, as is stated in the clue.
The easiest lines to decipher are in the third and fifth stanzas, mentioning the positions of the three. With the Sword raised heavenward, it should be placed at the top. As the sun rises in the east and sets in the west, the Scales can be placed on the right and the White Bird on the left.
As for the bottom, two clues hint to it being blank. First, the Fox left no trace as it disappeared after its defeat against the Swords. Since its polar opposite is the Swords, it should be placed at the bottom. The second is the last line, which mentions that nothing is left in the land to be placed on the board.
The Fox Wets Its Tail (Good Ending)
Ebisugaoka in Silence Ending Crest Puzzle Solution
| Crest Arrangement |
|---|
 Top: Blank (flip Scales) Left: White Bird Right: Black Bird Bottom: Heavens |
| Journal Entry |
|
White and Black fought, battling upon a set of scales.
Yet neither wanted for the scales, for what they desired was simply a quiet, gray place where they could belong together. "Whether we flee or spread our wings and fly is our decision alone—one to make only once we are ready." They had no use for those who towered from the heavens, imposing their will on others. |
The solution for the fourth ending is quite easy to decipher as the only relevant Crests are the White Bird, Black Bird, and the Heavens.
The White and Black Birds are considered as opposites and are equal in stature. As such, they are placed in the middle section. The third line hints to their exact positions, as the keywords flee and spread our wings are shown by the White and Black Birds respectively, so the White should be on the left and the Black on the right.
The last line implies that the heavens should be placed at the bottom, since there can be nothing above the birds who are imposing their wills on others. Finally, the Crest at the top should be left blank for they desire not the scales, but a quiet place to rest.
Ebisugaoka in Silence (True Ending)
Where to Find the Crests in Shimizu Residence
- Scales Crest Puzzle Location
- White Bird and Fox Crest Puzzle Location
- Black Bird and Sword Crest Location
Scales Crest Puzzle Location
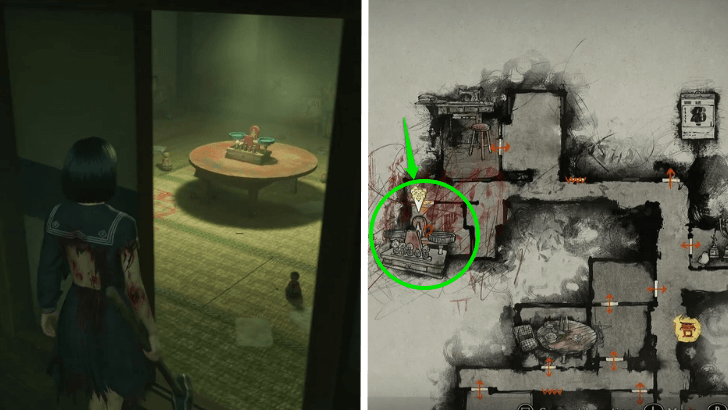
The Scales Crest is a reward for solving the Scales Puzzle in Shimizu Residence II. You can head to the upper-left portion of the area to find a half-closed door. Upon solving the Crest puzzle, the drawer will open and the Scale Crest revealed.
Scales Puzzle Solution and Guide
White Bird and Fox Crest Puzzle Location
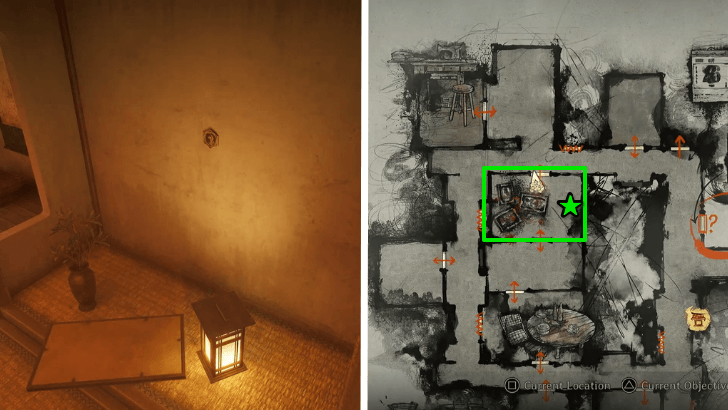
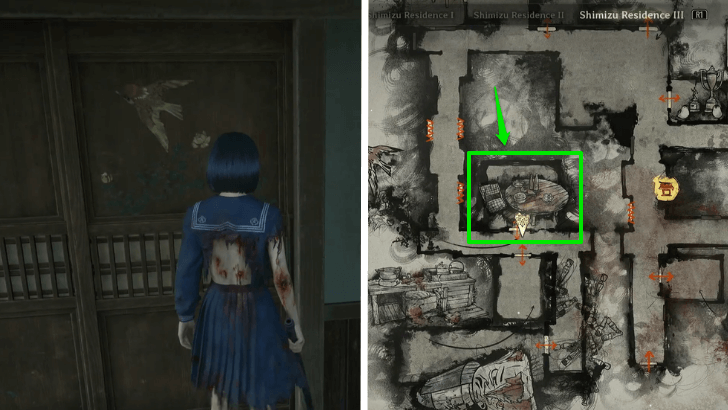
The White Bird and Fox Crest can be found behind a large picture frame from the Ominous Photo Puzzle in Shimizu Residence I. You must first retrieve Hinako's portrait and place it on the wall.
Change the orientations of the different photos in the Crest puzzle to complete it. Once you do, a picture frame will fall off the wall and the Crest can be collected.
How to Use White Bird and Fox Plate
Hinako's Portrait Location
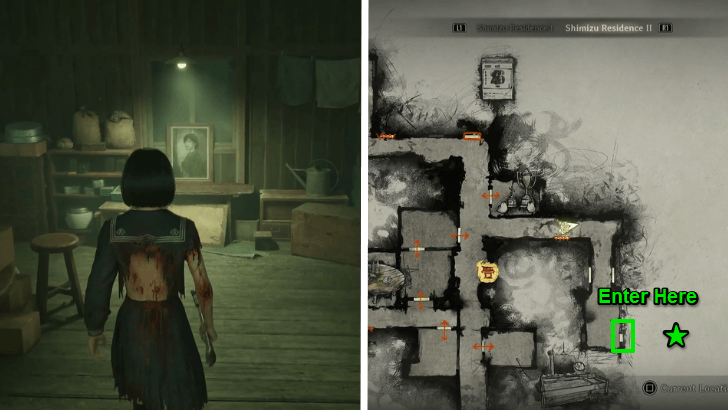
You can find Hinako's Portrait in Shimizu Residence II in the right-most room. You will pass by multiple long hallways before reaching the portrait room. An enemy will be on standby just outside of it.
Black Bird and Sword Crest Location
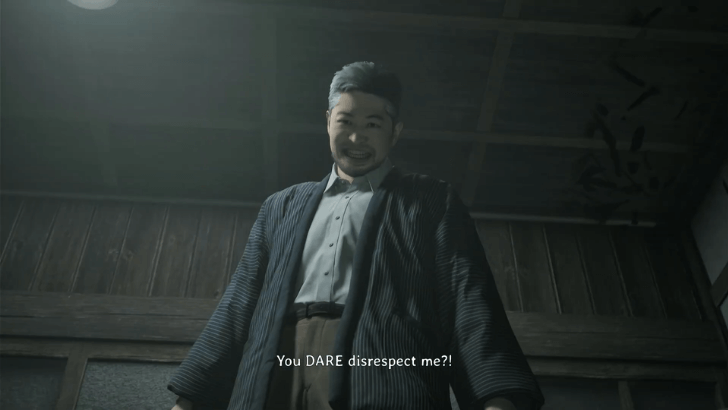
The Black Bird and Sword Crest is found in the room that requires the Fletching Key. It is found in Shimizu Residence III, where a short cutscene with Hinako's parents will be triggered.
How to Use Black Bird and Sword Plate
Fletching Key and Stove Location
| Fletching Key Location | Stove Location |
|---|---|
 |
 |
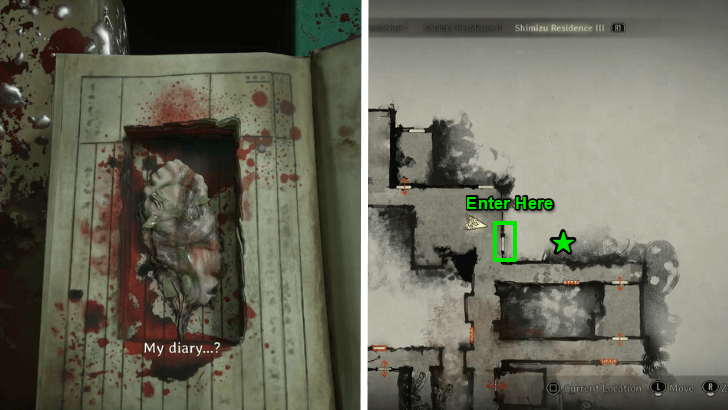
To get the key, you must search for Hinako's Diary in the bookshelf of the upper-right room in Shimizu Residence III. There, the Block of Wax item will be hidden inside the book.
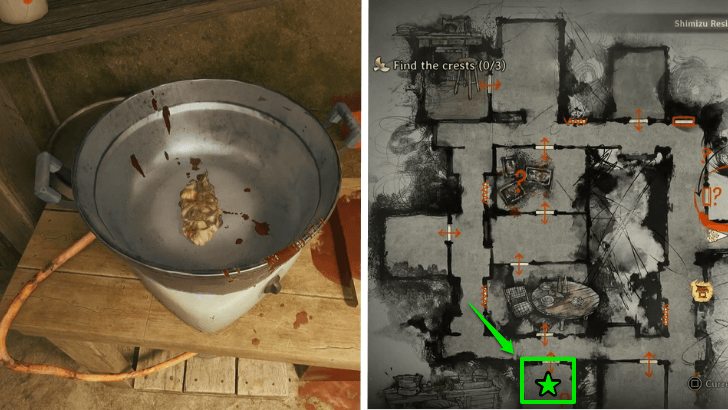
Melt it with the pan and stove in Shimizu Residence I to retrieve the Fletching Key.
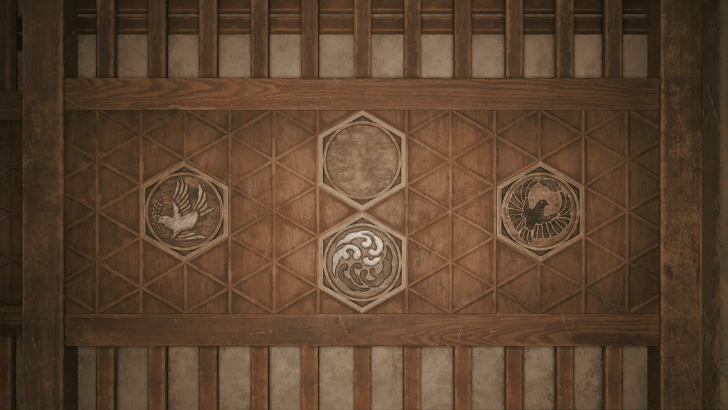
My Room Puzzle Location
Located in Shimizu Residence
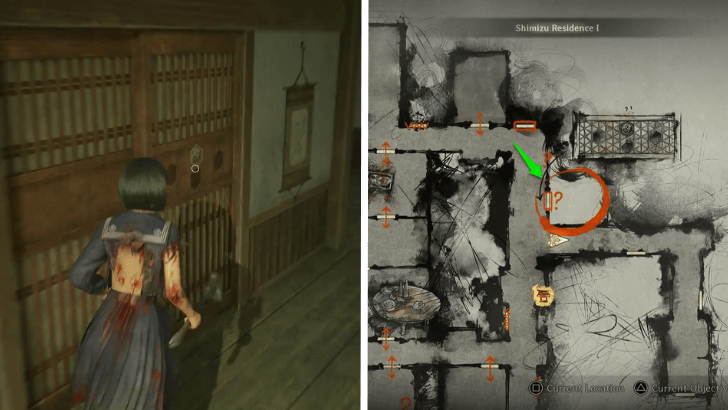
The My Room Puzzle can be found in Shimizu Residence I. You must first complete the other Crest puzzles in the area to solve this one and open Hinako's room.
My Room Puzzle Rewards
Pine Tree Emblem
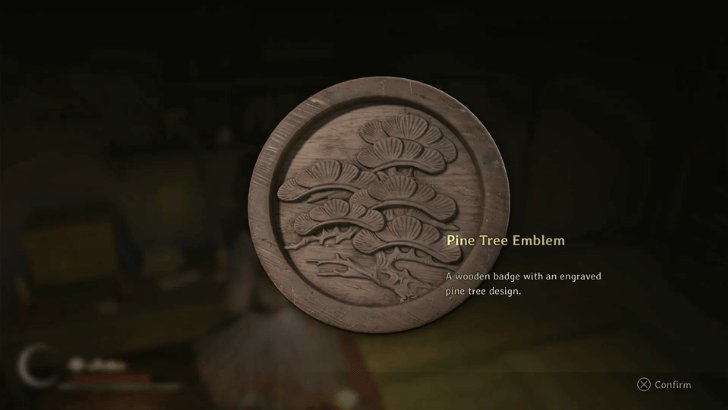
The Pine Tree Emblem will be found inside Hinako's Room. You can use this on the door with the missing emblem to unlock it and access the unknown area.
Access to Hinako's Parents Boss Fight
The door where you insert the Pine Tree Emblem leads to a boss fight with Hinako's transformed parents. This is a required boss fight to leave the nightmare and return to Ebisugaoka.
Hinako's Parents Boss Fight Guide
Silent Hill f Related Guides
Puzzle Guides
| All Lost in the Fog Puzzles and Codes |
List of All Puzzles
| Dark Shrine Path | |
|---|---|
| Altar Puzzle | Shrine Vault |
| Fields (Fog Town) | |
| Doctor's House | Field Puzzle |
| Middle School | |
| Stairwell Puzzle | Secret Box |
| Locker Code | |
| Worship Hall | |
| Door Puzzle | Light Puzzle |
| Cage Puzzle | Memories Puzzle |
| Main Hall | |
| Crimson Water Puzzle (New Game+) |
|
| Shimizu Residence | |
| Scales Puzzle | Ominous Photo |
| My Room Puzzle | |
| Treasure Hall | |
| Mural Puzzle | |
Author
My Room Puzzle (Crest Puzzle) Guide
Rankings
- We could not find the message board you were looking for.
Gaming News


Popular Games

Genshin Impact Walkthrough & Guides Wiki
Umamusume: Pretty Derby Walkthrough & Guides Wiki
Crimson Desert Walkthrough & Guides Wiki
Monster Hunter Stories 3: Twisted Reflection Walkthrough & Guides Wiki
Honkai: Star Rail Walkthrough & Guides Wiki
Pokemon Pokopia Walkthrough & Guides Wiki
The Seven Deadly Sins: Origin Walkthrough & Guides Wiki
Wuthering Waves Walkthrough & Guides Wiki
Zenless Zone Zero Walkthrough & Guides Wiki
Arknights: Endfield Walkthrough & Guides Wiki


Recommended Games
Fire Emblem Heroes (FEH) Walkthrough & Guides Wiki
Diablo 4: Vessel of Hatred Walkthrough & Guides Wiki
Cyberpunk 2077: Ultimate Edition Walkthrough & Guides Wiki
Yu-Gi-Oh! Master Duel Walkthrough & Guides Wiki
Super Smash Bros. Ultimate Walkthrough & Guides Wiki
Pokemon Brilliant Diamond and Shining Pearl (BDSP) Walkthrough & Guides Wiki
Elden Ring Shadow of the Erdtree Walkthrough & Guides Wiki
Monster Hunter World Walkthrough & Guides Wiki
The Legend of Zelda: Tears of the Kingdom Walkthrough & Guides Wiki
Persona 3 Reload Walkthrough & Guides Wiki


All rights reserved
©2025 Konami Digital Entertainment
The copyrights of videos of games used in our content and other intellectual property rights belong to the provider of the game.
The contents we provide on this site were created personally by members of the Game8 editorial department.
We refuse the right to reuse or repost content taken without our permission such as data or images to other sites.
This has got to be one of the worst guides I have tried to follow in my entire life trying to 100% a video game. Not only are there so many errors, everything you need to do in-between the chapters for all the collectibles are at the bottom of the guide thus causing you to potentially miss it your first run, this fucking guide was written by an autistic person or something cause holy shit.