Best Omamori Tier List
★ Endings: Normal | Bad | Good | True | UFO
★ Best: Difficulty | Settings | Weapons
┗ Omamori Tier List | Builds
★ Puzzles: My Room | Locker Code | Mural
★ Missables: Door & Box | Ema | Inventory Size
★ Beginner's Guide | Fox Mask | Lore Explained
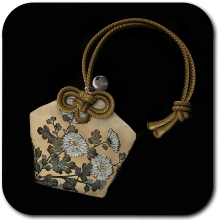
Here is a tier list of all the best Omamori in Silent Hill f. See ratings for all the Omamori and the best Omamori to equip here!
| Omamori Guides | |
|---|---|
| Best Omamori | All Omamori |
Silent Hill f Best Omamori Tier List
Omamori Tier List
| Tier | Omamori | |||
|---|---|---|---|---|
|
|
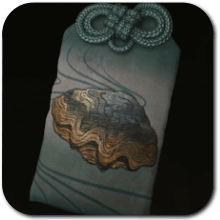
 Boar Boar Boar Greatly increases Stamina recovery speed and greatly shortens Out of Breath duration.
|
 Crow Crow Crow Slightly restores Health after defeating enemies.
|
 Spider Spider Spider Greatly decreases weapon durability consumption from performing Light Attack.
|
 Hawk Hawk Hawk Greatly decreases Focus charging time.
|
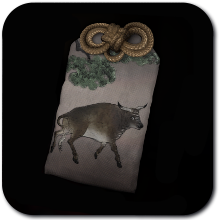 Bull Bull Bull Greatly decreases Stamina consumed by Heavy and Charged Attacks.
|
 Serpent Serpent Serpent Will automatically perform a Counter when the visual hint appears, but consumes Max Sanity when activated. When equipping, Sanity will also recover at a slower rate.
|
- | - | |
|
|
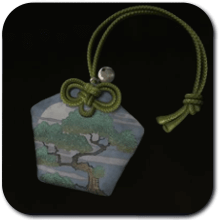 Pine Pine Pine Increases Max Health.
|
 Plum Plum Plum Increases Max Stamina.
|
 Kudzu Leaf Kudzu Leaf Kudzu Leaf Increases Max Health, Sanity, and Stamina.
|
 Mantis Mantis Mantis Slightly restores Health after each successful Counter.
|
 Sakura Sakura Sakura Enhances the effects of Health restoring items and Omamoris.
|
 Owl Owl Owl Greatly decreases Sanity consumption while using Focus.
|
 Suzuran Suzuran Suzuran Perfect Dodges become easier to perform.
|
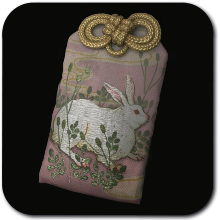 Rabbit Rabbit Rabbit Press Heavy Attack immediately after performing a Perfect Dodge to deal a powerful Counter. This Counter greatly consumes Stamina.
|
|
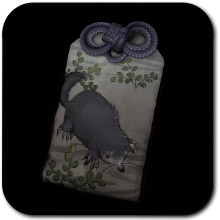
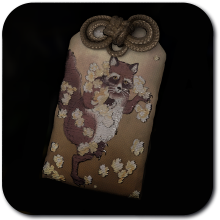 Tanuki Tanuki Tanuki Turns physical damage received into Sanity damage.
|
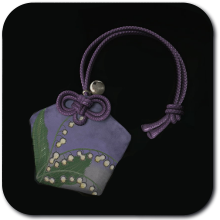
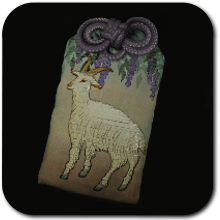 Goat Goat Goat Take less damage when facing multiple enemies. Scales with the number of enemies.
|
- | - | |
|
|
 Blessed Hand Mirror Blessed Hand Mirror Blessed Hand Mirror When taking fatal damage from normal attacks, this mirror will break instead. Health, Sanity, and Stamina will be fully restored.
|
 Horse Horse Horse Greatly decreases the amount of Stamina consumed when sprinting in fights.
|
 Wolf Wolf Wolf Deals additional damage when using weapons with high durability. Effective only for weapons with durability.
|
 Bamboo Bamboo Bamboo Increases Max Sanity.
|
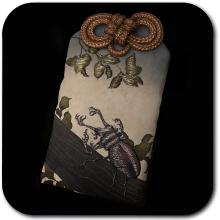 Beetle Beetle Beetle Greatly increases damage inflicted to stunned enemies.
|
 Weasel Weasel Weasel Greatly increases damage dealt by normal attacks, but Hinako will no longer be able to stun enemies.
|
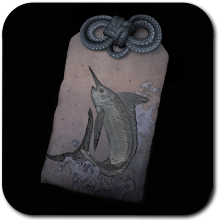 Swordfish Swordfish Swordfish After countering an attack, Stamina will not be consumed for a set time.
|
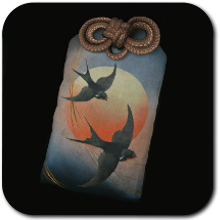 Swallow Swallow Swallow Performing a Counter without using Focus increases damage inflicted. Stacks up to 5 times and resets when damage is taken.
|
|
 Shrew Mole Shrew Mole Shrew Mole Dodging does not consume Stamina while in a near-death state.
|
 Crab Crab Crab Weapon durability will not decrease while using Focus.
|
 Otter Otter Otter Restores spare weapons' durability upon defeating an enemy.
|
 Whale Whale Whale When using a restorative item, you will not be interrupted by normal attacks.
|
|
 Willow Willow Willow Enhances the effects of items and Omamoris that restore Sanity.
|
 Cuckoo Cuckoo Cuckoo Greatly increases damage inflicted while in a near-death state.
|
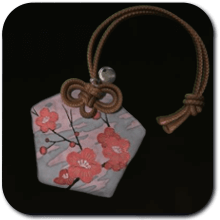
 Peony Peony Peony Slightly restores Health upon picking up food items.
|
- | |
|
|
 Camel Camel Camel Decreases current Max Sanity consumed by Charged Attacks.
|
 Turtle Turtle Turtle Greatly decreases damage taken at full Health.
|
 Cat Cat Cat Greatly decreases the damage taken while dodging.
|
 Butterfly Butterfly Butterfly Greatly decreases Stamina consumed by Dodging, but you are unable to continuously Dodge.
|
 Bear Bear Bear Greatly increases stun power when weapon durability is low.
|
 Clam Clam Clam Decreases enemy line of sight.
|
 Hound Hound Hound Slightly restores current Max Sanity after defeating enemies.
|
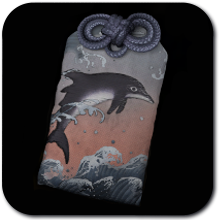 Dolphin Dolphin Dolphin Slightly restores current Max Sanity after a Perfect Dodge.
|
|
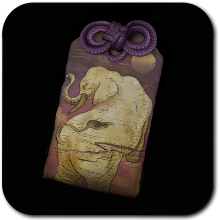 Elephant Elephant Elephant Prevents Staggering from normal attacks, but greatly increases damage taken.
|
 Daisy Daisy Daisy Sanity and Stamina are unlimited, but Hinako will die instantly from any physical damage.
|
- | - | |
This Tier List is continously being updated as we encounter more Omamori in our playthrough. Placements for the Omamori is subjected to change as we explore what Silent Hill f has to offer!
Tier List Criteria
Tier List Ranking Explanation
| S-tier Omamoris have benefits that are useful at nearly any stage of the game. It can alleviate the difficulty of both combat and exploration when equipped, regardless if players are at the Dark Shrine or in Ebisugaoka. | |
| A-Tier Omamoris have passive effects that strong, but may vary in usefulness depending on player skill and preference. These are the general options to pick from if an Omamori slot is available. | |
| B-Tier Omamoris are strong but niche, largely fluctuates in usefulness depending on location and playstyle. While nice to have, these aren't a priority to equip unless a free slot is available. | |
| C-Tier Omamoris have passives that are both weak and niche. These Omamoris are largely situational, and are easily circumvented with proper gameplay. |
Tier List Explanation by Rank
| Omamori by Tier | |||
|---|---|---|---|
S-Tier Omamori
| Omamori | Effect and Explanation |
|---|---|
|
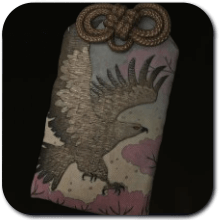
Hawk
|
Effect: Greatly decreases Focus charging time.
• Enables an easier execution of Focus attacks against bosses and mobs. • Allow players to execute more Focus Attacks when an enemy is staggered for more damage. |
|
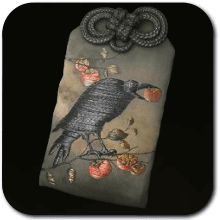
Crow
|
Effect: Slightly restores Health after defeating enemies.
• Alleviates pressure in healing, especially at higher Action difficulties where consumables are scarce. • Useful in exploration where mobs are common for easy heals. |
|
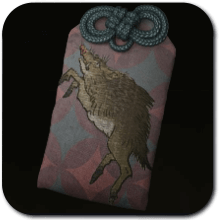
Boar
|
Effect: Greatly increases Stamina recovery speed and greatly shortens Out of Breath duration.
• Good to have as most actions uses Stamina. • Lessen the Out of Breath duration, allowing you to act more. |
|
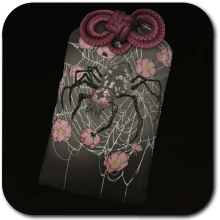
Spider
|
Effect: Greatly decreases weapon durability consumption from performing Light Attack.
• Lets you fight more outside of the Dark Shrine as it lessen the durability cost to use a weapon. |
|
Bull
|
Effect: Greatly decreases Stamina consumed by Heavy and Charged Attacks.
• Lets you spam Heavy and Charged attacks easier. • These are among the stronger attacks in game, translating to a damage output increase. |
|
Serpent
|
Effect: Will automatically perform a Counter when the visual hint appears, but consumes Max Sanity when activated. When equipping, Sanity will also recover at a slower rate.
• Automatic counters work to both protect you from damage and deal damage in retaliation. • Costs Sanity, so can hamper Focus usage in battle. |
A-Tier Omamori
| Omamori | Effect and Explanation |
|---|---|
|
Mantis
|
Effect: Slightly restores Health after each successful Counter.
• There's less risk in dodging an attack than relying on Counters for heals. • Powerful to have in boss fights for skilled players. |
|
Plum
|
Effect: Increases Max Stamina.
• Increased Stamina offer more opportunities to dodge or attack. • Generally useful to have equipped, but not a necessity. |
|
Pine
|
Effect: Increases Max Health.
• Increased Health directly boosts survivability. • Generally useful to have equipped, but not a necessity. |
|
Sakura
|
Effect: Enhances the effects of Health restoring items and Omamoris.
• Can work in tandem with Crow or Mantis for less pressure in survivability. • Increased heal amount indirectly reduces item consumption, especially useful in higher Action difficulties. |
|
Owl
|
Effect: Greatly decreases Sanity consumption while using Focus.
• Great option to equip when reliant on Focus attacks to deal damage. |
|
Suzuran
|
Effect: Perfect Dodges become easier to perform.
• Makes Perfect Dodging easier, leading to more restored Stamina. • Performance still relies on player skill and preference. |
|
Kudzu Leaf
|
Effect: Increases Max Health, Sanity, and Stamina.
• Increases all of Hinako's resources, making this very generally useful. • Not a necessity, but good to have around. |
|
Rabbit
|
Effect: Press Heavy Attack immediately after performing a Perfect Dodge to deal a powerful Counter. This Counter greatly consumes Stamina.
• Grants Hinako a high-damage attack. • Requires Perfect Dodge to trigger, and you have to manage your Stamina due to its consumption. |
|
Goat
|
Effect: Take less damage when facing multiple enemies. Scales with the number of enemies.
• Good to have around when facing swarms of small mobs. • Also relevant in boss fights that have summons, but less relevant in those without any. |
|
Tanuki
|
Effect: Turns physical damage received into Sanity damage.
• Allows your Sanity to act as a second HP bar. • Consumes Sanity, which can hamper Focus usage in combat. |
B-Tier Omamori
| Omamori | Effect and Explanation |
|---|---|
|
Wolf
|
Effect: Deals additional damage when using weapons with high durability. Effective only for weapons with durability.
• Weapons have no durability at the Dark Shrine, losing its effect. • Toolkits are uncommon and weapons easily wear down, losing reliable uptime. |
|
Horse
|
Effect: Greatly decreases the amount of Stamina consumed when sprinting in fights.
• Combat does not generally make use of the Sprint mechanic. |
|
Blessed Hand Mirror
|
Effect: When taking fatal damage from normal attacks, this mirror will break instead. Health, Sanity, and Stamina will be fully restored.
• Powerful, but crippled by its consumable status. |
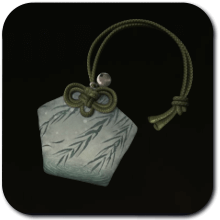
|
Bamboo
|
Effect: Increases Max Sanity.
• Increased Sanity lets you utilize Focus more. • Generally useful to have equipped, but not a necessity. |
|
Crab
|
Effect: Weapon durability will not decrease while using Focus.
• Lets you use more Focus attack without much loss to durability. • Only ever useful late game and most boss encounters are in Dark Shrine where weapons don't have durability. |
|
Willow
|
Effect: Enhances the effects of items and Omamoris that restore Sanity.
• Can be good to use if you use Focus attack often. • Generally useful to have but not really a necessity. |
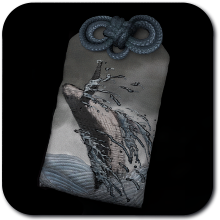
|
Whale
|
Effect: When using a restorative item, you will not be interrupted by normal attacks.
• Makes healing more consistent due to the interrupt resist. • Does not actually increase healing potency. |
|
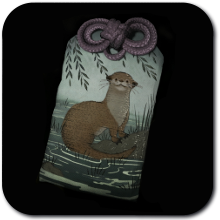
Otter
|
Effect: Restores spare weapons' durability upon defeating an enemy.
• Allows you to cycle through weapons and sustain their durability between enemies. • Does not work in the Dark Shrine due to weapons having no durability there. |
|
Cuckoo
|
Effect: Greatly increases damage inflicted while in a near-death state.
• High-risk, high-reward omamori that boosts damage, but requires low HP. |
|
Shrew Mole
|
Effect: Dodging does not consume Stamina while in a near-death state.
• Can be used as an emergency fallback that allows you to spam dodges or sprint away to heal. |
|
Swallow
|
Effect: Performing a Counter without using Focus increases damage inflicted. Stacks up to 5 times and resets when damage is taken.
• Provides a damage buff that can be stacked. • Requires both not getting hit and landing counters to be effective. |
|
Beetle
|
Effect: Greatly increases damage inflicted to stunned enemies.
• Works well as you generally want to hit stunned enemies. • Not effective against enemies that resist being stunned. |
|
Swordfish
|
Effect: After countering an attack, Stamina will not be consumed for a set time.
• Can allow for brief bursts unlimited stamina. • Requires countering attacks to trigger. |
|
Weasel
|
Effect: Greatly increases damage dealt by normal attacks, but Hinako will no longer be able to stun enemies.
• Good generic damage increase. • Not being able to stun enemies means no clear windows for attacks. |
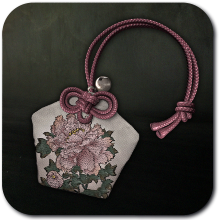
|
Peony
|
Effect: Slightly restores Health upon picking up food items.
• Good to use when you're lacking in heals. • Not that useful considering it's not often you find food items. |
C-Tier Omamori
| Omamori | Effect and Explanation |
|---|---|
|
Clam
|
Effect: Decreases enemy line of sight.
• Players can simply sneak or run past enemies without relying on its effects. |
|
Hound
|
Effect: Slightly restores current Max Sanity after defeating enemies.
• Sanity heal isn't useful as it automatically restores to full out of combat at any difficulty. |
|
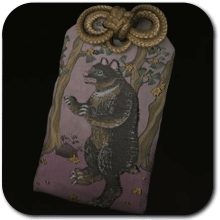
Bear
|
Effect: Greatly increases stun power when weapon durability is low.
• Low durability requirement means the high stun will only be available for a few hits before a weapon breaks. |
|
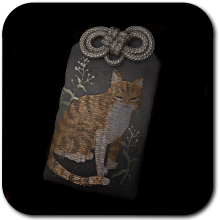
Cat
|
Effect: Greatly decreases the damage taken while dodging.
• Can help reduce the risk of mistimed dodges. • There are better options for survivability. |
|
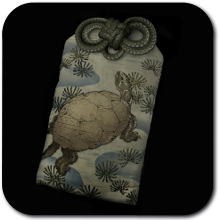
Turtle
|
Effect: Greatly decreases damage taken at full Health.
• Becomes more effective the more powerful the mitigated attack is. • There are more consistent options for survivability that do not rely on full HP. |
|
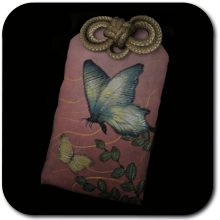
Butterfly
|
Effect: Greatly decreases Stamina consumed by Dodging, but you are unable to continuously Dodge.
• Requires precise dodging to be effective. • Runs into issues when fighting enemies with lengthy attacks. |
|
Camel
|
Effect: Decreases current Max Sanity consumed by Charged Attacks.
• Generally helpful effect, but is outclassed by the Bull omamori. |
|
Dolphin
|
Effect: Slightly restores current Max Sanity after a Perfect Dodge.
• May be helpful in extended combat, but Sanity is easy to come by in all difficulties. |
|
Elephant
|
Effect: Prevents Staggering from normal attacks, but greatly increases damage taken.
• Allows you to keep attacking through enemy attacks. • Makes your survivability very fragile. |
|
Daisy
|
Effect: Sanity and Stamina are unlimited, but Hinako will die instantly from any physical damage.
• Specialized omamori that requires the user to not get hit at all, or risk instant death. |
Silent Hill f Related Guides

Guides by Category
| Silent Hill f Categories | |
|---|---|
 Chapters Chapters |
 Puzzles Puzzles |
 Endings Endings |
 Bosses Bosses |
 Enemies Enemies |
 Omamori Omamori |
 Weapons Weapons |
 Items Items |
 Tips and Tricks Tips and Tricks |
 Characters Characters |
 Costumes Costumes |
 Interactive Map Interactive Map |
 News News |
- |
Recommended Guides
 New Game Plus Guide
 All Missables and Points of No Return
 All Ema Locations
 All Inventory Size Upgrade Locations
 All Hokora Shrine Locations: How to Save
 All Lost in the Fog Puzzles and Codes
 How to Get Faith
 All Final Bosses
 All Jizo Statue Locations
 How to Open Sakuko's Mailbox
 Combat Guide and Tips
 All Inari-sama Door and Box Locations
 List of All Journal Entries
 Speedrun Guide
 All Secrets and Easter Eggs
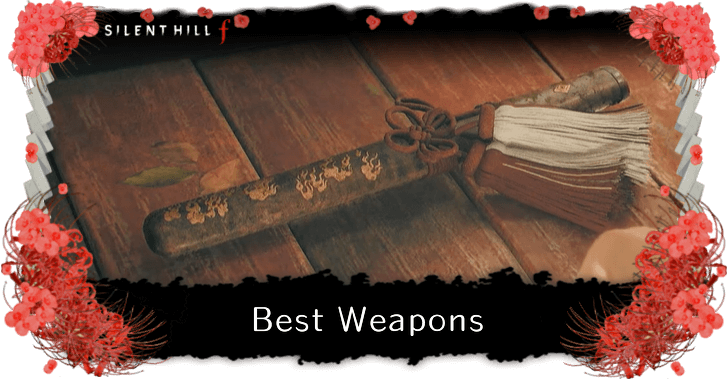 Best Weapons
 Best and Recommended Settings
 Difficulty Differences and Best Difficulty Settings
 Best Builds
 List of Pray Abilities - Best Upgrades
 Best Ending
 Time Period
 Story Explained
 Wedding Massacre Explained
 Kudzu Explained
 Who Is the Doll?
 Why Is Hinako a Traitor?
 Is White Claudia in the Red Capsule?
 Is SHf Multiplayer?
 List of Voice Actors
 What is SHf's Gameplay?
 How Long to Beat
 Are There Guns?
 List of Known Bugs and Issues
 Bonus Content
 What Does f Stand For?
 Trophy and Achievements Guide
 Untouchable Trophy Guide
 No One Left Behind Trophy Guide
 Sly Like the Fox Trophy Guide
 Where Are You Going? Trophy Guide
 O Divine Tree Trophy Guide
 Good Intentions Trophy Guide
 Agile Escape Trophy Guide
 Omamori Sage Trophy Guide
Comment
Definitely. It’s kind of unbelievable they’d consider it “niche” when Otter almost completely negates the most bothersome mechanic in the game for its portions. Who cares if it doesn’t apply to the dark world that still transforms the gameplay of a little over half the game.
Author
Best Omamori Tier List
Rankings
- We could not find the message board you were looking for.
Gaming News


![Marathon Cryo Archive Map Teased as [REDACTED] on Selection Screen](https://img.game8.co/4442236/6357203e58172f6de57f1991e7c39b22.png/thumb)


Popular Games

Genshin Impact Walkthrough & Guides Wiki
Umamusume: Pretty Derby Walkthrough & Guides Wiki
Pokemon Pokopia Walkthrough & Guides Wiki
Honkai: Star Rail Walkthrough & Guides Wiki
Monster Hunter Stories 3: Twisted Reflection Walkthrough & Guides Wiki
Arknights: Endfield Walkthrough & Guides Wiki
Wuthering Waves Walkthrough & Guides Wiki
Zenless Zone Zero Walkthrough & Guides Wiki
Pokemon TCG Pocket (PTCGP) Strategies & Guides Wiki
Monster Hunter Wilds Walkthrough & Guides Wiki


Recommended Games
Diablo 4: Vessel of Hatred Walkthrough & Guides Wiki
Cyberpunk 2077: Ultimate Edition Walkthrough & Guides Wiki
Fire Emblem Heroes (FEH) Walkthrough & Guides Wiki
Yu-Gi-Oh! Master Duel Walkthrough & Guides Wiki
Super Smash Bros. Ultimate Walkthrough & Guides Wiki
Pokemon Brilliant Diamond and Shining Pearl (BDSP) Walkthrough & Guides Wiki
Elden Ring Shadow of the Erdtree Walkthrough & Guides Wiki
Monster Hunter World Walkthrough & Guides Wiki
The Legend of Zelda: Tears of the Kingdom Walkthrough & Guides Wiki
Persona 3 Reload Walkthrough & Guides Wiki


All rights reserved
©2025 Konami Digital Entertainment
The copyrights of videos of games used in our content and other intellectual property rights belong to the provider of the game.
The contents we provide on this site were created personally by members of the Game8 editorial department.
We refuse the right to reuse or repost content taken without our permission such as data or images to other sites.
I have to agree that the ranking given to Otter is just flat out wrong. It's incredibly useful. Also, show some consistency, will you. You're counting the fact weapons don't have durability in the Dark Shrine against Otter, but not against Spider. It's a problem for both of them, or it isn't a problem for either of them.