Worship Hall Walkthrough and Guide
★ Endings: Normal | Bad | Good | True | UFO
★ Best: Difficulty | Settings | Weapons
┗ Omamori Tier List | Builds
★ Puzzles: My Room | Locker Code | Mural
★ Missables: Door & Box | Ema | Inventory Size
★ Beginner's Guide | Fox Mask | Lore Explained
This is a full Worship Hall walkthrough for Silent Hill f. See how to find Sakuko, how to find the missing object, Shu's prized possession locations, how to open the locked door, all Worship Hall puzzle solutions, and more here!
| ◀︎ Previous Area | Next Area ▶︎ |
|---|---|
| Middle School | Mountain Path |
Worship Hall Walkthrough
- Find a Way to Open the Locked Door
- Explore Inside
- Find Sakuko
- Obtain the Key in Front of the Cage
- Return to the Grand Hall
- Find the Missing Object to Fit in the Device
- Return to the Grant Hall and Proceed to the Inner Room
- Find Shu's Prized Possessions
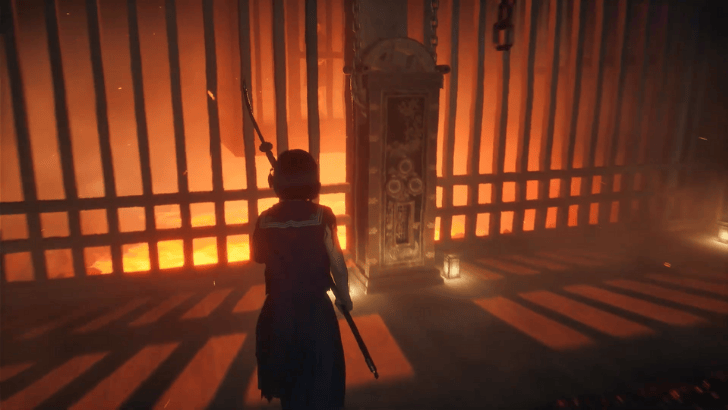
1. Find a Way to Open the Locked Door
Follow Fox Mask down the hallway, who closes the Sacred Door in front of you. To open the locked door, interact with the right Inari statue and enter the Eastern Chambers where Sakuko will be found.
2. Explore Inside
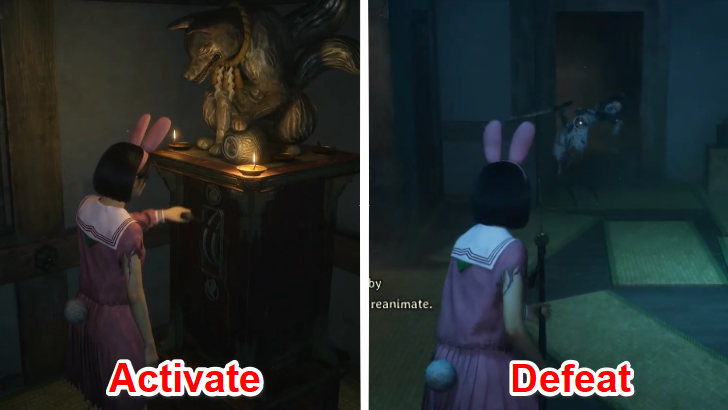
Upon entering the Eastern Chambers, interact with the statue in the corner of the room to switch its active color to blue. This unlocks the door on the opposite side, allowing a Blade Legs Monster to rush in and attack.
Defeat it within the room’s protection, as the evil-warding lantern will prevent the monster from ever respawning here. You can recognize other safe zones similar to this within the Dark Shrine areas by their blue glow, and enemies marked with blue specks of light will not respawn once defeated within these areas.
3. Find Sakuko (Solve the Doors Puzzle)
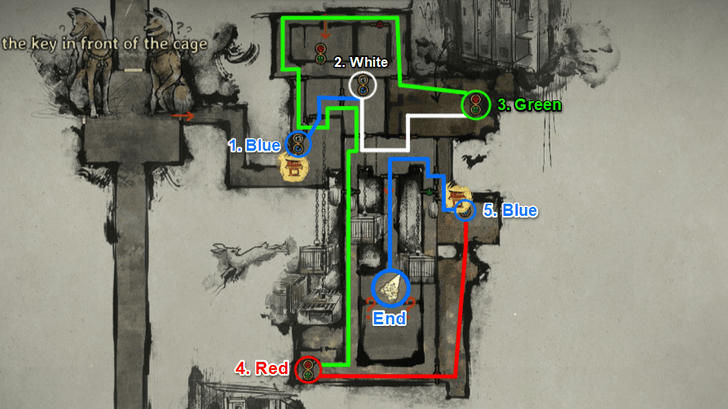
To find Sakuko, pull the lever switches attached to various statues matching the colored symbols on each locked door. Start in the room with the Hokora by switching the first statue to blue, then proceed through the rooms. Switch the second statue to white, the third statue to green, then loop back into the first room to head south.
Change the fourth statue to red, then go north-east to switch the fifth statue to blue. This sequence unlocks the path outside and the central door where you will find Sakuko trapped at the end of the hall, past the cages.
Door Puzzle Solution and Guide
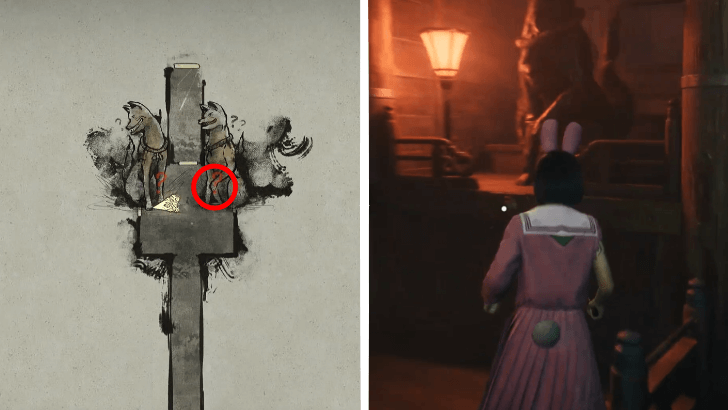
4. Obtain the Key in Front of the Cage (Solve the Light Puzzle)
| Story | 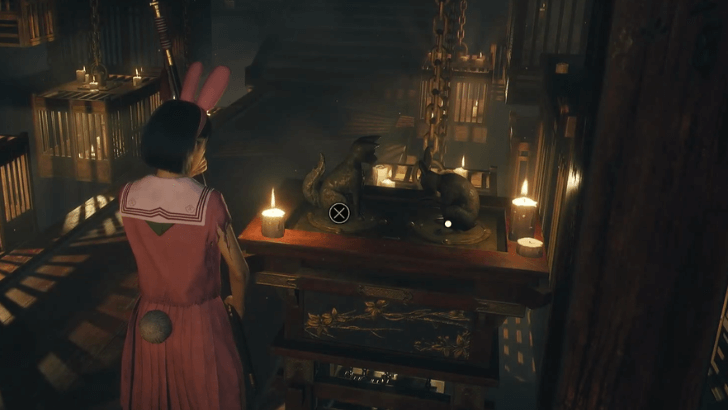 Fox (E) - Rabbit (W) - Fox (E) - Rabbit (W) Fox and Rabbit face each other |
|---|---|
| Hard | 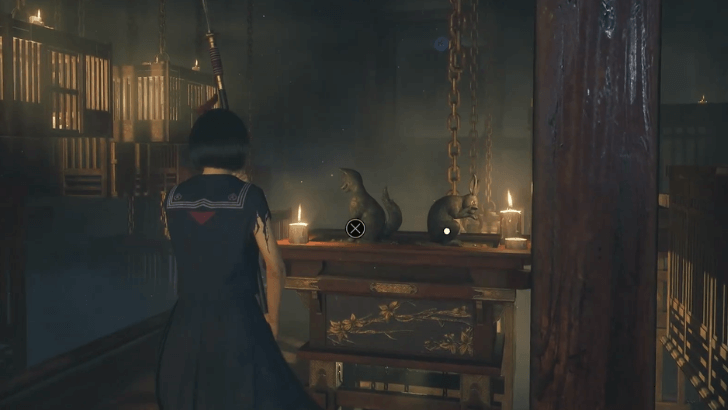 Fox (W) - Rabbit (E) - Fox (W) - Rabbit (E) Fox and Rabbit face away from each other |
| Lost in the Fog | 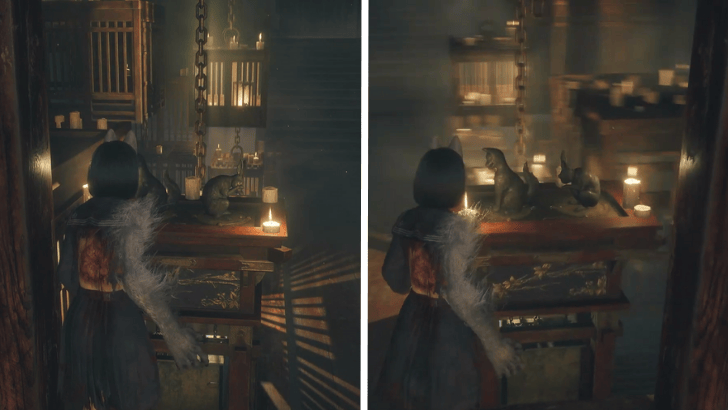 Fox (W) - Rabbit (E) - Fox (W) - Rabbit (W) Left: Fox and Rabbit face away from other Right: Fox and Rabbit Face to the left |
Directional Legends: W = West, E = East
According to the Journal, align the Fox and Rabbit sculptures facing each other on Story difficulty, or turn them away from each other on Hard difficulty. As for the Lost in the Fog difficulty, the left Fox and Rabbit pair must be facing away from each other, while the ones on the right side are both facing the left.
This levels and opens the suspended cages, allowing you to collect the Restrain and Talon Lampshades. Place these shades on the lamps on either side of the offering table in front of Sakuko’s cell to obtain the White Rabbit Emblem Key.
Light Puzzle Solution and Guide
5. Return to the Grand Hall
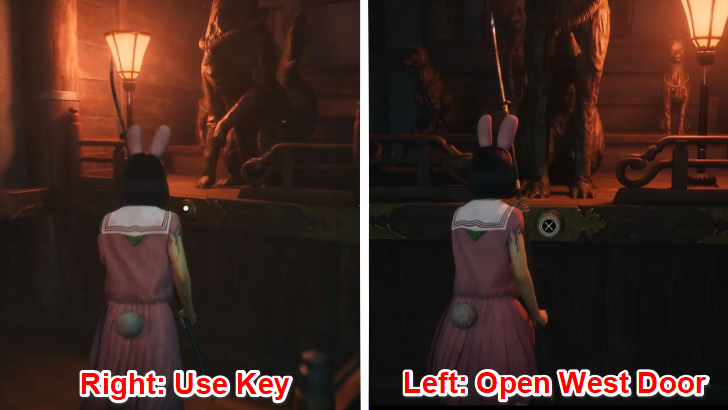
Return to the Grand Hall and use the White Rabbit Emblem Key on the Inari statue to the right of the Sacred Door. This opens the first door, revealing another locked one behind it.
Then, interact with the Inari statue on the left side to unlock the western chambers, where you’ll find Rinko trapped in a suspended cage above a pool of lava.
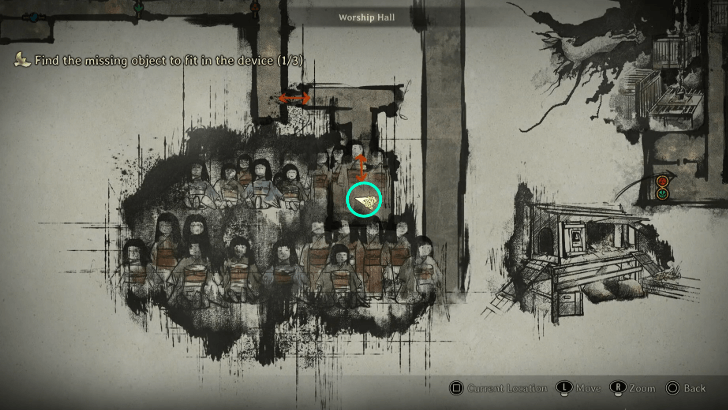
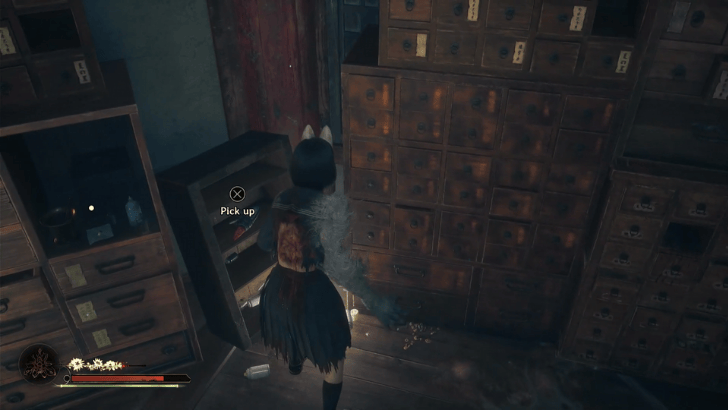
6. Find the Missing Object to Fit in the Device
In front of Rinko’s cage is a cabinet with three circular slots. To progress the area, you’ll need to collect the three objects that fit into these slots. These objects are crests that can be found within the rooms at the western wing of Rinko’s location.
Find the Three Missing Objects
| How to Find the Three Missing Objects | |
|---|---|
| 1 |  Pull the lever on the fox statue to the left of the cabinet and turn it green. This opens the southern corner door which you need to go through, then head into the middle room. Switch the statue there to white, then loop around to the far east side to reach the classroom. |
| 2 | 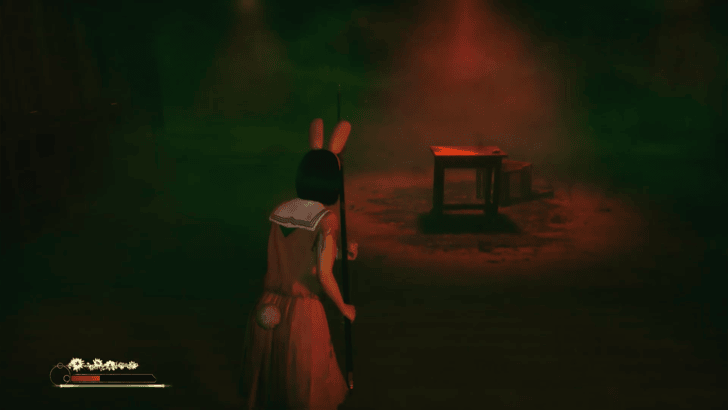 Interact with the blue lamp on the teacher’s podium to shift the scenery. Then, check the lone desk in the center to obtain the Forward-Facing Fox Crest. A Blade Legs Monster will appear afterwards, which you can either defeat or dodge, then exit through the only door to return to Rinko’s cell where multiple enemies await. |
| 3 | 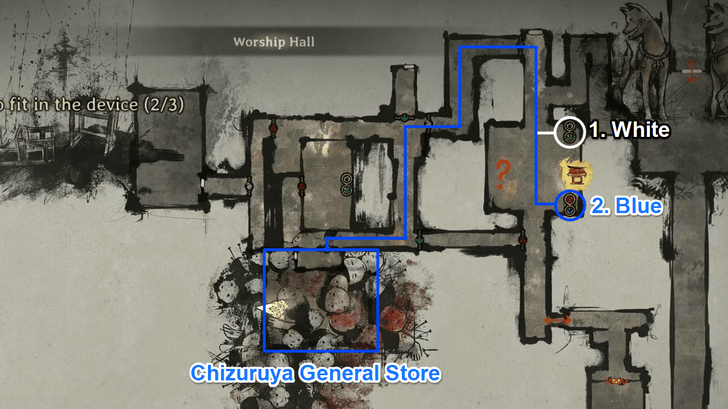 Switch the fox statue on the left to white, then switch the fox statue on the right to blue. This will give you a clear path leading from the northern doorway, all the way down to the Chizuruya General Store room. |
| 4 | 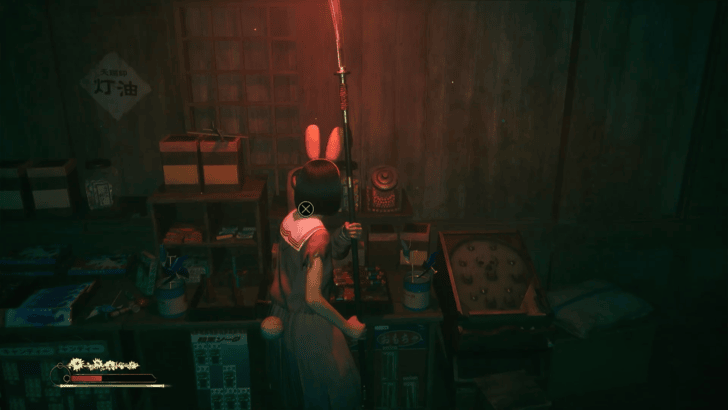 Find the Leftward-Facing Fox Crest behind a pink candy jar on a shelf at the western side of the shop, then exit the room to land back at Rinko's cell. |
| 5 | 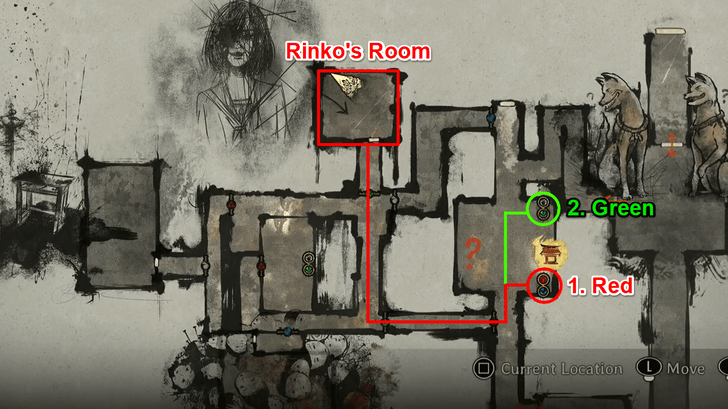 Switch the fox statue on the right to red, then switch the fox statue's color on the left to green. Afterwards, head through the southern passageway and walk through the open gates leading north to find Rinko's room. |
| 6 | 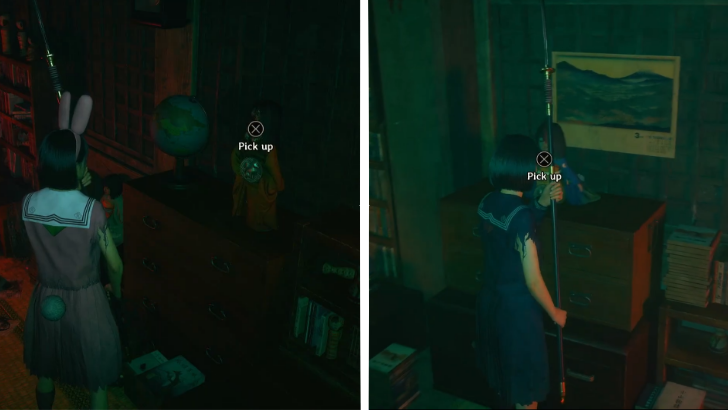 Interact with the blue lamp on Rinko's study desk to shift the scenery. Depending on your puzzle difficulty, the Rightward-Facing Fox Crest can be found behind the red doll in Story difficulty, while it's located behind the blue doll on Hard difficulty. Exit the room to find yourself back at Rinko's cell. |
| 7 | 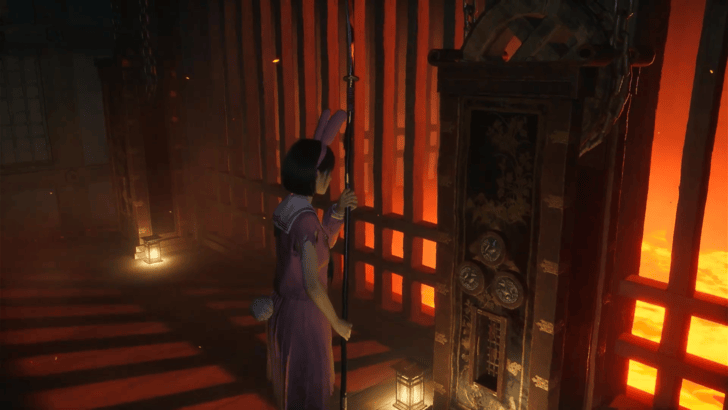 |
Get the Swallow Omamori in New Game+
| Map Location | World Location |
|---|---|
 |
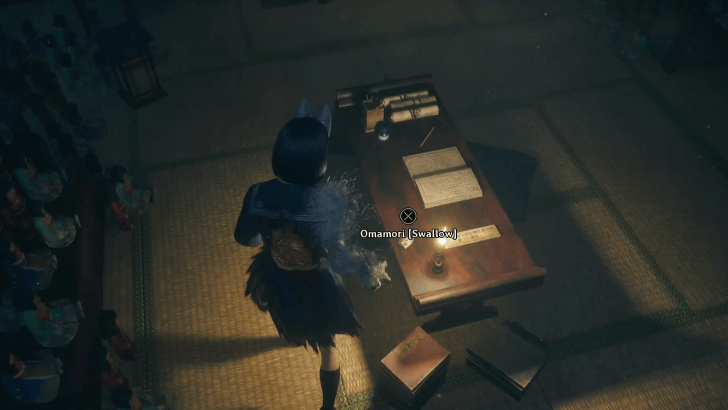 |
The Swallow Omamori can be found in the Western Chambers during a New Game+ playthrough. Head south to find an Inari door with the item, an Ema, and a few collectible documents.
7. Return to the Grand Hall and Proceed to the Inner Room

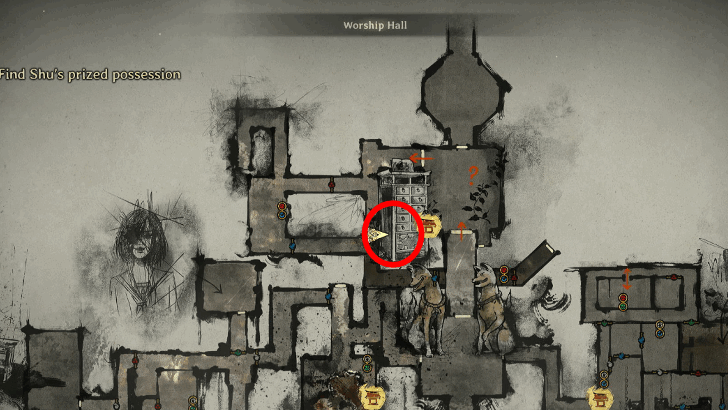
Go back to the Grand Hall, in front of the Sacred Door, and use the Tri Scale Emblem Key on the Inari Statue at the left. This will open the final door leading into the inner room, where six pedestals line either side, bearing objects that Shu treasures most.
8. Find Shu's Prized Possessions
| Item | Map View | World View | |
|---|---|---|---|
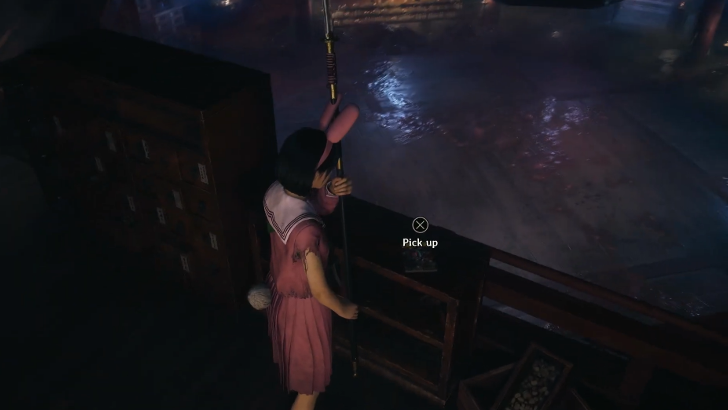
| 1 | Brainiac Hero Comic | 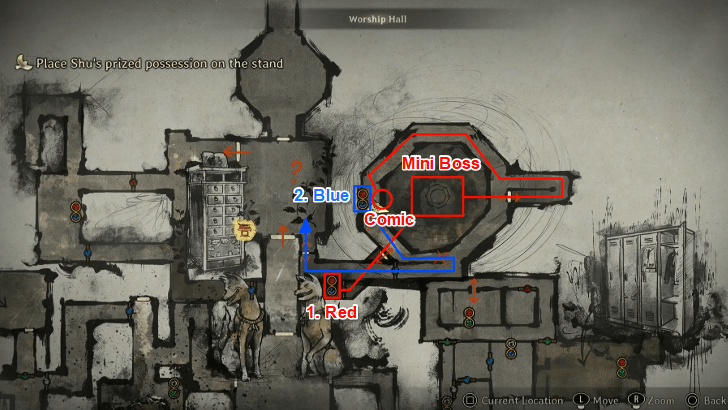 |
 |
| 2 | Drawing of a Young Shimizu Hinako | 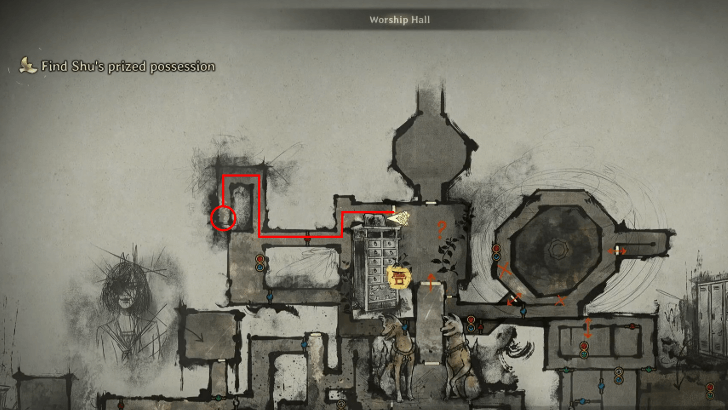 |
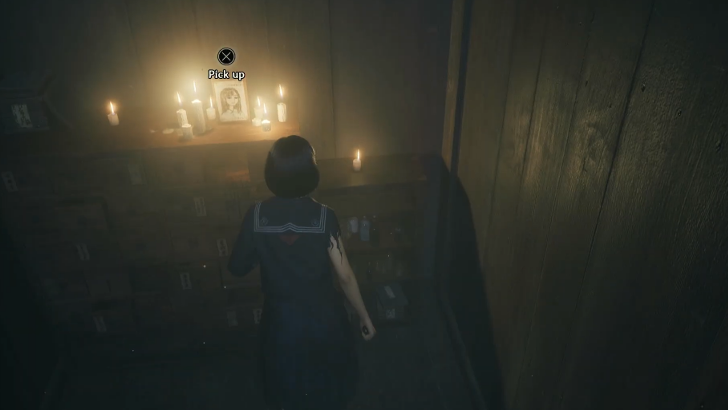 |
| 3 | Raygun |  |
 |
The number of Shu’s possessions required for the Memories Puzzle depends on your chosen difficulty. On Story, you’ll only need to recover the Brainiac Hero Comic which is located by the railing on the floor above the mini-boss arena. As for the other difficulties, you must also search for the Drawing item on Hard, with Lost in the Fog requiring all 3 possessions.
Once obtained, place the items on the corresponding empty pedestals to complete the puzzle. Doing so will trigger a cutscene that concludes this section and transports Hinako back to Ebisugaoka Middle School, where she awakens.
Memories Puzzle Solution and Guide
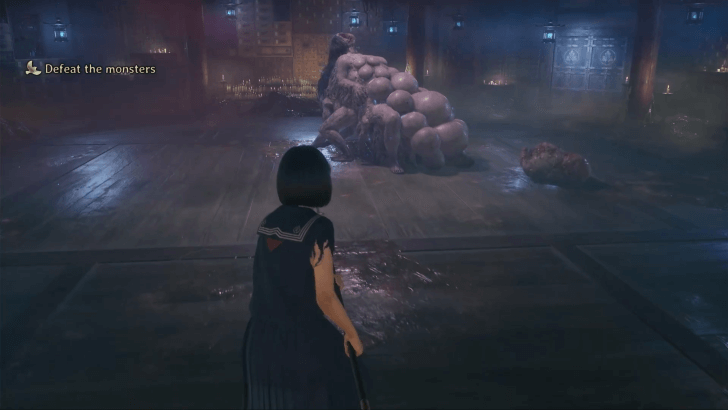
Defeat the Birthing Monster
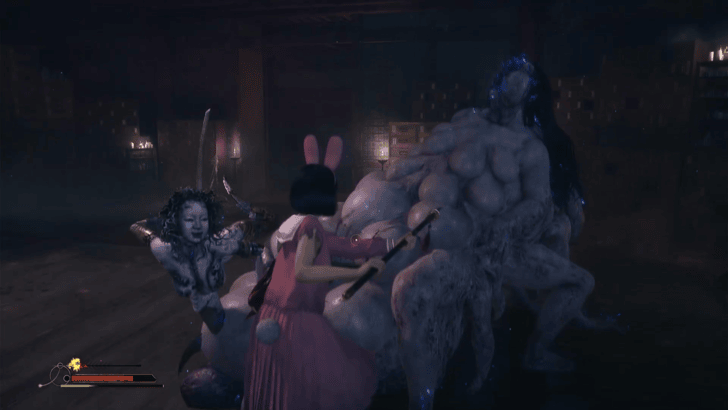
The Birthing Monster is a formidable mini-boss first encountered while searching for one of Shu’s prized possessions in the eastern chamber. It can spawn additional threats like the Blade Legs Monster, but you can destroy its cocoons before they hatch to stay in control.
The monster itself attacks with a ranged spit and a powerful melee tackle, so keep your distance, dodge often, and strike back with your Naginata whenever an opening appears.
Birthing Monster Boss Fight Guide
Worship Hall Puzzles
All Puzzles in Dark Shrine Worship Hall
| Puzzle | Description |
|---|---|
| Door Puzzle | Activate switches to open doors that will lead you to the Worship Hall East Room. |
| Light Puzzle | Change the direction where statues are facing to adjust the hanging cages' heights and obtain the lampshades. |
| Cage Puzzle | Find the three objects in the Worship Hall and fit it inside the device in front of the cage. |
| Memories Puzzle | Locate Shu's prized possessions within the Dark Shrine's halls and place it on the appropriate pedestals. |
Worship Hall Bosses and Enemies
Boss Enemy: Birthing Monster
| Birthing Monster Information | |
|---|---|
 |
|
| Description | A monster covered in swollen, skin-crawling mounds. As each one pulses, it spawns more and more horrors. What a vile show of life. I'd rather die than turn into a monster like this. |
A grotesque monster that deals both ranged and melee attacks. Keep watch of its movements and proactively destroy every cocoon it births in order to prevent more enemies from appearing in the stage!
All Enemies in Dark Shrine Worship Hall
|
|
|
|
The Blade Legs Monster, Oi-Omoi, and Shackled Monster will be frequently seen around the winding hallways of the Dark Shrine Worship Hall. Stay vigilant and either slay or flee from them!
Worship Hall Collectibles/Missables
All Hidden Omamori Locations
| Omamori | Overworld | Map |
|---|---|---|
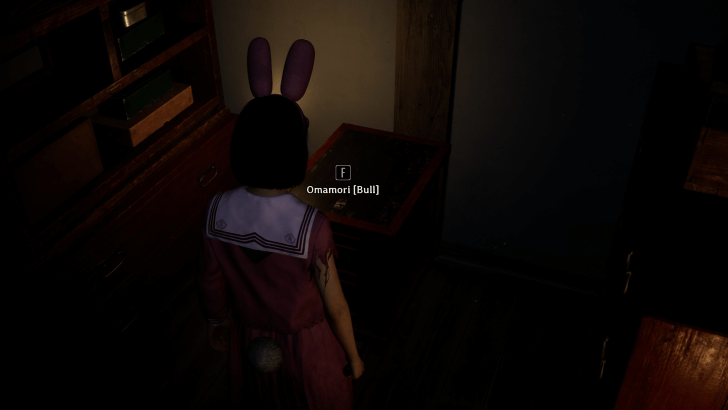
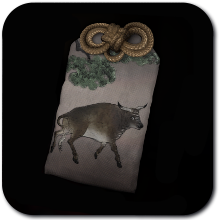 Bull Bull |
 |
 |
| Complete the Light Puzzle tied to Sakuko at the Worship hall, then return to where the lockers are. | ||
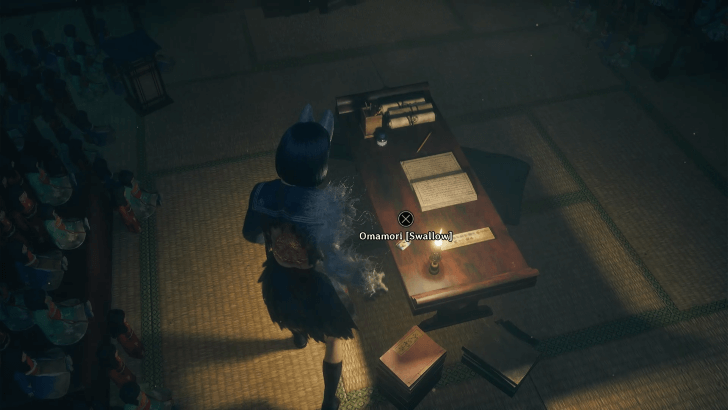
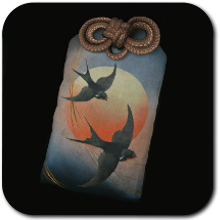 Swallow Swallow |
 |
 |
| Located in a new area south of Rinko's cage in the Dark Shrine Worship Hall. The room only opens during NG+. | ||
All Inari-sama Door and Box Locations
| NG+ Worship Hall Inari-sama Door | |
|---|---|
 |
|
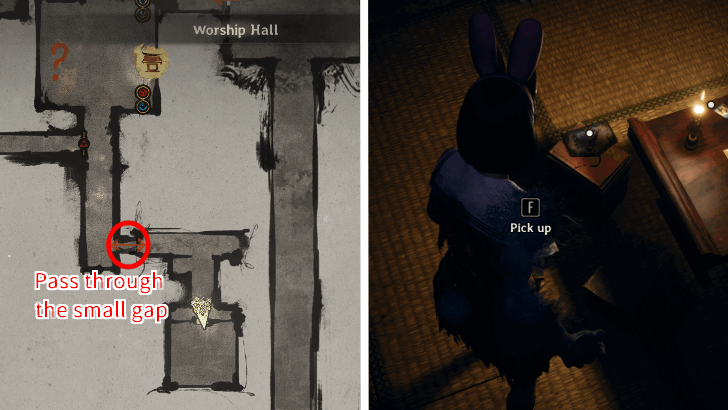
| Location | Found near Rinko's cage. Go south from the Hokora Shrine in Rinko's cage and pass through the small gap to reach the sealed door. |
All Inari-sama Door and Box Locations
All Ema Locations
| Run | Overworld | Map |
|---|---|---|
| 1st Run | 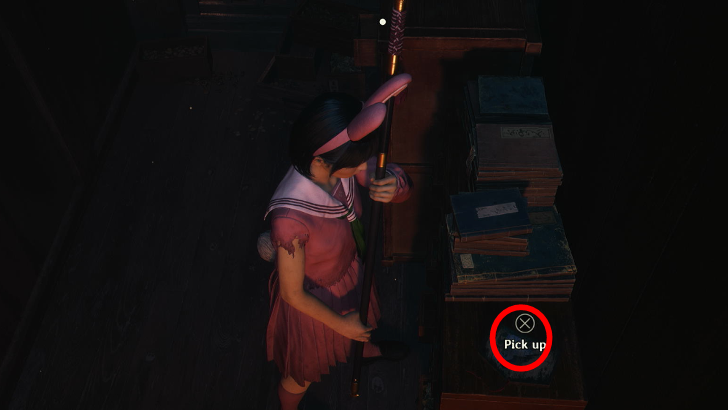 |
 |
| Found on top of the books which requires to obtain White Emblem Rabbit Key + The Tri Scale Emblem Key to access the area. | ||
| NG+ Only | 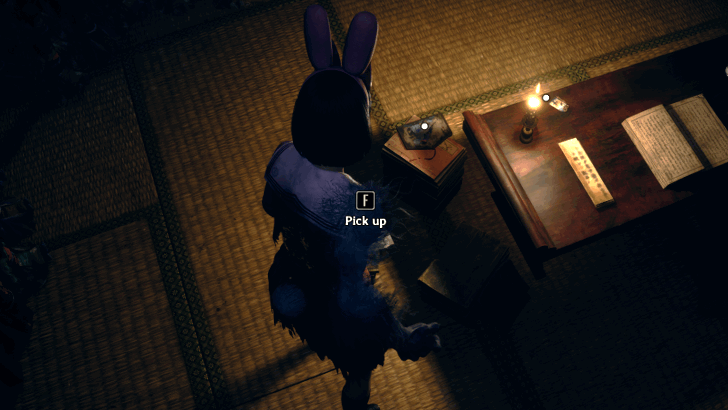 |
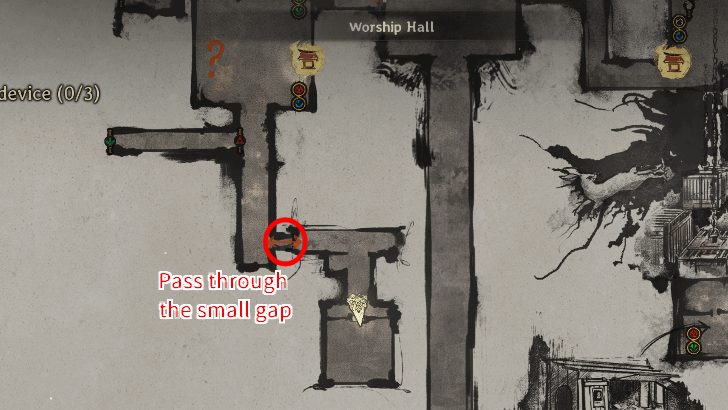 |
| Located inside the Inari-sama Door in the Worship Hall. Head south from the Hokora Shrine and pass through the small gap to reach the sealed door. | ||
Silent Hill f Related Guides

All Chapter Guides and Walkthrough
All Story Chapters
| Silent Hill f Story Walkthrough Chapters | |
|---|---|
| 1 | Ebisugaoka |
| 2 | Shrine Path |
| 3 | Fields (Fog Town) |
| 4 | Corridors |
| 5 | Alleyways (Fog Town) |
| 6 | Middle School |
| 7 | Worship Hall |
| 8 | Mountain Path |
| 9 | Main Hall |
| 10 | Shimizu Residence |
| 11 | Treasure Hall |
| 12 | Corrupted Fog Town |
| 13 | Dark Shrine Final Path |
Author
Worship Hall Walkthrough and Guide
Rankings
- We could not find the message board you were looking for.
Gaming News

![Death Stranding 2: On The Beach [PC] Review | A Port That Delivers](https://img.game8.co/4447392/15310a0c9aa1b6843bb713b2ea216930.jpeg/show)


Popular Games

Genshin Impact Walkthrough & Guides Wiki
Umamusume: Pretty Derby Walkthrough & Guides Wiki
Crimson Desert Walkthrough & Guides Wiki
Monster Hunter Stories 3: Twisted Reflection Walkthrough & Guides Wiki
Honkai: Star Rail Walkthrough & Guides Wiki
Pokemon Pokopia Walkthrough & Guides Wiki
The Seven Deadly Sins: Origin Walkthrough & Guides Wiki
Wuthering Waves Walkthrough & Guides Wiki
Zenless Zone Zero Walkthrough & Guides Wiki
Arknights: Endfield Walkthrough & Guides Wiki


Recommended Games
Fire Emblem Heroes (FEH) Walkthrough & Guides Wiki
Diablo 4: Vessel of Hatred Walkthrough & Guides Wiki
Cyberpunk 2077: Ultimate Edition Walkthrough & Guides Wiki
Yu-Gi-Oh! Master Duel Walkthrough & Guides Wiki
Super Smash Bros. Ultimate Walkthrough & Guides Wiki
Pokemon Brilliant Diamond and Shining Pearl (BDSP) Walkthrough & Guides Wiki
Elden Ring Shadow of the Erdtree Walkthrough & Guides Wiki
Monster Hunter World Walkthrough & Guides Wiki
The Legend of Zelda: Tears of the Kingdom Walkthrough & Guides Wiki
Persona 3 Reload Walkthrough & Guides Wiki


All rights reserved
©2025 Konami Digital Entertainment
The copyrights of videos of games used in our content and other intellectual property rights belong to the provider of the game.
The contents we provide on this site were created personally by members of the Game8 editorial department.
We refuse the right to reuse or repost content taken without our permission such as data or images to other sites.
Good idea to make no mention of the bull charm in the wlkthrough and leave it in a section at the end of the page. Really well thought out.