Corridors Walkthrough and Guide
★ Endings: Normal | Bad | Good | True | UFO
★ Best: Difficulty | Settings | Weapons
┗ Omamori Tier List | Builds
★ Puzzles: My Room | Locker Code | Mural
★ Missables: Door & Box | Ema | Inventory Size
★ Beginner's Guide | Fox Mask | Lore Explained
This is a full Corridors walkthrough for Silent Hill f. See a guide on how to get the Naginata and how to enter the Shrine Doors, Corridors puzzle solutions, how to defeat Sakuko, exploring New Game+ content and more here!
| ◀︎ Previous Area | Next Area ▶︎ |
|---|---|
| Fields (Fog Town) | Alleyways (Fog Town) |
List of Contents
Corridors Walkthrough
- Go on Ahead
- Find a Way to the Sacred Door
- Investigate the Strange Object
- Head to the Storage Room
- Search for the Missing Object Part
- Escape from Peril
- Head to the Sacred Door
- Find Where the Voice is Coming From
- Return to the Sacred Door
- Prepare Ahead of the Fight
- Defeat the Sakuko-like Entity
1. Go on Ahead
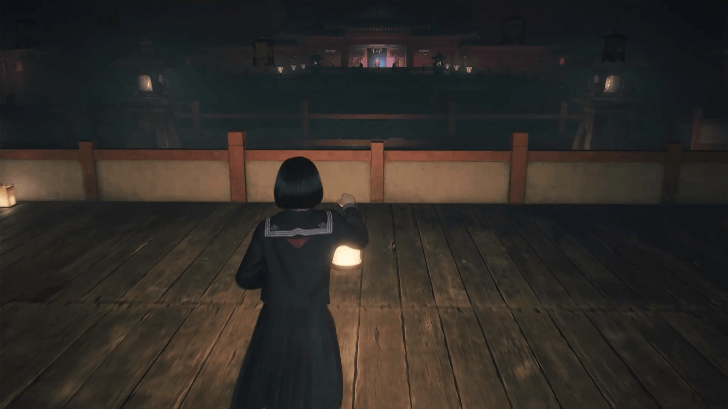
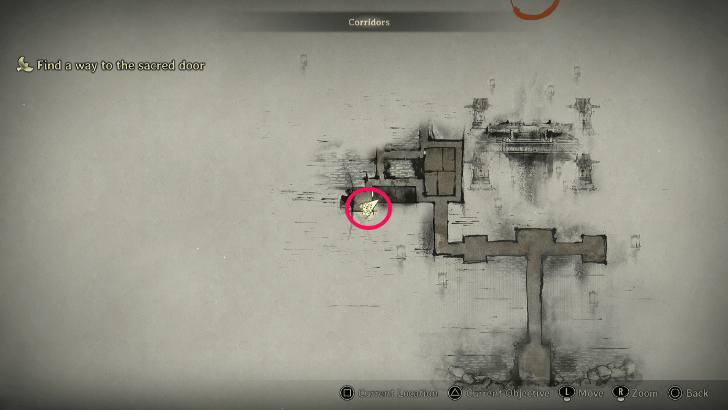
After falling down the stairs, Hinako once again wakes up in the otherworldly Corridors of the Dark Shrine. The realm itself has changed since then, use the map to see the new area and get a feel for your surroundings.
Keep heading north afterwards to see the blue aura of the Fox Mask across where you are. They will not wait for you and will disappear followed by a change in objectives.
2. Find a Way to the Sacred Door
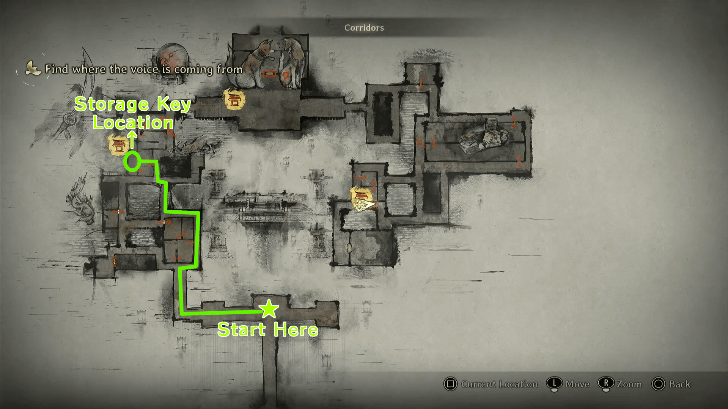
You will then be tasked to enter the same Sacred Door the Fox Mask entered as your next objective, but we advise looking for a Storage Key, located from an open room to the north through a crawlspace.
Pick the key up and don't leave the room yet! Head outside the crawlspace and head to the inner part of the room.
3. Investigate the Strange Object
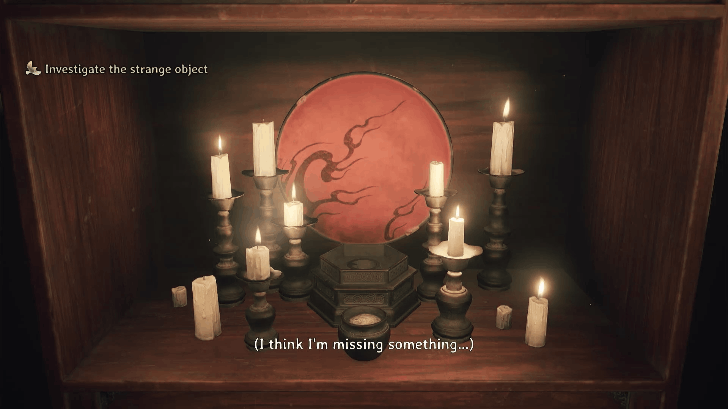
Following the prior steps, you should enter said room corridor and head to the left of it to see an altar with a missing item that it requires.
The missing object would be in an initially inaccessible room near where the storage key is and Hinako will comment on it being open now.
4. Head to the Storage Room
After investigating, head to the storage room where the Storage Key is needed. You will find some items here as well as very important notes about the story and lore which can help you later!
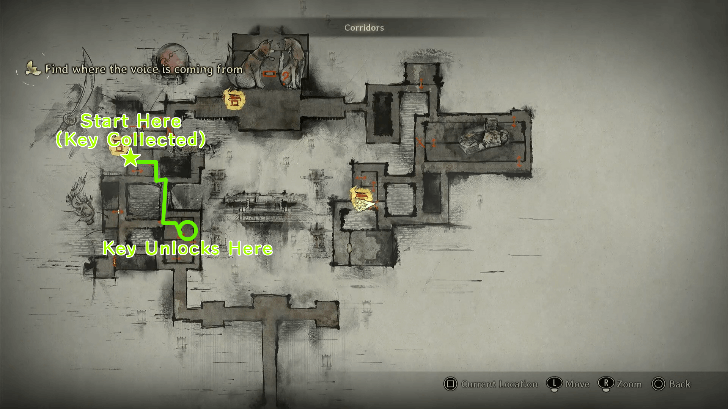
5. Search for the Missing Object Part
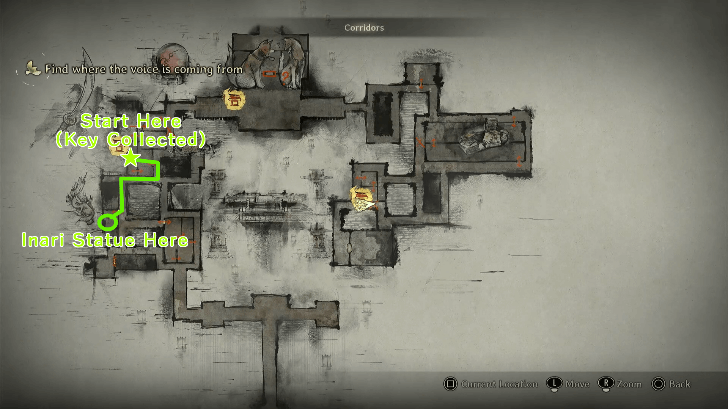
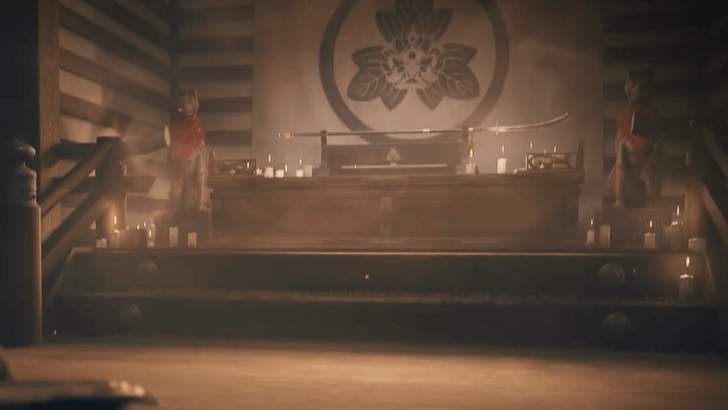
Head to a previously locked room leftwards of the map and go to its' opposing end. Some paintings will fall down behind you and a secret message hidden behind one of them can be read. The item, an Inari Sculpture can then be collected.
Return to the strange altar and place the sculpture there to enter a secret passage leading to the Naginata, a weapon only usable in the Dark Shrine areas.
6. Escape from Peril
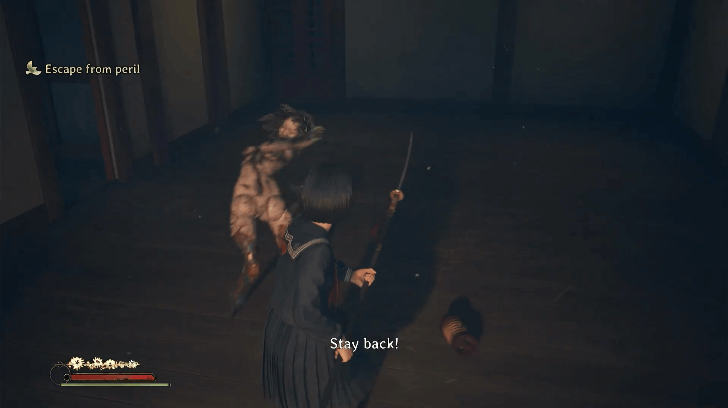
Upon entry into the Naginata Room, a surprise ambush will be initiated by a Blade Leg Monster. Pick up the Naginata and take it out.
Remember that the Naginata has a longer range and better damage than the Kaiken short dagger and can finish these enemies in a single heavy attack followed by a 4-swing combo.
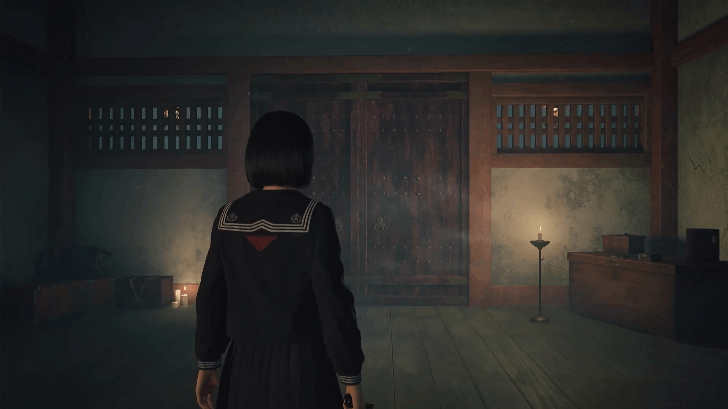
7. Head to the Sacred Door
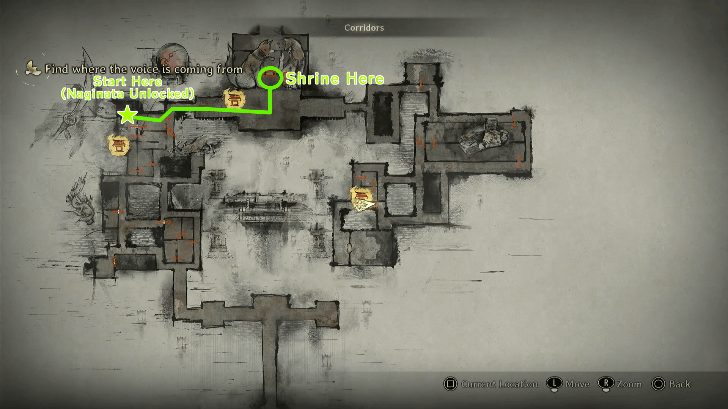
Once the Naginata is unlocked, continue to the direction of the Sacred Door. Investigating it shows that it is locked and you will need to find the missing component.
Hinako will then hear a voice calling to her afterwards, her childhood friend Sakuko, asking her to follow to the west of the Shrine. You must follow the instructions of the voice to continue.
Explore Other Rooms for Items
Both the western side and eastern side has some items that can be useful to you located in open rooms. Some enemies will patrol the inside of a room however, so time your movements whenever you can.
Open Other Rooms With The Fox Insignia in New Game+
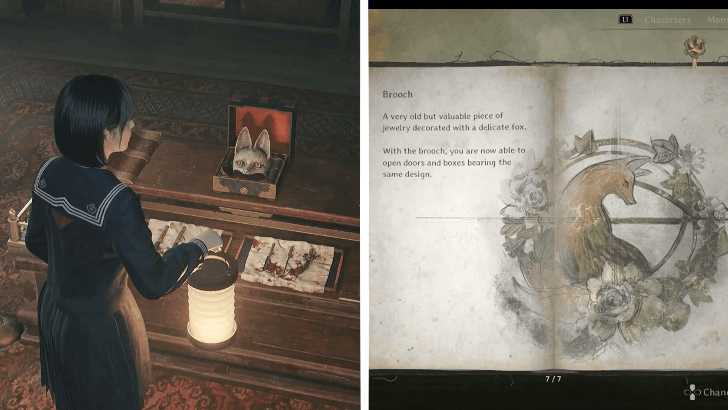
On a New Game+ run, you will be able to access different doors with the same Fox insignia as the Brooch, allowing you to get more lore items and secrets! Make sure to explore the area to get them all!
New Game Plus Guide: All Unlockables
Explore Other Rooms for Items
Both the western side and eastern side has some items that can be useful to you located in open rooms. Some enemies will patrol the inside of a room however, so time your movements whenever you can.
8. Find Where the Voice is Coming From
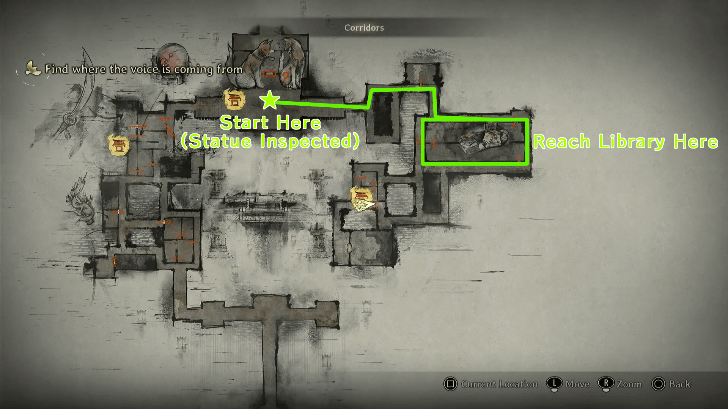
Head to the Western Side of the Shrine to start looking for the origin of the voice, but you will encounter real enemies this time. Equip your Naginata and make sure to slow your movement in the area whenever necessary.
Eventually following the trail on the right will have you encounter a barely-open library door that you can squeeze through. This section is entirely linear but take the corners to find some lore notes and items. Reach the end of the library but be careful of ambushes!
9. Return to the Sacred Door
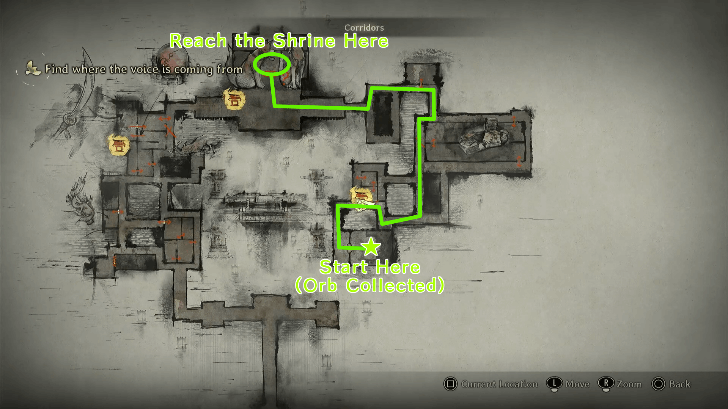
Eventually you will reach the end of the western temple to get a Stone Orb but this will trigger the mob chase sequence that forces Hinako to run and evade. Return to the Sacred Door and a cutscene will play, ending the sequence.
10. Prepare Ahead of the Fight (Find Fox Mask)
You will enter a room filled with medical supplies, collect what you can as you will have to face Sakuko after this safe room. Prepare your character before heading forward as you cannot return once the cutscene has started.
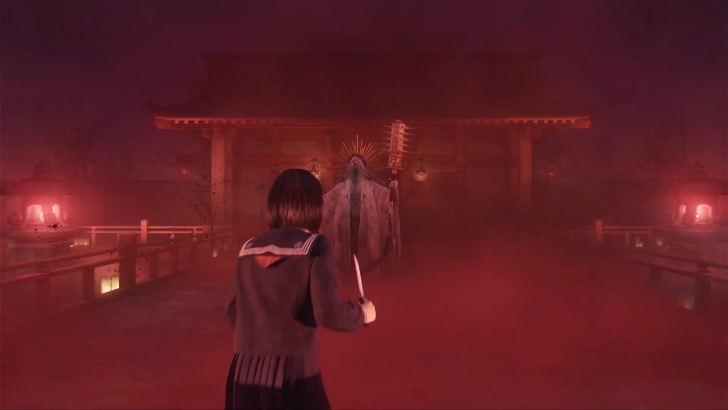
11. Defeat the Sakuko-like Entity
You will have to fight a corrupted Sakuko to proceed forward, acting as a boss fight. They have two phases, with the first phase requiring the player to dodge the ranged and melee mace attacks as well as any hug attacks the entity will do, all which deal massive damage.
After dealing enough damage, the boss will start their second phase by making the area around the map darker, and moving to the fog, charging up their stun attack. You must follow and strike several times to interrupt their charge. Sakuko will go down after several interrupted charges.
Once the fight is over, a cutscene will play and Hinako will wake up after falling down the stairs. The team will then decide to move out through the Ebisugaoka Alleyways.
Ebisugaoka Alleyways Walkthrough
Corridors Bosses and Enemies
Boss Enemy: Sakuko-Like Entity
| Sakuko-Like Entity Information | |
|---|---|
 |
|
| Description | A monster in the form of a miko, or shrine maiden. It sounds just like Sakuko... It swings around a spiked mace and chain. With each swing, the crisp chime of a bell rings out. Is this actually Sakuko? Or is this monster just pretending to be her? |
Sakuko is technically the first actual boss fight in the game, featuring two phases and only appearing in this form once. Their first phase has more attacks and also feature more movement, while their second phase makes them run away from the player.
Use your Naginata and engage the target from behind as the enemy does not have any back attacks. You can also constantly swing on the side of this boss to attack them.
Sakuko-Like Entity Boss Fight Guide
All Enemies in Corridors
|
|
|
These are the enemies you will encounter in the Corridors. Make sure to use your newly-found Naginata to take out the enemies quicker and safer!
Corridors Collectibles/Missables
All Hidden Omamori Locations
| Omamori | Overworld | Map |
|---|---|---|
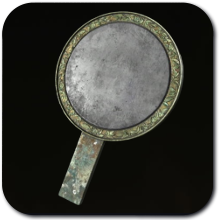 Blessed Hand Mirror Blessed Hand Mirror |
 |
 |
| Obtained from a table in the room that the Stone Orb opens in the Dark Shrine Corridors chapter. | ||
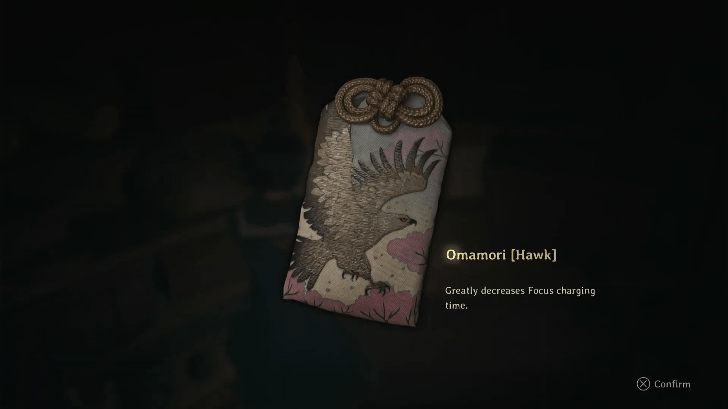
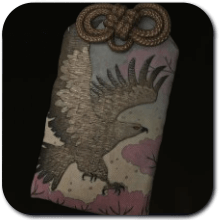 Hawk Hawk |
 |
 |
| Can be found at the Dark Shrine Corridors. | ||
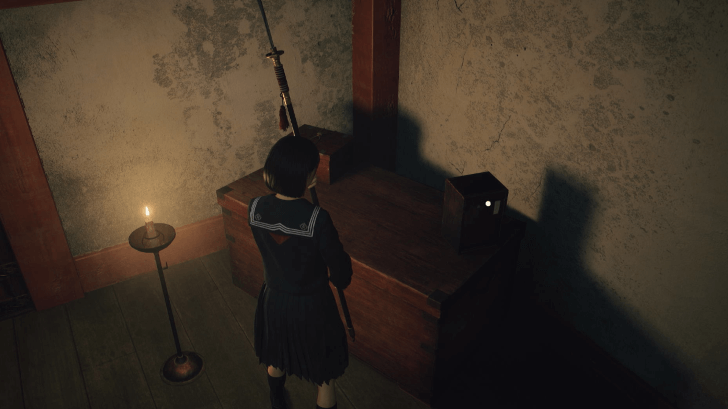
All Inventory Upgrade Locations
| Item | Overworld | Map |
|---|---|---|
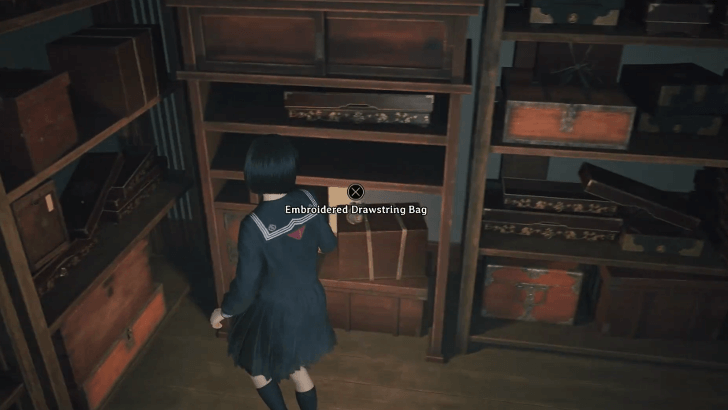 |
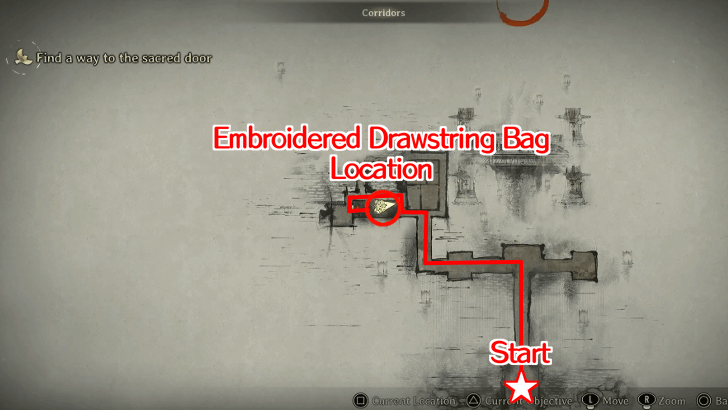 |
The Embroidered Drawstring Bag is only obtainable in New Game+. You can find it inside a storage room west of the Dark Shrine Corridors.
All Inventory Size Upgrade Locations
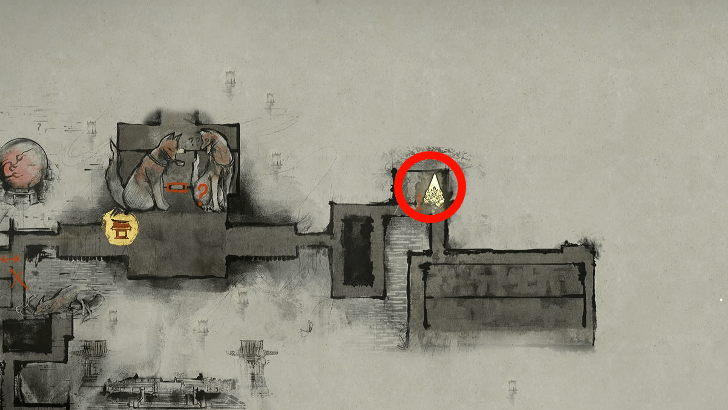
All Inari-sama Door and Box Locations
| NG+ Corridors Inari-sama Door | |
|---|---|
 |
|
| Location | Found within the multiple storage rooms of the Corridors. This sealed door is at the westernmost door from the starting point of this chapter. |
All Inari-sama Door and Box Locations
All Ema Locations
| Run | Overworld | Map |
|---|---|---|
| 1st Run | 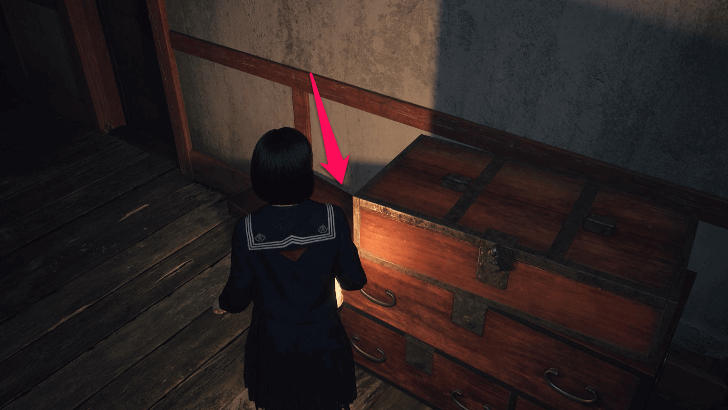 |
 |
| Found beside the chests near the partition in the western section of the Dark Shrine. | ||
All Weapon Locations
| Weapon | Overworld |
|---|---|
 Naginata Naginata
|
 |
| Found in a secret passage near the strange altar during Chapter 4. |
Silent Hill f Related Guides

All Chapter Guides and Walkthrough
All Story Chapters
| Silent Hill f Story Walkthrough Chapters | |
|---|---|
| 1 | Ebisugaoka |
| 2 | Shrine Path |
| 3 | Fields (Fog Town) |
| 4 | Corridors |
| 5 | Alleyways (Fog Town) |
| 6 | Middle School |
| 7 | Worship Hall |
| 8 | Mountain Path |
| 9 | Main Hall |
| 10 | Shimizu Residence |
| 11 | Treasure Hall |
| 12 | Corrupted Fog Town |
| 13 | Dark Shrine Final Path |
Comment
Author
Corridors Walkthrough and Guide
Rankings
- We could not find the message board you were looking for.
Gaming News


![Marathon Cryo Archive Map Teased as [REDACTED] on Selection Screen](https://img.game8.co/4442236/6357203e58172f6de57f1991e7c39b22.png/thumb)


Popular Games

Genshin Impact Walkthrough & Guides Wiki
Umamusume: Pretty Derby Walkthrough & Guides Wiki
Pokemon Pokopia Walkthrough & Guides Wiki
Honkai: Star Rail Walkthrough & Guides Wiki
Monster Hunter Stories 3: Twisted Reflection Walkthrough & Guides Wiki
Arknights: Endfield Walkthrough & Guides Wiki
Wuthering Waves Walkthrough & Guides Wiki
Zenless Zone Zero Walkthrough & Guides Wiki
Pokemon TCG Pocket (PTCGP) Strategies & Guides Wiki
Monster Hunter Wilds Walkthrough & Guides Wiki


Recommended Games
Diablo 4: Vessel of Hatred Walkthrough & Guides Wiki
Cyberpunk 2077: Ultimate Edition Walkthrough & Guides Wiki
Fire Emblem Heroes (FEH) Walkthrough & Guides Wiki
Yu-Gi-Oh! Master Duel Walkthrough & Guides Wiki
Super Smash Bros. Ultimate Walkthrough & Guides Wiki
Pokemon Brilliant Diamond and Shining Pearl (BDSP) Walkthrough & Guides Wiki
Elden Ring Shadow of the Erdtree Walkthrough & Guides Wiki
Monster Hunter World Walkthrough & Guides Wiki
The Legend of Zelda: Tears of the Kingdom Walkthrough & Guides Wiki
Persona 3 Reload Walkthrough & Guides Wiki


All rights reserved
©2025 Konami Digital Entertainment
The copyrights of videos of games used in our content and other intellectual property rights belong to the provider of the game.
The contents we provide on this site were created personally by members of the Game8 editorial department.
We refuse the right to reuse or repost content taken without our permission such as data or images to other sites.