This survey will take about 1 minute.
Your answers will help us to improve our website.
Minecraft Dungeons
Best Artifacts for Early Game
Artifacts can make or break a build in Minecraft Dungeons. When your weapons won't cut it, learn which Artifacts you can pull out as your trump card to handle any threat!
| Artifact Guides | |
|---|---|
| List of Artifacts | Artifacts Tier List |
| Best Artifacts for Early Game | Best Artifacts Overall |
Best Offensive Artifacts
These Artifacts serve as a third weapon, giving you an extra option when your two primary weapons can't quite pick up what the enemies are laying down.
Fireworks Arrow

The classic Fireworks Arrow holds its value from the tutorial level through the entire first half of the game. While your stronger bows can't shoot fast enough to handle swarms of enemies, and faster bows can't back their speed up with damage, Fireworks Arrow handles both situations with an explosion that can both topple powerful foes and wipe out a wave of grunts.
Its major drawback is its long cooldown period, so it's best paired together with Armor like the Evocation Robe which has the effect of lowering artifact cooldown time.
Fireworks Arrow Stats, Effects and Location
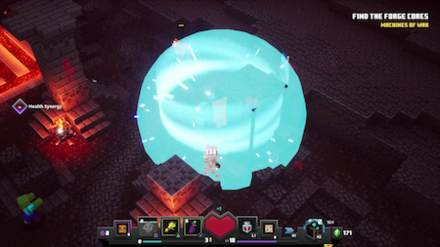
Harvester
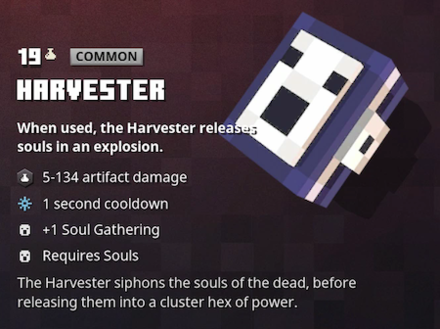
The melee, Soul-based version of the Fireworks Arrow, the Harvester allows you to either rush into a crowd and deal massive damage all around you, or get out with your life when you're swarmed by enemies. It has the disadvantage of requiring you to stand in the middle of the fray, but as its explosion has a wider range than the Fireworks Arrow, it tends to deal more overall damage.
The Harvester requires Souls to function, which can make it much easier to use than an Artifact with a standard cooldown when your build is based around Souls. Weapons with Soul Gathering like Soul Knife will help Harvester's power max out, making it all the more deadly.
Harvester Stats, Effects and Location
Best Defensive Artifacts
These Artifacts will heal your character or otherwise make it difficult for enemies to lay down the finishing blow.
Shock Powder

The Shock Powder's effect is mild compared to explosive Artifacts like Harvester, but it's a reliable one with an effect useful for both offensive and defense. As implied in the description, it's great for getting out of a situation when you're surrounded, but it can also be used to give yourself an extra push to knock out a group of enemies.
Compared to the Wind Horn, its cooldown period is a bit longer, but it's worth it as it takes enemies considerably longer to recover from.
Shock Powder Stats, Effects and Location
Soul Healer
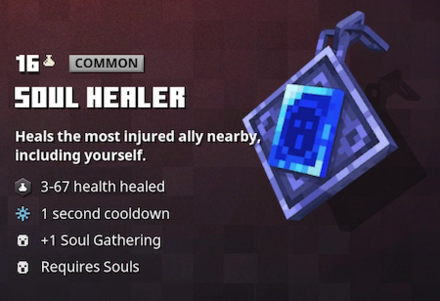
The Soul Healer has the advantage of running off Souls, which spares it the binary of a cooldown time. Even if you've only collected a few Souls since you last used it, you can continue living off tiny health boosts when you're in a tight spot, while other healing items may be in cooldown and unusable when you most need them.
The downside of the Soul Healer is the same as its upside – you need Souls to use it, so if you're low on health and there's no wimpy enemies to take out, you might not be able to pull it off. It's best used in situations like Boss Battles where hordes of standard enemies continually rush you, providing a constant source of Souls.
Keep in mind that when playing in a multiplayer setting, the Soul Healer will heal other players instead, so its usage changes a bit, but it can still be used primarily on yourself if your health is the lowest in your party.
Soul Healer Stats, Effects and Location
Best Support Artifacts
Support Artifacts are used to back up other strategies, benefitting your character in other ways beyond simple attack and defense.
Boots of Swiftness

The Boots of Swiftness are not just fun to run across the map with – they're also great for dodge-and-run heavy builds. Turn on the Boots when you're about to head into a fight, then dash and dodge around taking out enemies one by one. Great for handling ranged enemies who don't do well at close range. And with only 5 seconds of cooldown, you can keep them going throughout the battle with high consistency. Use the Boots to get through!
Boots of Swiftness Stats, Effects and Location
Wonderful Wheat

The Wonderful Wheat summons a Llama to fight alongside you, a Pet who holds its own without a doubt. The Llama will spit at foes, dealing ranged damage and hitting from a distance, unlike other familiars who run into the fray and get hurt themselves.
It can also act as a damage shield while enemies focus their attacks on it. This can be a great ploy for a ranged build, allowing you to fire at ranged enemies while they're too busy hitting the Llama to shoot back. And as the Llama depends only on its cooldown time, there's not much worry about its health running out, and you'll be able to quickly summon it again to keep holding the line.
Wonderful Wheat Stats, Effects and Location
Related Links
Comment
5  Anonymous almost 6 years
when you get to the last difficulty and got a golem, you'll think about what you said here haha.
Author

Best Artifacts for Early Game
Please participate in our site
improvement survey
04/2026
improvement survey
04/2026
Would you assist in
improving Game8's site?
improving Game8's site?

×
We are listening to our users' valuable opinions and discussing how to act on them.
The information collected through this survey will be used for the purpose of improving our services. In addition, the information will only be disclosed a part of a statistic in a format that will not allow identification of personal information.
Begin Survey
Not Now
×
Please rate each item regarding Game8.co's Advertisements.
Amount of Ads
Very Dissatisfied
Somewhat Dissatisfied
Fine
Somewhat Satisfied
Highly Satisfied
Placement of Ads
Timing of Ad Display
Ad Loading Speed
Safeness of Ads
Content of Ads
×
Please rate each item regarding Game8.co's Quality of Articles.
Amount of information
Very Dissatisfied
Somewhat Dissatisfied
Fine
Somewhat Satisfied
Highly Satisfied
Frequency of updates
Speed of new information
Accuracy of articles
Understandibility of articles
Readability of sentences
×
Please rate each item regarding Game8.co's Usability of the Site.
Ease of finding information
Very Dissatisfied
Somewhat Dissatisfied
Fine
Somewhat Satisfied
Highly Satisfied
Loading Speed
Use of Color
Font Size
Visibility of Images
Easy to Understand Layout
×
Please rate each item regarding Game8.co's Message Boards, Comments.
Ease of Writing
Very Dissatisfied
Somewhat Dissatisfied
Fine
Somewhat Satisfied
Highly Satisfied
Readability
Ease in Finding Information
Comment Quality
Comment Quantity
Admin Response
×
Please rate each item regarding Game8.co's Site's new design.
Please rate our site's new design
Very Dissatisfied
Somewhat Dissatisfied
Fine
Somewhat Satisfied
Highly Satisfied
Do you think that the website's design change makes the site easier to use?
Has the new design made it easier for you to find information on the site?
Has the new design improved the overall visual appeal of the site?
How would you rate your overall satisfaction with the new design of the site?
×
How likely are you to recommend Game8 to someone you know?
Very Unlikely
0
1
2
3
4
5
6
7
8
9
10
Very Likely
If you have other opinions regarding potential improvement to the website, please share them with us. We would appreciate your honest opinion.
Note: This is a free response section, so you can proceed without entering anything.
Note: Please be sure not to enter any kind of personal information into your response.
Note: Please be sure not to enter any kind of personal information into your response.
×
Thank You
×
Thank you for participating in our survey! Your answers will help us to improve the quality of our website and services.
We hope you continue to make use of Game8.
We hope you continue to make use of Game8.
Close
Rankings
- We could not find the message board you were looking for.
Gaming News


![Forza Horizon 6 Review [Preview] | Beautiful Roads With a Whole Lot of Oversteer](https://img.game8.co/4460981/a7254c24945c43fbdf6ad9bea52b5ce9.png/thumb)
Popular Games

Genshin Impact Walkthrough & Guides Wiki
Crimson Desert Walkthrough & Guides Wiki
Umamusume: Pretty Derby Walkthrough & Guides Wiki
Honkai: Star Rail Walkthrough & Guides Wiki
Monster Hunter Stories 3: Twisted Reflection Walkthrough & Guides Wiki
Wuthering Waves Walkthrough & Guides Wiki
The Seven Deadly Sins: Origin Walkthrough & Guides Wiki
Pokemon TCG Pocket (PTCGP) Strategies & Guides Wiki
Pokemon Pokopia Walkthrough & Guides Wiki
Zenless Zone Zero Walkthrough & Guides Wiki


Recommended Games
Monster Hunter World Walkthrough & Guides Wiki
Fire Emblem Heroes (FEH) Walkthrough & Guides Wiki
Pokemon Brilliant Diamond and Shining Pearl (BDSP) Walkthrough & Guides Wiki
Super Smash Bros. Ultimate Walkthrough & Guides Wiki
Diablo 4: Vessel of Hatred Walkthrough & Guides Wiki
Cyberpunk 2077: Ultimate Edition Walkthrough & Guides Wiki
Yu-Gi-Oh! Master Duel Walkthrough & Guides Wiki
Elden Ring Shadow of the Erdtree Walkthrough & Guides Wiki
The Legend of Zelda: Tears of the Kingdom Walkthrough & Guides Wiki
Persona 3 Reload Walkthrough & Guides Wiki


All rights reserved
Mojang © 2009-2020. "Minecraft" is a trademark of Mojang Synergies AB
The copyrights of videos of games used in our content and other intellectual property rights belong to the provider of the game.
The contents we provide on this site were created personally by members of the Game8 editorial department.
We refuse the right to reuse or repost content taken without our permission such as data or images to other sites.
I take back what I've said. Golems are the way to go! They got a strong knockback, even zombie can't touch it.