How to Beat The Valkyrie | Boss Fight Guide (Normal & Hard)

This is a guide to beating the Boss The Valkyrie in the game Final Fantasy 7 Remake (FF7R). This article explains The Valkyrie's attack patterns, weaknesses, and tips and strategies for defeating it on both Normal and Hard Mode.
List of Contents
The Valkyrie Stats and Information
Basic Information
| The Valkyrie | ||
|---|---|---|

|
Species | Movement | Type |
| Mechanical | Flying | Boss |
Description
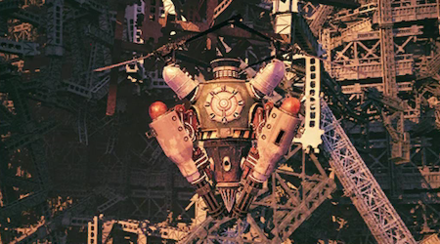
A high-speed aerial weapon manufactured by Shinra's Advanced Weaponry Division. Its giant cannon launches grenades and status-ailment bombs.
Assess (Tips)
Melee, lightning, and wind attacks rapidly fill its stagger gauge, but long-range and magic attacks have only a slight effect. All attacks have a slight effect on its stagger gauge during Limiter.
The Valkyrie Stats
| Easy | Normal | Hard | |
|---|---|---|---|
| HP | 28373 | 51588 | 84888 |
| Attack | 191 | 328 | |
| Magic Attack | 191 | 328 | |
| Defense | 206 | 342 | |
| Magic Defense | 117 | 194 | |
The Valkyrie Weaknesses & Resistances
| Weakness / Status Ailments | Lightning, Wind | |
|---|---|---|
| Lesser Resistances | Stop | |
| Greater Resistances | Fixed Damage, Proportional Damage | |
| Immunities | Poison, Silence, Sleep, Slow, Stop, Berserk | |
| Absorbed Elements | - | |
Stagger Rates
| ×2 | ×0.25 | ×0.5 | ×1 |
| - | |||
| ×1 | ×1.25※ | ×1.75 | - |
Stagger Length
| Stagger Length | 10 seconds |
|---|
Rewards
| Easy/Normal | Hard | |
|---|---|---|
| Gil | 1200 | 2250 |
| AP | 10 | 30 |
| Exp | 1200 | 4500 |
| Items Dropped | Cog Bangle (100%) | |
| Rare Items Dropped | - | |
| Steal | - | |
Learnable Enemy Skills
No Enemy Skills can be learned from The Valkyrie.
The Valkyrie Boss Fight Guide
The Valkyrie Abilities and Attack Patterns
| Name | Element | Blockable? | Knockdown? | Status |
|---|---|---|---|---|
|
|
- | Yes | No | - |
| Fires at the party with its gatling guns. | ||||
|
|
|
Yes | No | - |
| Fires 2 rockets simultaneously at the party 3 times. | ||||
|
|
|
No | No | - |
| Drops napalm onto the battlefield, lighting areas on fire for 12 seconds (24 on Hard mode). | ||||
|
|
- | No | No |
|
| Drops gas bombs in 4 directions onto the battlefield, leaving gas clouds that cause Poison and Sleep for 12 seconds (24 on Hard mode). | ||||
|
|
- | Yes | Yes | - |
| Begins spinning and pierces the ground with its drill. | ||||
|
|
- | Yes | No | - |
| Stabs its drill into the ground and chases a target while spinning. | ||||
|
|
|
Yes/No | No | - |
| Uses Mark 98 Rotary Cannons, Mark 99 Anti-fiend Artillery, and Napalm Drop all at once. | ||||
|
Limiter Override
|
- | - | - | - |
| Shields itself, increasing its magical and elemental defense, as well as boosting its movement speed. | ||||
|
|
- | No | Yes | - |
| A beam of light that follows a target and if touched will shoot a particle ray in 2 seconds (1 on Hard mode). The Valkyrie can be hit by the Particle Cannon as well but only if baited by a party member. | ||||
*Status Effects and Ailments Guide
Best Characters for This Boss
Available Characters
 Cloud Cloud
|
 Barret Barret
|
 Tifa Tifa
|
Best Characters and Equipment
Because The Valkyrie will stay in the air for much of the first Phase, it's recommended to focus on attacking with Barret. Equip Barret's weapon with Elemental Materia + Lightning Materia to maximize damage.
 Cloud Cloud |
Role: Attacker & Healer Weapon: Mythril Saber Armor: Heavy Duty Bracer Accessory: Otherworldly Crystal |
|---|---|
 Tifa Tifa |
Role: Attacker Weapon: Mythril Claws Armor: Gothic Bangle Accessory: Mythical Amulet |
 Barret Barret |
Role: Tank & Long-Range Attacker Weapon: Big Bertha Armor: Mythril Armlet Accessory: Healing Carcanet |
When it's Staggered, come in with Cloud or Tifa and use hard-hitting melee attacks. You can also use this opportunity to increase your party's damage output by using Cloud's Infinity's End.
Best Materia for Cloud
The number of slots in your Weapon may vary depending on your Weapon Level.
| Weapon (5 Slots) | |
|---|---|
| Armor (3 Slots) | |
| Summon | |
Best Materia for Tifa
| Weapon (4 Slots) | ||
|---|---|---|
| Armor (3 Slots) | ||
| Summon | ||
Best Materia for Barret
| Weapon (5 Slots) | ||
|---|---|---|
| Armor (2 Slots) | ||
| Summon | ||
During the battle, use Barret to deal damage with his lightning-infused attacks and Thundaga. Since Barret is also equipped with Warding Materia linked to Binding and Poison Materias, he will also gain resistance to the effects of Antipersonnel Gas.
Cloud will be your healer for this battle so be sure to equip him with Magic Up materia to increase his healing output and HP Up materia to make him endure more hits.
Save Tifa's MP so she can use Raise (or Arise) whenever an ally is downed. Since she is using her ATB charges mostly to revive downed members, which should not be happening a lot of times during the battle, use these charges to summon Ifrit and issue summon skills.
The Valkyrie Attack Phases
Phase 1
| Phase Point Summary | |
|---|---|
| 1 | You'll be on a narrow, slanted platform. |
| 1 | The Valkyrie will fly around off the stage, out of range of most melee attacks. |
| 2 | It will use Mark 98 Rotary Cannons and Mark 99 Anti-fiend Artillery. |
Phase 2
| Phase Point Summary | |
|---|---|
| 1 | You'll move to a wider, flat platform. |
| 2 | The Valkyrie will stay closer, hovering just over the ground, within the range of attack for all party members. |
| 3 | Right off the bat, it will use Antipersonnel Gas. Watch the ground and dodge! |
| 4 | It will use its previously listed attacks, as well as Drill Dive, immediately followed by Bombardment. When it uses Drill Dive, stay out of the way and wait for the attack to end. |
Phase 3
| Phase Point Summary | |
|---|---|
| 1 | It will start off out of reach and immediately use Limiter Override. It will also release a laser satellite at the same time. The attack from the satellite takes a long time to charge, so you should be able to avoid it easily. |
| 2 | Will continue to use Limiter Override throughout the Phase. |
Tips & Strategies for Beating The Valkyrie
| ★ Strategy Checklist ★ (Click to jump) |
||
|---|---|---|
|
|
Use Lightning Materia

Like other mechs, The Valkyrie suffers from a serious weakness to Lightning Magic. It's suggested to equip all three party members with Lightning Materia before the battle, and be sure at least one is powered up to Level 3 by this point, unlocking Thundaga.
It's highly recommended to give Elemental Materia + Lightning Materia to Barret, so his bullets will deal extra damage to The Valkyrie throughout the fight. Since he's the only ranged fighter available, this will provide a steady source of damage even when The Valkyrie is out of reach.
Other combinations, like Synergy Materia + Lightning Materia, can also be helpful to stack on.
Prepare Immunity to Sleep

The Valkyrie's Antipersonnel Gas Ability can put your best fighters to Sleep in the middle of the fight. Its Poison effect can be remedied quickly, but it's best to ensure that you can avoid sleep using Accessories such as the Headband, or combinations like Warding Materia + Binding Materia which provide immunity to Sleep.
Hide Behind the Wall

In the second phase of the fight, there will be a wall available which The Valkyrie's bullets can't penetrate. Use this when The Valkyrie is preparing an Ability, then come back around to fire off a stream of bullets with Barret.
That said, keep in mind that the wall can't protect from the laser attack from the satellite, so be sure to dodge this attack as it's charging up.
Pierce Limiter Override with the Laser

When The Valkyrie uses Limiter Override, it becomes resistant to all types of attacks, which also causes your attacks to have almost no effect on its stagger gauge.
Once the barrier is up, you can pierce it using its own laser satellite. Lure the satellite towards The Valkyrie until it starts to charge, then dodge to avoid receiving massive damage from the laser attack.
If the laser hits The Valkyrie, it will pop the Limiter Override barrier, deal a lot of damage to it, and will significantly fill its stagger gauge.
This is the most effective way to deal with the effects of Limiter Override as The Valkyrie will just use it again immediately once the effects of the previous barrier ends.
The Valkyrie: Hard Mode Guide
Best Characters and Equipment
 Cloud Cloud |
Weapon: Mythril Saber Armor: Force Bracelet Accessory: Criclet |
|---|---|
 Tifa Tifa |
Weapon: Feathered Gloves Armor: Force Bracelet Accessory: Champion Belt |
 Barret Barret |
Weapon: Light Machinge Gun Armor: Chain Bangle Accessory: Healing Carcanet |
Best Materia to Use
The number of slots in your Weapon may vary depending on your Weapon Level.
Cloud
| Weapon (6 Slots) | ||||
|---|---|---|---|---|
| Armor (4 Slots) | ||||
| Summon | ||||
Tifa
| Weapon (6 Slots) | |||
|---|---|---|---|
| Armor (4 Slots) | |||
| Summon | |||
Barret
| Weapon (6 Slots) | |||
|---|---|---|---|
| Armor (4 Slots) | |||
| Summon | |||
| ★Strategy Checklist★ | ||
|---|---|---|
|
|
Switch Characters Constantly
When it is using one of its attacks it will focus on the character you are controlling at the moment. You will be holding block most of the time otherwise so it is best to switch immediately and start attacking with your other party members.
Only Has Wind as Its Weakness
Unlike in normal mode, Valkyrie has no weakness to Lightning magic this time around. Make sure you have Wind materia equipped and time your spells right to make sure they hit!
Watch Your MP Usage
The Valkryie fight functions very simiilarly to its Normal Mode counterpart so your main objective is still to hit its weakpoints and stagger it. However, the inability to use items to recover MP means you must be wary of your surroundings to minimize how much you use healing magic.
Be Sure To Bring Healing Materia
On Hard Mode, the Valkyrie's attacks are incredibly strong and can trap a character leading to their death, so be sure to have Healing and Revive Materia equipped to prepare for the worst case.
Be watchful for its Antipersonnel Gas as well, as it will inflict Sleep and Poison on whoever it hits. To combat this, have a Cleansing Materia equipped on one of your characters.
Stay Away From Its Laser!
The laser that appears on the battlefield during phase 3 can deal around 5000 damage to anyone it hits, possibly leading to death, so more than before make sure to keep away from it!
Boss Fight Related Articles
Major Story Bosses
| All Major Story Bosses | |
|---|---|
| Chapter 1 | Scorpion Sentinel |
| Chapter 4 | Roche |
| Chapter 5 | Crab Warden |
| Chapter 7 | Airbuster |
| Chapter 8 | Reno Rude |
| Chapter 9 | Hell House |
| Chapter 10 | Abzu |
| Chapter 11 | Ghoul Eligor |
| Chapter 13 | Failed Experiment |
| Chapter 14 | Abzu (2nd Fight) |
| Chapter 15 | The Valkyrie |
| Chapter 16 | Specimen H0512 |
| Chapter 17 | Jenova Dreamweaver Rufus The Arsenal |
| Chapter 18 | Motor Ball Whisper Harbinger Sephiroth |
VR Mission Bosses
| All VR Mission Bosses | |
|---|---|
| Chapter 8 | Shiva |
| Chapter 9 | Fat Chocobo |
| Chapter 13 | Leviathan |
| Secret Boss | Bahamut |
| Superboss | Pride and Joy Prototype |
Story Sub-Bosses
| All Story Sub-Bosses | |
|---|---|
| Chapter 2 | The Huntsman |
| Chapter 3 | The Hoodlums |
| Chapter 4 | Enigmatic Spectre |
| Chapter 12 | Enigmatic Spectre |
| Chapter 17 | M.O.T.H. Unit Brain Pod Swordipede |
Monster Variants & Optional Sub-Bosses
| All Monster Variants & Optional Sub-Bosses | |
|---|---|
| Chapter 3 | Doomrat Cerulean Drake Wrath Hound |
| Chapter 8 | Hedgehog Pie King Mark II Monodrive Venomantis Chromogger |
| Chapter 14 | Rust Drake Tonberry Trypapolis Type-0 Behemoth |
| Chapter 17 | Malboro |
Comment
Just make sure you have Resist on atleast 2 allies. Most importantly keeping your party hastened, utilize your elemental materia and make Barrett shoot the living crap out of kit with lightning. Make him the lead, keep a character like tifa or Cloud have healing-Magnify pairing and so long as your re applying the regen/cures this will make rebuffing haste and resist hardly any trouble. It may also be a good idea to manawall barrett. Then thundara or Ga for the win
Author
How to Beat The Valkyrie | Boss Fight Guide (Normal & Hard)
improvement survey
03/2026
improving Game8's site?

Your answers will help us to improve our website.
Note: Please be sure not to enter any kind of personal information into your response.

We hope you continue to make use of Game8.
Rankings
- We could not find the message board you were looking for.
Gaming News
Popular Games

Genshin Impact Walkthrough & Guides Wiki

Honkai: Star Rail Walkthrough & Guides Wiki

Umamusume: Pretty Derby Walkthrough & Guides Wiki

Pokemon Pokopia Walkthrough & Guides Wiki

Resident Evil Requiem (RE9) Walkthrough & Guides Wiki

Monster Hunter Wilds Walkthrough & Guides Wiki

Wuthering Waves Walkthrough & Guides Wiki

Arknights: Endfield Walkthrough & Guides Wiki

Pokemon FireRed and LeafGreen (FRLG) Walkthrough & Guides Wiki

Pokemon TCG Pocket (PTCGP) Strategies & Guides Wiki
Recommended Games

Diablo 4: Vessel of Hatred Walkthrough & Guides Wiki

Fire Emblem Heroes (FEH) Walkthrough & Guides Wiki

Yu-Gi-Oh! Master Duel Walkthrough & Guides Wiki

Super Smash Bros. Ultimate Walkthrough & Guides Wiki

Pokemon Brilliant Diamond and Shining Pearl (BDSP) Walkthrough & Guides Wiki

Elden Ring Shadow of the Erdtree Walkthrough & Guides Wiki

Monster Hunter World Walkthrough & Guides Wiki

The Legend of Zelda: Tears of the Kingdom Walkthrough & Guides Wiki

Persona 3 Reload Walkthrough & Guides Wiki

Cyberpunk 2077: Ultimate Edition Walkthrough & Guides Wiki
All rights reserved
© SQUARE ENIX CO., LTD. All Rights Reserved.
CHARACTER DESIGN:TETSUYA NOMURA/ROBERTO FERRARI
The copyrights of videos of games used in our content and other intellectual property rights belong to the provider of the game.
The contents we provide on this site were created personally by members of the Game8 editorial department.
We refuse the right to reuse or repost content taken without our permission such as data or images to other sites.


![Everwind Review [Early Access] | The Shaky First Step to A Very Long Journey](https://img.game8.co/4440226/ab079b1153298a042633dd1ef51e878e.png/thumb)

![Monster Hunter Stories 3 Review [First Impressions] | Simply Rejuvenating](https://img.game8.co/4438641/2a31b7702bd70e78ec8efd24661dacda.jpeg/thumb)


I dont know. I kinda hoped I would see Lenneth here.