How to Beat Scorpion Sentinel | Boss Fight Guide (Normal & Hard Mode)

This is a guide to beating the boss Scorpion Sentinel from Chapter 1 of Final Fantasy 7 Remake. This article explains Scorpion Sentinel's attack patterns, weaknesses, and tips and strategies for defeating it on both Normal and Hard mode.
List of Contents
- Scorpion Sentinel Stats and Information
- Scorpion Sentinel Boss Battle Guide
- Best Characters for This Boss
- Tips & Strategies for Beating Scorpion Sentinel
- Scorpion Sentinel: Hard Mode Guide
- Best Characters and Equipment
- Best Materia to Use
- Hard Mode Basic Strategy
- Tips & Strategies
- Boss Fight Related Articles
Scorpion Sentinel Stats and Information
Scorpion Sentinel Basic Information
| Scorpion Sentinel | ||
|---|---|---|
|
Species | Movement | Type |
| Mechanical | Grounded | Boss |
Description
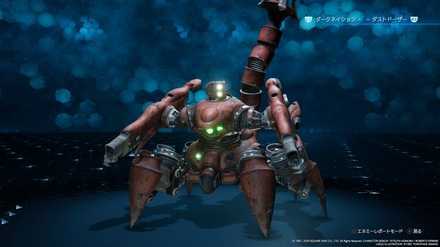
A large sentry weapon manufactured by Shinra's Advanced Weapon Division. Highly mobile due to its many legs and armed with an array of heavy weapons. Deployed at Mako Reactor 1 to protect the core.
Assess (Tips)
Its stagger gauge does not fill while its force field is deployed.
Scorpion Sentinel Stats
| Easy | Normal | Hard | |
|---|---|---|---|
| HP | 5188 | 9432 | 56592 |
| Attack | 56 | 301 | |
| Magic Attack | 56 | 301 | |
| Defense | 57 | 326 | |
| Magic Defense | 11 | 268 | |
Scorpion Sentinel Weaknesses & Resistances
| Weakness / Status Ailments | Lightning (When its barrier is not up) | |
|---|---|---|
| Lesser Resistances | - | |
| Greater Resistances | - | |
| Immunities | Poison, Silence, Sleep, Slow, Berserk, Proportional Damage, Lightning (When its barrier is up) | |
| Absorbed Elements | - | |
Stagger Rates
| ×1 | ×1 | ×1 | ×1 |
| - | |||
| ×1 | ×1 | ×1 | - |
Stagger Length
| Phase 1 | Phase 2 | Phase 3 | Phase 4 |
|---|---|---|---|
| 8 seconds | 8 seconds | 5 seconds | 10 seconds |
Rewards for Defeating Scorpion Sentinel
| Easy/Normal | Hard | |
|---|---|---|
| Gil | 100 | 2250 |
| AP | 10 | 30 |
| Exp | 100 | 4500 |
| Items Dropped | - | |
| Rare Items Dropped | - | |
| Steal | - | |
Learnable Enemy Skills
No Enemy Skills can be learned from Scorpion Sentinel.
Changes form as it takes damage

Each time Scorpion Sentinel takes a set amount of damage, it will change its form and its attack pattern. Keep in mind how to handle each of its forms before wrangling with it.
Summary of each form
| Remaining HP | Method of Attack |
|---|---|
| 100% (Phase 1) | Locks onto its target, then exacts a concentrated attack |
| 70% (Phase 2) | Puts up a barrier to deflect attacks |
| 40% (Phase 3) | Begins using its Tail Laser occasionally |
| 10% (Phase 4) | Activates an auto-repair unit to heal itself. Will use Overkill, a flurry of ranged attacks |
How to Pressure Scorpion Sentinel
| Phase | Situation |
|---|---|
| Phase 1 Phase 2 |
・For 5 seconds after it takes damage equal to 8% of its max HP ・For 1.5 seconds after a character is freed from its Death Grip |
| Phase 2 | After the barrier is destroyed |
| Phase 3 | For 3 seconds after using Tail Laser |
| Phase 4 | For 5 seconds after destroying one of its legs |
Breakable Parts
| Name | HP | Details |
|---|---|---|
| FIeld Generator | No HP | ・Can only be attacked from the back ・Takes .5x damage from magic |
| Legs | 4% of Max HP | ・Can only be targetted during phase 4 |
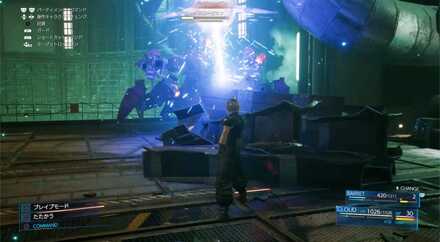
Scorpion Sentinel Boss Battle Guide
Scorpion Sentinel Abilities and Attack Patterns
| Name | Element | Blockable? | Knockdown? | Status |
|---|---|---|---|---|
|
|
- | Yes | No | - |
| Shoots bullets from both arms. Each arm targets a different party member. | ||||
|
|
|
Yes | Yes | - |
| Releases an electric wave into the surrounding area. | ||||
|
|
- | Yes | No | - |
| Leaps up high and attempts to crush its target. | ||||
|
|
- | Yes | Yes | - |
| Presses hard with its front legs charged with electricity. | ||||
|
|
|
Yes | Yes | - |
| Lashes out and strikes with its tail. | ||||
|
|
- | No | Yes | - |
| Grabs its target with both arms and shocks them with electricity after 5 seconds. Dealing 1% of its total HP in damage or hitting it with the Lightning element will free the target. | ||||
|
Target Scanner
|
- | No | No | - |
| Targets a party member for a strong attack. | ||||
|
|
|
Yes | Yes | - |
| Hits the ground repeatedly with its tail. | ||||
|
|
- | Yes | No | - |
| Fires out a salvo of small missiles. | ||||
|
|
|
No | Yes | - |
| While sending electricity out of its legs, charges a laser on its tail that goes off in 8 seconds, 6 for subsequent shots. (On hard mode the first laser goes off in 6 seconds followed by a second laser.) |
||||
|
|
- | Yes | No | - |
| Fires off blasts from its tail. | ||||
|
|
- | Yes | No | - |
| Uses Mark 98 Cannons, Mark 99 Launchers, and Stinger Salvo all at once. | ||||
|
|
- | - | - | - |
| Surrounds itself with a green aura and recovers 1% of its max HP every 5 seconds (3% on Hard). If it recovers 16% of its max HP, is sent into pressured state, or staggered, it will stop healing. | ||||
*Status Effects and Ailments Guide
Hard Mode Attacks
| Attack | Description |
|---|---|
| Overkill | Launches a chaotic salvo of missiles toward anything in front while shooting lasers |
| Tail Laser ※Watch Out! |
Stores up electric waves and fires a laser from its tail twice |
Best Characters for This Boss
Available Characters
 Cloud Cloud
|
 Barret Barret
|
Recommended Characters
While you'll want to change to Cloud for the second phase when the barrier is up, Barret is the best character to control for this battle.
Use Barret to Avoid Getting Interrupted
Many of the Sentinel Scorpion attacks are close-ranged and will interrupt Cloud's attack if he's too close.
You can also continue attacking it when it's on the wall, so Barret has the clear upperhand with his range, Thunder and Cure.
Use Cloud for Phase 2 and During Stagger
During the second phase, when the barrier is up, the Sentinel Scorpion will take reduced damage from bullets and be immune to Thunder, so you should switch to Cloud and attack from behind.
If you manage to Stagger the boss, you'll also want to switch to Cloud and go into Punisher mode to deal out some serious damage.
Tips & Strategies for Beating Scorpion Sentinel
| ★Strategy Checklist★ | ||
|---|---|---|
|
|
Thunder brings the pain
Scorpion Sentinel's main weakness is Thunder Magic. Barret can use Thunder, so either switch to Barret and attack, or use the ◯ button to select the Thunder command.
Balancing attacking and defending is key

Scorpion Sentinel uses a variety of ranged attacks, and Cloud in particular can have his HP run ragged in a matter of moments. Instead of simply pushing hard offensively, it's important to Guard sometimes and play defensively to limit the amount of damage your party takes.
Avoid Death Grip

Scorpion Sentinel is able to use Death Grip, an unguardable attack which bounds one of your characters. A warning symbol should appear next to the move name to signal that the attack is unguardable and should be avoided.
If one of your characters is bound by Death Grip, they will be unable to move and also take damage when the move is over, so switch to the other character to continue attacking and save the bound teammate.
When the barrier is up, attack from behind

In Scorpion Sentinel's 2nd Phase, it will set up a barrier which can deflect attacks. On its tail end, the Field Generator will be visible, and is vulnerable to attacks. Use Abilities and Magic to deal damage to the Field Generator.
Hide from Tail Laser behind debris
In its 3rd Phase, Scorpion Sentinel will repeatedly gather electricity and fire off its Tail Laser. It deals heavy damage, in Normal Mode averaging around 600 damage. The scattered surrounding debris can protect you from the attack, so when the animation for the attack begins, be sure to start searching for a place to hide.
When it's on its last legs, destroy it

When Scorpion Sentinel has only a small amount of HP remaining, it will begin to heal itself while attacking in a frenzy. By destroying its left and right legs, you can cause it to falter and stop moving, so be sure to focus your most powerful Abilities on the legs.
Hard to fill its Focus Gauge

Scorpion Sentinel's Focus Gauge takes a long time to fill up. Simply attacking haphazardly will make the battle long and arduous – it's best to aim for a Stagger, which will provide an opening to pull ahead in the battle.
Chances to Stagger Scorpion Sentinel
| Explanation | |
|---|---|
| 1st Chance | After saving your teammate from Death Grip (~1 second window) |
| 2nd Chance | The barrier from the 2nd Phase must have been destroyed |
| 3rd Chance | After it uses Tail Laser in the 3rd Phase (~3 second window) |
| 4th Chance | After destroying its legs in the 4th Phase |
After it's staggered, lay on the damage

If you've pulled off the tough feat of Staggering Scorpion Sentinel, seize your chance to attack. When attacking with Cloud or Barret's Unique Ability, your ATB Gauge will be maxed out, so rain down hard on it with Abilities and Magic.
Don't forget – after you've Staggered an enemy, your Limit Gauge will fill up. When it's at max, you'll be able to do a mega-powerful Limit Break attack, so save up to unleash at the end of the fight.
Scorpion Sentinel: Hard Mode Guide
Best Characters and Equipment
| Cloud |
Role: Tank & Attacker Weapon: Buster Sword Armor: Supreme Bracer Accessory: Crescent Moon Charm or Survival Vest |
|---|---|
| Barret |
Role: Healer & Long-Range Attacker Weapon: Gatling Gun or Big Bertha Armor: Supreme Bracer Accessory: Revival Earings or Survival Vest |
As MP needs to be managed right and most of your attacks outside of Stagger will be standard attacks, it is best to rely on weapons with a balance of Physical Attack and Magic Attack. Weapons like Buster Sword and Gatling Gun are recommended. You can also use Big Bertha for more damage on Physical Attacks if you feel like you do not need the extra MP and Magic attack.
Supreme Bracers are encouraged for both Cloud and Barret, as Scoropion Sentinal's hard to avoid attacks are physical. You'll be blocking a lot of these attacks so increasing your defense is a must.
With Barret as your primary healer, Revival Earrings are a solid choice, as having Barret down can make the fight much more difficult as you can not use items to revive. Crescent Moon Charm can be good for Cloud as you will be using Barret for most of the battle. And Survival Vests are also solid choices to further up your party's Defense.
Best Materia to Use
The number of slots in your Weapon may vary depending on your Weapon Level.
Cloud
| Weapon (4 Slots) | |
|---|---|
| Armor (3 Slots) | |
| Summon | |
Barret
| Weapon (4 Slots) | ||
|---|---|---|
| Armor (3 Slots) | ||
| Summon | ||
Having Elemental binded with Lightning for both Cloud and Barret is the best offensive choices. This will let you deal more damage without having to use any MP. Charkra is also a must have for them both. It will let you heal without consuming any MP. Revival is also important to have. Without Phoenix Down, this is the only way to revive any fallen teamamtes.
Steadfast Block is a good materia to have on Cloud as he will be tanking and blocking most of the damage. While ATB Assist will ensure Barret can follow up after Cloud uses Focused Thrust twice to stagger the Scorpion Sentinel. And ATB Boost will ensure Cloud will have enough ATB to do so. It can also be used after Staggering to use Infinity's End.
For Barret, he will need Healing binded with Magnify to be able to maximize the MP he uses for healing. Refocus is another great materia to have. It grants good stats and with its Refocus Limit will significantly boost Barret's damage output.
Fat Chocobo is good on Cloud as it will give him stats to make him tankier and Leviathan is a good summon to use against the Scorpion Sentinel.
Hard Mode Basic Strategy
In battle, control Barret and keep attacking with your basic attacks from afar. For the first phase, keep pelting it with attacks and wait for it to use Death Grip on Cloud, then use Thunder or any high damaging ability to save Cloud and to knock it off balance. When this happens use Focused Thrust and Focused Shot to put it into Stagger.
For the second phase, switch to Cloud and try to attack it from behind to damage the shield generator. After the shield generator is down, use Focused Thrust and Focused Shot to put it into Stagger again.
For the third phase, wait for it to use its Tail Laser, but beware: It shoots it twice in Hard mode. Use Thunder or high damaging abilities to knock it off balance, then use Focused Thrust and Focused Shot to put it into Stagger once more.
You will want to save some MP for the last phase. During the last phase use all your damaging abilities and Thunder to break its legs to put it into Stagger.
Tips & Strategies
| ★Strategy Checklist★ | ||
|---|---|---|
|
|
Can Receive One of Barret's Manuscripts
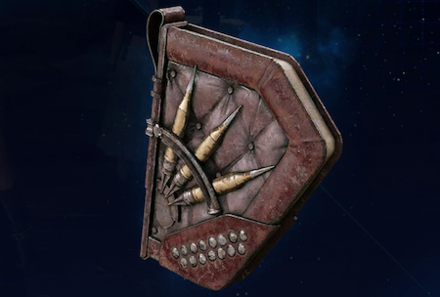
If you take down the Scorption Sentinel on Hard Mode, you will receive Barret's Manuscript, Sharpshooter's Companion Vol. IV. Every Hard Mode boss fight will drop a Manuscript for a character, so those looking to max out their skill points should give Hard Mode a go!
Use the Chakra Materia to Heal
While playing on Hard Mode you are unable to use items so preserving your MP becomes vital. You want to save your MP for filling the Scorpion Sentinel's focus gauge with lightning magic, so when you are low on HP use the Chakra materia instead.
You can also equip Cloud's Mythril Saber with its 50% MP Regeneration boost to go wild with magic.
Beware of its Second Tail Laser!

Another new addition on Hard Mode is that the Scorpion Sentinel will use its Tail Laser attack a second time immediately after the first. Just like with the first attack, quickly take cover again to avoid damage.
Boss Fight Related Articles
Major Story Bosses
| All Major Story Bosses | |
|---|---|
| Chapter 1 | Scorpion Sentinel |
| Chapter 4 | Roche |
| Chapter 5 | Crab Warden |
| Chapter 7 | Airbuster |
| Chapter 8 | Reno Rude |
| Chapter 9 | Hell House |
| Chapter 10 | Abzu |
| Chapter 11 | Ghoul Eligor |
| Chapter 13 | Failed Experiment |
| Chapter 14 | Abzu (2nd Fight) |
| Chapter 15 | The Valkyrie |
| Chapter 16 | Specimen H0512 |
| Chapter 17 | Jenova Dreamweaver Rufus The Arsenal |
| Chapter 18 | Motor Ball Whisper Harbinger Sephiroth |
VR Mission Bosses
| All VR Mission Bosses | |
|---|---|
| Chapter 8 | Shiva |
| Chapter 9 | Fat Chocobo |
| Chapter 13 | Leviathan |
| Secret Boss | Bahamut |
| Superboss | Pride and Joy Prototype |
Story Sub-Bosses
| All Story Sub-Bosses | |
|---|---|
| Chapter 2 | The Huntsman |
| Chapter 3 | The Hoodlums |
| Chapter 4 | Enigmatic Spectre |
| Chapter 12 | Enigmatic Spectre |
| Chapter 17 | M.O.T.H. Unit Brain Pod Swordipede |
Monster Variants & Optional Sub-Bosses
| All Monster Variants & Optional Sub-Bosses | |
|---|---|
| Chapter 3 | Doomrat Cerulean Drake Wrath Hound |
| Chapter 8 | Hedgehog Pie King Mark II Monodrive Venomantis Chromogger |
| Chapter 14 | Rust Drake Tonberry Trypapolis Type-0 Behemoth |
| Chapter 17 | Malboro |
Comment
Not as hard as u guys make it out to be.
Author

How to Beat Scorpion Sentinel | Boss Fight Guide (Normal & Hard Mode)
Rankings
- We could not find the message board you were looking for.
Gaming News
![Animal Crossing: New Horizons Review [Switch 2] | Needlessly Crossing Over to a New Generation](https://img.game8.co/4391759/47d0408b0b8a892e453a0b90f54beb8a.png/show)


Popular Games

Genshin Impact Walkthrough & Guides Wiki
Honkai: Star Rail Walkthrough & Guides Wiki
Arknights: Endfield Walkthrough & Guides Wiki
Umamusume: Pretty Derby Walkthrough & Guides Wiki
Wuthering Waves Walkthrough & Guides Wiki
Pokemon TCG Pocket (PTCGP) Strategies & Guides Wiki
Abyss Walkthrough & Guides Wiki
Zenless Zone Zero Walkthrough & Guides Wiki
Digimon Story: Time Stranger Walkthrough & Guides Wiki
Clair Obscur: Expedition 33 Walkthrough & Guides Wiki


Recommended Games
Fire Emblem Heroes (FEH) Walkthrough & Guides Wiki
Pokemon Brilliant Diamond and Shining Pearl (BDSP) Walkthrough & Guides Wiki
Diablo 4: Vessel of Hatred Walkthrough & Guides Wiki
Super Smash Bros. Ultimate Walkthrough & Guides Wiki
Yu-Gi-Oh! Master Duel Walkthrough & Guides Wiki
Elden Ring Shadow of the Erdtree Walkthrough & Guides Wiki
Monster Hunter World Walkthrough & Guides Wiki
The Legend of Zelda: Tears of the Kingdom Walkthrough & Guides Wiki
Persona 3 Reload Walkthrough & Guides Wiki
Cyberpunk 2077: Ultimate Edition Walkthrough & Guides Wiki


All rights reserved
© SQUARE ENIX CO., LTD. All Rights Reserved.
CHARACTER DESIGN:TETSUYA NOMURA/ROBERTO FERRARI
The copyrights of videos of games used in our content and other intellectual property rights belong to the provider of the game.
The contents we provide on this site were created personally by members of the Game8 editorial department.
We refuse the right to reuse or repost content taken without our permission such as data or images to other sites.
I really have no chance of getting this game too 100% i cant even beat the first boss on hard :(