This survey will take about 1 minute.
Your answers will help us to improve our website.
Fire Emblem: Three Houses (FE3H)
Ashen Wolves Chapter 5: Betrayal Walkthrough
This is the walkthrough for the 5th chapter of the side story DLC in Fire Emblem: Three Houses (FETH, FE3H). Read on to see what you can do in Abyss, as well as all battle info, map features, enemy data, and a strategy guide for the battle, Besieged in the Chapel Ruins.
List of Contents
| Previous Chapter | Next Chapter |
|---|---|
| Chapter 4: Danger in the Dark | Chapter 6: Return to Me |
Chapter 5 - Betrayal
Exploring Abyss
Chapter Objectives
Before the battle starts, you are free to wander around Abyss and talk to inhabitants and browse shops.
Take note that this will be the last time you can explore Abyss in the side story.
Chapter Tips
You can get a Rusted Bow in the Scrap Heap Room to turn it into an Iron Bow.
Chapter 5 Mission: Besieged in the Chapel Ruins

Battle Preparation
Study Aelfric's Abilities
Aelfric joins you in this battle. Although he is vulnerable, he has powerful magic spells, so you can use him from a safe distance.
Map and Overview
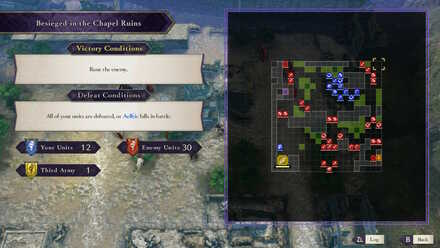
| Victory Conditions | |
|---|---|
| Rout the enemy. | |
| Defeat Conditions | |
| All of your units are defeated, or Aelfric falls in battle. | |
| # of Player Units | 12 |
| # of Enemies | 30 + 2 + 2 |
| # of Third Army | 1 + 3 + 2 |
Aelfric joins your party
For this battle, Aelfric joins your team. However, make sure you protect him or you automatically lose.
Hapi's summoned monsters are not your allies
Although the monsters involved in the battle are summoned by Hapi, they are not your allies. They are considered a third army units, and not ally units, because everyone in the map is an enemy for them.
Enemies
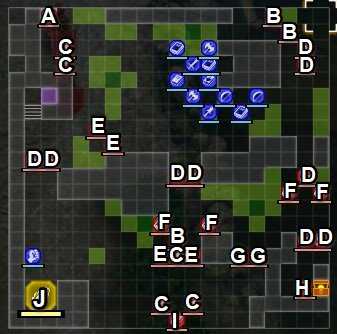
| Pos | Enemy | Pos | Enemy |
|---|---|---|---|
| A | Thief Leader (Warrior) | B | Thief (Assassin) |
| C | Thief (Paladin) | D | Thief (Fortress Knight) |
| E | Thief (Hero) | F | Thief (Warlock) |
| G | Thief (Sniper) | H | Metodey |
| I | Thief (Bishop) | J | Giant Bird |
 |
 |
Units A will keep spawning around the Thief Leader if you have not defeated him yet, and Units B will spawn on the right side later on as backup.
| Enemy Reinforcements | |||
|---|---|---|---|
| A | Thief (Paladin) | B | Thief (Sniper) |

Hapi will summon these monsters when you defeat the Thief Leader.
| Monster Reinforcements | |||
|---|---|---|---|
| A | Giant Bird | B | Giant Wolf |
Enemy Stats
Thief Leader
| Level | HP | Mov. | Class |
|---|---|---|---|
| 32 | 47 | - | Warrior |
| Mt. | Spd | Hit | Crit |
| 41 | 11 | 91 | 46 |
| Range | Prt | Res | Avd |
| 1 | 19 | 8 | 18 |
| Weapon | Dropped Items | ||
| Killer Axe | N/A | ||
| Battalion | |||
| Thieves | |||
| Level | Endurance | Gambit | Uses |
| 1 | 75 | Disturbance | 2 |
Metodey
| Level | HP | Mov. | Class |
|---|---|---|---|
| 32 | 44 | - | Assassin |
| Mt. | Spd | Hit | Crit |
| 35 | 23 | 111 | 19 |
| Range | Prt | Res | Avd |
| 1 | 19 | 8 | 44 |
| Weapon | Dropped Items | ||
| Brave Sword | Large Bullion | ||
| Battalion | |||
| Thieves | |||
| Level | Endurance | Gambit | Uses |
| 1 | 75 | Disturbance | 2 |
Enemy data will be gathered soon.
Chests
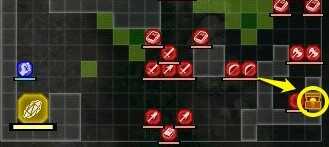
There is only 1 chest in this map, which is found beside Metoday's initial position. You can use Yuri or Ashe to open the chest with their Locktouch ability.
| Loot |
|---|
| Silver Sword+ |
Map Features
Terrain Types
| Tiles | Description |
|---|---|
| Edifice | Navigable by fliers only |
| Rubble | Navigable by fliers only |
| Rampart | Navigable by fliers only |
| Forest | +30% Avo and 1 Def for non-fliers |
| Thicket | +40% Avo and 2 Def for non-fliers |
| Heal Tile+ | +30% HP each turn, +1 Def and +1 Res for non-fliers |
| Ballista | 5 Mt, 15 Durability, 3-12 Range, Bow Skill of D or higher is required to use |
Tips and Tricks
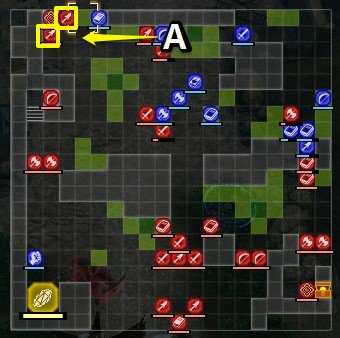
Split the group in two
Make sure to have 1 healer on each side, and do not isolate Aelfric in a dangerous position. Since enemy reinforcements will spawn at the top left and top right, split the 2 groups in left and right, before you head down to the larger number of enemies.
Secure the Ballista
Defeat the Ballista user at the start so he does not target the weaker units. Once you have gained control, use it to one-shot the Thief Leader. Because of its high range, you can leave an archer on that post and keep picking off enemies from afar.
Take cover in forests and thickets
Use the greenery to your advantage. Especially that you need to protect Aelfric, position your magic users inside forests and thickets and have them finish off rushing enemies.
Use the monsters as distraction
Use the two wolves that spawn at the bottom to distract the enemy units and take them from behind. This will make your job a whole lot easier since their HP's would have been halved by the time you get to them.
Chapter 5 - After the Battle
The chapter immediately ends after the battle, so you are free to proceed to the next one.
Hapi Now Recruitable
After this chapter, you can now recruit Hapi in Part I of the main story.
How to Recruit the Ashen Wolves
Fire Emblem: Three Houses - Related Links
 DLC - Cindered Shadows Walkthrough |
||
| DLC - Cindered Shadows | ||
|---|---|---|
| Chapter 1: The Fourth House | Chapter 2: What Lies Beneath | Chapter 3: The Rite of Rising |
| Chapter 4: Danger in the Dark | Chapter 5: Betrayal | Chapter 6: Return to Me |
| Chapter 7: Wolf Pack | ||
Comment
Author
Ashen Wolves Chapter 5: Betrayal Walkthrough
Please participate in our site
improvement survey
03/2026
improvement survey
03/2026
Would you assist in
improving Game8's site?
improving Game8's site?

×
We are listening to our users' valuable opinions and discussing how to act on them.
The information collected through this survey will be used for the purpose of improving our services. In addition, the information will only be disclosed a part of a statistic in a format that will not allow identification of personal information.
Begin Survey
Not Now
×
Please rate each item regarding Game8.co's Advertisements.
Amount of Ads
Very Dissatisfied
Somewhat Dissatisfied
Fine
Somewhat Satisfied
Highly Satisfied
Placement of Ads
Timing of Ad Display
Ad Loading Speed
Safeness of Ads
Content of Ads
×
Please rate each item regarding Game8.co's Quality of Articles.
Amount of information
Very Dissatisfied
Somewhat Dissatisfied
Fine
Somewhat Satisfied
Highly Satisfied
Frequency of updates
Speed of new information
Accuracy of articles
Understandibility of articles
Readability of sentences
×
Please rate each item regarding Game8.co's Usability of the Site.
Ease of finding information
Very Dissatisfied
Somewhat Dissatisfied
Fine
Somewhat Satisfied
Highly Satisfied
Loading Speed
Use of Color
Font Size
Visibility of Images
Easy to Understand Layout
×
Please rate each item regarding Game8.co's Message Boards, Comments.
Ease of Writing
Very Dissatisfied
Somewhat Dissatisfied
Fine
Somewhat Satisfied
Highly Satisfied
Readability
Ease in Finding Information
Comment Quality
Comment Quantity
Admin Response
×
Please rate each item regarding Game8.co's Site's new design.
Please rate our site's new design
Very Dissatisfied
Somewhat Dissatisfied
Fine
Somewhat Satisfied
Highly Satisfied
Do you think that the website's design change makes the site easier to use?
Has the new design made it easier for you to find information on the site?
Has the new design improved the overall visual appeal of the site?
How would you rate your overall satisfaction with the new design of the site?
×
How likely are you to recommend Game8 to someone you know?
Very Unlikely
0
1
2
3
4
5
6
7
8
9
10
Very Likely
If you have other opinions regarding potential improvement to the website, please share them with us. We would appreciate your honest opinion.
Note: This is a free response section, so you can proceed without entering anything.
Note: Please be sure not to enter any kind of personal information into your response.
Note: Please be sure not to enter any kind of personal information into your response.
×
Thank You
×
Thank you for participating in our survey! Your answers will help us to improve the quality of our website and services.
We hope you continue to make use of Game8.
We hope you continue to make use of Game8.
Close
Rankings
- We could not find the message board you were looking for.
Gaming News


![Monster Hunter Stories 3 Review [First Impressions] | Simply Rejuvenating](https://img.game8.co/4438641/2a31b7702bd70e78ec8efd24661dacda.jpeg/thumb)
Popular Games

Genshin Impact Walkthrough & Guides Wiki
Honkai: Star Rail Walkthrough & Guides Wiki
Umamusume: Pretty Derby Walkthrough & Guides Wiki
Pokemon Pokopia Walkthrough & Guides Wiki
Resident Evil Requiem (RE9) Walkthrough & Guides Wiki
Monster Hunter Wilds Walkthrough & Guides Wiki
Wuthering Waves Walkthrough & Guides Wiki
Arknights: Endfield Walkthrough & Guides Wiki
Pokemon FireRed and LeafGreen (FRLG) Walkthrough & Guides Wiki
Pokemon TCG Pocket (PTCGP) Strategies & Guides Wiki


Recommended Games
Diablo 4: Vessel of Hatred Walkthrough & Guides Wiki
Cyberpunk 2077: Ultimate Edition Walkthrough & Guides Wiki
Fire Emblem Heroes (FEH) Walkthrough & Guides Wiki
Yu-Gi-Oh! Master Duel Walkthrough & Guides Wiki
Super Smash Bros. Ultimate Walkthrough & Guides Wiki
Pokemon Brilliant Diamond and Shining Pearl (BDSP) Walkthrough & Guides Wiki
Elden Ring Shadow of the Erdtree Walkthrough & Guides Wiki
Monster Hunter World Walkthrough & Guides Wiki
The Legend of Zelda: Tears of the Kingdom Walkthrough & Guides Wiki
Persona 3 Reload Walkthrough & Guides Wiki


All rights reserved
©2019 Nintendo / INTELLIGENT SYSTEMS. Co-developed by KOEI TECMO GAMES CO., LTD. Fire Emblem and Nintendo Switch are trademarks of Nintendo. © 2019 Nintendo.
The copyrights of videos of games used in our content and other intellectual property rights belong to the provider of the game.
The contents we provide on this site were created personally by members of the Game8 editorial department.
We refuse the right to reuse or repost content taken without our permission such as data or images to other sites.