Chapter 17: Combat at Tailtean Plains (Black Eagles) Walkthrough
This is a battle walkthrough for the mission Combat at Tailtean Plains from Fire Emblem: Three Houses (FETH, FE3H). Read on to find out about map features, what enemies you will encounter, and tips for winning!
List of Contents
| Previous Battle | Story Walkthrough | Next Battle |
|---|---|---|
| Chapter 16: Siege of Arianrhod | Chapter 17: Field of Revenge | Chapter 18: The Fight for Fhirdiad |
Chapter 17 (Black Eagles) - Map and Overview

| Victory Conditions | |
|---|---|
| Defeat all enemy commanders. | |
| Defeat Conditions | |
| Your character or Edelgard falls in battle. | |
| # of Player Units | 10 |
| # of Enemies | 15 -> 19 -> 27 |
Chapter 17 (Black Eagles) - Enemies
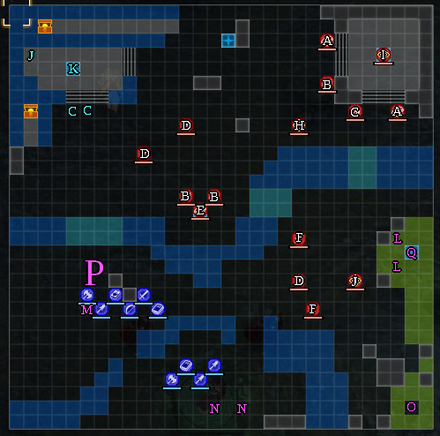
Cyan marked forces arrive in Turn 2, Pink marked forces arrive later on.
| Pos | Enemy | Pos | Enemy |
|---|---|---|---|
| A | Kingdom Soldier (Dark Knight) | J | Kingdom Soldier (Pegasus Knight) |
| B | Kingdom Soldier (Dark Bishop) | K | Mercedes |
| C | Kingdom Soldier (Fortress Knight) | L | Church Soldier (Holy Knight) |
| D | Kingdom Soldier (Paladin) | M | Church Soldier (Falcon Knight) |
| E | Kingdom Soldier (Gremory) | N | Church Soldier (Great Knight) |
| F | Kingdom Soldier (Swordmaster) | O | Church Soldier (Gremory) |
| G | Sylvain | P | Golem |
| H | Dedue | Q | Rhea |
| I | Dimitri |
Dimitri
| Level | HP | Mov. | Class |
|---|---|---|---|
| 37 | 58 | - | Great Lord |
| Mt. | Spd | Hit | Crit |
| 68 | 21 | 118 | 42 |
| Range | Prt | Res | Avd |
| 1 | 26 | 10 | 51 |
| Weapon | Dropped Items | ||
| Areadbhar | N/A | ||
| Battalion | |||
| King of Lions Corps | |||
| Level | Endurance | Gambit | Uses |
| 1 | 120 | Wave Attack | 2 |
Rhea
Enemy data will be gathered soon.
Dedue
Enemy data will be gathered soon.
Sylvain
Enemy data will be gathered soon.
Mercedes
| Level | HP | Mov. | Class |
|---|---|---|---|
| 37 | 42 | 4 | Bishop |
| Mt. | Spd | Hit | Crit |
| 34 | 17 | - | - |
| Range | Prt | Res | Avd |
| 1-7 | 12 | 42 | 57 |
| Weapon | Dropped Items | ||
| Fortify | N/A | ||
| Battalion | |||
| Church Soldiers | |||
| Level | Endurance | Gambit | Uses |
| 1-7 | 75 | Resonant White Magic | 3 |
Dimitri
Enemy data will be gathered soon.
Rhea
Enemy data will be gathered soon.
Dedue
Enemy data will be gathered soon.
Sylvain
Enemy data will be gathered soon.
Mercedes
Enemy data will be gathered soon.
Loot
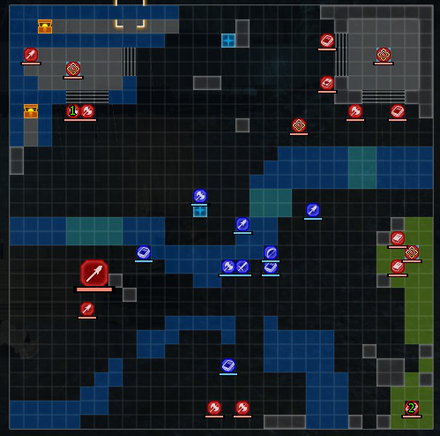
| Position | Loot Dropped |
|---|---|
| 1 | Kadmos Shield |
| 2 | Giant Shell |
Kadmos Shield
Equippable that adds 3 protection, and negates special damage versus armor. Good for Edelgard, as Emperor is a heavy armor class.
Giant Shell
Increases defense by 2 points when used. Very out of the way, so not really worth it.
Chapter 17 (Black Eagles) - Chests
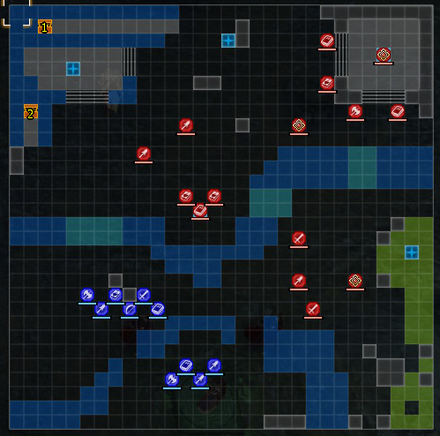
| Position | Chest Contents |
|---|---|
| 1 | Brave Bow |
| 2 | Brave Axe |
Brave Bow
Allows you to attack twice. Very worth getting, especially if your Bernadetta or whoever is your Archer is used a lot.
Brave Axe
Allows you to attack twice. Very worth getting, particularly for Edelgard, because it disregards speed.
Chapter 17 (Black Eagles) - Map Features
Tiles
| Tiles | Description |
|---|---|
| Wasteland Stairs |
Difficult for cavalry to traverse |
| River Rubble Rock |
Navigable only by fliers |
| Shoal | Navigable only by fliers |
| Forest | 1 Prt, + 30 Mv, except for fliers |
| Stronghold | 2 Prt, 2 Res + 30% Avo, +30% HP each turn except for non-fliers |
| Heal Tile+ | 1 Prt, 1 Res, +30% HP each turn for non-fliers |
Reinforcements
At turn 2, Kingdom reinforcements will come from the north and take position in the cyan area encircled. Afterwards, church reinforcements will arrive in the encircled pink areas.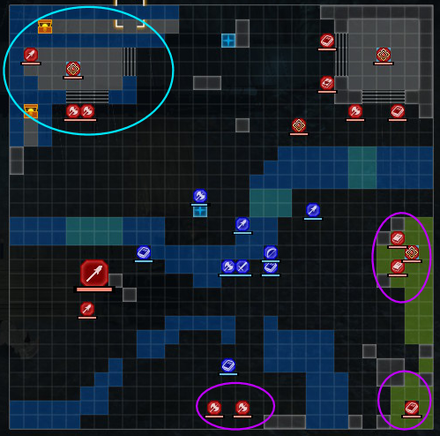
Chapter 17 (Black Eagles) - Tips and Tricks
Dedue and the Paladin with Sylvain Turn Into Demonic Beasts
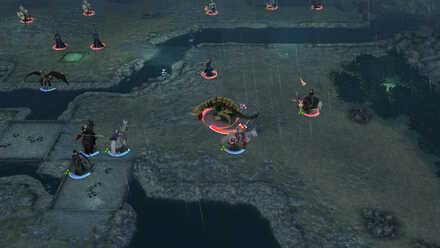
Using crest stones, Dedue and the Paladin in Sylvain's group will become Demonic Beasts if you approach them. Dedue will still count as a commander when he is in beast form, so it makes it substantially harder to end the mission.
Defeat Them Right Away to Prevent Transformation
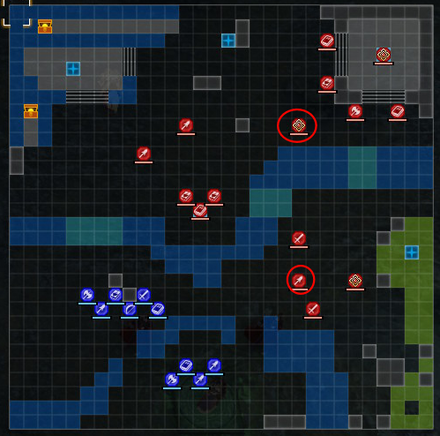
Their transformation only takes place the turn after you approach. If you manage to kill them on the same turn you approach them, you stop their transformation altogether.
Move Away From The Starting Position
Church reinforcements will pop up in the two starting locations for your units, so if you have your backline healers just sitting there, they'll be in danger. Make sure to not leave them behind.
Dismount Your Cavalry
Most of the map is wasteland, so your cavalry units are better off dismounted for more movement.
Defat Rhea to Get Rid of Church Soldiers
Once you defeat Rhea, all church reinforcements will fall back (except the Golem). This makes it more optimal to rush Rhea than to engage all the church forces.
Fire Emblem: Three Houses - Related Links
Part 2 - Crimson Flower Battle Walkthroughs
 |
||
| Part 2 - Azure Moon | ||
|---|---|---|
| Chapter 13: The Great Bridge Coup | Chapter 14: Capturing Derdriu | Chapter 15: Protecting Garreg Mach |
| Chapter 16: The Siege of Arianrhod | Chapter 17: Combat at Tailtean Plains | Chapter 18: The Fight for Fhirdiad |
Comment
Author
Chapter 17: Combat at Tailtean Plains (Black Eagles) Walkthrough
improvement survey
03/2026
improving Game8's site?

Your answers will help us to improve our website.
Note: Please be sure not to enter any kind of personal information into your response.

We hope you continue to make use of Game8.
Rankings
- We could not find the message board you were looking for.
Gaming News
Popular Games

Genshin Impact Walkthrough & Guides Wiki

Honkai: Star Rail Walkthrough & Guides Wiki

Umamusume: Pretty Derby Walkthrough & Guides Wiki

Pokemon Pokopia Walkthrough & Guides Wiki

Resident Evil Requiem (RE9) Walkthrough & Guides Wiki

Monster Hunter Wilds Walkthrough & Guides Wiki

Wuthering Waves Walkthrough & Guides Wiki

Arknights: Endfield Walkthrough & Guides Wiki

Pokemon FireRed and LeafGreen (FRLG) Walkthrough & Guides Wiki

Pokemon TCG Pocket (PTCGP) Strategies & Guides Wiki
Recommended Games

Diablo 4: Vessel of Hatred Walkthrough & Guides Wiki

Fire Emblem Heroes (FEH) Walkthrough & Guides Wiki

Yu-Gi-Oh! Master Duel Walkthrough & Guides Wiki

Super Smash Bros. Ultimate Walkthrough & Guides Wiki

Pokemon Brilliant Diamond and Shining Pearl (BDSP) Walkthrough & Guides Wiki

Elden Ring Shadow of the Erdtree Walkthrough & Guides Wiki

Monster Hunter World Walkthrough & Guides Wiki

The Legend of Zelda: Tears of the Kingdom Walkthrough & Guides Wiki

Persona 3 Reload Walkthrough & Guides Wiki

Cyberpunk 2077: Ultimate Edition Walkthrough & Guides Wiki
All rights reserved
©2019 Nintendo / INTELLIGENT SYSTEMS. Co-developed by KOEI TECMO GAMES CO., LTD. Fire Emblem and Nintendo Switch are trademarks of Nintendo. © 2019 Nintendo.
The copyrights of videos of games used in our content and other intellectual property rights belong to the provider of the game.
The contents we provide on this site were created personally by members of the Game8 editorial department.
We refuse the right to reuse or repost content taken without our permission such as data or images to other sites.


![Everwind Review [Early Access] | The Shaky First Step to A Very Long Journey](https://img.game8.co/4440226/ab079b1153298a042633dd1ef51e878e.png/thumb)

![Monster Hunter Stories 3 Review [First Impressions] | Simply Rejuvenating](https://img.game8.co/4438641/2a31b7702bd70e78ec8efd24661dacda.jpeg/thumb)


