Chapter 20: Confrontation at the Palace (Golden Deer) Walkthrough
This is the battle walkthrough for the mission Confrontation at the Palace (Golden Deer Route) in Fire Emblem: Three Houses (FETH, FE3H). Read on to find out about map features, what enemies you will encounter, and tips for winning!
List of Contents
| Previous Battle | Story Walkthrough | Next Battle |
|---|---|---|
| Chapter 19: The Enbarr Infiltration |
Chapter 20: Conclusion of the Crossing Roads | Chapter 21: Stand Strong at Shambhala |
Chapter 20 (Golden Deer) - Map and Overview
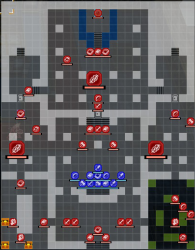
| Victory Conditions | |
|---|---|
| Defeat the enemy commander. | |
| Defeat Conditions | |
| Casual: All of your units fall in battle. Classic: Your character or Claude falls in battle. |
|
| # of Player Units | 11 |
| # of Enemies | Normal: 36 + Reinforcements Hard: 38 + Reinforcements |
Chapter 20 (Golden Deer) - Enemies
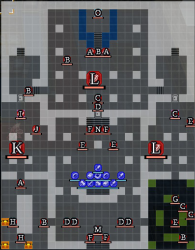
| Pos | Enemy | Pos | Enemy |
|---|---|---|---|
| A | Imperial Soldier (Mortal Savant) | I | Agarthan Soldier (Warlock) |
| B | Imperial Soldier (Gremory) | J | Agarthan Soldier (Dark Bishop) |
| C | Imperial Soldier (Sniper) | K | Demonic Beast |
| D | Imperial Soldier (Swordmaster) | L | Giant Demonic Beast |
| E | Imperial Soldier (Warrior) | M | Dorothea |
| F | Imperial Soldier (Bishop) | N | Petra |
| G | Imperial Soldier (War Master) | O | Edelgard |
| H | Imperial Soldier (Grappler) |
Reinforcements
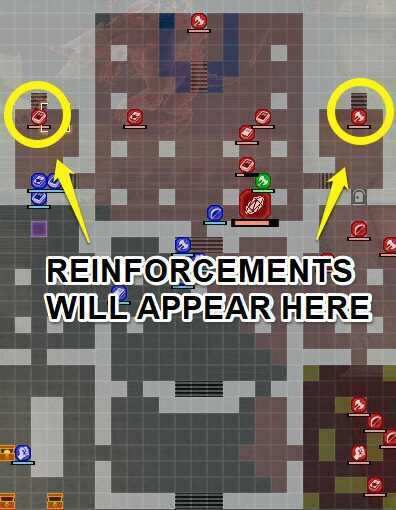
Once you are nearing the Throne Room, Edelgard will start to send in reinforcements from these 2 tiles. Enemies will come to each tile one by one. To stop them from appearing, you need one unit to step on each tile.
Enemy Stats
Dorothea
Enemy data will be gathered soon.
Petra
| Level | HP | Mov. | Class |
|---|---|---|---|
| 39 | 48 | 6 | Assassin |
| Mt. | Spd | Hit | Crit |
| 42 | 44 | 131 | 65 |
| Range | Prt | Res | Avd |
| 1 | 20 | 8 | 84 |
| Weapon | Dropped Items | ||
| Wo Dao | Door Key | ||
| Battalion | |||
| Brigid Hunters | |||
| Level | Endurance | Gambit | Uses |
| 1 | 105 | Poison Tactic | 1 |
Edelgard
| Level | HP | Mov. | Class |
|---|---|---|---|
| 40 | 58 | - | Emperor |
| Mt. | Spd | Hit | Crit |
| 69 | 9 | 122 | 34 |
| Range | Prt | Res | Avd |
| 1 | 31 | 19 | 9 |
| Weapon | Dropped Items | ||
| Aymr | N/A | ||
| Battalion | |||
| Supreme Armored Co. | |||
| Level | Endurance | Gambit | Uses |
| 1 | 120 | Raging Flames | 2 |
Dorothea
| Level | HP | Mov. | Class |
|---|---|---|---|
| 40 | 51 | 4 | Warlock |
| Mt. | Spd | Hit | Crit |
| 54 | 17 | 142 | 27 |
| Range | Prt | Res | Avd |
| 1-2 | 16 | 34 | 42 |
| Weapon | Dropped Items | ||
| Ragnarok | Door Key | ||
| Battalion | |||
| Opera Co. Volunteers | |||
| Level | Endurance | Gambit | Uses |
| 1-2 | 75 | Dance of the Goddess | 1 |
Petra
| Level | HP | Mov. | Class |
|---|---|---|---|
| 40 | 54 | 6 | Assassin |
| Mt. | Spd | Hit | Crit |
| 49 | 50 | 137 | 71 |
| Range | Prt | Res | Avd |
| 1 | 26 | 8 | 90 |
| Weapon | Dropped Items | ||
| Wo Dao | Door Key | ||
| Battalion | |||
| Brigid Hunters | |||
| Level | Endurance | Gambit | Uses |
| 1 | 105 | Poison Tactic | 1 |
Edelgard
| Level | HP | Mov. | Class |
|---|---|---|---|
| 41 | 65 | - | Emperor |
| Mt. | Spd | Hit | Crit |
| 75 | 16 | 128 | 40 |
| Range | Prt | Res | Avd |
| 1 | 36 | 25 | 16 |
| Weapon | Dropped Items | ||
| Aymr | N/A | ||
| Battalion | |||
| Supreme Armored Co. | |||
| Level | Endurance | Gambit | Uses |
| 1 | 120 | Raging Flames | 2 |
Loot
The most important dropped items are the door keys, which you will need in order to access Edelgard's throne room. These are dropped by Dorothea, Petra, and the Grappler in the garden. Additionally, there is one Talisman lootable from the Gremory in the garden.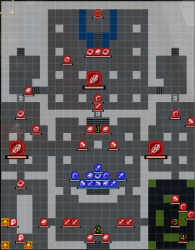
| Pos | Loot Dropped |
|---|---|
| 1 | Door Key |
| 2 | Door Key |
| 3 | Door Key |
| 4 | Talisman |
Door Key
Essential for the map, as this is the only way to access Edelgard's throne room. There is no reason to not go for the one Petra holds, as she is closest, aside from the fact that she's difficult to face.
Talisman
It increases Resistance by 2. While useful especially because the Throne Room is filled with magic users, it might be a bit too out of the way to be worth it.
Chapter 20 (Golden Deer) - Chests
There are three chests, in the treasure room southwest of your starting position. There are no chest keys dropped in this map, so you either need to bring your own or have a thief with you.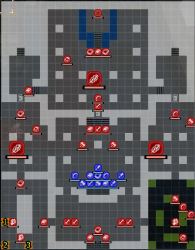
| Pos | Chest Contents |
|---|---|
| 1 | Silver Gauntlets |
| 2 | Kadmos Shield |
| 3 | Giant Shell |
Silver Gauntlets
Silver-grade hand-to-hand weapon. Do not bother unless you have a brawler/grappler/war master in your army. Even if you do have one, you can easily buy Silver Gauntlets so it may not be worth going all this way to get it.
Kadmos Shield
A shield that negates any anti-armor damage. Must have if you field a Armored Knight or a Fortress Knight, but not really worth it otherwise.
Giant Shell
Increases Defense by 2 points. Good if you want to make your magic users less squishy, or if you have an unarmed class or armored class, buff them up to be even more tanky.
Chapter 20 (Golden Deer) - Map Features
The player army starts at the central grand hall.
North of the grand hall is a singular staircase that leads into the throne room. To the west and east of the grand hall there are corridors.
South of the western corridor is the treasure room, while south of the easter corridor is a garden. The north of either corridor leads to a locked door protecting a small room where reinforcements pour out from, and these rooms lead into the throne room.
Likewise, the throne room, north of the grand hall, is locked behind a closed door as well.
| Tiles | Description |
|---|---|
| Thicket | 20% Avo, 1 Prt to all non-fliers |
| Wall | Cannot be crossed |
| Pillar | Cannot be crossed |
| Stairs | Difficult for cavalry to traverse |
| Channel | Difficult for cavalry to traverse |
| Throne | 40% Avo, 5 Def and Res, and recovers 30% HP per turn. |
Chapter 20 (Golden Deer) - Tips and Tricks
Engage Edelgard All At Once
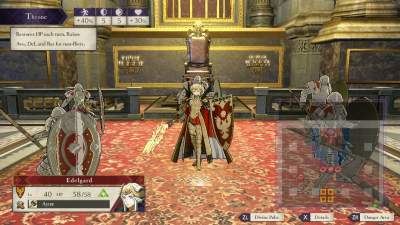
Edelgard is seated in her throne, which buffs her greatly and heals her a lot. Do not engage her one by one, as she can just heal from it the next turn. Finish her in one or two turns by doing all out attacks.
Engage Petra with Ranged Units
Petra is an assassin, which means she's both hard to hit and has a good chance of landing critical hits. If she hits even your strongest melee units, there's a chance that she kills them instantly. Engage her with ranged and be wary of dealing with her, even if the predicted attack should kill her.
Enemy Reinforcements
Once you open the door to the Throne Room, Edelgard will commend you for getting this far, but then order her units to defeat you. From here on out, there will be enemy reinforcements coming from the northeastern room in the form of Imperial Soldiers (Warriors) and the northwestern room in the form of Agarthan Soldiers (Warlocks).
Dedue Holds the Line
In turn 3, Dedue will arrive from the northeastern room as a Fortress Knight. Soldiers who attack him will more often than not deal no damage, so just ensure none of the Mortal Savants or Gremories attack him. He'll do a good job holding off reinforcements from that side.
Fire Emblem: Three Houses - Related Links
Part 2 - Verdant Wind Battle Walkthroughs
Comment
Author
Chapter 20: Confrontation at the Palace (Golden Deer) Walkthrough
improvement survey
03/2026
improving Game8's site?

Your answers will help us to improve our website.
Note: Please be sure not to enter any kind of personal information into your response.

We hope you continue to make use of Game8.
Rankings
- We could not find the message board you were looking for.
Gaming News
Popular Games

Genshin Impact Walkthrough & Guides Wiki

Honkai: Star Rail Walkthrough & Guides Wiki

Umamusume: Pretty Derby Walkthrough & Guides Wiki

Pokemon Pokopia Walkthrough & Guides Wiki

Resident Evil Requiem (RE9) Walkthrough & Guides Wiki

Monster Hunter Wilds Walkthrough & Guides Wiki

Wuthering Waves Walkthrough & Guides Wiki

Arknights: Endfield Walkthrough & Guides Wiki

Pokemon FireRed and LeafGreen (FRLG) Walkthrough & Guides Wiki

Pokemon TCG Pocket (PTCGP) Strategies & Guides Wiki
Recommended Games

Diablo 4: Vessel of Hatred Walkthrough & Guides Wiki

Cyberpunk 2077: Ultimate Edition Walkthrough & Guides Wiki

Fire Emblem Heroes (FEH) Walkthrough & Guides Wiki

Yu-Gi-Oh! Master Duel Walkthrough & Guides Wiki

Super Smash Bros. Ultimate Walkthrough & Guides Wiki

Pokemon Brilliant Diamond and Shining Pearl (BDSP) Walkthrough & Guides Wiki

Elden Ring Shadow of the Erdtree Walkthrough & Guides Wiki

Monster Hunter World Walkthrough & Guides Wiki

The Legend of Zelda: Tears of the Kingdom Walkthrough & Guides Wiki

Persona 3 Reload Walkthrough & Guides Wiki
All rights reserved
©2019 Nintendo / INTELLIGENT SYSTEMS. Co-developed by KOEI TECMO GAMES CO., LTD. Fire Emblem and Nintendo Switch are trademarks of Nintendo. © 2019 Nintendo.
The copyrights of videos of games used in our content and other intellectual property rights belong to the provider of the game.
The contents we provide on this site were created personally by members of the Game8 editorial department.
We refuse the right to reuse or repost content taken without our permission such as data or images to other sites.


![Monster Hunter Stories 3 Review [First Impressions] | Simply Rejuvenating](https://img.game8.co/4438641/2a31b7702bd70e78ec8efd24661dacda.jpeg/thumb)


