Chapter 19: The Enbarr Infiltration (Golden Deer) Walkthrough
This is the battle walkthrough for the mission The Enbarr Infiltration (Golden Deer Route) in Fire Emblem: Three Houses (FETH, FE3H). Read on to find out about map features, what enemies you will encounter, and tips for winning!
List of Contents
| Previous Battle | Story Walkthrough | Next Battle |
|---|---|---|
| Chapter 18: Taking Fort Merceus | Chapter 19: The Chaos of War |
Chapter 20: Confrontation at the Palace |
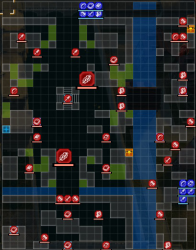
Chapter 19 (Golden Deer) - Map and Overview
| Victory Conditions | |
|---|---|
| Defeat all enemy commanders. | |
| Defeat Conditions | |
| Casual: All of your units fall in battle. Classic: Your character or Claude falls in combat. |
|
| # of Player Units | 11 |
| # of Enemies | Normal: 36 + Reinforcements Hard: 40 + Reinforcements |
Chapter 19 (Golden Deer) - Enemies
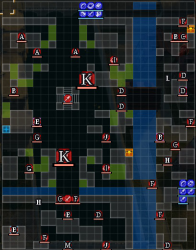
| Pos | Enemy | Pos | Enemy |
|---|---|---|---|
| A | Imperial Soldier (Paladin) | B | Imperial Soldier (Sniper) |
| C | Imperial Soldier (Warrior) | D | Imperial Soldier (Grappler) |
| E | Imperial Soldier (Warlock) | F | Imperial Soldier (Fortress Knight) |
| G | Imperial Soldier (Bishop) | H | Imperial Soldier (Swordmaster) |
| I | Agarthan Soldier (Warlock) | J | Agarthan Soldier (Dark Bishop) |
| K | Winged Demonic Beast | L | Death Knight |
| M | Hubert | - | - |
Reinforcements
| Wave 1 | Wave 2 |
|---|---|
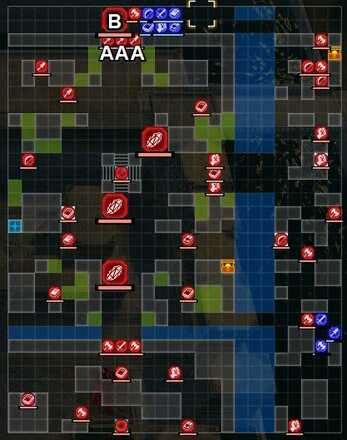 |
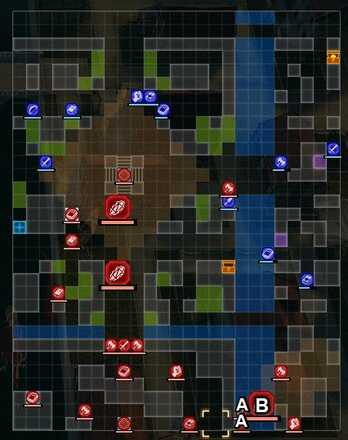 |
| Pos | Enemy | Pos | Enemy |
|---|---|---|---|
| A | Imperial Soldier (Falcon Knight) | B | Winged Demonic Beast |
Enemy Stats
Hubert
| Level | HP | Mov. | Class |
|---|---|---|---|
| 39 | 41 | - | Dark Bishop |
| Mt. | Spd | Hit | Crit |
| 58 | 7 | 106 | 21 |
| Range | Prt | Res | Avd |
| 1-2 | 16 | 39 | 27 |
| Weapon | Dropped Items | ||
| Agnea's Arrow | Goddess Icon | ||
| Battalion | |||
| Vesta Sorcery Engineers | |||
| Level | Endurance | Gambit | Uses |
| 1-2 | 75 | Resonant Lightning | 1 |
Death Knight
| Level | HP | Mov. | Class |
|---|---|---|---|
| 39 | 41 | - | Dark Bishop |
| Mt. | Spd | Hit | Crit |
| 58 | 7 | 106 | 21 |
| Range | Prt | Res | Avd |
| 1-2 | 16 | 39 | 27 |
| Weapon | Dropped Items | ||
| Agnea's Arrow | Goddess Icon | ||
| Battalion | |||
| Vesta Sorcery Engineers | |||
| Level | Endurance | Gambit | Uses |
| 1-2 | 75 | Resonant Lightning | 1 |
Winged Demonic Beast
| Level | HP | Mov. | Class |
|---|---|---|---|
| 39 | 41 | - | Dark Bishop |
| Mt. | Spd | Hit | Crit |
| 58 | 7 | 106 | 21 |
| Range | Prt | Res | Avd |
| 1-2 | 16 | 39 | 27 |
| Weapon | Dropped Items | ||
| Agnea's Arrow | Goddess Icon | ||
| Battalion | |||
| Vesta Sorcery Engineers | |||
| Level | Endurance | Gambit | Uses |
| 1-2 | 75 | Resonant Lightning | 1 |
Hubert
| Level | HP | Mov. | Class |
|---|---|---|---|
| 40 | 47 | - | Dark Bishop |
| Mt. | Spd | Hit | Crit |
| 64 | 15 | 113 | 28 |
| Range | Prt | Res | Avd |
| 1-2 | 16 | 39 | 35 |
| Weapon | Dropped Items | ||
| Agnea's Arrow | Goddess Icon | ||
| Battalion | |||
| Vestra Sorcery Engineers | |||
| Level | Endurance | Gambit | Uses |
| 1-2 | 75 | Resonant Lightning | 1 |
Death Knight
| Level | HP | Mov. | Class |
|---|---|---|---|
| 40 | 47 | - | Dark Bishop |
| Mt. | Spd | Hit | Crit |
| 64 | 15 | 113 | 28 |
| Range | Prt | Res | Avd |
| 1-2 | 16 | 39 | 35 |
| Weapon | Dropped Items | ||
| Agnea's Arrow | Goddess Icon | ||
| Battalion | |||
| Vestra Sorcery Engineers | |||
| Level | Endurance | Gambit | Uses |
| 1-2 | 75 | Resonant Lightning | 1 |
Winged Demonic Beast
| Level | HP | Mov. | Class |
|---|---|---|---|
| 40 | 47 | - | Dark Bishop |
| Mt. | Spd | Hit | Crit |
| 64 | 15 | 113 | 28 |
| Range | Prt | Res | Avd |
| 1-2 | 16 | 39 | 35 |
| Weapon | Dropped Items | ||
| Agnea's Arrow | Goddess Icon | ||
| Battalion | |||
| Vestra Sorcery Engineers | |||
| Level | Endurance | Gambit | Uses |
| 1-2 | 75 | Resonant Lightning | 1 |
Loot
There are three items that can be looted in this map: a Dark Seal from Death Knight, a Wo Dao from the swordmaster north of Hubert's position, and a Goddess Icon from Hubert.
| Pos | Loot |
|---|---|
| 1 | Dark Seal |
| 2 | Wo Dao |
| 3 | Goddess Icon |
Dark Seal
Dark Seals are what you use to upgrade units to Dark Mage and Dark Bishop classes in the Certifications menu. This far in, you should already have Advanced classes, so unless you already have a Dark Mage to upgrade, it is not really worth getting this, but since you have to defeat the Death Knight anyway, the point is kind of moot.
Wo Dao
The Wo Dao is a variation of the Killer Sword that cannot be bought, only upgraded from the Killer Sword with 6 Black-Sand Steels and a Professor Level of B. Given that this is quite expensive, if you do have someone who mainly uses sword with good Strength, this will make them incredibly strong in the field. Also, since you're along the final stretch of the game, the fifteen uses should be enough.
Goddess Icon
Increases luck by four points, which slightly raises evasion, and lowers enemy crit chance. Since you need to defeat Hubert anyway. you will definitely get this.
Chapter 19 (Golden Deer) - Chests
There are two chests in this map, one by the northeastern wall entrance and another near the center of the map, by the river. There are no chest keys dropped by enemies so you should either bring someone with the Locktouch ability, or bring your own keys.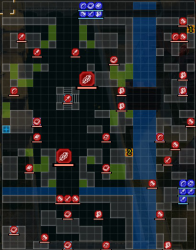
| Pos | Chest Content |
|---|---|
| 1 | Brave Sword |
| 2 | Axe of Zoltan |
Brave Sword
Brave Sword is always useful, as in the right hands it usually ensures that your unit can one-hit enemies without taking damage because they'll be dead before they can counter. Granted that it's also right next to the northeastern entrance, it's not too out of the way if you divert two troops from the north to take the area then return.
Axe of Zoltan
The strongest common axe in game, definitely worth getting especially if you have an axe user (most likely Hilda or Raphael in this case).
Chapter 19 (Golden Deer) - Map Features
The Imperial Capital is split into two parts by the river. The larger western part is more open with a large open paths leading into squares, while the eastern part is a winding maze of buildings that make for tight engagement spaces.
| Tiles | Description |
|---|---|
| Thicket | 20% Avo, 1 Prt to all non-fliers |
| Edifice | Navigable only by fliers |
| River | Navigable only by fliers |
| Fire Orb | 5 Mt, 15 Durability, 3-12 Rng, Can only be used by Magic Classes |
| Onager | 10 Mt, 15 Durability, 3-10 Rng, Cannot be used by mounted or magic units |
| Ballista | 5 Mt, 15 Durability, 3-12 Rng, Requires Bow Skill of D or higher |
| Heal Tile+ | 1 Prt, 1 Res, +30% HP each turn for non-fliers |
| Stronghold | 2 Prt, 2 Res, +30% HP each turn for non-fliers |
Chapter 19 (Golden Deer) - Tips and Tricks
Place Your Fast Movers on the Southern Start
The units starting across the Enbarr river will have to be quick, as there are emplacements on that side that need to be taken quickly in order to prevent reinforcements. Cavalry is good, but fliers would be better so they can easily cross and join your main force in the square, and they can move more freely in the tight confined eastern area.
Take the Emplacements to Stop Reinforcements
There are three emplacements, two by the marketplace east of the river and one in front of the Opera House by the town squares.
Imperial reinforcements will come from the north and south. The first wave will be at the end of Turn 3, where a Winged Demonic Beast will enter from where your north army started. At the end of Turn 6, a Winged Demonic Beast will come from the south along with two Falcon Knights.
Beware of Hubert's Bolting
One of Hubert's spells, Bolting, is very long ranged and high damage. If you're gathering your forces outside the gates for an assault on the compound he's in, he can still attack you if you're too close.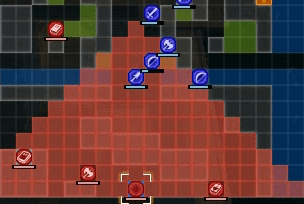
Fire Emblem: Three Houses - Related Links
Part 2 - Verdant Wind Battle Walkthroughs
Comment
Author
Chapter 19: The Enbarr Infiltration (Golden Deer) Walkthrough
improvement survey
03/2026
improving Game8's site?

Your answers will help us to improve our website.
Note: Please be sure not to enter any kind of personal information into your response.

We hope you continue to make use of Game8.
Rankings
- We could not find the message board you were looking for.
Gaming News
Popular Games

Genshin Impact Walkthrough & Guides Wiki

Honkai: Star Rail Walkthrough & Guides Wiki

Umamusume: Pretty Derby Walkthrough & Guides Wiki

Pokemon Pokopia Walkthrough & Guides Wiki

Resident Evil Requiem (RE9) Walkthrough & Guides Wiki

Monster Hunter Wilds Walkthrough & Guides Wiki

Wuthering Waves Walkthrough & Guides Wiki

Arknights: Endfield Walkthrough & Guides Wiki

Pokemon FireRed and LeafGreen (FRLG) Walkthrough & Guides Wiki

Pokemon TCG Pocket (PTCGP) Strategies & Guides Wiki
Recommended Games

Diablo 4: Vessel of Hatred Walkthrough & Guides Wiki

Cyberpunk 2077: Ultimate Edition Walkthrough & Guides Wiki

Fire Emblem Heroes (FEH) Walkthrough & Guides Wiki

Yu-Gi-Oh! Master Duel Walkthrough & Guides Wiki

Super Smash Bros. Ultimate Walkthrough & Guides Wiki

Pokemon Brilliant Diamond and Shining Pearl (BDSP) Walkthrough & Guides Wiki

Elden Ring Shadow of the Erdtree Walkthrough & Guides Wiki

Monster Hunter World Walkthrough & Guides Wiki

The Legend of Zelda: Tears of the Kingdom Walkthrough & Guides Wiki

Persona 3 Reload Walkthrough & Guides Wiki
All rights reserved
©2019 Nintendo / INTELLIGENT SYSTEMS. Co-developed by KOEI TECMO GAMES CO., LTD. Fire Emblem and Nintendo Switch are trademarks of Nintendo. © 2019 Nintendo.
The copyrights of videos of games used in our content and other intellectual property rights belong to the provider of the game.
The contents we provide on this site were created personally by members of the Game8 editorial department.
We refuse the right to reuse or repost content taken without our permission such as data or images to other sites.


![Monster Hunter Stories 3 Review [First Impressions] | Simply Rejuvenating](https://img.game8.co/4438641/2a31b7702bd70e78ec8efd24661dacda.jpeg/thumb)


