Chapter 20: Taking Fort Merceus (Blue Lions) Walkthrough
This is the battle walkthrough for the mission Taking Fort Merceus from Fire Emblem: Three Houses (FETH, FE3H). Read on to find out about map features, what enemies you will encounter, and tips for winning!
List of Contents
| Previous Battle | Story Walkthrough | Next Battle |
|---|---|---|
| Chapter 19: Saving Derdriu | Chapter 20: The Impregnable Fortress | Chapter 21: Assault on Enbarr |
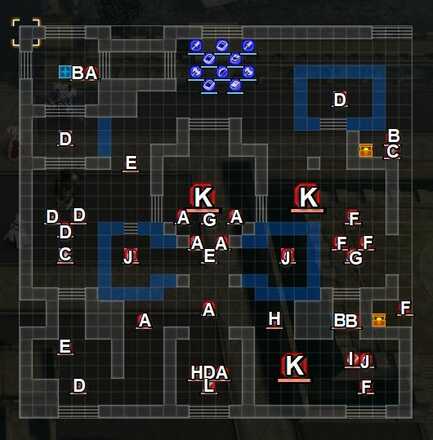
Chapter 20 (Blue Lions) - Map and Overview
| Victory Conditions | |
|---|---|
| Defeat the enemy commander. | |
| Defeat Conditions | |
| Your character or Dimitri falls in battle. | |
| # of Player Units | 10 |
| # of Enemies | 38 |
Chapter 20 (Blue Lions) - Enemies

| A | Imperial Soldier (Fortress Knight) | B | Imperial Soldier (Great Knight) |
|---|---|---|---|
| C | Imperial Soldier (Bishop) | D | Imperial Soldier (Dark Bishop) |
| E | Imperial Soldier (Warlock) | F | Imperial Soldier (Paladin) |
| G | Imperial Soldier (War Master) | H | Imperial Soldier (Warrior) |
| I | Imperial Soldier (Mortal Savant) | J | Imperial Soldier (Sniper) |
| K | Demonic Beast | L | Death Knight |
Death Knight
| Level | HP | Mov. | Class |
|---|---|---|---|
| 50 | 57 | - | Death Knight |
| Mt. | Spd | Hit | Crit |
| 50 | 30 | 130 | 43 |
| Range | Prt | Res | Avd |
| 1 | 29 | 23 | 45 |
| Weapon | Dropped Items | ||
| Scythe of Sariel | N/A | ||
Caspar
| Level | HP | Mov. | Class |
|---|---|---|---|
| 40 | 68 | 6 | War Master |
| Mt. | Spd | Hit | Crit |
| 55 | 21 | 97 | 38 |
| Range | Prt | Res | Avd |
| 1 | 27 | 10 | 31 |
| Weapon | Dropped Items | ||
| Brave Axe | Brave Axe | ||
Linhardt
| Level | HP | Mov. | Class |
|---|---|---|---|
| 40 | 43 | 4 | Bishop |
| Mt. | Spd | Hit | Crit |
| 29 | 9 | 110 | 20 |
| Range | Prt | Res | Avd |
| 1-2 | 12 | 37 | 49 |
| Weapon | Dropped Items | ||
| Nosferatu | N/A | ||
Death Knight
| Level | HP | Mov. | Class |
|---|---|---|---|
| 50 | 64 | 7 | Death Knight |
| Mt. | Spd | Hit | Crit |
| 60 | 32 | 107 | 21 |
| Range | Prt | Res | Avd |
| 7 | 37 | 30 | 60 |
| Weapon | Dropped Items | ||
| Brave Lance | N/A | ||
| Battalion | |||
| Reaper Knights | |||
| Level | Endurance | Gambit | Uses |
| 7 | 75 | Assault Troop | 2 |
Caspar
Enemy data will be gathered soon.
Linhardt
Enemy data will be gathered soon.
Loot
Brave Axe

Caspar (or the war master on the east side of the map) drops a Brave Axe he has equipped upon defeat.
Chapter 20 (Blue Lions) - Chests

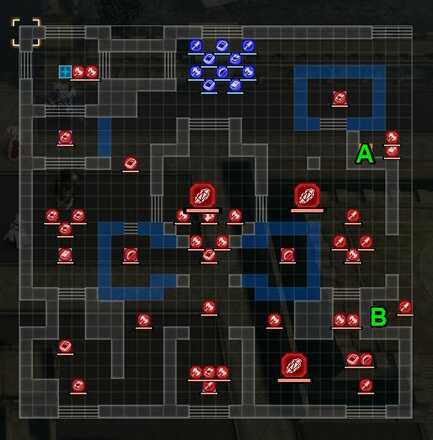
Extra Large Bullion - A
An Extra Large Bullion can be found on the northern chest marked as A on the image above.
Black Pearl - B
A Black Pearl can be found on the southern chest marked as B on the image above.
There are no keys available on this map so bring a unit with lockpick or bring chest keys to secure the treasures.
Chapter 20 (Blue Lions) - Map Features
## Tiles
| Tiles | Description |
|---|---|
| Stairs | Difficult for cavalry to traverse |
| Rampart | Navigable only by fliers |
| Channel | Navigable only by fliers |
| Fire Orb | 5 Mt, 15 Durability, 3-12 Rng, Can only be used by Magic Classes |
| Ballista | 5 Mt, 15 Durability, 3-12 Rng, Requires Bow Skill of D or higher |
| Heal Tile+ | 1 Prt, 1 Res, +30% HP each turn for non-fliers |
Ballistae and Fire Orbs
There are fire orbs and Ballistae scattered on the map. Navigate your units around taking these tiles to secure dominance in the battlefield.
Enemy Reinforcements
There's a small center fortress, with big aisles to either side of it, where reinforcements come from. The emplacements are elevated, but can be flown into to dispatch of quickly. The area is mazelike and hard to navigate.
Chapter 20 (Blue Lions) - Tips and Tricks
Taking out the Defenses
The ballistae and fire orbs are relatively unguarded, so sending a flyer in to take care of them could work, granted you defeat them once you swoop down.
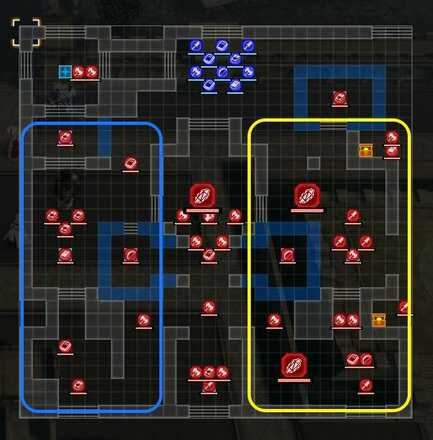
Physical and Magic Sides
The blue area has more magic users while the yellow side has more damage dealers. Place your units accordingly.
Linhardt's side, the west side, mostly has mages while Caspars mostly has Cavaliers. Split your party accordingly so that your units susceptible to mages do not engage Linhardt's forces and vice versa.
Stopping Enemy Reinforcements
For every turn Caspar and Linhardt are alive, a Paladin and a Dark Bishop will come from the south entrance of their respective sides. Eliminate them and stop these units from spawning.
Using Ballistae against Caspar and Linhardt
If you take the center early and man the ballistae, Caspar, Linhardt and their retinue are in range of it and can be attacked by them.
Take out the Magic Orb Early
If you have a flier, putting them on your right flank can have them reach the eastern magical orb in turn one if they're strong enough to beat the Dark Bishop in one hit. Recommend using a Pegasus Knight, as they are strong versus mages.
Fire Emblem: Three Houses - Related Links
Part 2 - Azure Moon Battle Walkthroughs
Comment
Author
Chapter 20: Taking Fort Merceus (Blue Lions) Walkthrough
improvement survey
03/2026
improving Game8's site?

Your answers will help us to improve our website.
Note: Please be sure not to enter any kind of personal information into your response.

We hope you continue to make use of Game8.
Rankings
- We could not find the message board you were looking for.
Gaming News
Popular Games

Genshin Impact Walkthrough & Guides Wiki

Honkai: Star Rail Walkthrough & Guides Wiki

Umamusume: Pretty Derby Walkthrough & Guides Wiki

Pokemon Pokopia Walkthrough & Guides Wiki

Resident Evil Requiem (RE9) Walkthrough & Guides Wiki

Monster Hunter Wilds Walkthrough & Guides Wiki

Wuthering Waves Walkthrough & Guides Wiki

Arknights: Endfield Walkthrough & Guides Wiki

Pokemon FireRed and LeafGreen (FRLG) Walkthrough & Guides Wiki

Pokemon TCG Pocket (PTCGP) Strategies & Guides Wiki
Recommended Games

Diablo 4: Vessel of Hatred Walkthrough & Guides Wiki

Fire Emblem Heroes (FEH) Walkthrough & Guides Wiki

Yu-Gi-Oh! Master Duel Walkthrough & Guides Wiki

Super Smash Bros. Ultimate Walkthrough & Guides Wiki

Pokemon Brilliant Diamond and Shining Pearl (BDSP) Walkthrough & Guides Wiki

Elden Ring Shadow of the Erdtree Walkthrough & Guides Wiki

Monster Hunter World Walkthrough & Guides Wiki

The Legend of Zelda: Tears of the Kingdom Walkthrough & Guides Wiki

Persona 3 Reload Walkthrough & Guides Wiki

Cyberpunk 2077: Ultimate Edition Walkthrough & Guides Wiki
All rights reserved
©2019 Nintendo / INTELLIGENT SYSTEMS. Co-developed by KOEI TECMO GAMES CO., LTD. Fire Emblem and Nintendo Switch are trademarks of Nintendo. © 2019 Nintendo.
The copyrights of videos of games used in our content and other intellectual property rights belong to the provider of the game.
The contents we provide on this site were created personally by members of the Game8 editorial department.
We refuse the right to reuse or repost content taken without our permission such as data or images to other sites.


![Everwind Review [Early Access] | The Shaky First Step to A Very Long Journey](https://img.game8.co/4440226/ab079b1153298a042633dd1ef51e878e.png/thumb)

![Monster Hunter Stories 3 Review [First Impressions] | Simply Rejuvenating](https://img.game8.co/4438641/2a31b7702bd70e78ec8efd24661dacda.jpeg/thumb)


