Chapter 18: The Enbarr Infiltration (Church) Walkthrough
This is the battle walkthrough for the mission The Enbarr Infiltration (Church Route) in Fire Emblem: Three Houses (FETH, FE3H). Read on to find out about map features, what enemies you will encounter, and tips for winning!
List of Contents
| Previous Battle | Story Walkthrough | Next Battle |
|---|---|---|
| Chapter 17: Taking Fort Merceus | Chapter 18: The Chaos of War | Chapter 19: Confrontation at the Palace |
Chapter 18 (Church) - Map and Overview
| Victory Conditions | |
|---|---|
| Defeat enemy commanders | |
| Defeat Conditions | |
| Byleth falls in battle. | |
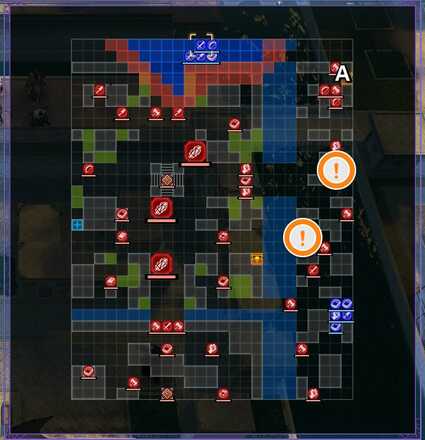
| # of Player Units | 10 |
| # of Enemies | 40 |
Chapter 18 (Church) - Enemies

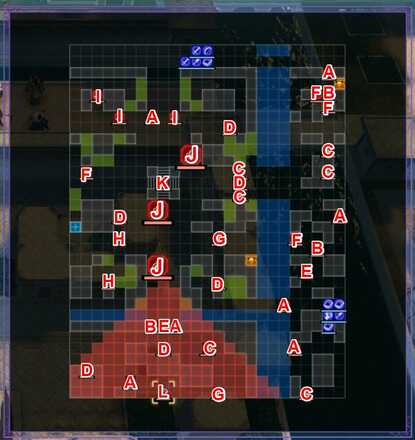
| A | Imperial Soldier (Fortress Knight) | B | Imperial Soldier (Warrior) |
|---|---|---|---|
| C | Imperial Soldier (Grappler) | D | Imperial Soldier (Warlock) |
| E | Imperial Soldier (Swordmaster) | F | Imperial Soldier (Sniper) |
| G | Imperial Soldier (Dark Bishop) | H | Imperial Soldier (Bishop) |
| I | Imperial Soldier (Paladin) | J | Winged Demonic Beast |
| K | Death Knight | L | Hubert |
Death Knight
| Level | HP | Mov. | Class |
|---|---|---|---|
| 48 | 63 | 7 | Death Knight |
| Mt. | Spd | Hit | Crit |
| 60 | 36 | 37 | 50 |
| Range | Prt | Res | Avd |
| 1 | 37 | 29 | 66 |
| Weapon | Dropped Items | ||
| Scythe of Sariel | Dark Seal | ||
| Battalion | |||
| Reaper Knights | |||
| Level | Endurance | Gambit | Uses |
| 1 | 75 | Assault Troop | 2 |
Hubert
| Level | HP | Mov. | Class |
|---|---|---|---|
| 40 | 47 | - | Dark Bishop |
| Mt. | Spd | Hit | Crit |
| 64 | 15 | 113 | 28 |
| Range | Prt | Res | Avd |
| 1-2 | 16 | 39 | 35 |
| Weapon | Dropped Items | ||
| Agnea's Arrow | Goddess Icon | ||
| Battalion | |||
| Vestra Sorcery Engineers | |||
| Level | Endurance | Gambit | Uses |
| 1-2 | 75 | Resonant Lightning | 1 |
Chapter 18 (Church) - Chests

Brave Sword (A)
A Brave Sword can be obtained from the chest at the north eastern side of the map.
Axe of Zoltan (B)
An Axe of Zoltan can be obtained near the center of the battlefield (at the bottom right corner of the center area).
Chapter 18 (Church) - Map Features
Tiles
| Tiles | Description |
|---|---|
| Rampart | Navigable only by fliers |
| Stairs | Difficult for cavalry to travers |
| Fire Orb | 5 Mt, 15 Durability, 3-12 Rng, Can only be used by Magic Classes |
| Ballista | 5 Mt, 15 Durability, 3-12 Rng, Requires Bow Skill of D or higher |
| Heal Tile+ | 1 Prt, 1 Res, +30% HP each turn for non-fliers |
Church (Green) and Opera (Yellow)

If Dorothea/Manuela are placed near the Opera and/or Seteth/Flayn are placed near the Church, you can gain some new battalions after the battle.
Reinforcements
There are 2 sets of reinforcemens consisting of 3 Pegasus Knights and a Demon Beast for the first batch and 2 Pegasus Knights with a Demon Beast on the second one. Contrary to what Hubert will say during the battle, no more units will come after these two.
Chapter 18 (Church) - Tips and Tricks
Occupy the Onager and Ballista
Onager and Ballista location
These are the two most important tiles you need to occupy in the battle as swiftly as possible. They will help you combat the incoming Pegasus Knights and Demon Beasts and will allow you to lure enemies (more on this below.)
Luring Enemies
After occupying the Ballista, you can start attacking enemies from far away. With the Death Knight occupying the center of the battlefield, it is close to impossible to win by fighting them head on. Attack the Demon Beasts and other units within the range of the Ballista then kill them when they approach.
Luring the Death Knight
There is a Fire Orb behind the Death Knight so a single unit might not survive the extreme damage the Death Knight can deal followed up by the Fire Orb. Deploy at least two units adjacent to each other to divide the aggro of the Fire Orb and the Death Knight
Approaching Hubert

Hubert has the magic Bolting which has extreme range and damage. Fortunately, magic has limited uses, so prepare a unit with high resistance to magic and use a Pure Water on them until Hubert exhausts all of Bolting's uses. This will allow you to approach Hubert easily.
Fire Emblem: Three Houses - Related Links
Part 2 - Silver Snow Battle Walkthroughs
Comment
Author
Chapter 18: The Enbarr Infiltration (Church) Walkthrough
improvement survey
03/2026
improving Game8's site?

Your answers will help us to improve our website.
Note: Please be sure not to enter any kind of personal information into your response.

We hope you continue to make use of Game8.
Rankings
- We could not find the message board you were looking for.
Gaming News
Popular Games

Genshin Impact Walkthrough & Guides Wiki

Honkai: Star Rail Walkthrough & Guides Wiki

Umamusume: Pretty Derby Walkthrough & Guides Wiki

Pokemon Pokopia Walkthrough & Guides Wiki

Resident Evil Requiem (RE9) Walkthrough & Guides Wiki

Monster Hunter Wilds Walkthrough & Guides Wiki

Wuthering Waves Walkthrough & Guides Wiki

Arknights: Endfield Walkthrough & Guides Wiki

Pokemon FireRed and LeafGreen (FRLG) Walkthrough & Guides Wiki

Pokemon TCG Pocket (PTCGP) Strategies & Guides Wiki
Recommended Games

Diablo 4: Vessel of Hatred Walkthrough & Guides Wiki

Fire Emblem Heroes (FEH) Walkthrough & Guides Wiki

Yu-Gi-Oh! Master Duel Walkthrough & Guides Wiki

Super Smash Bros. Ultimate Walkthrough & Guides Wiki

Pokemon Brilliant Diamond and Shining Pearl (BDSP) Walkthrough & Guides Wiki

Elden Ring Shadow of the Erdtree Walkthrough & Guides Wiki

Monster Hunter World Walkthrough & Guides Wiki

The Legend of Zelda: Tears of the Kingdom Walkthrough & Guides Wiki

Persona 3 Reload Walkthrough & Guides Wiki

Cyberpunk 2077: Ultimate Edition Walkthrough & Guides Wiki
All rights reserved
©2019 Nintendo / INTELLIGENT SYSTEMS. Co-developed by KOEI TECMO GAMES CO., LTD. Fire Emblem and Nintendo Switch are trademarks of Nintendo. © 2019 Nintendo.
The copyrights of videos of games used in our content and other intellectual property rights belong to the provider of the game.
The contents we provide on this site were created personally by members of the Game8 editorial department.
We refuse the right to reuse or repost content taken without our permission such as data or images to other sites.


![Everwind Review [Early Access] | The Shaky First Step to A Very Long Journey](https://img.game8.co/4440226/ab079b1153298a042633dd1ef51e878e.png/thumb)

![Monster Hunter Stories 3 Review [First Impressions] | Simply Rejuvenating](https://img.game8.co/4438641/2a31b7702bd70e78ec8efd24661dacda.jpeg/thumb)


