Chapter 17: Taking Fort Merceus (Church) Walkthrough
This is the battle walkthrough for the mission Taking Fort Merceus from Fire Emblem: Three Houses (FETH, FE3H). Read on to find out about map features, what enemies you will encounter, and tips for winning!
List of Contents
| Previous Battle | Story Walkthrough | Next Battle |
|---|---|---|
| Chapter 16: The Great Bridge Coup | Chapter 17: The Impregnable Fortress | Chapter 18: The Enbarr Infiltration |
Chapter 17 (Church) - Map and Overview
| Victory Conditions | |
|---|---|
| Defeat the enemy commander. | |
| Defeat Conditions | |
| Byleth falls in battle. | |
| # of Player Units | 10 |
| # of Enemies | 37 |
Chapter 17 (Church) - Enemies

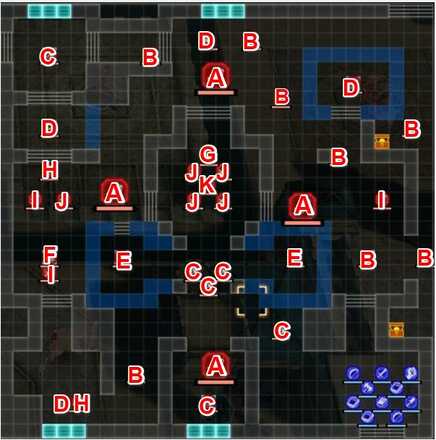
| A | Demon Beasts | B | Imperial Soldier (Paladin) |
|---|---|---|---|
| C | Imperial Soldier (Fortress Knight)) | D | Imperial Soldier (Dark Mage) |
| E | Imperial Soldier (Archer) | F | Imperial Soldier (Warrior) |
| G | Imperial Soldier (Bishop) | H | Imperial Soldier (Dark Bishop) |
| I | Imperial Soldier (Sword Master) | J | Imperial Soldier (Assassin) |
| K | Death Knight | - | - |
Death Knight
| Level | HP | Mov. | Class |
|---|---|---|---|
| 45 | 61 | - | Death Knight |
| Mt. | Spd | Hit | Crit |
| 57 | 34 | 132 | 49 |
| Range | Prt | Res | Avd |
| 1 | 34 | 28 | 59 |
| Weapon | Dropped Items | ||
| Scythe of Sariel | Dark Seal | ||
| Battalion | |||
| Reaper Knights | |||
| Level | Endurance | Gambit | Uses |
| 1 | 75 | Assault Troop | 2 |
Chapter 17 (Church) - Chests

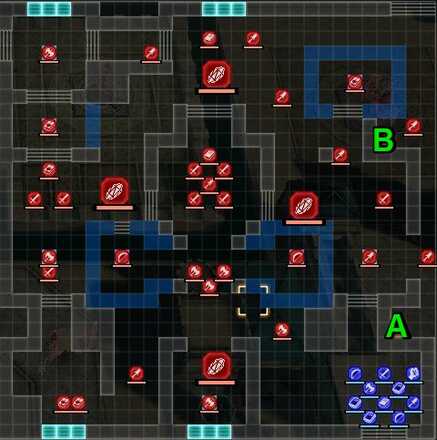
Speedwing (A)
A Speedwing can be obtained from the chest near the starting point of your units.
Aurora Shield (B)
An Aurora Shield can be obtained from the chest located on the far north side of the map.
Chapter 17 (Church) - Map Features
Tiles
| Tiles | Description |
|---|---|
| Rampart | Navigable only by fliers |
| Stairs | Difficult for cavalry to travers |
| Fire Orb | 5 Mt, 15 Durability, 3-12 Rng, Can only be used by Magic Classes |
| Ballista | 5 Mt, 15 Durability, 3-12 Rng, Requires Bow Skill of D or higher |
| Heal Tile+ | 1 Prt, 1 Res, +30% HP each turn for non-fliers |
Reinforcement Tiles

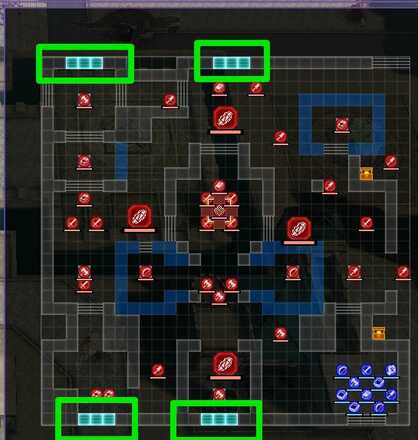
There are tiles on the battlefield that can be stepped on to stop the influx of enemy units from entering the fray. You can leave the tile after stepping on it and the enemies still won't respawn.
Escape Route
The Death Knight will start escaping during the battle. You must defeat the Death Knight the moment you reach him.
Chapter 17 (Church) - Tips and Tricks
Deploy a High Mobility Unit to Get Chests
Deploying a fast unit can minimize the time spent obtaining the chest. Prolonging the fight will cause enemies to swarm your team so time is of the essence.
Capture and Leave Respawn Tiles
You only need to step on the respawn tiles to make enemies stop from respawning. No need to make your units stay and make them help in the battle!
Bring a Unit with Knightkneeler
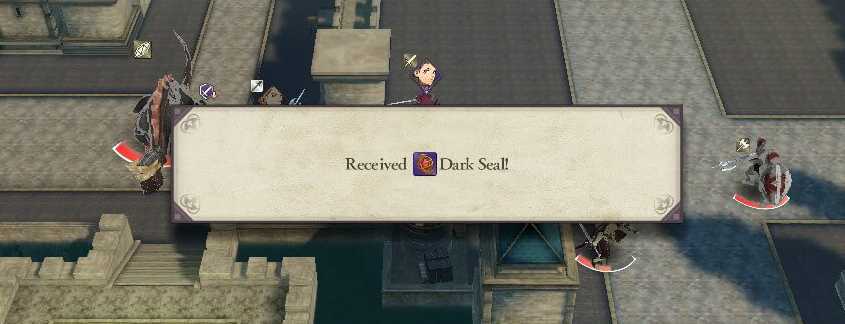
The Death Knight dropping a Dark Seal after its death.
Your units should be strong enough to survive an attack from the Death Knight but that doesn't mean the Death Knight is now an easy foe. Defeating him immediately is a must and the Knightkneeler Combat Art does this right.
Fire Emblem: Three Houses - Related Links
Part 2 - Silver Snow Battle Walkthroughs
Comment
Author
Chapter 17: Taking Fort Merceus (Church) Walkthrough
improvement survey
03/2026
improving Game8's site?

Your answers will help us to improve our website.
Note: Please be sure not to enter any kind of personal information into your response.

We hope you continue to make use of Game8.
Rankings
- We could not find the message board you were looking for.
Gaming News
Popular Games

Genshin Impact Walkthrough & Guides Wiki

Honkai: Star Rail Walkthrough & Guides Wiki

Umamusume: Pretty Derby Walkthrough & Guides Wiki

Pokemon Pokopia Walkthrough & Guides Wiki

Resident Evil Requiem (RE9) Walkthrough & Guides Wiki

Monster Hunter Wilds Walkthrough & Guides Wiki

Wuthering Waves Walkthrough & Guides Wiki

Arknights: Endfield Walkthrough & Guides Wiki

Pokemon FireRed and LeafGreen (FRLG) Walkthrough & Guides Wiki

Pokemon TCG Pocket (PTCGP) Strategies & Guides Wiki
Recommended Games

Diablo 4: Vessel of Hatred Walkthrough & Guides Wiki

Fire Emblem Heroes (FEH) Walkthrough & Guides Wiki

Yu-Gi-Oh! Master Duel Walkthrough & Guides Wiki

Super Smash Bros. Ultimate Walkthrough & Guides Wiki

Pokemon Brilliant Diamond and Shining Pearl (BDSP) Walkthrough & Guides Wiki

Elden Ring Shadow of the Erdtree Walkthrough & Guides Wiki

Monster Hunter World Walkthrough & Guides Wiki

The Legend of Zelda: Tears of the Kingdom Walkthrough & Guides Wiki

Persona 3 Reload Walkthrough & Guides Wiki

Cyberpunk 2077: Ultimate Edition Walkthrough & Guides Wiki
All rights reserved
©2019 Nintendo / INTELLIGENT SYSTEMS. Co-developed by KOEI TECMO GAMES CO., LTD. Fire Emblem and Nintendo Switch are trademarks of Nintendo. © 2019 Nintendo.
The copyrights of videos of games used in our content and other intellectual property rights belong to the provider of the game.
The contents we provide on this site were created personally by members of the Game8 editorial department.
We refuse the right to reuse or repost content taken without our permission such as data or images to other sites.


![Everwind Review [Early Access] | The Shaky First Step to A Very Long Journey](https://img.game8.co/4440226/ab079b1153298a042633dd1ef51e878e.png/thumb)

![Monster Hunter Stories 3 Review [First Impressions] | Simply Rejuvenating](https://img.game8.co/4438641/2a31b7702bd70e78ec8efd24661dacda.jpeg/thumb)


