Chapter 14: Protecting Garreg Mach (Golden Deers) Walkthrough
This is the battle walkthrough for the mission Hunting by Daybreak from Fire Emblem: Three Houses (FETH, FE3H). Read on to find out about map features, what enemies you will encounter, and tips for winning!
List of Contents
| Previous Battle | Story Walkthrough | Next Battle |
|---|---|---|
| Chapter 13: Hunting by Daybreak | Chapter 14: The Alliance Leader's Ambitions | Chapter 15: Ambush at Ailell |
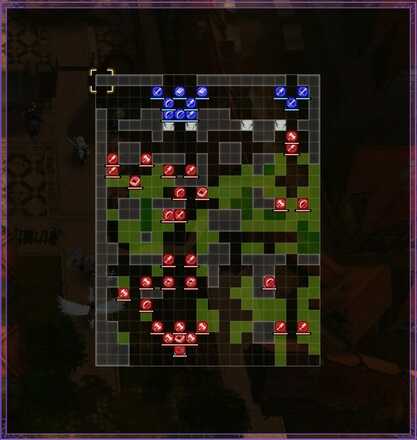
Chapter 14 (Golden Deers) - Map and Overview

| Victory Conditions | |
|---|---|
| Route the enemy. ↓ Defeat the enemy commander. |
|
| Defeat Conditions | |
| All your units fall in battle, or a defended location is captured. | |
| # of Player Units | 11 |
| # of Enemies | Normal: 31 Hard: 35 |
Chapter 14 (Golden Deers) - Enemies
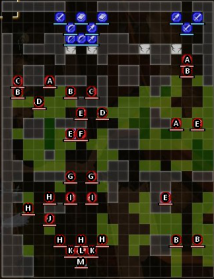
You will be facing Imperial Soldiers. Most of them are mounted and long-range so do not take them lightly. Randolph is accompanied by a squad of fortress knights, with warriors and a warlock to deal damage.
When there are only 5 enemy units left, Randolph will leave the Heal Tile+ and rush to your position.

| Pos | Enemy | Pos | Enemy |
|---|---|---|---|
| A | Imperial Soldier (Armored Knight) | H | Imperial Soldier (Fortress Knight) |
| B | Imperial Soldier (Pegasus Knight) | I | Imperial Soldier (Dark Bishop) |
| C | Imperial Soldier (Cavalier) | J | Imperial Soldier (Sniper) |
| D | Imperial Soldier (Mage) | K | Imperial Soldier (Warrior) |
| E | Imperial Soldier (Archer) | L | Imperial Soldier (Warlock) |
| F | Imperial Soldier (Mercenary) | M | Randolph |
| G | Imperial Soldier (Paladin) |
Enemy Stats
Randolph
| Level | HP | Mov. | Class |
|---|---|---|---|
| 29 | 52 | - | Warrior |
| Mt. | Spd | Hit | Crit |
| 52 | 10 | 83 | 22 |
| Range | Prt | Res | Avd |
| 1 | 21 | 8 | 18 |
| Weapon | Dropped Items | ||
| Silver Axe | N/A | ||
| Battalion | |||
| Empire Raiders | |||
| Level | Endurance | Gambit | Uses |
| 1 | 75 | Absorption | 1 |
Randolph
| Level | HP | Mov. | Class |
|---|---|---|---|
| 30 | 57 | - | Warrior |
| Mt. | Spd | Hit | Crit |
| 57 | 16 | 101 | 26 |
| Range | Prt | Res | Avd |
| 1 | 26 | 13 | 31 |
| Weapon | Dropped Items | ||
| Silver Axe | N/A | ||
| Battalion | |||
| Empire Raiders | |||
| Level | Endurance | Gambit | Uses |
| 1 | 75 | Absorption | 1 |
Loot
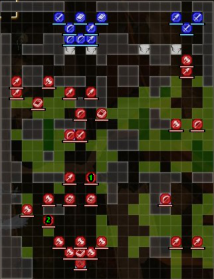
There are two lootable items in this map.

| Pos | Loot |
|---|---|
| 1 | Brave Lance |
| 2 | Magic Bow |
Brave Lance
A Brave Lance is definitely worth it, due to the double attack. More often than not, in the hands of a skilled lance user, it allows them to defeat enemies in one battle. It's also in the to Randolph, so you'll encounter it anyway unless you flank from the right.
Magic Bow
A bow that deals magic damage instead of physical, targeting Res instead of Def. Good to have for archers with decent Mag skill, especially versus armored and flying units.
Chapter 14 (Golden Deers) - Chests
There are no chests in this battle.
Chapter 14 (Golden Deers) - Map Features
A wide map with few adjacent spaces, you can easily lose your allies if you are not careful. The area is surrounded by terrain only navigable by fliers, as well as fences you can destroy.
Terrain Types
| Tiles | Description |
|---|---|
| Wall (Breakable) | HP 20, Impassable until destroyed |
| Edifice Fence Rampart |
Navigable only by fliers |
| Forest | 1 Prt, +30% Avo, except for fliers |
| Thicket | 1 Prt, +20% Avo, except for fliers |
| Onager | 1o Mt, 15 Durability, 3-10 Range, cannot be used by mounted or magic units |
| Heal Tile+ | 1 Prt, 1 Res, +30% HP each turn for non-fliers |
Chapter 14 (Golden Deers) - Tips and Tricks
Equip Unit-Effective Weapons
Most of the enemy units are armored, and with new weapons in the Armory, you should be able to get swords and axes that can pierce through armor. The Golden Deers house also has a lot of archers so you should be strong against flying units.
Go on Defense
We highly recommend staying on the backline and waiting for the enemies to approach you. If most of your units are archers and mages, you could be easily wiped out. Stay on the defensive side of the battle and let the long-ranged units attack from afar, and let the tankier units be in front.
Secure the Onagers
Depending on your strategy, if you want to push the enemies back, make sure to secure the onager for the other allies (NPCs).
Fire Emblem: Three Houses - Related Links
Part 2 - Verdant Wind Battle Walkthroughs
Comment
Author
Chapter 14: Protecting Garreg Mach (Golden Deers) Walkthrough
improvement survey
03/2026
improving Game8's site?

Your answers will help us to improve our website.
Note: Please be sure not to enter any kind of personal information into your response.

We hope you continue to make use of Game8.
Rankings
- We could not find the message board you were looking for.
Gaming News
Popular Games

Genshin Impact Walkthrough & Guides Wiki

Honkai: Star Rail Walkthrough & Guides Wiki

Umamusume: Pretty Derby Walkthrough & Guides Wiki

Pokemon Pokopia Walkthrough & Guides Wiki

Resident Evil Requiem (RE9) Walkthrough & Guides Wiki

Monster Hunter Wilds Walkthrough & Guides Wiki

Wuthering Waves Walkthrough & Guides Wiki

Arknights: Endfield Walkthrough & Guides Wiki

Pokemon FireRed and LeafGreen (FRLG) Walkthrough & Guides Wiki

Pokemon TCG Pocket (PTCGP) Strategies & Guides Wiki
Recommended Games

Diablo 4: Vessel of Hatred Walkthrough & Guides Wiki

Fire Emblem Heroes (FEH) Walkthrough & Guides Wiki

Yu-Gi-Oh! Master Duel Walkthrough & Guides Wiki

Super Smash Bros. Ultimate Walkthrough & Guides Wiki

Pokemon Brilliant Diamond and Shining Pearl (BDSP) Walkthrough & Guides Wiki

Elden Ring Shadow of the Erdtree Walkthrough & Guides Wiki

Monster Hunter World Walkthrough & Guides Wiki

The Legend of Zelda: Tears of the Kingdom Walkthrough & Guides Wiki

Persona 3 Reload Walkthrough & Guides Wiki

Cyberpunk 2077: Ultimate Edition Walkthrough & Guides Wiki
All rights reserved
©2019 Nintendo / INTELLIGENT SYSTEMS. Co-developed by KOEI TECMO GAMES CO., LTD. Fire Emblem and Nintendo Switch are trademarks of Nintendo. © 2019 Nintendo.
The copyrights of videos of games used in our content and other intellectual property rights belong to the provider of the game.
The contents we provide on this site were created personally by members of the Game8 editorial department.
We refuse the right to reuse or repost content taken without our permission such as data or images to other sites.


![Everwind Review [Early Access] | The Shaky First Step to A Very Long Journey](https://img.game8.co/4440226/ab079b1153298a042633dd1ef51e878e.png/thumb)

![Monster Hunter Stories 3 Review [First Impressions] | Simply Rejuvenating](https://img.game8.co/4438641/2a31b7702bd70e78ec8efd24661dacda.jpeg/thumb)


