Chapter 17: To War at Gronder (Blue Lions) Walkthrough
This is the battle walkthrough for the mission To War at Gronder from Fire Emblem: Three Houses (FETH, FE3H). Read on to find out about map features, what enemies you will encounter, and tips for winning!
List of Contents
| Previous Battle | Story Walkthrough | Next Battle |
|---|---|---|
| Chapter 16: The Great Bridge Coup |
Chapter 17: Blood of the Eagle and Lion | Chapter 18: Reclaiming the Capital |
Chapter 17 (Blue Lions) - Map and Overview

| Victory Conditions | |
|---|---|
| Defeat all enemy commanders. | |
| Defeat Conditions | |
| Your character or Dimitri falls in battle. | |
| # of Player Units | 10 |
| # of Enemies | 22 |
| # of Third Army | 16 |
Chapter 17 (Blue Lions) - Enemies
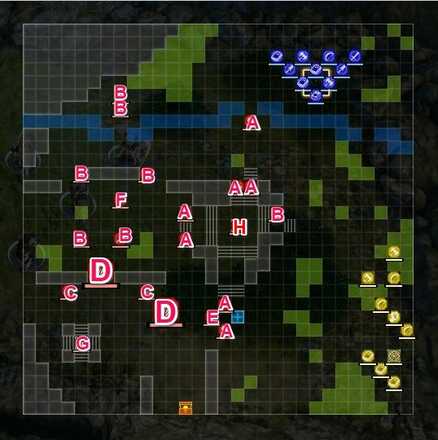
| Adrestrian Empire (Edelgard's Forces) | |||
|---|---|---|---|
| A | Imperial Soldier (Fortress Knight) | B | Imperial Soldier (Paladin) |
| C | Mysterious Soldier (Dark Bishop) | D | Demonic Beast |
| E | Petra | F | Hubert |
| G | Edelgard | H | Bernadetta |
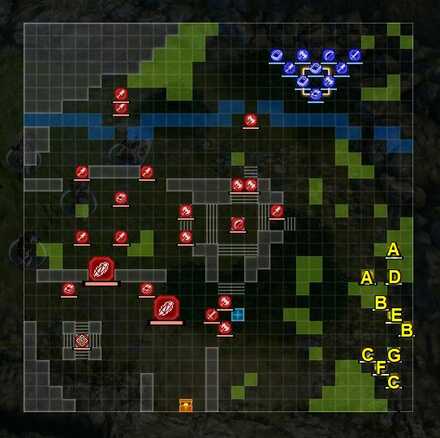
| Leicester Alliance (Claude's Forces) | |||
|---|---|---|---|
| A | Alliance Soldier (Fortress Knight) | B | Alliance Soldier (Sniper) |
| C | Alliance Soldier (Warlock) | D | Ignatz |
| E | Raphael | F | Lysithea |
| G | Claude | - | - |
Enemy Stats (Normal)
Bernadetta
| Level | HP | Mov. | Class |
|---|---|---|---|
| 34 | 42 | - | Sniper |
| Mt. | Spd | Hit | Crit |
| 36 | 10 | 142 | 24 |
| Range | Prt | Res | Avd |
| 2-3 | 16 | 8 | 10 |
| Weapon | Dropped Items | ||
| Brave Bow | Brave Bow | ||
| Battalion | |||
| Varley Archers | |||
| Level | Endurance | Gambit | Uses |
| 2-3 | 75 | Fusillade | 2 |
Petra
| Level | HP | Mov. | Class |
|---|---|---|---|
| 34 | 45 | 6 | Assassin |
| Mt. | Spd | Hit | Crit |
| 44 | 35 | 126 | 31 |
| Range | Prt | Res | Avd |
| 1 | 18 | 8 | 69 |
| Weapon | Dropped Items | ||
| Sword of Zoltan | N/A | ||
| Battalion | |||
| Brigid Hunters | |||
| Level | Endurance | Gambit | Uses |
| 1 | 105 | Poison Tactic | 1 |
Hubert
| Level | HP | Mov. | Class |
|---|---|---|---|
| 34 | 39 | 4 | Dark Bishop |
| Mt. | Spd | Hit | Crit |
| 48 | 10 | 103 | 20 |
| Range | Prt | Res | Avd |
| 1-2 | 15 | 35 | 25 |
| Weapon | Dropped Items | ||
| Banshee Θ | N/A | ||
| Battalion | |||
| Vestra Sorcery Engineers | |||
| Level | Endurance | Gambit | Uses |
| 1-2 | 75 | Resonant Lightning | 1 |
Edelgard
| Level | HP | Mov. | Class |
|---|---|---|---|
| 35 | 49 | 5 | Armored Lord |
| Mt. | Spd | Hit | Crit |
| 63 | 8 | 114 | 32 |
| Range | Prt | Res | Avd |
| 1 | 27 | 17 | 6 |
| Weapon | Dropped Items | ||
| Aymr | N/A | ||
| Battalion | |||
| Supreme Armored Co. | |||
| Level | Endurance | Gambit | Uses |
| 1 | 120 | Raging Flames | 2 |
Ignatz
| Level | HP | Mov. | Class |
|---|---|---|---|
| 34 | 42 | 5 | Sniper |
| Mt. | Spd | Hit | Crit |
| 43 | 15 | 150 | 28 |
| Range | Prt | Res | Avd |
| 2-3 | 15 | 16 | 45 |
| Weapon | Dropped Items | ||
| Silver Bow | N/A | ||
| Battalion | |||
| Victor Private Military | |||
| Level | Endurance | Gambit | Uses |
| 2-3 | 105 | Assembly | 2 |
Raphael
| Level | HP | Mov. | Class |
|---|---|---|---|
| 34 | 65 | 6 | Grappler |
| Mt. | Spd | Hit | Crit |
| 44 | 15 | 124 | 32 |
| Range | Prt | Res | Avd |
| 1 | 29 | 6 | 28 |
| Weapon | Dropped Items | ||
| Silver Gauntlets | N/A | ||
| Battalion | |||
| Leicester Mercenaries | |||
| Level | Endurance | Gambit | Uses |
| 1 | 105 | Blaze | 1 |
Lysithea
| Level | HP | Mov. | Class |
|---|---|---|---|
| 34 | 34 | 5 | Gremory |
| Mt. | Spd | Hit | Crit |
| 62 | 12 | 131 | 21 |
| Range | Prt | Res | Avd |
| 1-2 | 13 | 33 | 39 |
| Weapon | Dropped Items | ||
| Dark Spikes T | N/A | ||
| Battalion | |||
| Ordelia Sorcery Co. | |||
| Level | Endurance | Gambit | Uses |
| 1-2 | 75 | Resonant Lightning | 1 |
Claude
| Level | HP | Mov. | Class |
|---|---|---|---|
| 35 | 42 | 7 | Wyvern Master |
| Mt. | Spd | Hit | Crit |
| 55 | 22 | 113 | 41 |
| Range | Prt | Res | Avd |
| 2-3 | 18 | 11 | 47 |
| Weapon | Dropped Items | ||
| Failnaught | N/A | ||
| Battalion | |||
| Immortal Corps | |||
| Level | Endurance | Gambit | Uses |
| 2-3 | 120 | Ashes and Dust | 2 |
Hilda
| Level | HP | Mov. | Class |
|---|---|---|---|
| 34 | 60 | 5 | Warrior |
| Mt. | Spd | Hit | Crit |
| 68 | 16 | 127 | 46 |
| Range | Prt | Res | Avd |
| 1 | 27 | 9 | 23 |
| Weapon | Dropped Items | ||
| Freikugel | N/A | ||
| Battalion | |||
| Goneril Valkyries | |||
| Level | Endurance | Gambit | Uses |
| 1 | 105 | Assault Troop | 2 |
Leonie
Enemy data will be gathered soon.
Enemy Stats (Hard)
Bernadetta
Enemy data will be gathered soon.
Petra
| Level | HP | Mov. | Class |
|---|---|---|---|
| 35 | 51 | 6 | Assassin |
| Mt. | Spd | Hit | Crit |
| 51 | 42 | 132 | 38 |
| Range | Prt | Res | Avd |
| 1 | 24 | 8 | 78 |
| Weapon | Dropped Items | ||
| Sword of Zoltan | N/A | ||
| Battalion | |||
| Brigid Hunters | |||
| Level | Endurance | Gambit | Uses |
| 1 | 105 | Poison Tactic | 1 |
Hubert
| Level | HP | Mov. | Class |
|---|---|---|---|
| 35 | 44 | 4 | Dark Bishop |
| Mt. | Spd | Hit | Crit |
| 54 | 16 | 108 | 25 |
| Range | Prt | Res | Avd |
| 1-2 | 16 | 36 | 33 |
| Weapon | Dropped Items | ||
| Banshee | N/A | ||
| Battalion | |||
| Vestra Sorcery Engineers | |||
| Level | Endurance | Gambit | Uses |
| 1-2 | 75 | Resonant Lightning | 1 |
Edelgard
| Level | HP | Mov. | Class |
|---|---|---|---|
| 36 | 55 | 5 | Armored Lord |
| Mt. | Spd | Hit | Crit |
| 70 | 14 | 122 | 38 |
| Range | Prt | Res | Avd |
| 1 | 31 | 23 | 12 |
| Weapon | Dropped Items | ||
| Aymr | N/A | ||
| Battalion | |||
| Supreme Armored Co. | |||
| Level | Endurance | Gambit | Uses |
| 1 | 120 | Raging Flames | 2 |
Ignatz
Enemy data will be gathered soon.
Raphael
| Level | HP | Mov. | Class |
|---|---|---|---|
| 35 | 71 | 6 | Grappler |
| Mt. | Spd | Hit | Crit |
| 51 | 17 | 132 | 39 |
| Range | Prt | Res | Avd |
| 1 | 32 | 6 | 30 |
| Weapon | Dropped Items | ||
| Silver Gauntlets | N/A | ||
| Battalion | |||
| Leicester Mercenaries | |||
| Level | Endurance | Gambit | Uses |
| 1 | 105 | Blaze | 1 |
Lysithea
Enemy data will be gathered soon.
Claude
| Level | HP | Mov. | Class |
|---|---|---|---|
| 36 | 47 | 7 | Wyvern Master |
| Mt. | Spd | Hit | Crit |
| 62 | 29 | 119 | 47 |
| Range | Prt | Res | Avd |
| 2-3 | 23 | 13 | 56 |
| Weapon | Dropped Items | ||
| Failnaught | N/A | ||
| Battalion | |||
| Immortal Corps | |||
| Level | Endurance | Gambit | Uses |
| 2-3 | 120 | Ashes and Dust | 2/2 |
Hilda
Enemy data will be gathered soon.
Leonie
Enemy data will be gathered soon.
Loots
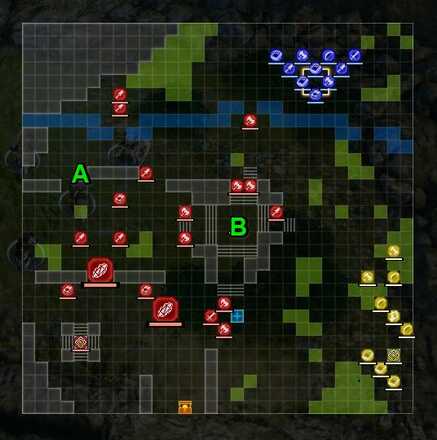
Lampos Shield - A
A Lampos Shield can be obtained from the paladin marked as A. It is held by a Paladin make sure to bring a high damage unit to defeat it.
Brave Bow - B
A Brave Bow is held by Bernadetta who stands atop the pyramid. Bernadetta is replaced by an Imperial General if she is recruited to your party. The exact location is shown as B on the map above.
Chapter 17 (Blue Lions) - Chests
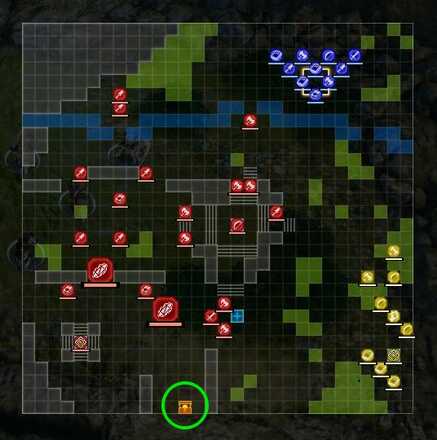
Umbral Steel
The chest is in the same location as the previous eagle vs lion battle. There is no obtainable key in the battle however, so brining a unit with lockpick or bringing a key is a must to open the said chest.
Chapter 17 (Blue Lions) - Map Features
At the center of the three armies, there is a hill. There are three Heal Tile+'s on the map, one for each of the other house leaders, and directly south of the pyramid. At the very top of the hill lies a ballista, manned by an opponent, that can be used by units that are skilled in Bows.
| Tiles | Description |
|---|---|
| Wasteland | Difficult for cavalry to traverse |
| River | Navigable only by fliers |
| Forest | 1 Prt, +30% Avo, except for fliers |
| Cliff | Navigable only by fliers |
| Fence | Navigable only by fliers |
| Pillar | Cannot be crossed |
| Stairs | Difficult for cavalry to traverse |
| Heal Tile+ | 1 Prt, 1 Res, +30% HP each turn for non-fliers |
| Ballista | 5 Mt, 15 Durability, 3-12 Rng, Requires Bow Skill of D or higher |
| Fiery Floor | -15% HP each turn for non-fliers |
Chapter 17 (Blue Lions) - Tips and Tricks
Armored Knights on the Hill
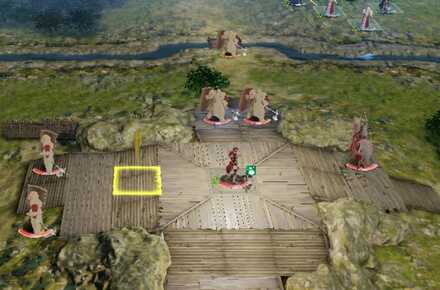
Most of the units guarding the hill are armored knights. Make sure to have your magic users ready to engage them.
Claude's Cunning Ambush
A few turns in, Alliance forces will pop up from behind your troops and the forest they are stationed at. Leading the ambush from behind is Hilda, so be careful and keep a good rearguard. Leonie will also join the fray.
The Burning Pyramid
If there are Kingdom and/or Alliance units on the center hill and no Imperial forces there, Edelgard witll set fire to it, causing 15% HP damage to everyone standing there per turn. Once you clear the ballista, evacuate it at once, or if possible, send a minimal force.
Petra at the Ballista
If you manage to defeat Bernadetta from afar, but go around the hill, Petra will go from her position at the south of the pyramid and take the ballista if the hill is clear.
Fire Emblem: Three Houses - Related Links
Part 2 - Azure Moon Battle Walkthroughs
Comment
Author
Chapter 17: To War at Gronder (Blue Lions) Walkthrough
improvement survey
03/2026
improving Game8's site?

Your answers will help us to improve our website.
Note: Please be sure not to enter any kind of personal information into your response.

We hope you continue to make use of Game8.
Rankings
- We could not find the message board you were looking for.
Gaming News
Popular Games

Genshin Impact Walkthrough & Guides Wiki

Honkai: Star Rail Walkthrough & Guides Wiki

Umamusume: Pretty Derby Walkthrough & Guides Wiki

Pokemon Pokopia Walkthrough & Guides Wiki

Resident Evil Requiem (RE9) Walkthrough & Guides Wiki

Monster Hunter Wilds Walkthrough & Guides Wiki

Wuthering Waves Walkthrough & Guides Wiki

Arknights: Endfield Walkthrough & Guides Wiki

Pokemon FireRed and LeafGreen (FRLG) Walkthrough & Guides Wiki

Pokemon TCG Pocket (PTCGP) Strategies & Guides Wiki
Recommended Games

Diablo 4: Vessel of Hatred Walkthrough & Guides Wiki

Cyberpunk 2077: Ultimate Edition Walkthrough & Guides Wiki

Fire Emblem Heroes (FEH) Walkthrough & Guides Wiki

Yu-Gi-Oh! Master Duel Walkthrough & Guides Wiki

Super Smash Bros. Ultimate Walkthrough & Guides Wiki

Pokemon Brilliant Diamond and Shining Pearl (BDSP) Walkthrough & Guides Wiki

Elden Ring Shadow of the Erdtree Walkthrough & Guides Wiki

Monster Hunter World Walkthrough & Guides Wiki

The Legend of Zelda: Tears of the Kingdom Walkthrough & Guides Wiki

Persona 3 Reload Walkthrough & Guides Wiki
All rights reserved
©2019 Nintendo / INTELLIGENT SYSTEMS. Co-developed by KOEI TECMO GAMES CO., LTD. Fire Emblem and Nintendo Switch are trademarks of Nintendo. © 2019 Nintendo.
The copyrights of videos of games used in our content and other intellectual property rights belong to the provider of the game.
The contents we provide on this site were created personally by members of the Game8 editorial department.
We refuse the right to reuse or repost content taken without our permission such as data or images to other sites.


![Monster Hunter Stories 3 Review [First Impressions] | Simply Rejuvenating](https://img.game8.co/4438641/2a31b7702bd70e78ec8efd24661dacda.jpeg/thumb)


