Chapter 12: The Battle of Garreg Mach Walkthrough
This is the battle walkthrough for the mission The Battle of Garreg Mach from Fire Emblem: Three Houses (FETH, FE3H). Read on to find out about map features, what enemies you will encounter, and tips for winning!
List of Contents
| Previous Battle | Story Walkthrough | Next Battle |
|---|---|---|
| Chapter 11: Conflict in the Holy Tomb | Chapter 12: To War | Black Eagles Blue Lions Golden Deers Church of Seiros |
Chapter 12 - Map and Overview
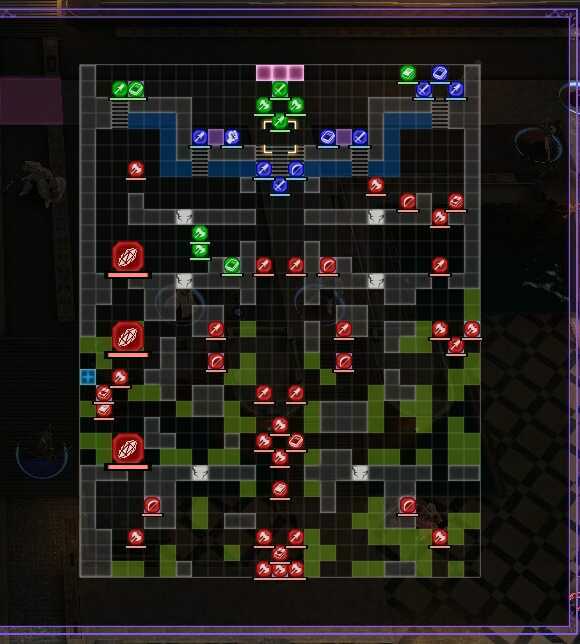
| Victory Conditions | |
|---|---|
| Defeat the enemy commander. | |
| Defeat Conditions | |
| Casual: All of your units dall in battle, Rhea falls in battle, or the defended location is captured. Classic: Rhea or Byleth falls in battle. |
|
| # of Player Units | 11 |
| # of Ally Units | 10 + 4 |
| # of Enemies | Normal: 33 Hard: 39 |
Chapter 12 - Enemies
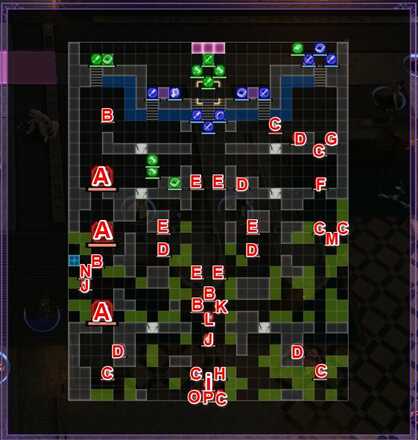
| A | Demon Beats | B | Imperial Soldier (Warrior) |
|---|---|---|---|
| C | Imperial Soldier (Fortress Knight) | D | Imperial Soldier (Archer) |
| E | Imperial Soldier (Pegasus Knight) | F | Imperial Soldier (Cavalier) |
| G | Imperial Soldier (Dark Mage) | H | Imperial Soldier (Paladin) |
| I | Imperial Soldier (Dark Bishop) | J | Imperial Soldier (Bishop) |
| K | Imperial Soldier (Mage) | L | Randolph |
| M | Death Knight | N | Hubert |
| O | Ladislava | P | Edelgard |
Enemy Stats
Death Knight
Enemy data will be gathered soon.
Hubert
Enemy data will be gathered soon.
Randolph
Enemy data will be gathered soon.
Ladislava
Enemy data will be gathered soon.
Edelgard
Enemy data will be gathered soon.
Death Knight
| Level | HP | Mov. | Class |
|---|---|---|---|
| 30 | 52 | 7 | Death Knight |
| Mt. | Spd | Hit | Crit |
| 44 | 24 | 125 | 44 |
| Range | Prt | Res | Avd |
| 1 | 25 | 21 | 34 |
| Weapon | Dropped Items | ||
| Scythe of Sariel | Dark Seal | ||
Hubert
| Level | HP | Mov. | Class |
|---|---|---|---|
| 25 | 33 | - | Dark Mage |
| Mt. | Spd | Hit | Crit |
| 44 | 11 | 101 | 21 |
| Range | Prt | Res | Avd |
| 1-2 | 10 | 26 | 24 |
| Weapon | Dropped Items | ||
| Banshee | N/A | ||
| Battalion | |||
| Vestra Sorcery Engineers | |||
| Level | Endurance | Gambit | Uses |
| 1-2 | 75 | Resonant Lightning | 1 |
Randolph
| Level | HP | Mov. | Class |
|---|---|---|---|
| 25 | 53 | 5 | Warrior |
| Mt. | Spd | Hit | Crit |
| 53 | 13 | 99 | 24 |
| Range | Prt | Res | Avd |
| 1 | 22 | 11 | 27 |
| Weapon | Dropped Items | ||
| Silver Axe | N/A | ||
| Battalion | |||
| Empire Raiders | |||
| Level | Endurance | Gambit | Uses |
| 1 | 75 | Absorption | 1 |
Ladislava
| Level | HP | Mov. | Class |
|---|---|---|---|
| 25 | 45 | 7 | Wyvern Rider |
| Mt. | Spd | Hit | Crit |
| 50 | 15 | 88 | 24 |
| Range | Prt | Res | Avd |
| 1 | 25 | 11 | 25 |
| Weapon | Dropped Items | ||
| Silver Axe | N/A | ||
| Battalion | |||
| Empire Elite Wyvern Co. | |||
| Level | Endurance | Gambit | Uses |
| 1 | 75 | Assembly | 2 |
Edelgard
| Level | HP | Mov. | Class |
|---|---|---|---|
| 26 | 57 | 5 | Flame Emperor |
| Mt. | Spd | Hit | Crit |
| 48 | 5 | 80 | 16 |
| Range | Prt | Res | Avd |
| 1 | 25 | 13 | -1 |
| Weapon | Dropped Items | ||
| Silver Axe | N/A | ||
| Battalion | |||
| Flame Emperor Co. | |||
| Level | Endurance | Gambit | Uses |
| 1 | 75 | Raging Flames | 2 |
Chapter 12 - Chests
There are no chests on this map.
Chapter 12 - Map Features
Tiles
| Tiles | Description |
|---|---|
| Forest | 20% Avo, 1 Prt to all non-fliers |
| Edifice | Navigable only by fliers |
| Rampart | Navigable only by fliers |
| Channel | Navigable only by fliers |
| Rampart | Navigable only by fliers |
| Stairs | Difficult for cavalry to travers |
| Fire Orb | 5 Mt, 15 Durability, 3-12 Rng, Can only be used by Magic Classes |
| Onager | 10 Mt, 15 Durability, 3-10 Rng, Cannot be used by mounted or magic units |
| Ballista | 5 Mt, 15 Durability, 3-12 Rng, Requires Bow Skill of D or higher |
| Heal Tile+ | 1 Prt, 1 Res, +30% HP each turn for non-fliers |
| Stronghold | 2 Prt, 2 Res, +30% HP each turn for non-fliers |
Breakable Walls
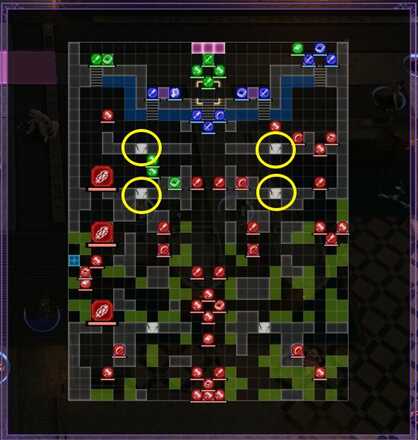
These walls should or should not be destroyed depending on the units you have on the battlefield.
Demon Beasts
The enemies fight together with demon beasts. Prepare your battalions to ensure that you can handle the flood of demon beasts that will continue to enter the battlefield.
Strongholds
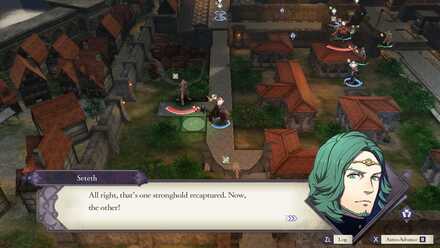
Alright, that's one stronghold recaptured. Now the other!
Enemy units will continue to appear if the 2 strongholds are left untouched. Prioritize defeating the enemies that are positioned on the 2 areas to claim them and stop enemies from entering the fight.
Protecting Allies
Rhea joins the fray but is a unit that must be protected at all costs. Plan out your unit movements with preventing enemies from reaching Rhea in mind.
Ballistae, Fire Orbs, and Onagers
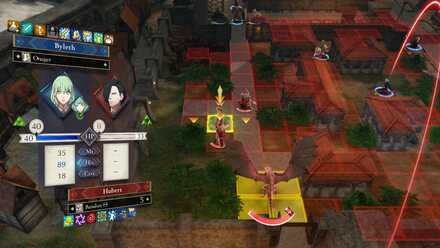
 Defeating Hubert with an Onager.
There are ballistae, fire orbs, and onagers scattered on the battlefield. Place units on these tiles to maximize the area you can cover with your attacks.
Chapter 12 - Tips and Tricks
Focus Units on the Left
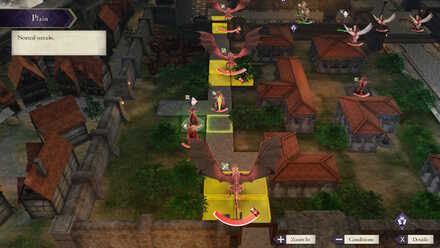
Demon Beasts appear as enemies on the left side of the battlefield. Capture this stronghold first before the other one on the right.
Utilize the Ballistas, Fire Orbs, and Onagers
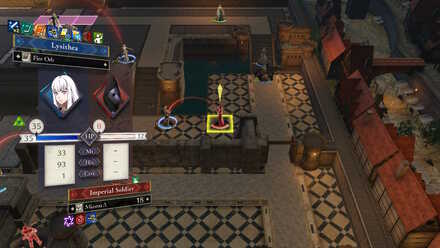
Lysithea instantly killing an enemy with a Fire Orb.
Your units are greatly outnumbered so using attacks that can attack them from afar before they reach you is a must.
Prepare a Stride Gambit
Enemies will also use Ballistas on their side of the area. Using Stride on your units can make them instantly reach and defeat these units.
Destroy the Walls
After the monastry area are cleared of enemies. Destroying the walls will allow your archers and magicians to reach the Ballista and Fire Orbs that are placed further below.
Fire Emblem: Three Houses - Related Links
Part 1 - White Clouds Battle Walkthroughs
Comment
Author
Chapter 12: The Battle of Garreg Mach Walkthrough
improvement survey
03/2026
improving Game8's site?

Your answers will help us to improve our website.
Note: Please be sure not to enter any kind of personal information into your response.

We hope you continue to make use of Game8.
Rankings
- We could not find the message board you were looking for.
Gaming News
Popular Games

Genshin Impact Walkthrough & Guides Wiki

Honkai: Star Rail Walkthrough & Guides Wiki

Umamusume: Pretty Derby Walkthrough & Guides Wiki

Pokemon Pokopia Walkthrough & Guides Wiki

Resident Evil Requiem (RE9) Walkthrough & Guides Wiki

Monster Hunter Wilds Walkthrough & Guides Wiki

Wuthering Waves Walkthrough & Guides Wiki

Arknights: Endfield Walkthrough & Guides Wiki

Pokemon FireRed and LeafGreen (FRLG) Walkthrough & Guides Wiki

Pokemon TCG Pocket (PTCGP) Strategies & Guides Wiki
Recommended Games

Diablo 4: Vessel of Hatred Walkthrough & Guides Wiki

Fire Emblem Heroes (FEH) Walkthrough & Guides Wiki

Yu-Gi-Oh! Master Duel Walkthrough & Guides Wiki

Super Smash Bros. Ultimate Walkthrough & Guides Wiki

Pokemon Brilliant Diamond and Shining Pearl (BDSP) Walkthrough & Guides Wiki

Elden Ring Shadow of the Erdtree Walkthrough & Guides Wiki

Monster Hunter World Walkthrough & Guides Wiki

The Legend of Zelda: Tears of the Kingdom Walkthrough & Guides Wiki

Persona 3 Reload Walkthrough & Guides Wiki

Cyberpunk 2077: Ultimate Edition Walkthrough & Guides Wiki
All rights reserved
©2019 Nintendo / INTELLIGENT SYSTEMS. Co-developed by KOEI TECMO GAMES CO., LTD. Fire Emblem and Nintendo Switch are trademarks of Nintendo. © 2019 Nintendo.
The copyrights of videos of games used in our content and other intellectual property rights belong to the provider of the game.
The contents we provide on this site were created personally by members of the Game8 editorial department.
We refuse the right to reuse or repost content taken without our permission such as data or images to other sites.


![Everwind Review [Early Access] | The Shaky First Step to A Very Long Journey](https://img.game8.co/4440226/ab079b1153298a042633dd1ef51e878e.png/thumb)

![Monster Hunter Stories 3 Review [First Impressions] | Simply Rejuvenating](https://img.game8.co/4438641/2a31b7702bd70e78ec8efd24661dacda.jpeg/thumb)


