Chapter 13: Hunting at Daybreak (Blue Lions) Walkthrough
This is the battle walkthrough for the mission Hunting at Daybreak from Chapter 13: Reunion at Dawn in Fire Emblem: Three Houses (FETH, FE3H). Read on to find out about map features, what enemies you will encounter, and tips for winning!
List of Contents
| Previous Battle | Story Walkthrough | Next Battle |
|---|---|---|
| Chapter 12: The Battle of Garreg Mach | Chapter 13: Reunion at Dawn | Chapter 14: Protecting Garreg Mach |
Map and Overview

| Victory Conditions | |
|---|---|
| Defeat the enemy commander | |
| Defeat Conditions | |
| Your character or Dimitri falls. Enemy commander escapes. |
|
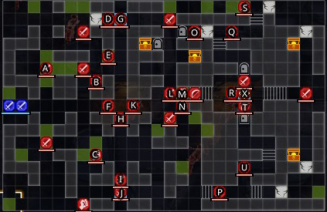
| # of Player Units | 2+4+3 |
| # of Enemies | 31 - Normal 36-Hard |
Enemies

| Pos | Enemy | Pos | Enemy |
|---|---|---|---|
| A | Bandit (Mercenary) | B | Bandit (Thief) |
| C | Bandit (Assassin) | D | Bandit (Brawler) |
| E | Bandit (Archer) | F | Bandit (Sniper) |
| G | Pallardo | - | - |
Pallardo
| Level | HP | Mov. | Class |
|---|---|---|---|
| 27 | 36 | - | Thief |
| Mt. | Spd | Hit | Crit |
| 26 | 14 | 112 | 12 |
| Range | Prt | Res | Avd |
| 1 | 12 | 3 | 27 |
| Weapon | Dropped Items | ||
| Silver Sword | Speed Ring | ||
| Battalion | |||
| Pallardo Bodyguards | |||
| Level | Endurance | Gambit | Uses |
| 1 | 75 | Poison Tactic | 1 |
Pallardo
| Level | HP | Mov. | Class |
|---|---|---|---|
| 28 | 41 | - | Thief |
| Mt. | Spd | Hit | Crit |
| 30 | 19 | 116 | 16 |
| Range | Prt | Res | Avd |
| 1 | 16 | 7 | 32 |
| Weapon | Dropped Items | ||
| Silver Sword | N/A | ||
| Battalion | |||
| Pallardo Bodyguards | |||
| Level | Endurance | Gambit | Uses |
| 1 | 75 | Poison Tactic | 1 |
Loot

| Loot Dropped | Enemy Location |
|---|---|
| Concoction | A, B, E, F |
| Antitoxin | C, L |
| Door Key | D, M, O |
| Hexlock Shield | G |
| Silver Sword | H |
| Chest Key | I, N, S, T |
| Leather Shield | J |
| Blessed Bow | K |
| Bullion | O, P, Q, R |
Chests

Armorslayer
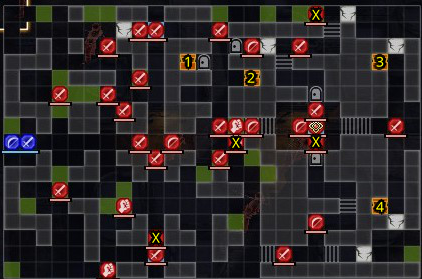
An Armorslayer can be found from the treasure chest marked as 1 on the image above.
Silver Lance
A Silver Lance can be found from the treasure chest marked as 2 on the image above.
Cursed Ashiya Sword
A hard item to use. The Cursed Ashiya Sword can be found on the chest marked as 3 on the image above. This sword has low durability and has self damaging effect but has a high mt and high critical rate. Definitely a worth item to get.
Axe of Ukonvasara
A relic weapon. This axe can be wielded by Lorenz to a greater effect so do try to get it if Lorenz is recruited in your party. The axe also regenerates the HP of its wielder making it a good weapon to have overall. The Axe is found on the chest marked with 4 on the image above.
Keys
There are four enemies holding chest keys that they drop upon defeat, marked with an X in the map.
Map Features
Tiles
| Tiles | Description |
|---|---|
| Wall (Breakable) | HP 20, Impassable until destroyed |
| Wall Edifice Rampart Rubble Mountain |
Navigable only by fliers |
| Forest | 1 Prt, +30% Avo, except for fliers |
| Heal Tile+ | 1 Prt, 1 Res, +30% HP each turn for non-fliers |
Reinforcement 1
At the start of the player phase of turn 3, Gilbert and Ashe will appear in the northwestern corner of the map, while Annette and Mercedes appear in the southwestern corner, all under your control.
Reinforcement 2
When any of these units advance to about the midline of the map, Felix, Ingrid and Sylvain will arrive at the northeastern corner. If you lose any of these characters before this mission in Classic mode, they will not return.
You will traverse through the huge map of the chapel. Some parts are closed off by locked doors, and you will be surrounded by walls and edifices which are only navigable by fliers.
Fake Commander

Pallardo (the real one) will try to escape after the first pallardo is killed. Try to station troops to halt Pallardo's exit route.
Tips and Tricks
Powerlevelling Trick
Things Needed
- All enemies routed except Pallardo (fake)
- Magic abilities (preferrably, magics with no crit chance like Fire)
- Training Weapons (bow to be specific)

The first Pallardo will not approach any unit attacking it (except when they're in melee range). Use this opportunity to level up mages and archers until their magic/ weapon durability runs out (attack then leave Pallardo to regenerate health then repeat).
The battle will not end even if the fake Pallardo dies so use a divine pulse if an attack accidentally kills him with a critical hit. Try to priotize characters with attacks that have 0 crit chance to maximize the trick and remember to place Byleth near that unit for the Professor's expertise buff.
Why Does the Trick Work?
Mainly because Pallardo does not chase nor escape and heals every turn. It also works better than normal units since enemy commanders give more EXP than normal enemies.
Remember Ashe's Lockpick Skill

If Ashe is still in your party (survived all battles in classic mode) then his ability “Lockpick” can greatly aid you in opening doors and chests even without keys.
Bring a Door Key
Because Pallardo escapes past the north door, have one of your units engaging him already have a Door Key beforehand. Otherwise, have Byleth whip it out before killing the fake Pallardo and trade it to some units near him/her.
Keep Someone in Front of the Door
 Felix cutting off Palardo's escape route.
It would be a good idea to station someone there (most likely either Ingrid, Sylvain, or Felix but anyone will do). It will cut Pallardo and his allies off from escaping the one-tile wide corridor.
Fire Emblem: Three Houses - Related Links
Part 2 - Azure Moon Battle Walkthroughs
Comment
Author
Chapter 13: Hunting at Daybreak (Blue Lions) Walkthrough
improvement survey
03/2026
improving Game8's site?

Your answers will help us to improve our website.
Note: Please be sure not to enter any kind of personal information into your response.

We hope you continue to make use of Game8.
Rankings
- We could not find the message board you were looking for.
Gaming News
Popular Games

Genshin Impact Walkthrough & Guides Wiki

Honkai: Star Rail Walkthrough & Guides Wiki

Umamusume: Pretty Derby Walkthrough & Guides Wiki

Pokemon Pokopia Walkthrough & Guides Wiki

Resident Evil Requiem (RE9) Walkthrough & Guides Wiki

Monster Hunter Wilds Walkthrough & Guides Wiki

Wuthering Waves Walkthrough & Guides Wiki

Arknights: Endfield Walkthrough & Guides Wiki

Pokemon FireRed and LeafGreen (FRLG) Walkthrough & Guides Wiki

Pokemon TCG Pocket (PTCGP) Strategies & Guides Wiki
Recommended Games

Diablo 4: Vessel of Hatred Walkthrough & Guides Wiki

Fire Emblem Heroes (FEH) Walkthrough & Guides Wiki

Yu-Gi-Oh! Master Duel Walkthrough & Guides Wiki

Super Smash Bros. Ultimate Walkthrough & Guides Wiki

Pokemon Brilliant Diamond and Shining Pearl (BDSP) Walkthrough & Guides Wiki

Elden Ring Shadow of the Erdtree Walkthrough & Guides Wiki

Monster Hunter World Walkthrough & Guides Wiki

The Legend of Zelda: Tears of the Kingdom Walkthrough & Guides Wiki

Persona 3 Reload Walkthrough & Guides Wiki

Cyberpunk 2077: Ultimate Edition Walkthrough & Guides Wiki
All rights reserved
©2019 Nintendo / INTELLIGENT SYSTEMS. Co-developed by KOEI TECMO GAMES CO., LTD. Fire Emblem and Nintendo Switch are trademarks of Nintendo. © 2019 Nintendo.
The copyrights of videos of games used in our content and other intellectual property rights belong to the provider of the game.
The contents we provide on this site were created personally by members of the Game8 editorial department.
We refuse the right to reuse or repost content taken without our permission such as data or images to other sites.


![Everwind Review [Early Access] | The Shaky First Step to A Very Long Journey](https://img.game8.co/4440226/ab079b1153298a042633dd1ef51e878e.png/thumb)

![Monster Hunter Stories 3 Review [First Impressions] | Simply Rejuvenating](https://img.game8.co/4438641/2a31b7702bd70e78ec8efd24661dacda.jpeg/thumb)


