Chapter 10: Sealed Forest Snare Walkthrough
This is the battle walkthrough for the mission Sealed Forest Snare from Fire Emblem: Three Houses (FETH, FE3H). Read on to find out about map features, what enemies you will encounter, and tips for winning!
List of Contents
| Previous Battle | Story Walkthrough | Next Battle |
|---|---|---|
| Chapter 9: Salvation at the Chapel | Chapter 10: Where the Goddess Dwells | Chapter 11: Conflict in the Holy Tomb |
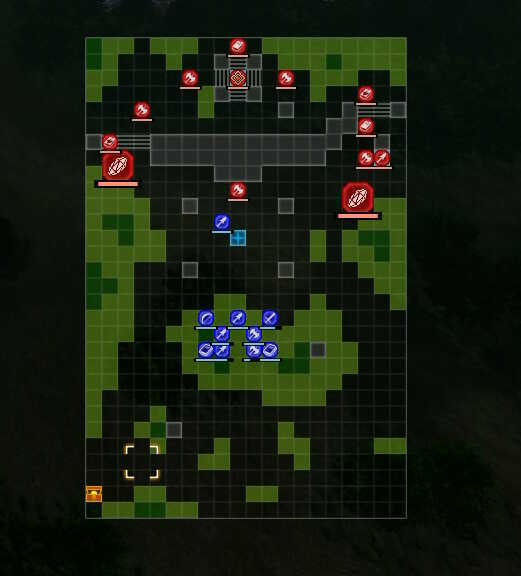
Chapter 10 - Map and Overview
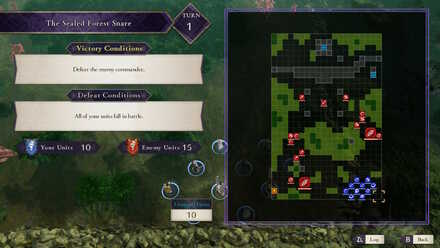
| Victory Conditions | |
|---|---|
| Defeat the enemy commander. | |
| Defeat Conditions | |
| Casual: All of your units fall in battle. Classic: Your character or your house leader falls in battle.. |
|
| # of Player Units | 10 |
| # of Enemies | Normal: 13 + 10 Hard: 15 + 13 |
Chapter 10 - Enemies
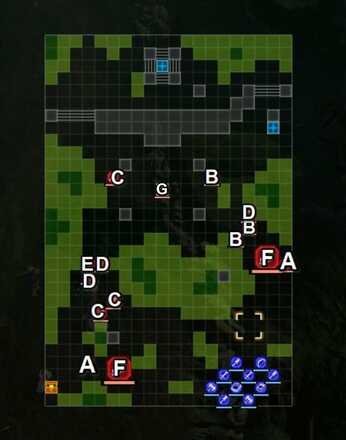 |
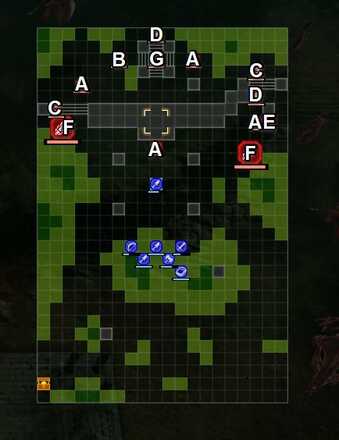 |
| Phase 1 | |||
|---|---|---|---|
| A | Mysterious Soldier (Dark Mage) | B | Mysterious Soldier (Brigand) |
| C | Mysterious Soldier (Cavalier) | D | Mysterious Soldier (Archer) |
| E | Mysterious Soldier (Armored Knight) | F | Mysterious Soldier (Demonic Beast) |
| G | Monica | - | - |
| Phase 2 | |||
|---|---|---|---|
| A | Mysterious Soldier (Armored Knight) | B | Mysterious Soldier (Brigand) |
| C | Mysterious Soldier (Dark Mage) | D | Mysterious Soldier (Archer) |
| E | Mysterious Soldier (Cavalier) | F | Mysterious Soldier (Demonic Beast) |
| G | Solon | - | - |
Enemy Stats
Monica
| Level | HP | Mov. | Class |
|---|---|---|---|
| 21 | 35 | - | Assassin |
| Mt. | Spd | Hit | Crit |
| 28 | 26 | 105 | 33 |
| Range | Prt | Res | Avd |
| 1 | 12 | 8 | 26 |
| Weapon | Dropped Items | ||
| Athame | N/A | ||
Demonic Beast
| Level | HP | Mov. | Class |
|---|---|---|---|
| 19 | 43 (x2) | 4 | Exp. Demonic Beast |
| Mt. | Spd | Hit | Crit |
| 28 | 7 | 93 | 6 |
| Range | Prt | Res | Avd |
| 1-2 | 14 | 5 | 7 |
| Weapon | Dropped Items | ||
| N/A | |||
Solon
| Level | HP | Mov. | Class |
|---|---|---|---|
| 21 | 33 | - | Dark Bishop |
| Mt. | Spd | Hit | Crit |
| 35 | 5 | 87 | 17 |
| Range | Prt | Res | Avd |
| 1-2 | 13 | 28 | 0 |
| Weapon | Dropped Items | ||
| Banshee Θ | Circe Staff | ||
| Battalion | |||
| Solon Subordinates | |||
| Level | Endurance | Gambit | Uses |
| 1-2 | 75 | Resonant Flames | 1 |
Monica
| Level | HP | Mov. | Class |
|---|---|---|---|
| 22 | 39 | - | Assassin |
| Mt. | Spd | Hit | Crit |
| 30 | 30 | 109 | 35 |
| Range | Prt | Res | Avd |
| 1 | 16 | 8 | 30 |
| Weapon | Dropped Items | ||
| Athame | N/A | ||
Demonic Beast
| Level | HP | Mov. | Class |
|---|---|---|---|
| 20 | 56 | 4 | Exp. Demonic Beast |
| Mt. | Spd | Hit | Crit |
| 32 | 10 | 96 | 8 |
| Range | Prt | Res | Avd |
| 1-2 | 18 | 8 | 10 |
| Weapon | Dropped Items | ||
| Crest Stone Shard | N/A | ||
Solon
| Level | HP | Mov. | Class |
|---|---|---|---|
| 22 | 37 | 4 | Dark Bishop |
| Mt. | Spd | Hit | Crit |
| 39 | 5 | 89 | 19 |
| Range | Prt | Res | Avd |
| 1-2 | 13 | 29 | 0 |
| Weapon | Dropped Items | ||
| Banshee | N/A | ||
| Battalion | |||
| Solon Subordinates | |||
| Level | Endurance | Gambit | Uses |
| 1-2 | 75 | Resonant Flames | 1 |
Chapter 10 - Chests
Speed Ring
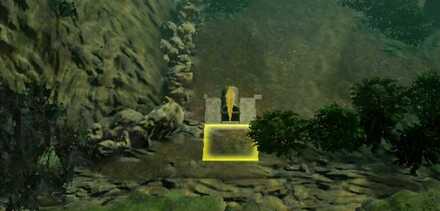
There is one chest containing a Speed Ring at the bottom left corner of the map. There is no foe holding a key, so it can only be opened by someone who can open chests with Locktouch or by bringing a key with you.
Chapter 10 - Map Features
Tiles
| Tiles | Description |
|---|---|
| Heal Tile + | + 1 Def, + 1 Res, and +30% HP per turn |
Multiple Phases
There are two parts to this battle. This is also the reason why the enemies seem to lackluster in quantity at first glance. Defeating Monica will trigger the 2nd part of the fight where Solon appears as the 2nd enemy commander.
Chapter 10 - Tips and Tricks
Defeat all Enemies During Phase 1
A half-empty battlefield after Solon and his troops appear during phase 2.
Enemies you did not defeat during phase 1 will remain for the remainder of the fight during phase 2. Make sure to defeat all of them first instead of rushing straight for Monica. This will prevent an ambush for your party during phase 2.
Use Healing Tiles Before Phase 2
Take note that your units' health does not regenerate for the second part of the battle, so take care not to overexert them attempting to defeat Monica. Using the Heal Tiles for injured units will prove beneficial for the 2nd stage of the fight.
The Sword of the Creator's Durability Resets in Phase 2
During Phase 2, the Sword of the Creator's durability resets, meaning there is no loss to using it as much as you want when fighting Monica.
Take the Western Stairs in Phase 2
During Phase 2, there are two paths of approaching Solon: the eastern and western stairs. It is better to take the western approach as the east has a Cavalier on a Heal Tile+.
Outrange Solon
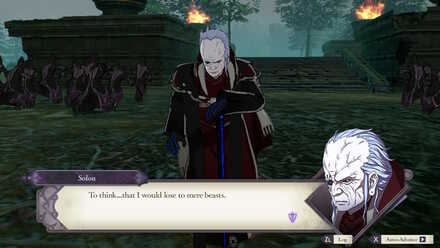
Solon has an attack range of 2. He hits hard but is very vulnerable so having a long-range unit like a sniper can make short work of him.
Fire Emblem: Three Houses - Related Links
Part 1 - White Clouds Battle Walkthroughs
Comment
Author
Chapter 10: Sealed Forest Snare Walkthrough
improvement survey
03/2026
improving Game8's site?

Your answers will help us to improve our website.
Note: Please be sure not to enter any kind of personal information into your response.

We hope you continue to make use of Game8.
Rankings
- We could not find the message board you were looking for.
Gaming News
Popular Games

Genshin Impact Walkthrough & Guides Wiki

Honkai: Star Rail Walkthrough & Guides Wiki

Umamusume: Pretty Derby Walkthrough & Guides Wiki

Pokemon Pokopia Walkthrough & Guides Wiki

Resident Evil Requiem (RE9) Walkthrough & Guides Wiki

Monster Hunter Wilds Walkthrough & Guides Wiki

Wuthering Waves Walkthrough & Guides Wiki

Arknights: Endfield Walkthrough & Guides Wiki

Pokemon FireRed and LeafGreen (FRLG) Walkthrough & Guides Wiki

Pokemon TCG Pocket (PTCGP) Strategies & Guides Wiki
Recommended Games

Diablo 4: Vessel of Hatred Walkthrough & Guides Wiki

Cyberpunk 2077: Ultimate Edition Walkthrough & Guides Wiki

Fire Emblem Heroes (FEH) Walkthrough & Guides Wiki

Yu-Gi-Oh! Master Duel Walkthrough & Guides Wiki

Super Smash Bros. Ultimate Walkthrough & Guides Wiki

Pokemon Brilliant Diamond and Shining Pearl (BDSP) Walkthrough & Guides Wiki

Elden Ring Shadow of the Erdtree Walkthrough & Guides Wiki

Monster Hunter World Walkthrough & Guides Wiki

The Legend of Zelda: Tears of the Kingdom Walkthrough & Guides Wiki

Persona 3 Reload Walkthrough & Guides Wiki
All rights reserved
©2019 Nintendo / INTELLIGENT SYSTEMS. Co-developed by KOEI TECMO GAMES CO., LTD. Fire Emblem and Nintendo Switch are trademarks of Nintendo. © 2019 Nintendo.
The copyrights of videos of games used in our content and other intellectual property rights belong to the provider of the game.
The contents we provide on this site were created personally by members of the Game8 editorial department.
We refuse the right to reuse or repost content taken without our permission such as data or images to other sites.


![Everwind Review [Early Access] | The Shaky First Step to A Very Long Journey](https://img.game8.co/4440226/ab079b1153298a042633dd1ef51e878e.png/thumb)

![Monster Hunter Stories 3 Review [First Impressions] | Simply Rejuvenating](https://img.game8.co/4438641/2a31b7702bd70e78ec8efd24661dacda.jpeg/thumb)


