Chapter 6: The Underground Chamber Walkthrough

This is the battle walkthrough for the mission The Underground Chamber from Fire Emblem: Three Houses (FETH, FE3H). Read on to find out about map features, what enemies you will encounter, and tips for winning!
List of Contents
| Previous Battle | Story Walkthrough | Next Battle |
|---|---|---|
| Chapter 5: Tower of Black Winds | Chapter 6: Rumors of a Reaper | Chapter 7: Battle of The Eagle and Lion |
Chapter 6 - Map and Overview
| Victory Conditions | |
|---|---|
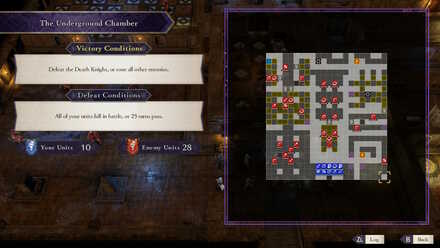
| Defeat the Death Knight or rout all other enemies. | |
| Defeat Conditions | |
| Byleth falls in battle or 25 turns have passed. | |
| # of Player Units | 8 |
| # of Enemies | Normal: 26 + 3 Hard: 28 + 3 |
Chapter 6 - Enemies
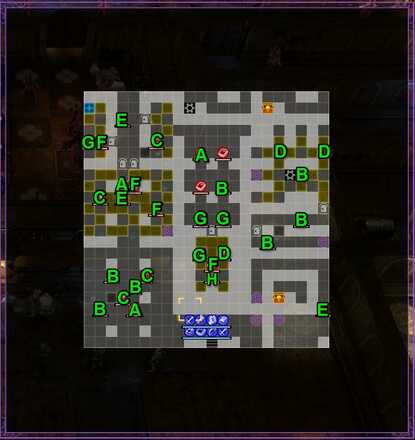
| Phase 1 | |||
|---|---|---|---|
| Pos | Enemy | Pos | Enemy |
| A | Flame Emperor Soldier (Myrmidon) | B | Flame Emperor Soldier (Archer) |
| C | Flame Emperor Soldier (Soldier) | D | Flame Emperor Soldier (Cavalier) |
| E | Flame Emperor Soldier (Armored Knights) | F | Flame Emperor Soldier (Mage) |
| G | Flame Emperor Soldier (Dark Mage) | H | Death Knight |
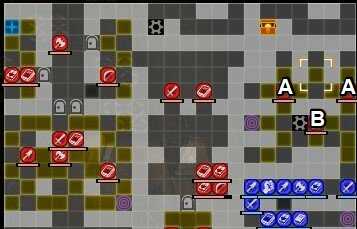
| Phase 2 | |||
|---|---|---|---|
| Pos | Enemy | Pos | Enemy |
| A | Flame Emperor Soldier (Cavalier) | B | Flame Emperor Soldier (Archer) |
Death Knight - (Normal)
| Level | HP | Mov. | Class |
|---|---|---|---|
| 20 | 44 | - | Death Knight |
| Mt. | Spd | Hit | Crit |
| 35 | 15 | 124 | 43 |
| Range | Prt | Res | Avd |
| 1 | 17 | 18 | 25 |
| Weapon | Dropped Items | ||
| Scythe of Sariel | Dark Seal | ||
Death Knight - (Hard)
| Level | HP | Mov. | Class |
|---|---|---|---|
| 20 | 46 | - | Death Knight |
| Mt. | Spd | Hit | Crit |
| 37 | 17 | 124 | 43 |
| Range | Prt | Res | Avd |
| 1 | 19 | 18 | 27 |
| Weapon | Dropped Items | ||
| Scythe of Sariel | Dark Seal | ||
Chapter 6 - Chests
There are treasure chests that are placed in seemingly inaccessible parts of the area. These chests contain rare items which will be listed below.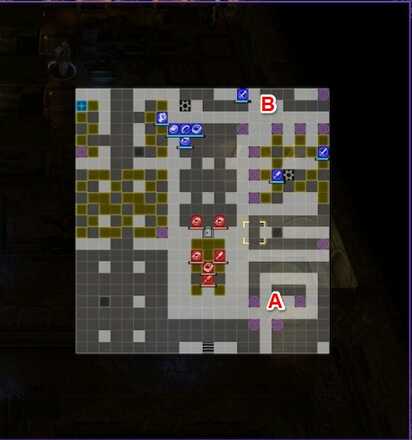
Treasure Chest A: Contains a Levin Sword, a sword that has lightning properties.
Treasure Chest B: Contains a March Ring, a valuable accessory that increases the user's move by 1.
Chapter 6 - Map Features
Warp Points
There are warp points in the map that can be used to move your units to otherwise, inaccessible areas. Below are the points the warp gates will lead you to.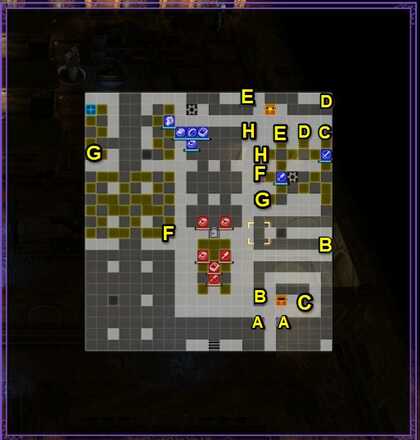
Levers
There are also levers in the map that triggers events which will be listed below.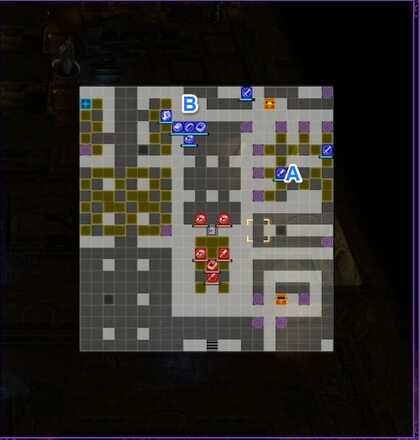
Lever A: Activates all Warp Tiles.
Lever B: Deactivates the stat boosting tiles in the area.
Chapter 6 - Tips and Tricks
Take the Right Route for Warp
The right route is usually the best one, especially if you have a strong magic unit.. After reaching the area with several warp points, have a Thief or Assassin take the upper warp and upper right warp points.
Then, have everyone teleport to the center. Defeat all the enemies in the center and the units near the Death Knight.
Take Left Route to Rout All Enemies
Alternatively, you could complete this battle by defeating all other enemies. To do this, send the majority of your forces to the left route then move about 2 units to the right—preferably a Thief and a healer. Have the two groups press forward on their chosen routes until they meet again at the center.
Surround the Death Knight
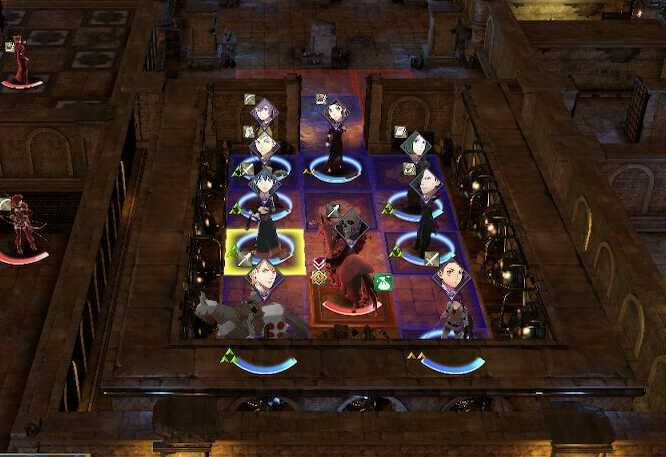
A recommended line up against the Death Knight would be 2 units with an offensive battalion, an archer with a light weapon, and a high level spear user with the Knightkneeler Combat Art.
The Death Knight will not attack your party as long as no unit ends their turn next to it or damages it.
Finish It Off with Knightkneeler

Once all units have surrounded the Death Knight, have the units that can survive the Death Knight attack him. Make sure to leave at least one space for the spear user's finishing attack.
When the Death Knight's HP is low enough, use the Knightkneeler ability to finish the battle.
Fire Emblem: Three Houses - Related Links
Part 1 - White Clouds Battle Walkthroughs
Comment
Author
Chapter 6: The Underground Chamber Walkthrough
improvement survey
03/2026
improving Game8's site?

Your answers will help us to improve our website.
Note: Please be sure not to enter any kind of personal information into your response.

We hope you continue to make use of Game8.
Rankings
- We could not find the message board you were looking for.
Gaming News
Popular Games

Genshin Impact Walkthrough & Guides Wiki

Honkai: Star Rail Walkthrough & Guides Wiki

Umamusume: Pretty Derby Walkthrough & Guides Wiki

Pokemon Pokopia Walkthrough & Guides Wiki

Resident Evil Requiem (RE9) Walkthrough & Guides Wiki

Monster Hunter Wilds Walkthrough & Guides Wiki

Wuthering Waves Walkthrough & Guides Wiki

Arknights: Endfield Walkthrough & Guides Wiki

Pokemon FireRed and LeafGreen (FRLG) Walkthrough & Guides Wiki

Pokemon TCG Pocket (PTCGP) Strategies & Guides Wiki
Recommended Games

Diablo 4: Vessel of Hatred Walkthrough & Guides Wiki

Fire Emblem Heroes (FEH) Walkthrough & Guides Wiki

Yu-Gi-Oh! Master Duel Walkthrough & Guides Wiki

Super Smash Bros. Ultimate Walkthrough & Guides Wiki

Pokemon Brilliant Diamond and Shining Pearl (BDSP) Walkthrough & Guides Wiki

Elden Ring Shadow of the Erdtree Walkthrough & Guides Wiki

Monster Hunter World Walkthrough & Guides Wiki

The Legend of Zelda: Tears of the Kingdom Walkthrough & Guides Wiki

Persona 3 Reload Walkthrough & Guides Wiki

Cyberpunk 2077: Ultimate Edition Walkthrough & Guides Wiki
All rights reserved
©2019 Nintendo / INTELLIGENT SYSTEMS. Co-developed by KOEI TECMO GAMES CO., LTD. Fire Emblem and Nintendo Switch are trademarks of Nintendo. © 2019 Nintendo.
The copyrights of videos of games used in our content and other intellectual property rights belong to the provider of the game.
The contents we provide on this site were created personally by members of the Game8 editorial department.
We refuse the right to reuse or repost content taken without our permission such as data or images to other sites.


![Everwind Review [Early Access] | The Shaky First Step to A Very Long Journey](https://img.game8.co/4440226/ab079b1153298a042633dd1ef51e878e.png/thumb)

![Monster Hunter Stories 3 Review [First Impressions] | Simply Rejuvenating](https://img.game8.co/4438641/2a31b7702bd70e78ec8efd24661dacda.jpeg/thumb)


