Chapter 4: Assault at the Rite of Rebirth Battle Walkthrough
This is a walkthrough for the battle Assault at the Rite of Rebirth, from Chapter 4: Godesses' Rite of Rebirth in Fire Emblem: Three Houses. Read more to see all the map, enemies, chests, features and tips and tricks to guide you through the level.
List of Contents
| Previous Battle | Story Walkthrough | Next Battle |
|---|---|---|
| Chapter 3 Battle: The Magdred Ambush | Chapter 4: Rite of the Godesses' Rebirth | Chapter 5: The Gautier Inheritance |
Chapter 4 - Map and Overview
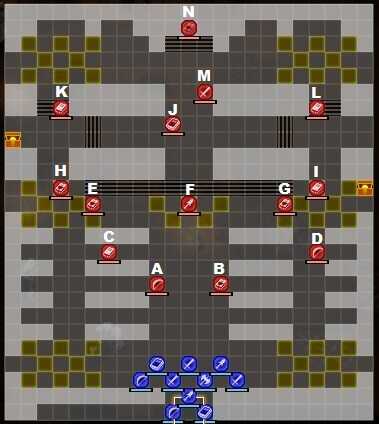
| Victory Conditions | |
|---|---|
| Defeat the enemy commander. | |
| Defeat Conditions | |
| Your Character or your House Leader falls in battle, or 25 turns pass. | |
| Player Units | 10 |
| Enemy Units | 14 |
Chapter 4 - Enemies
Enemy Placements (Normal)

| Pos | Enemy | Pos | Enemy |
|---|---|---|---|
| A | Western Church Soldier (Archer) | B | Western Church Soldier (Dark Bishop) |
| C | Western Church Soldier (Monk) | D | Western Church Soldier (Myrmidon) |
| E | Western Church Soldier (Priest) | F | Western Church Soldier (Mage) |
| G | Mysterious Mage | H | Death Knight |
Enemy Placements (Hard)
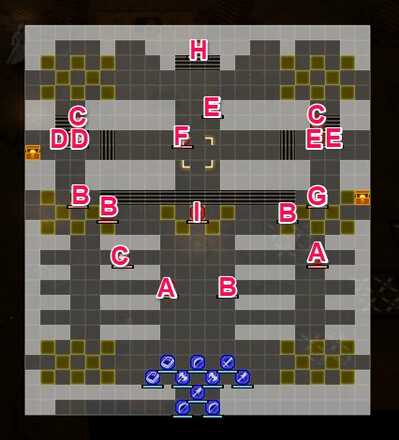
| Pos | Enemy | Pos | Enemy |
|---|---|---|---|
| A | Western Church Soldier (Archer) | B | Western Church Soldier (Dark Bishop) |
| C | Western Church Soldier (Monk) | D | Western Church Soldier (Fighter) |
| E | Western Church Soldier (Myrmidon) | F | Western Church Soldier (Mage) |
| G | Western Church Soldier (Priest) | H | Mysterious Mage |
| I | Death Knight | - | - |
Enemy Stats
Death Knight
| Level | HP | Mov. | Class |
|---|---|---|---|
| 16 | 42 | - | Death Knight |
| Mt. | Spd | Hit | Crit |
| 33 | 14 | 122 | 43 |
| Range | Prt | Res | Avd |
| 1 | 16 | 18 | 22 |
| Weapon | Dropped Items | ||
| Scythe of Sariel | Dark Seal | ||
Mysterious Mage
| Level | HP | Mov. | Class |
|---|---|---|---|
| 9 | 29 | - | Dark Mage |
| Mt. | Spd | Hit | Crit |
| 21 | 1 | 88 | 8 |
| Range | Prt | Res | Avd |
| 1-2 | 4 | 14 | -4 |
| Weapon | Dropped Items | ||
| Miasma Δ | N/A | ||
| Battalion | |||
| Mysterious Magic Users | |||
| Level | Endurance | Gambit | Uses |
| 1-2 | 75 | Resonant Flames | 1 |
Mysterious Mage
| Level | HP | Mov. | Class |
|---|---|---|---|
| 10 | 30 | - | Dark Mage |
| Mt. | Spd | Hit | Crit |
| 23 | 3 | 88 | 8 |
| Range | Prt | Res | Avd |
| 1-2 | 5 | 12 | -2 |
| Weapon | Dropped Items | ||
| Miasma Δ | N/A | ||
| Battalion | |||
| Mysterious Magic Users | |||
| Level | Endurance | Gambit | Uses |
| 1-2 | 75 | Resonant Flames | 1 |
Death Knight
| Level | HP | Mov. | Class |
|---|---|---|---|
| 16 | 42 | - | Death Knight |
| Mt. | Spd | Hit | Crit |
| 33 | 14 | 122 | 43 |
| Range | Prt | Res | Avd |
| 1 | 16 | 18 | 22 |
| Weapon | Dropped Items | ||
| Scythe of Sariel | Dark Seal | ||
Chapter 4 - Chests
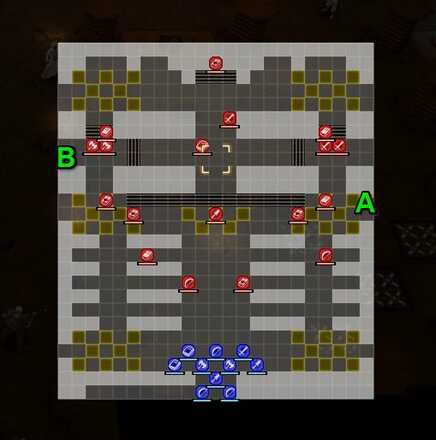
Spirit Dust (A)
A Spirit Dust can be obtained from the chest at the rightmost area of the map.
Intermediate Seal (B)
One treasure chest on the left side of the map contains an Intermediate Seal.
Chapter 4 - Map Features
Tiles
| Tiles | Description |
|---|---|
| Cover | + 2 Def, No Effect on Fliers |
| Wardwood | + 2 Res, No Effect on Fliers |
| Avo Floor | + 40% Avo, No Effect on Fliers |
| Pray Stone | + 30% HP per turn, + 30% Avo, + 2 Def, No Effect on Fliers |
Idle Enemy

A foe you will encounter often called the Death Knight makes his first appearance in this battle. The Death Knight drops the valuable item called Dark Seal but can be difficult to fell. On the sidenote, the Death Knight will not attack and chase the party unless provoked.
Tile Buffs
There are tiles in the map that provides certain bonuses. Try to place your units accordingly to maximize its benefits.
Enemy Reinforcements
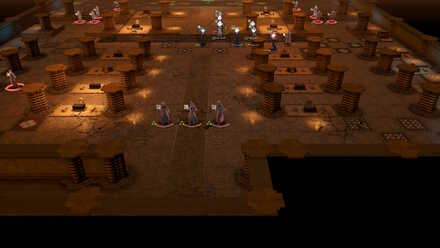
Three enemy mages will appear as reinforcements from the southern part of the map.
Chapter 4 - Tips and Tricks
Do Not Engage The Death Knight
The Death Knight is incredibly overpowered, much above your level. He can kill you in one or two hits. Do not engage him, and he will not engage you. However, if you attack him, or go within his attack range, he will go after you.
Engaging The Death Knight
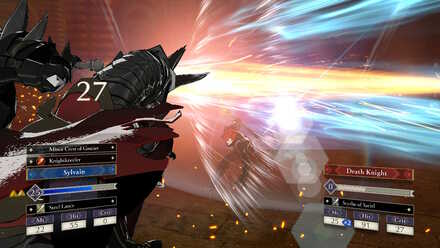
If you decide to battle against the Death Knight then it is completely possible to do so.Use battalions so the Death Knight would not be able to counter then use the spear combat art Knight Heeler to possibly kill the Death Knight.
Heal Tile
The Mysterious Mage recovers health per turn due to the heal tile he stands on. Engage him with both melee and range to kill him in one turn.
Keyholders Are Initially Close to Chests
The chests are right next to their keyholders, however, if you consolidate in one area they will go towards you and end up dropping their keys away from their chests. They are in small enough groups that it is viable to split your party in two and engage them in their aisles.
Fire Emblem: Three Houses - Related Links
Comment
Author
Chapter 4: Assault at the Rite of Rebirth Battle Walkthrough
improvement survey
03/2026
improving Game8's site?

Your answers will help us to improve our website.
Note: Please be sure not to enter any kind of personal information into your response.

We hope you continue to make use of Game8.
Rankings
- We could not find the message board you were looking for.
Gaming News
Popular Games

Genshin Impact Walkthrough & Guides Wiki

Honkai: Star Rail Walkthrough & Guides Wiki

Umamusume: Pretty Derby Walkthrough & Guides Wiki

Pokemon Pokopia Walkthrough & Guides Wiki

Resident Evil Requiem (RE9) Walkthrough & Guides Wiki

Monster Hunter Wilds Walkthrough & Guides Wiki

Wuthering Waves Walkthrough & Guides Wiki

Arknights: Endfield Walkthrough & Guides Wiki

Pokemon FireRed and LeafGreen (FRLG) Walkthrough & Guides Wiki

Pokemon TCG Pocket (PTCGP) Strategies & Guides Wiki
Recommended Games

Diablo 4: Vessel of Hatred Walkthrough & Guides Wiki

Fire Emblem Heroes (FEH) Walkthrough & Guides Wiki

Yu-Gi-Oh! Master Duel Walkthrough & Guides Wiki

Super Smash Bros. Ultimate Walkthrough & Guides Wiki

Pokemon Brilliant Diamond and Shining Pearl (BDSP) Walkthrough & Guides Wiki

Elden Ring Shadow of the Erdtree Walkthrough & Guides Wiki

Monster Hunter World Walkthrough & Guides Wiki

The Legend of Zelda: Tears of the Kingdom Walkthrough & Guides Wiki

Persona 3 Reload Walkthrough & Guides Wiki

Cyberpunk 2077: Ultimate Edition Walkthrough & Guides Wiki
All rights reserved
©2019 Nintendo / INTELLIGENT SYSTEMS. Co-developed by KOEI TECMO GAMES CO., LTD. Fire Emblem and Nintendo Switch are trademarks of Nintendo. © 2019 Nintendo.
The copyrights of videos of games used in our content and other intellectual property rights belong to the provider of the game.
The contents we provide on this site were created personally by members of the Game8 editorial department.
We refuse the right to reuse or repost content taken without our permission such as data or images to other sites.


![Everwind Review [Early Access] | The Shaky First Step to A Very Long Journey](https://img.game8.co/4440226/ab079b1153298a042633dd1ef51e878e.png/thumb)

![Monster Hunter Stories 3 Review [First Impressions] | Simply Rejuvenating](https://img.game8.co/4438641/2a31b7702bd70e78ec8efd24661dacda.jpeg/thumb)


