Part 6 Decisive Battle of Guandu Walkthrough and All Flag Locations
This is a guide to the Main Quest Decisive Battle of Guandu in Wo Long: Fallen Dynasty. Read on to see a full walkthrough of Decisive Battle of Guandu, all flag locations in the Decisive Battle of Guandu, as well as the recommended level and rewards for Decisive Battle of Guandu!
| Previous Mission | Next Mission |
|---|---|
| Behold the Glaive of Righteousness | The Crouching Dragon Roars |
List of Contents
Decisive Battle of Guandu Rewards and How to Unlock
Decisive Battle of Guandu How to Unlock
| How to Unlock | Complete Behold the Glaive of Righteousness mission |
|---|---|
| Recommended Level | 85 |
| Clear Condition | Defeat Yu Ji |
Decisive Battle of Guandu Rewards
|
・Genuine Qi Crystal x2 ・ Dual Reaper Halberds x1 ・ Heishan Champion Helmet x1 ・ Heishan Champion Footwear x1 |
Decisive Battle of Guandu All Flag Locations
All Battle Flag and Marking Flags Video Walkthrough
| All Flag Locations Walkthrough |
|---|
Battle Flag 1
| ① | You can find the first Battle Flag at the starting point. It has already been activated and is unmissable. |
|---|
Marking Flag 1
| ① | Head across the battlefield and ignore the enemies. Once you pass by the giant hedgehog, jump on the small ledge on the left. |
|---|---|
| ② | Pass through the tiger and jump on the second small ledge on the left. |
| ③ | Keep moving on the left side and pass through the medium-sized enemy with a hammer and cross the wooden bridge. |
| ④ | Head to the left side and climb the small stairs to find the first Marking Flag. Note: Make sure to interact with the ladder next to the Marking Flag to create a shortcut. |
Marking Flag 2
| ① | Backtrack all the way to the wooden bridge and immediately head left after crossing it. |
|---|---|
| ② | Head straight across the wall until you come across a side of the wall with white paint on it. |
| ③ | Climb on the wall with white paint on it and use the catapult near the headless corpse enemy to break the wooden wall on the right side. |
| ④ | Drop down back to the open area and head towards the newly opened area across to reach the second Marking Flag. |
Battle Flag 2
| ① | From the second Marking Flag, head to the right side and across the open area with a giant enemy with a hammer guarding the second Battle Flag. Note: Defeat the giant enemy with a hammer to activate this Battle Flag. |
|---|
How to Open the Gate
| ① | With the gate behind you, go to the right side and climb the red tree roots and head left. |
|---|---|
| ② | Make sure to activate the ladder shortcut near the scaffolding as you make your way up. |
| ③ | Head to the rightmost tree roots until you reach the area with multiple broken houses. |
| ④ | Continue following the tree roots' path until you reach an area with multiple giant statues of sword-wielding soldiers. |
| ⑤ | Pass through the giant statues and activate the lever on the right side to open the gate. |
Battle Flag 3
| ① | After opening the gate, head to the other side and use the second Battle Flag as the starting point. |
|---|---|
| ② | Pass through the gate and cross the tree roots on the right side. |
| ③ | Head to the left side and cross another set of tree roots. |
| ④ | Climb the wall with white paint on the left side inside the broken house and cross another set of tree roots to reach the third Battle Flag at the end of the path. |
How to Open the Shortcut
| ① | From the third Battle Flag, head to the right side of the red bulbs on the water. |
|---|---|
| ② | Drop down on the ledge and cross the narrow tree roots. |
| ③ | Jump on the small ledge and cross the tree roots on the right side. |
| ④ | As you climb the tree roots, take the path on the left side and follow the path down to a broken house with a hole in the wall. |
| ⑤ | Enter the hole in the wall and open the door to create the shortcut. |
Marking Flag 3
| ① | From the newely opened shortcut, backtrack all the way up to the broken house with the tree roots and jump on the ledge on the right side. |
|---|---|
| ② | Enter the hole in the wall of the house to find the third Marking Flag inside. |
Marking Flag 4
| ① | From the third Marking Flag, head outside of the broken house and jump down from the ledge on the right side. |
|---|---|
| ② | Head north towards the cliffside. Look down and jump on the tree roots below. |
| ③ | Follow the tree roots' path, passing through the broken house, and to the next area. |
| ④ | After passing through the medium-sized enemy with a spear, head right into the broken house and drop down on the tree roots below. |
| ⑤ | Cross the tree roots and climb the wall with white paint on it. |
| ⑥ | Find the fourth Marking Flag on the right side of the cliff next to the soldier. |
Marking Flag 5
| ① | Use the third Battle Flag as the starting point and climb the ledge north of it to access the shortcut. |
|---|---|
| ② | Once you are inside the house, head right and cross the tree roots. |
| ③ | Follow the tree roots until you reach an open area with Zhuyan on the left side. Head right and cross another set of tree roots. |
| ④ | Head up the path and pass through the headless corpse enemy. Find the broken house with a tiger inside and head to the left side of it to find another set of tree roots below the ledge. |
| ⑤ | Follow the tree roots to go around the house and enter inside to find the fifth Marking Flag. Note: Make sure to open the barred door inside to create a shortcut. |
Marking Flag 6
| ① | From the fifth Marking Flag, enter through the shortcut you just made and cross the tree roots across your path. |
|---|---|
| ② | Cross another set of tree roots and head right towards the ladder. |
| ③ | Kick the ladder and drop down towards the scaffolding to reach the sixth Marking Flag. |
Battle Flag 4
| ① | Use the second Battle Flag as your starting point. Head towards the gate and immediately head right to cross the tree roots. |
|---|---|
| ② | Continue heading straight towards the wall and jump over it. |
| ③ | Continue heading along the path and drop down towards the large arena to start a boss fight with Aoye. Note: You can access and defeat this boss right away as soon as you open the gate. |
| ④ | After defeating the boss, the fourth Battle Flag will appear at the northern end of the arena. |
Battle Flag 5
| ① | Use the third Battle Flag as your starting point and climb the ledge north of it to access the shortcut. |
|---|---|
| ② | Once you are inside the house, head right and cross the tree roots. |
| ③ | Follow the tree roots until you reach an open area with Zhuyan on the left side. Head right and cross another set of tree roots. |
| ④ | Head up the path and pass through the headless corpse enemy. Stick to the left side and climb another set of tree roots. |
| ⑤ | Head right once you reach a fork in the path and watch out for the fire ball casting enemy as you climb up. |
| ⑥ | Continue heading north of the tree roots while avoiding the fire ball casting enemies. Cross another set of tree roots while avoiding the red spirit enemy that will run towards your direction. |
| ⑦ | Reach the open area and head right towards the giant sword-wielding statue. Defeat it to activate the fifth Battle Flag. |
Marking Flag 7
| ① | From the fifth Battle Flag, head to the opposite side and jump across the tree roots to reach the seventh Marking Flag. |
|---|
Battle Flag 6
| ① | After defeating Yuan Shao, exit the arena and cross the tree roots north of it to reach the area with the sixth Battle Flag. |
|---|
Decisive Battle of Guandu All Collectibles
| All Collectibles |
|---|
Dragon Vein Essence Location
Head to the third Battle Flag with multiple bulbs emerging from the water and climb up the tree rootses north of it.
Once you reach a fork in the tree roots path, head left towards the branch with the broken house and follow the path into the hole in the wall of another broken house.
Head left and climb up the tree roots and follow the path until you reach a fork. Head right and drop down on the ledges to find a single broken house containing a treasure chest with the Dragon Vein Essence inside.
All Dragon Vein Crystal and Essence Locations
Disheartened Yuan Soldier's Note Location
Head straight from the first Battle Flag and find the item on the floor.
Yuan Zhao Assassin’s Note Location
From the second Battle Flag, climb the branches of the red tree and follow the path until it leads you to a broken house with the item on the floor.
Cao Cao Army Prisoner’s Note Location
From the second Battle Flag, head to the red tree roots on the right side of the hall with giant statues. Continue moving across the tents and cross the second red tree roots to enter the broken house with this item on the floor.
Decisive Battle of Guandu Golden Cicada Location
Golden Cicada Location 1
From the second Battle Flag, head to the area with multiple giant sword-wielding statues and head right from the toppled one towards the cliffside. Look down from the cliffside to find a small ledge below with the first Golden Cicada on it.
Golden Cicada Location 2
After defeating Yuan Shao, head south from the sixth Battle Flag and drop down from the ledge towards the area with three red bulbs. Pick up the second Golden Cicada in the middle of the three red bulbs.
All Golden Cicada Shells Locations
Decisive Battle of Guandu Shitieshou Demon (Panda) Location
After defeating Yuan Shao, head south from the sixth Battle Flag and drop down from the ledge towards the area with three red bulbs. You can find the Shitieshou Demon (Panda) in this location.
All Shitieshou Demon (Panda)Locations
Decisive Battle of Guandu Strategies and Tips
Be Careful Moving Around the Tree Roots
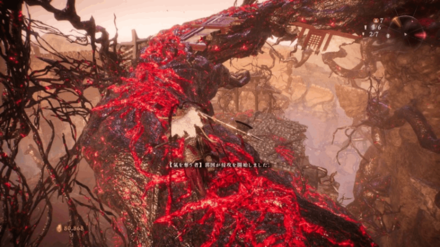
You will be moving on tree roots with narrow footholds and falls are common in this area. Move carefully, especially when attacking as you may fall down from the roots.
Avoid Unnecessary Fights with Enemies
The enemy placement in this main mission is brutal so it is best to ignore and run through them and aim to plant Battle Flags and Marking Flags throughout the mission instead.
Decisive Battle of Guandu Boss Guides
Yuan Shao
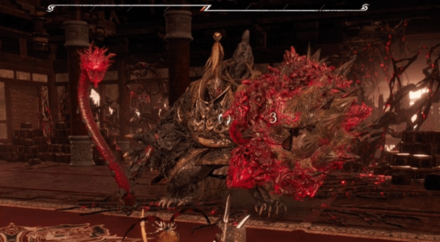
Yuan Shao is the mid-level boss for this main mission. His frequency of attacks matches the number of attacks you do, so it is best to moderate the number of normal attacks you use and deflect his Critical Blows.
Yu Jin
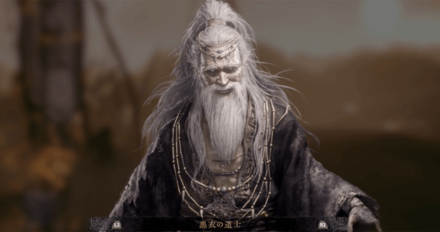
Yu Jin is the boss at the end of the mission. He mainly uses spells to attack and is prone to flinching. Use your best Wizardry spells to interrupt him while he is casting to stun him for a short period of time.
He uses two Critical Blows consisting of a spinning attack and a slamming attack, both of which can be easily deflected.
Transforms into a dragon during the 2nd phase
Yu Jin transforms into a dragon once you reach the second phase of the fight. Use a defensive approach when fighting the boss and do not try to follow him around throughout the arena.
Guard or dodge his normal attacks and focus on deflecting his Critical Blows.
Wo Long: Fallen Dynasty Related Guides

List of All Main Missions (Battlefields)
| Part 1: Encounter | |
|---|---|
 The Village of Calamity The Village of Calamity |
- |
| Part 2: Delusion | |
 Two Chivalrous Heroes Two Chivalrous Heroes |
 The Valley of Crying Wraiths The Valley of Crying Wraiths |
 The Demon Fort of the Yellow Heaven The Demon Fort of the Yellow Heaven |
- |
| Part 3: Corruption | |
 In Search of the Immortal Wizard In Search of the Immortal Wizard |
 Fall of the Corrupted Eunuc Fall of the Corrupted Eunuc |
| Part 4: Tyranny | |
 The Battle of Hulaoguan Pass The Battle of Hulaoguan Pass |
 Centuries of Glory Burned Away Centuries of Glory Burned Away |
 Darkness Over the Hanshui River Darkness Over the Hanshui River |
 Tyrant’s Final Banquet Tyrant’s Final Banquet |
| Part 5: Fortitude | |
 War's Flames Blaze Fiercely War's Flames Blaze Fiercely |
 The Way of the Warrior The Way of the Warrior |
 Lu Bu, Mightiest Among Men Lu Bu, Mightiest Among Men |
- |
| Part 6: Malice | |
 Behold the Glaive of Righteousness Behold the Glaive of Righteousness |
 Decisive Battle of Guandu Decisive Battle of Guandu |
| Part 7: Ascension | |
 The Crouching Dragon Roars The Crouching Dragon Roars |
- |
All Main Missions (Main Battlefields)
List of All Side Missions (Sub Battlefields)
Author
Part 6 Decisive Battle of Guandu Walkthrough and All Flag Locations
improvement survey
03/2026
improving Game8's site?

Your answers will help us to improve our website.
Note: Please be sure not to enter any kind of personal information into your response.

We hope you continue to make use of Game8.
Rankings
- We could not find the message board you were looking for.
Gaming News
Popular Games

Genshin Impact Walkthrough & Guides Wiki

Honkai: Star Rail Walkthrough & Guides Wiki

Umamusume: Pretty Derby Walkthrough & Guides Wiki

Pokemon Pokopia Walkthrough & Guides Wiki

Resident Evil Requiem (RE9) Walkthrough & Guides Wiki

Monster Hunter Wilds Walkthrough & Guides Wiki

Wuthering Waves Walkthrough & Guides Wiki

Arknights: Endfield Walkthrough & Guides Wiki

Pokemon FireRed and LeafGreen (FRLG) Walkthrough & Guides Wiki

Pokemon TCG Pocket (PTCGP) Strategies & Guides Wiki
Recommended Games

Diablo 4: Vessel of Hatred Walkthrough & Guides Wiki

Cyberpunk 2077: Ultimate Edition Walkthrough & Guides Wiki

Fire Emblem Heroes (FEH) Walkthrough & Guides Wiki

Yu-Gi-Oh! Master Duel Walkthrough & Guides Wiki

Super Smash Bros. Ultimate Walkthrough & Guides Wiki

Pokemon Brilliant Diamond and Shining Pearl (BDSP) Walkthrough & Guides Wiki

Elden Ring Shadow of the Erdtree Walkthrough & Guides Wiki

Monster Hunter World Walkthrough & Guides Wiki

The Legend of Zelda: Tears of the Kingdom Walkthrough & Guides Wiki

Persona 3 Reload Walkthrough & Guides Wiki
All rights reserved
Copyright ©2022 KOEI TECMO GAMES CO., LTD. All Rights Reserved.
The copyrights of videos of games used in our content and other intellectual property rights belong to the provider of the game.
The contents we provide on this site were created personally by members of the Game8 editorial department.
We refuse the right to reuse or repost content taken without our permission such as data or images to other sites.
 The Yellow Heaven Burns
 Tale of Guiguzi
 The Flying Swallow of Heishan
 Shadow of the Sacred Mountain
 Escape from the Capital
 The Valorous Trio
 Like Father, Like Son
 The Lost Sacred Artifact
 The Tiger’s Loyal Subjects
 Fate of the Entertainer
 Massacre of Meiwu Fort
 Realm of Battle
 Green Plum, Warm Liquor
 Zhao Yun's Exile
 The Unparalleled Spear
 The Uninhibited Heart
 Caliber of a Hero
 Legend of the Thunder God
 Preachers of the Dark Path
 The Assault on Wuchao
 The Fearless Blade
 Let’s Make Our Armor Shine!
 Heirloom Seal of the Realm
 The Request of Goddess Luo
 The Two Walls Stand Tall
 Pride of the Yuan Clan
 The Crouching Dragon’s Trial
 Let’s Make Our Halberds Shine!
 Wizardry Spell Mastery
 The Scarlet Crystal




![Monster Hunter Stories 3 Review [First Impressions] | Simply Rejuvenating](https://img.game8.co/4438641/2a31b7702bd70e78ec8efd24661dacda.jpeg/thumb)


