Heirloom Seal of the Realm Side Mission Walkthrough and All Flag Locations
This is a guide to the Heirloom Seal of the Realm, a side mission in Wo Long: Fallen Dynasty. Read on to see a full walkthrough of Heirloom Seal of the Realm, all flag locations in Heirloom Seal of the Realm, as well as the recommended level and rewards for Heirloom Seal of the Realm!
| Previous Side Mission | Next Side Mission |
|---|---|
| Let’s Make Our Armor Shine! | The Request of Goddess Luo |
List of Contents
Heirloom Seal of the Realm Rewards and How to Unlock
Heirloom Seal of the Realm How to Unlock
| How to Unlock | Complete Decisive Battle of Guandu mission |
|---|---|
| Recommended Level | 88 |
| Clear Condition | Defeat Leishi and open the treasure chest at the corner. |
Heirloom Seal of the Realm Rewards
|
・Dragon's Cure Powder x1 ・Elixir x3 ・Speak of King Fuchsia x1 ・Genuine Qi Crystal x2 |
Heirloom Seal of the Realm All Flag Locations
Battle Flag 1
| ① | You can find the first Battle Flag at the starting point. It has already been activated and is unmissable. |
|---|
Marking Flag 1
| ① | Start from the first Battle Flag and head towards the gate and turn left. |
|---|---|
| ② | Continue following the path across and turn left once you pass through the house with yellow lanterns. |
| ③ | Contniue along the path until you reach the first Marking Flag. |
Battle Flag 2
| ① | Backtrack all the way to the house with yellow lanterns and turn left on the boat with a torch hanging on the mast. |
|---|---|
| ② | Jump on the boat and towards the next area. Head right towards the house with a destroyed opening to find the second Battle Flag at the rightmost corner of the area. Note: You will need to defeat the enemy guarding the Battle Flag before you can activate it. |
Marking Flag 2
| ① | Head south from the second Battle Flag and jump on the destroyed house on the left side. |
|---|---|
| ② | 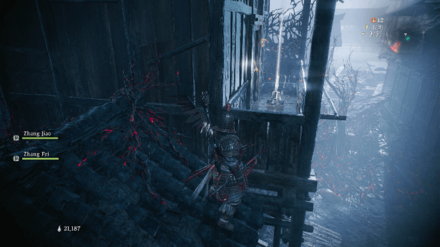 Jump on the rooftops on the left side and jump on the railing of the house to reach the second Marking Flag. |
Marking Flag 3
| ① | From the second Marking Flag, jump over the railing to descend down to the next area. |
|---|---|
| ② | Head straight across the area until you reach a tree and a destroyed house on the left side. |
| ③ | Go behind the destroyed house on the left side to find the third Marking Flag. |
Battle Flag 3
| ① | From the third Marking Flag, head south from it and turn left from the destroyed bridge. |
|---|---|
| ② | Continue following the path straight across until you reach the third Battle Flag near the giant partially opened door. Note: You will need to defeat the enemy guarding the Battle Flag before you can activate it. |
Marking Flag 4
| ① | From the third Battle Flag, head through the giant partially opened door and turn left. |
|---|---|
| ② | Head towards the wooden bridge with a torch to reach the fourth Marking Flag. |
Marking Flag 5
| ① | From the fourth Marking Flag, backtrack all the way to the giant partially opened door and head north. |
|---|---|
| ② | Turn right once you see the white tower to find the fifth Marking Flag on the right side of the said tower. |
Heirloom Seal of the Realm Shitieshou Demon (Panda) Location
From the starting point, turn left and continue following the path until you pass through the building on the left with yellow lanterns. Turn left and jump on the ledge of the building on the left.
Continue jumping on the ledges until you reach the top of the house that has a hole on the right side of the wall. Jump down from the hole and descend down the stairs.
Turn left from the stairs and continue along the path until you find the Shitieshou Demon (Panda) near the torch.
Heirloom Seal of the Realm Strategies and Tips
Raise Your Lightning Resistance
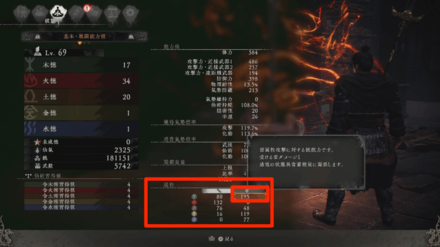
The boss you will face at the end of the side mission is Leishi, which uses Lightning elemental attacks. Equip armor with high Lightning resistance to reduce damage taken from the boss.
Open the Treasure Chest After Defeating Leishi
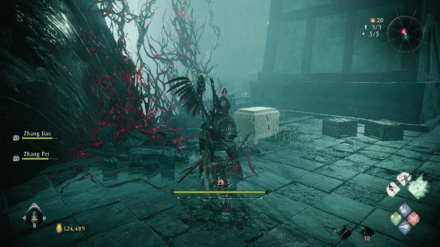
Once you defeat Leishi, make sure to open the treasure chest at the corner of the area to complete the side mission.
Heirloom Seal of the Realm Boss Guides
Deflect Leishi's Jumping Attack
Leishi has a long windup attack wherein it jumps in the air and slams its hammer on the ground. You can deflect this attack easily and use Martial Arts to counterattack.
How to Beat Leishi: Boss Fight Strategy Guide
Beware of Electric Shock Status Effect
Leishi will buff himself to grant Lightning elemental damage when his HP is reduced to half. If you get hit, you'll receive the Electric Shock status effect that reduces your moral and poison resistance.
Make sure to guard against his attacks at this point and only deflect if he performs a Critical Blow or an attack with a slow buildup.
Electric shock effect
| Status effect that appears when getting hit by a Lightning elemental weapon. Poison resistance attribute decreases and morale gradually decreases. |
Wo Long: Fallen Dynasty Related Guides

List of All Main Missions (Battlefields)
| Part 1: Encounter | |
|---|---|
 The Village of Calamity The Village of Calamity |
- |
| Part 2: Delusion | |
 Two Chivalrous Heroes Two Chivalrous Heroes |
 The Valley of Crying Wraiths The Valley of Crying Wraiths |
 The Demon Fort of the Yellow Heaven The Demon Fort of the Yellow Heaven |
- |
| Part 3: Corruption | |
 In Search of the Immortal Wizard In Search of the Immortal Wizard |
 Fall of the Corrupted Eunuc Fall of the Corrupted Eunuc |
| Part 4: Tyranny | |
 The Battle of Hulaoguan Pass The Battle of Hulaoguan Pass |
 Centuries of Glory Burned Away Centuries of Glory Burned Away |
 Darkness Over the Hanshui River Darkness Over the Hanshui River |
 Tyrant’s Final Banquet Tyrant’s Final Banquet |
| Part 5: Fortitude | |
 War's Flames Blaze Fiercely War's Flames Blaze Fiercely |
 The Way of the Warrior The Way of the Warrior |
 Lu Bu, Mightiest Among Men Lu Bu, Mightiest Among Men |
- |
| Part 6: Malice | |
 Behold the Glaive of Righteousness Behold the Glaive of Righteousness |
 Decisive Battle of Guandu Decisive Battle of Guandu |
| Part 7: Ascension | |
 The Crouching Dragon Roars The Crouching Dragon Roars |
- |
All Main Missions (Main Battlefields)
List of All Side Missions (Sub Battlefields)
| Part 2: Delusion | |
|---|---|
 The Yellow Heaven Burns The Yellow Heaven Burns |
 Tale of Guiguzi Tale of Guiguzi |
 The Flying Swallow of Heishan The Flying Swallow of Heishan |
- |
| Part 3: Corruption | |
 Shadow of the Sacred Mountain Shadow of the Sacred Mountain |
 Escape from the Capital Escape from the Capital |
 The Valorous Trio The Valorous Trio |
- |
| Part 4: Tyranny | |
 Like Father, Like Son Like Father, Like Son |
 The Lost Sacred Artifact The Lost Sacred Artifact |
 The Tiger’s Loyal Subjects The Tiger’s Loyal Subjects |
 Fate of the Entertainer Fate of the Entertainer |
 Massacre of Meiwu Fort Massacre of Meiwu Fort |
 Realm of Battle Realm of Battle |
 Green Plum, Warm Liquor Green Plum, Warm Liquor |
 Zhao Yun's Exile Zhao Yun's Exile |
 The Unparalleled Spear The Unparalleled Spear |
- |
| Part 5: Fortitude | |
 The Uninhibited Heart The Uninhibited Heart |
 Caliber of a Hero Caliber of a Hero |
 Legend of the Thunder God Legend of the Thunder God |
 Preachers of the Dark Path Preachers of the Dark Path |
| Part 6: Malice | |
 The Assault on Wuchao The Assault on Wuchao |
 The Fearless Blade The Fearless Blade |
 Let’s Make Our Armor Shine! Let’s Make Our Armor Shine! |
 Heirloom Seal of the Realm Heirloom Seal of the Realm |
 The Request of Goddess Luo The Request of Goddess Luo |
- |
| Part 7: Ascension | |
 The Two Walls Stand Tall The Two Walls Stand Tall |
 Pride of the Yuan Clan Pride of the Yuan Clan |
 The Crouching Dragon’s Trial The Crouching Dragon’s Trial |
 Let’s Make Our Halberds Shine! Let’s Make Our Halberds Shine! |
| Other Side Missions | |
 Wizardry Spell Mastery Wizardry Spell Mastery |
 The Scarlet Crystal The Scarlet Crystal |
Author
Heirloom Seal of the Realm Side Mission Walkthrough and All Flag Locations
improvement survey
03/2026
improving Game8's site?

Your answers will help us to improve our website.
Note: Please be sure not to enter any kind of personal information into your response.

We hope you continue to make use of Game8.
Rankings
- We could not find the message board you were looking for.
Gaming News
Popular Games

Genshin Impact Walkthrough & Guides Wiki

Honkai: Star Rail Walkthrough & Guides Wiki

Umamusume: Pretty Derby Walkthrough & Guides Wiki

Pokemon Pokopia Walkthrough & Guides Wiki

Resident Evil Requiem (RE9) Walkthrough & Guides Wiki

Monster Hunter Wilds Walkthrough & Guides Wiki

Wuthering Waves Walkthrough & Guides Wiki

Arknights: Endfield Walkthrough & Guides Wiki

Pokemon FireRed and LeafGreen (FRLG) Walkthrough & Guides Wiki

Pokemon TCG Pocket (PTCGP) Strategies & Guides Wiki
Recommended Games

Diablo 4: Vessel of Hatred Walkthrough & Guides Wiki

Cyberpunk 2077: Ultimate Edition Walkthrough & Guides Wiki

Fire Emblem Heroes (FEH) Walkthrough & Guides Wiki

Yu-Gi-Oh! Master Duel Walkthrough & Guides Wiki

Super Smash Bros. Ultimate Walkthrough & Guides Wiki

Pokemon Brilliant Diamond and Shining Pearl (BDSP) Walkthrough & Guides Wiki

Elden Ring Shadow of the Erdtree Walkthrough & Guides Wiki

Monster Hunter World Walkthrough & Guides Wiki

The Legend of Zelda: Tears of the Kingdom Walkthrough & Guides Wiki

Persona 3 Reload Walkthrough & Guides Wiki
All rights reserved
Copyright ©2022 KOEI TECMO GAMES CO., LTD. All Rights Reserved.
The copyrights of videos of games used in our content and other intellectual property rights belong to the provider of the game.
The contents we provide on this site were created personally by members of the Game8 editorial department.
We refuse the right to reuse or repost content taken without our permission such as data or images to other sites.


![Monster Hunter Stories 3 Review [First Impressions] | Simply Rejuvenating](https://img.game8.co/4438641/2a31b7702bd70e78ec8efd24661dacda.jpeg/thumb)


