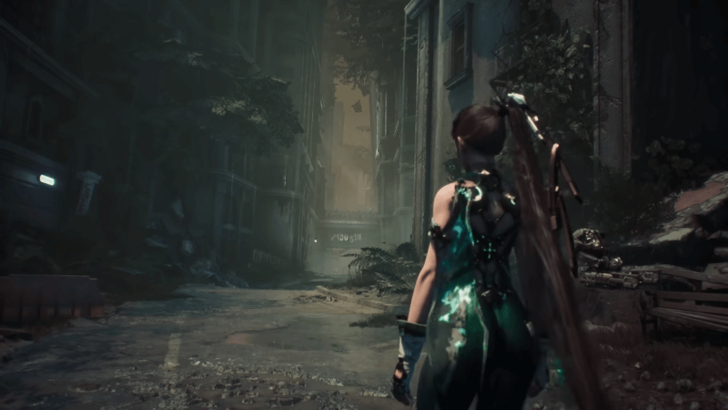
Scavenger Adam Mission Guide

Scavenger Adam is the second main mission in Stellar Blade. Read our guide for a full walkthrough on how to complete Scavenger Adam, including all passcode and important item locations, enemies encountered, as well as boss fight tips!
| ◄ Previous Mission | Next Mission ▶ |
|---|---|
| 7th Airborne Squad | Xion, the Last Remaining City |
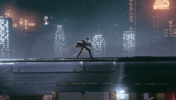
Scavenger Adam Mission Summary
 |
|
|---|---|
| After a staggering loss against an Alpha Naytiba, Eve must now continue her mission by working hand in hand with a new-found companion, Adam. | |
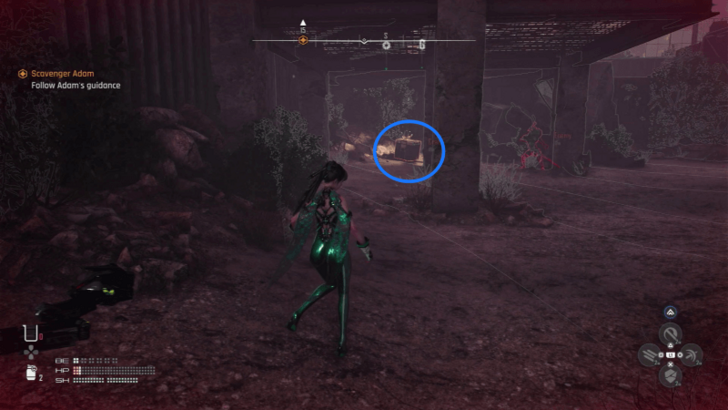
| Objectives | 1. Go to the Hall of Records
2. Follow Adam's guidance 3. Operate the crane to go to the sewer facility 4. Go to the Alpha Naytiba location 5. Defeat the Alpha Naytiba Gigas 6. Retrieve the Alpha Core |
| Bosses | •
 Abaddon •
 Gigas |
| Locations | • Silent Street
• Parking Tower • Abandoned Station • Flooded Commercial Sector • Memory Tower • Hall of Records • Construction Zone • City Underground Sector • Crater |

Naytiba Enemies in Scavenger Adam
| Enemies |
 Thornhead |
 Creeper |
 Beholder |
|---|---|---|
 Mutated Creeper |
 Barnacle |
 Cricket Slasher |
 Guardian |
 Heavy Guardian |
 Hydra |
 Cricket Boomer |
 Cannon Guardian |
 Dozer |
 Cricket Butcher |
 Mutated Hydra |
|
Scavenger Adam Walkthrough
| Jump to a Section! | ||
|---|---|---|
| Silent Street | Parking Tower | Abandoned Station |
| Flooded Commercial Sector | Memory Tower | Construction Zone |
| City Underground Sector | Crater | - |
Silent Street Walkthrough
| # | Silent Street Objectives |
|---|---|
| 1 |
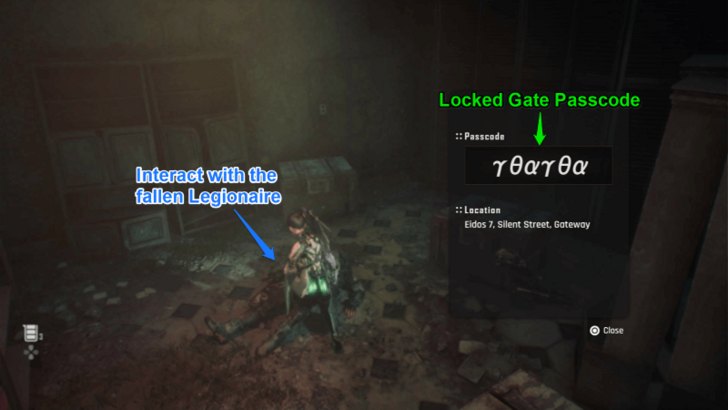 Open the Locked Gate The first hurdle you'll encounter in this mission is obtaining a passcode to open a locked gate. You can find the code on the body of one of the fallen legionaires lying in a nearby building. |
| 2 |
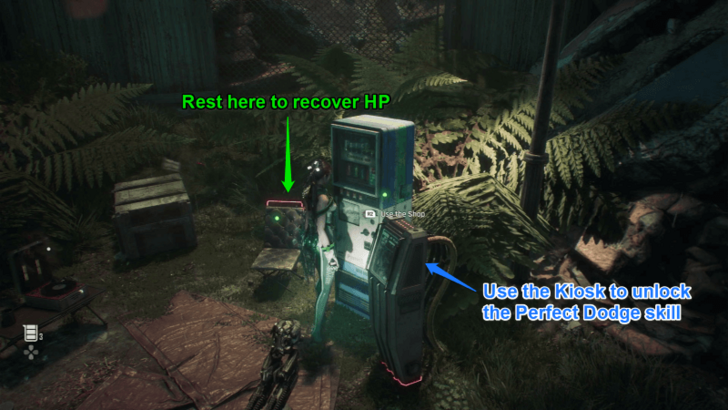 Unlock the Camp and Use Its Features In this area, you'll be able to unlock your very first camp. Use the kiosk to acquire the Perfect Dodge skill, and then rest before moving on. |
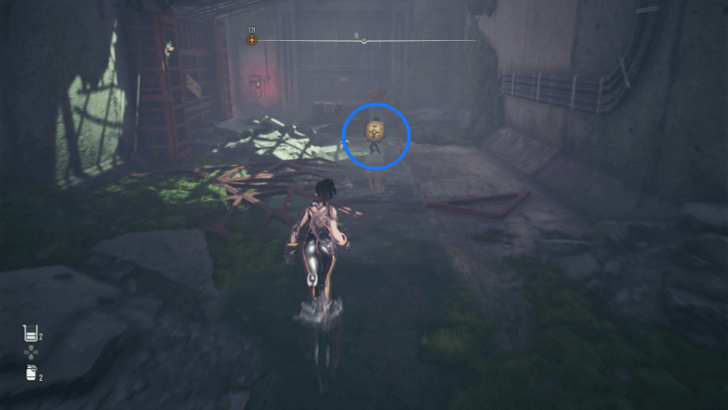
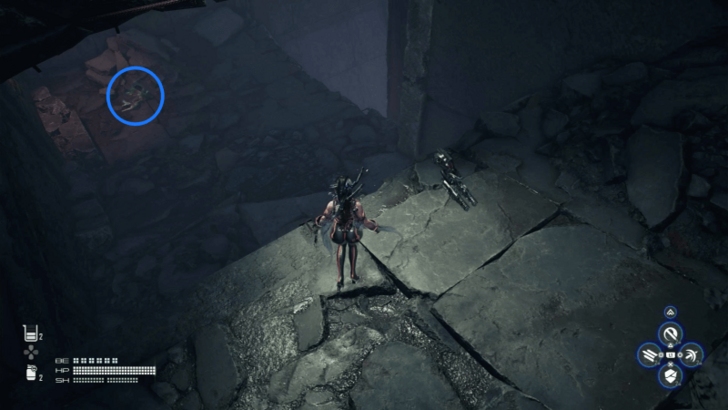
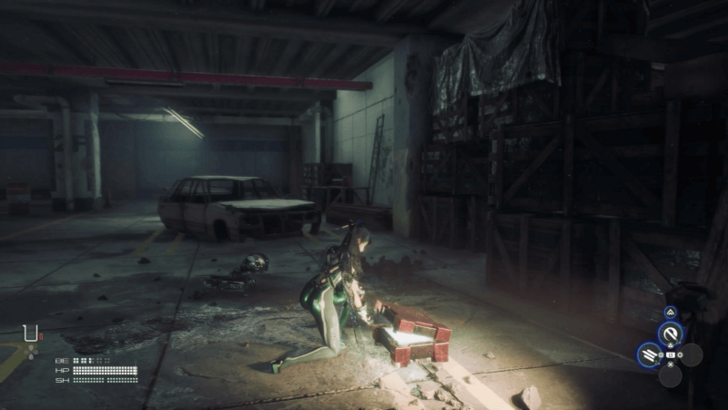
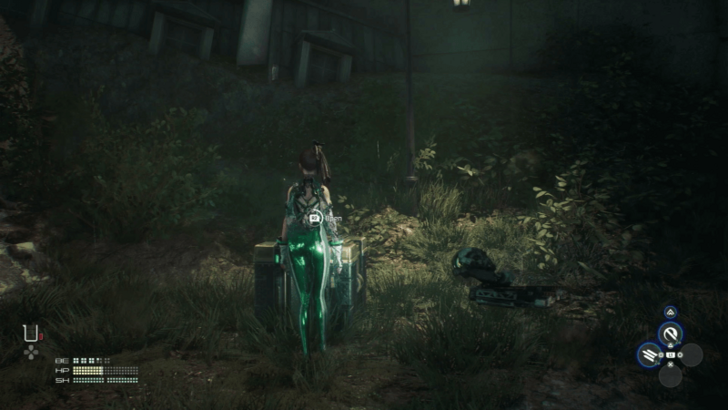
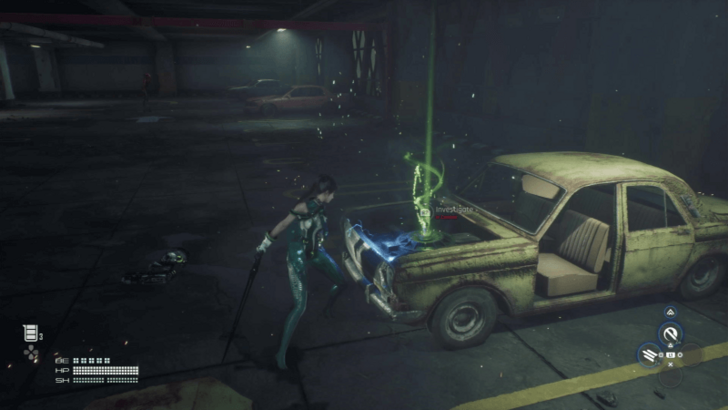
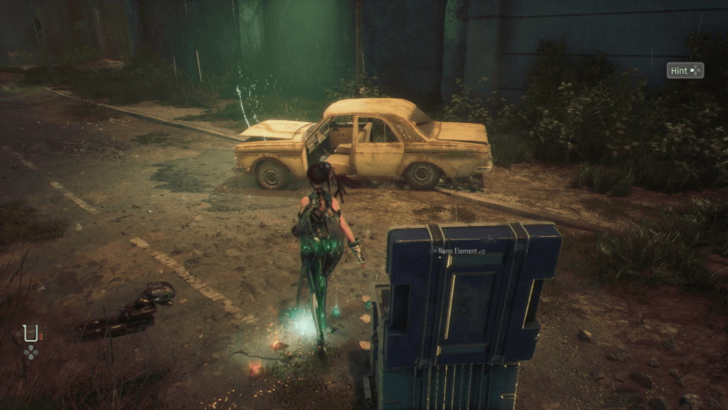
| 3 | 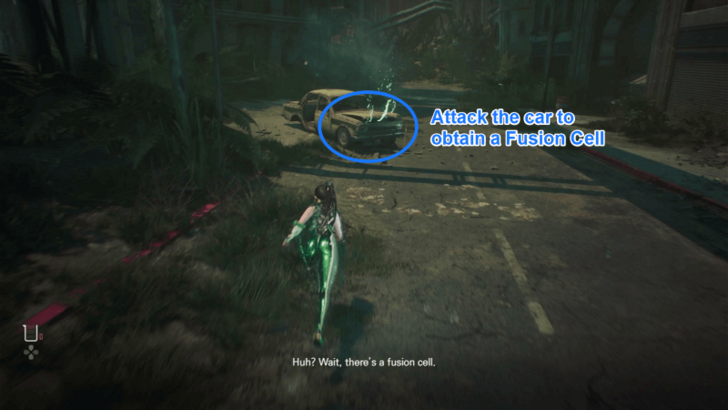 Acquire the Fusion Cell in the Broken Car After resting, push deeper into the silent street. You'll eventually come across a car with a glowing hood. Attack the car to get access to a Fusion Cell, which you'll have to use later on. |
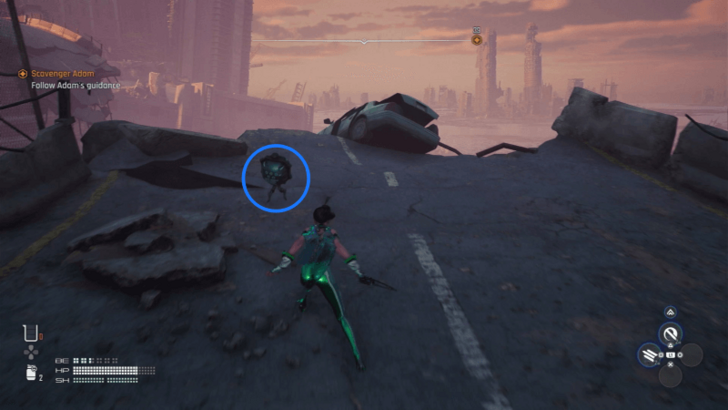
| 4 | 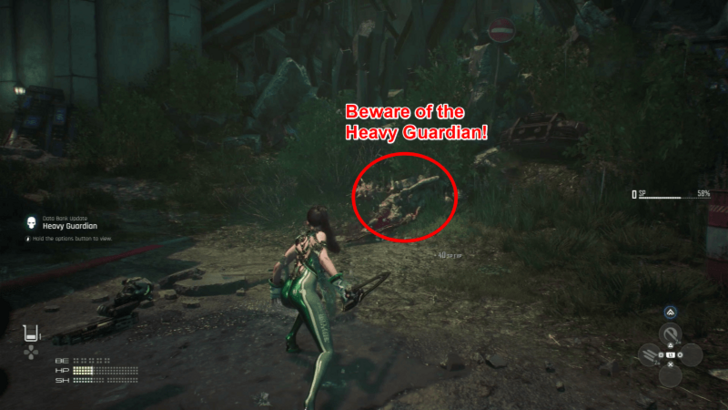 Survive the Ambush Pushing forward will lead you to an unavoidable ambush set by numerous Naytibas. Use the exploding barrels to deal a significant amount of damage to multiple nearby enemies. You'll also encounter a new type of enemy called the Heavy Guardian. Deal with them cautiously since they pack quite a punch. |
| 5 |  Climb up the Path Marked by the Legion After the ambush, make your way up the fallen buildings marked by the Legion. Swing carefully on the bars to make it all the way to the wall above. |
| 6 | 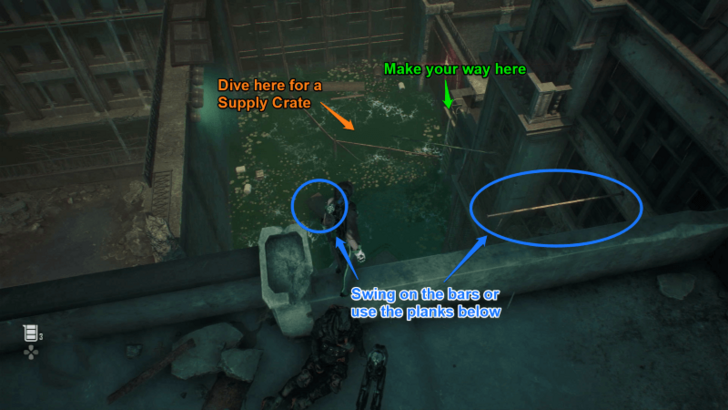 Make Your Way to the Library Continue that path until you reach an area with a small body of water. You can either swim and use the planks to get on the elevated staircase or climb and swing through the bars above. This will take you to a second camp you can unlock and recuperate at. |
| 7 | 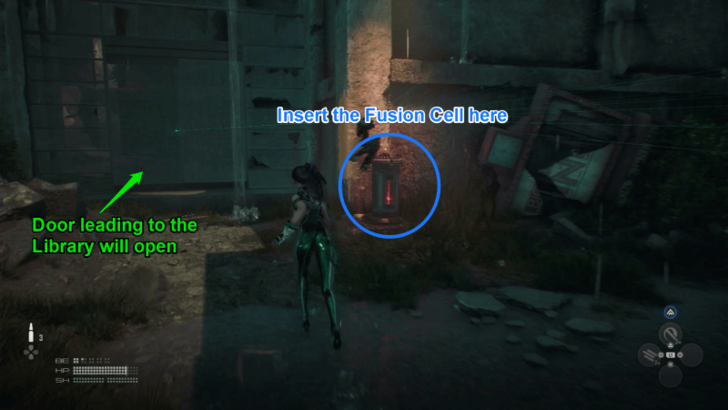 Use the Fusion Cell to Open the Library From the second camp, drop down, and you should see a device you can operate using the Fusion Cell. Operate the device to open the door leading to a library. |
Parking Tower Walkthrough
| Previous Section | Next Section |
|---|---|
| Silent Street | Abandoned Station |
| # | Parking Tower Objectives | ||||||||||
|---|---|---|---|---|---|---|---|---|---|---|---|
| 1 | 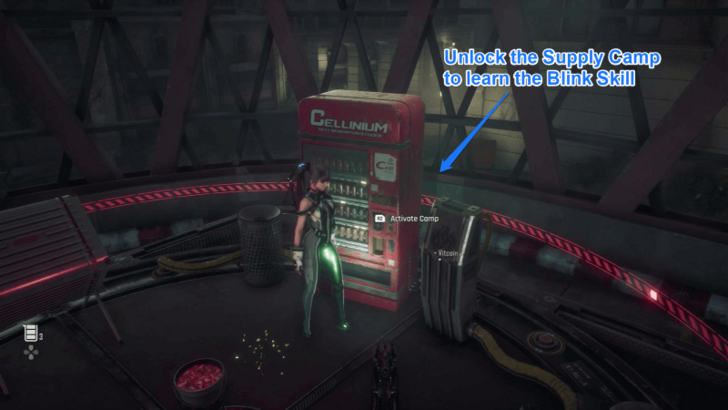 Unlock the Supply Camp and Use Its Features Defeat the enemies you'll encounter in the library to make your way to the Parking Tower. Climb up the tower, and you'll eventually reach a floor with a Supply Camp. Use the camp to learn the Blink skill and to rest for the upcoming battle. |
||||||||||
| 2 | 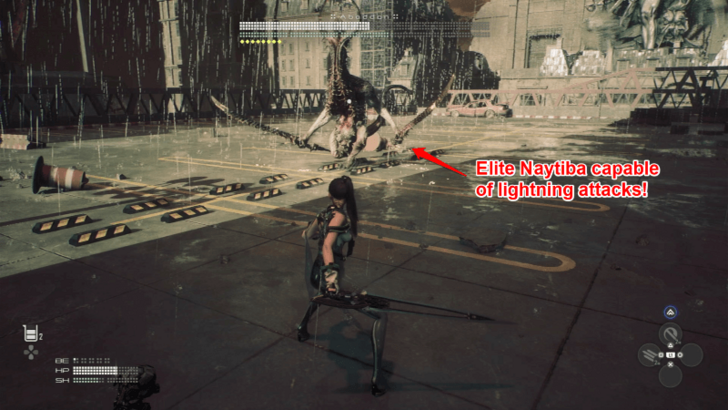 Defeat the Abaddon Continue going up the Parking Tower until you reach the rooftop, where you'll be greeted by a new Elite Naytiba called the Abbadon. Defeat it to be able to proceed to the Hall of Records. |
||||||||||
| 3 |  Descend to the Other Side of the Parking Tower After defeating the Abbadon, rest at the nearby Supply Camp to replenish health and resources. Then, proceed down the ramp to the left of the Supply Camp. |
||||||||||
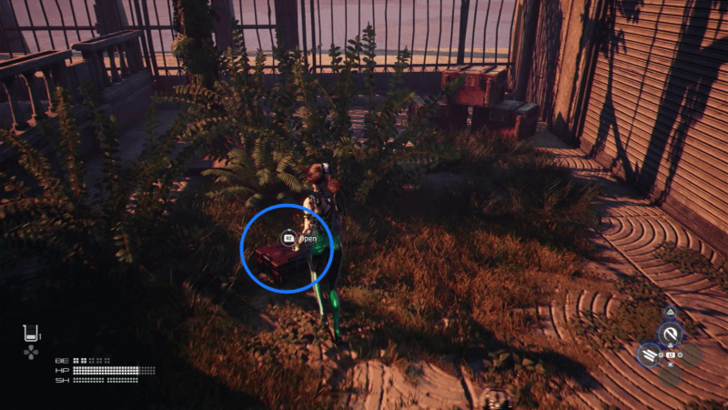
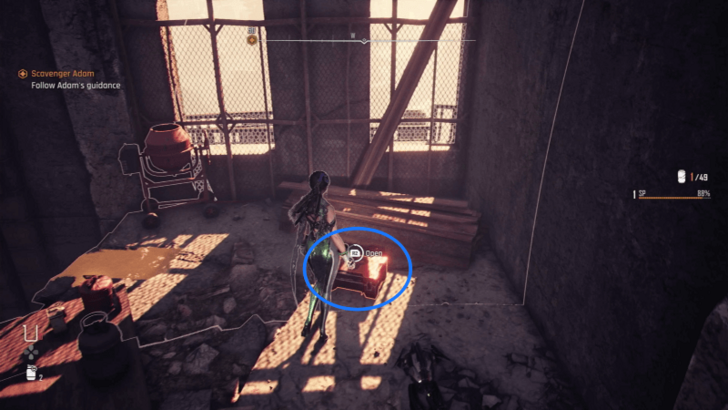
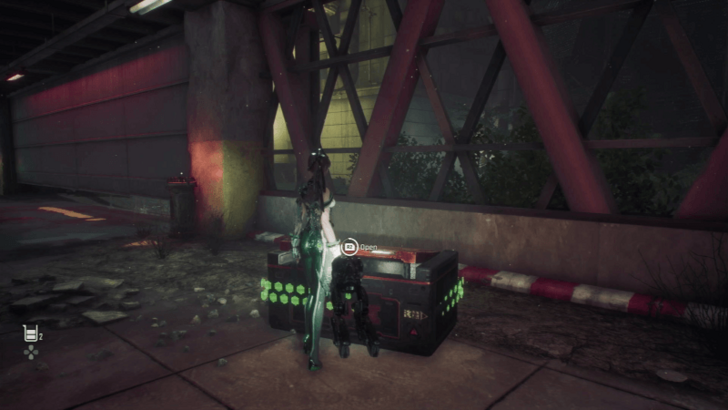
| 4 | 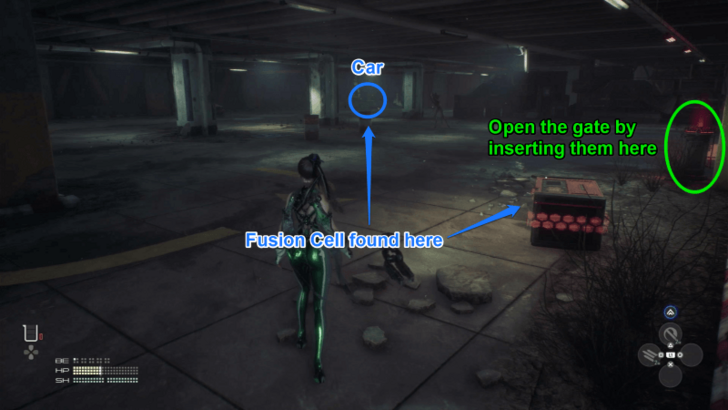 Open the Parking Tower Gate Obtain two Fusion Cells and place them on the devices located at the sides of the gate. You can get one from a red supply box and another from a car on the same floor. |
||||||||||
| 5 | 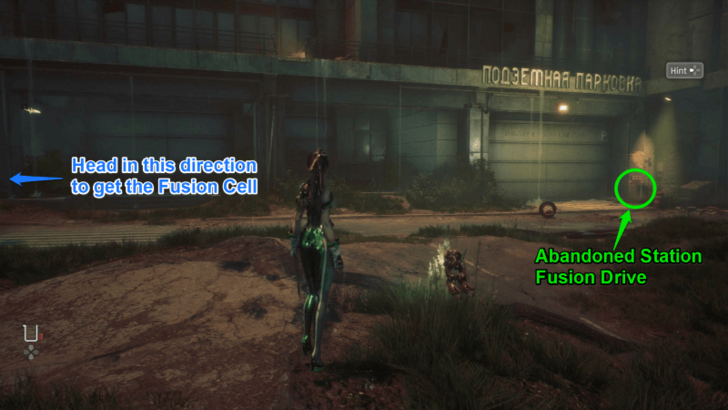 Go to the Abandoned Station After going out of the Parking Tower, turn right, and you'll be able to see another locked gate leading to the Abandoned Station. Acquire another Fusion Cell from a car nearby to open the gate. |
||||||||||
Abandoned Station Walkthrough
| Previous Section | Next Section |
|---|---|
| Parking Tower | Flooded Commercial Sector |
| # | Abandoned Station Objectives |
|---|---|
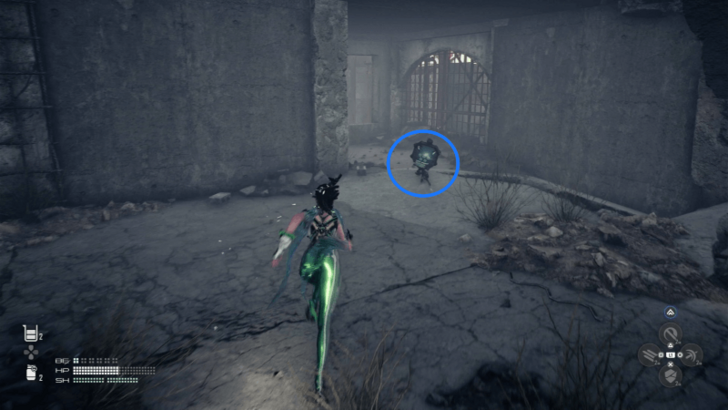
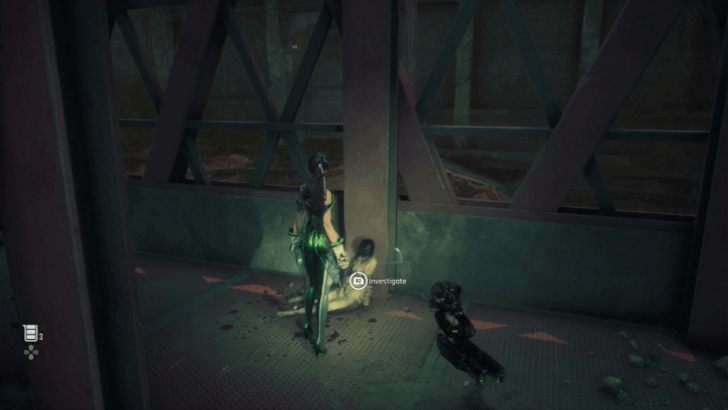
| 1 | 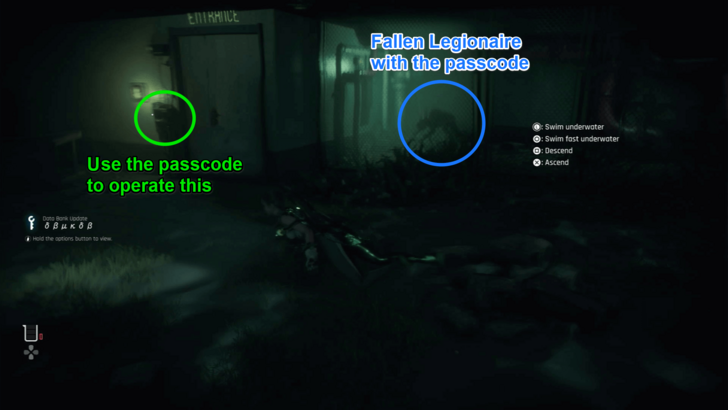 Open the Locked Door Dive down the submerged station and you'll be able to see a locked door marked with a green glowing sign that says "Entrance". You can get the passcode to this door from a Legionaire's corpse in an area beside the door. |
| 2 |  Climb the Elevator Shaft Using the Yellow Cable Enter the unlocked door and swim up. Then, approach the yellow rope to climb it. |
| 3 |  Rest in the Second Supply Camp Once you exit the door, there will be a supply camp where you can rest. |
| 4 | 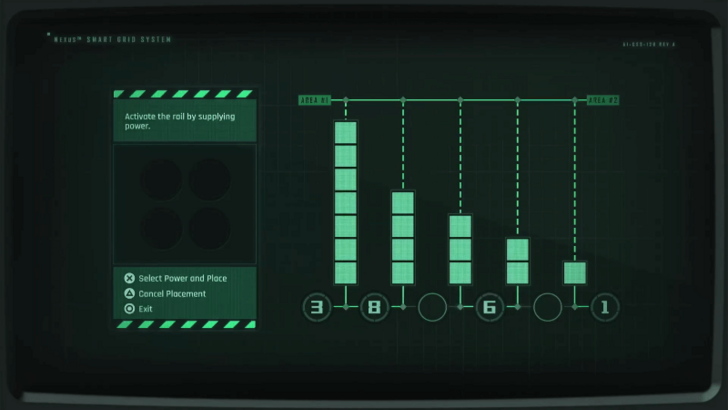 Power up the Monorail To provide electricity to the monorail, you must be able to correctly disseminate the cores to fill the required energy for each column. The correct sequence is: ③-⑧-◯-⑥-◯-① |
Flooded Commercial Sector Walkthrough
| Previous Section | Next Section |
|---|---|
| Abandoned Station | Memory Tower |
| # | Flooded Commercial Sector Objectives |
|---|---|
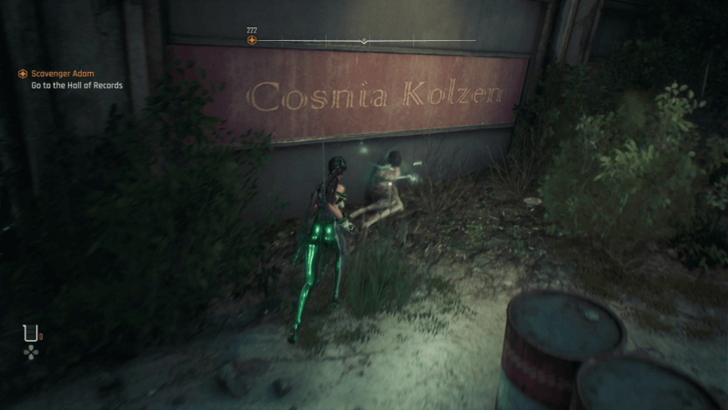
| 1 | 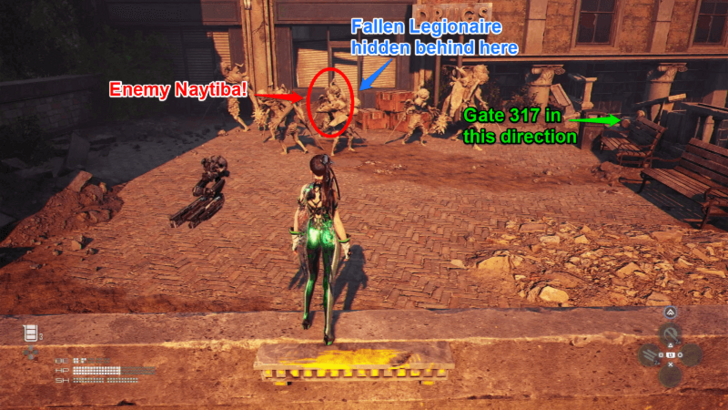 Open the 317 Gate The first objective upon arriving at the Flooded Commercial Sector is to open the Locked Gate labeled as 317. You can find its passcode in one of the fallen Legionaires hidden behind a group of Naytibas statues across the gate. |
| 2 | 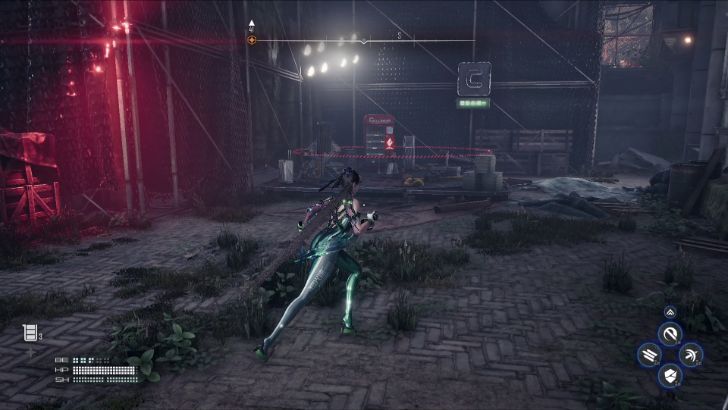 Activate the Supply Camp Moving to the right, there will be a supply camp where you can rest. |
| 3 | 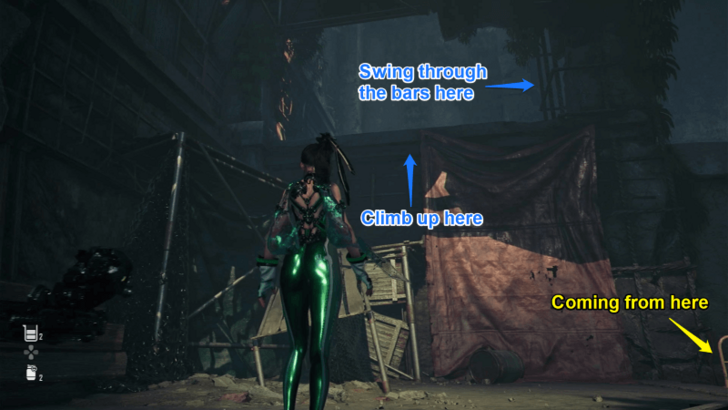 Make Your Way Through the Unlocked Area Upon unlocking Gate 317, make your way up until you reach the area where a clocktower is visible. Drop down there, and you should see another gate that you'll need to unlock. |
| 4 | 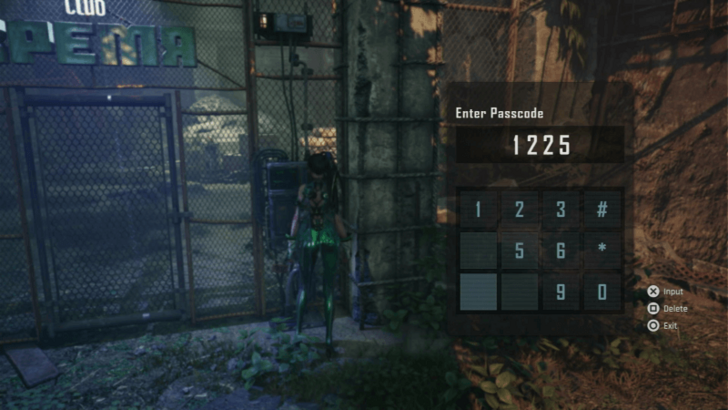 Open the Clocktower Gate To open the Clocktower Gate, you'll need to input the time being shown by the clocktower, which is 12:25. Once inside, you'll see a ladder located on the left side of the area. Climb up there and continue following the path marked by the Legion. |
| 5 |  Pass Through the Collapsed Walkway Follow the path until you find a collapsed walkway littered with rubble. This leads you down to the Memory Tower. |
Memory Tower Walkthrough
| Previous Section | Next Section |
|---|---|
| Flooded Commercial Sector | Construction Zone |
| # | Memory Tower Objectives |
|---|---|
| 1 | 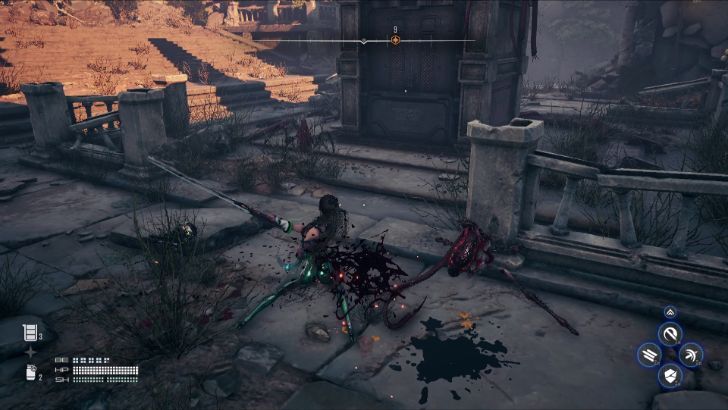 Defeat the Enemies in the Area Once you arrive, you will be greeted with enemies. Defeat them to explore safely. |
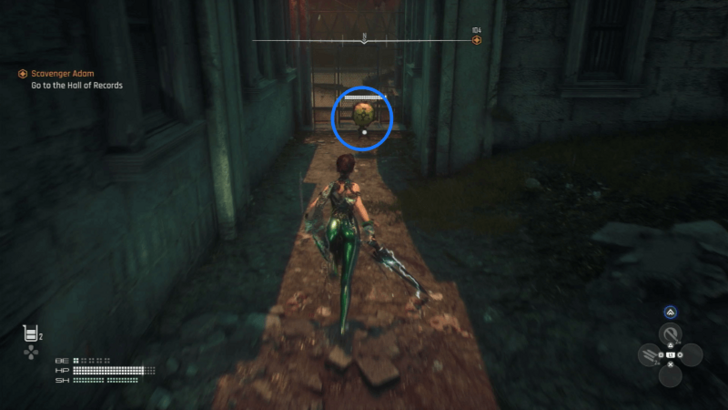
| 2 | 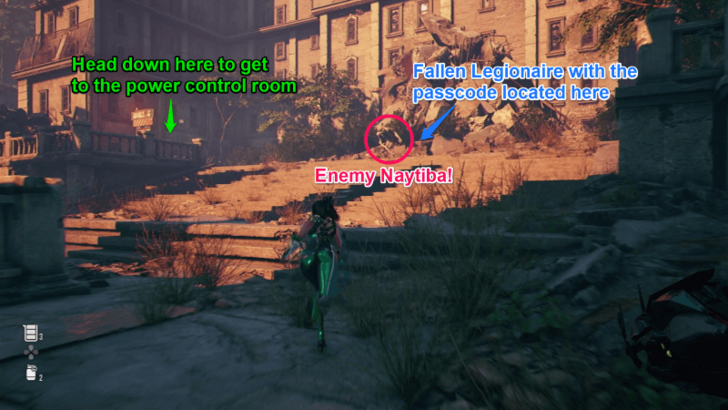 Unlock the Power Control Room A passcode related to powering up the victory monument can be found on top of the stairs on the left side of the monument. After obtaining the passcode, head left, and you should see a path going underground. |
| 3 | 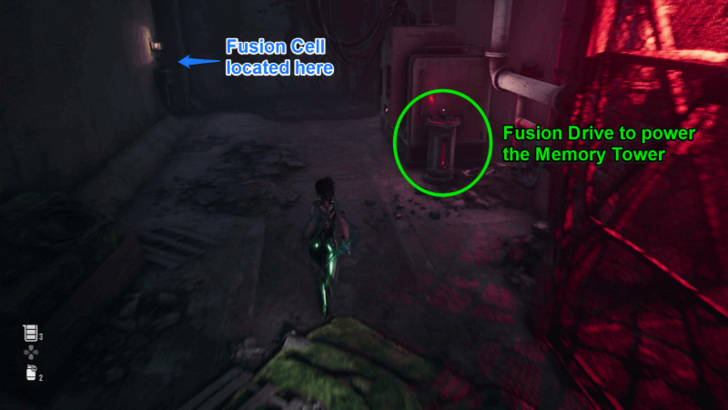 Use the Fusion Cell to Power the Memory Tower Use the passcode you've recently obtained to open a locked area in this underground passage. In there, you'll be able to obtain a Fusion Cell, which you can use to operate a nearby Fusion Drive and power up the Memory Tower. |
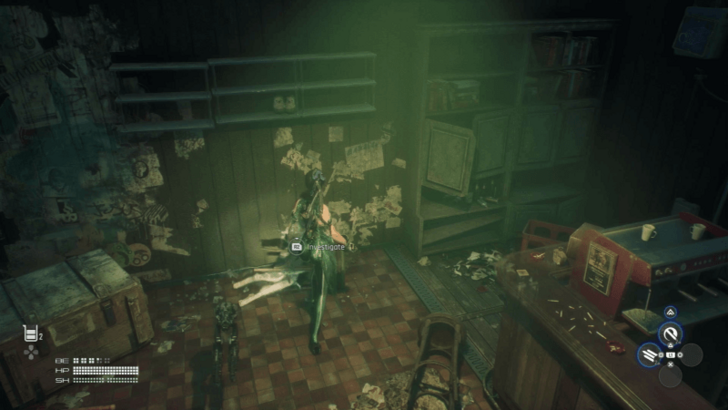
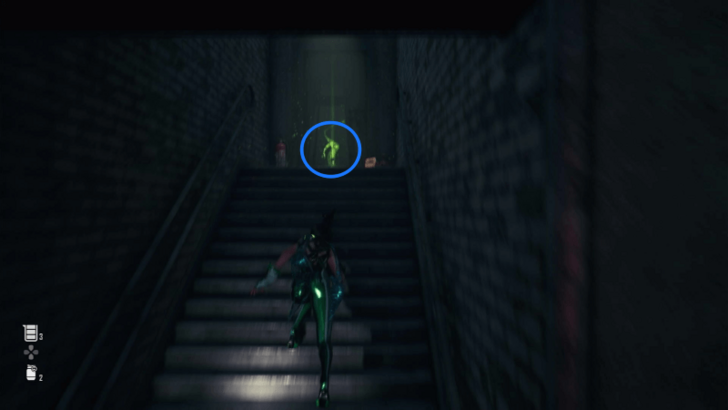
| 4 | 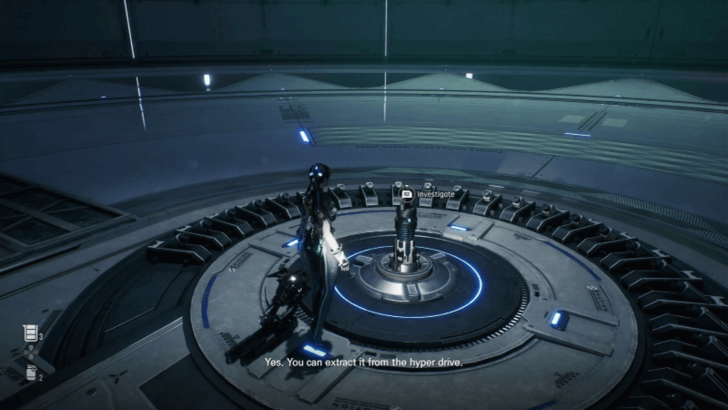 Retrieve the Hyper Cell from the Hall of Records Use the elevator inside the Memory Tower and head down to the Hall of Records. Continue approaching the set of screens in front of you until the Hyper Cell appear. Interact with it and exit the collapsing Hall of Records. |
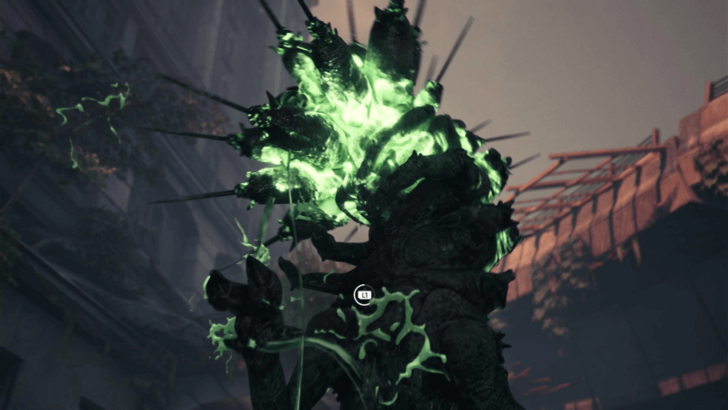
| 5 | 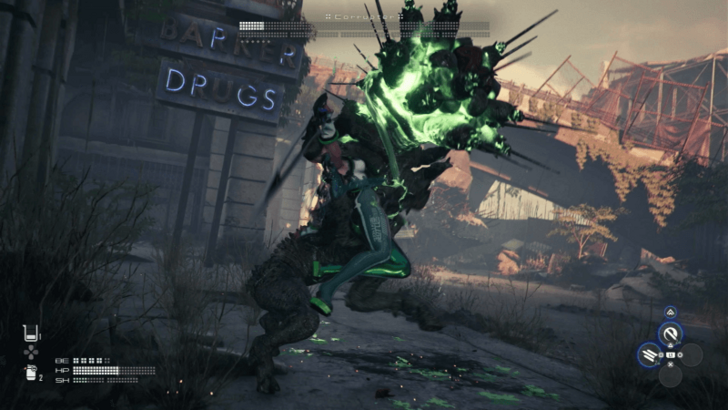 Defeat the Corrupter After obtaining the Hyper Cell, pressing forward will allow you to encounter a new Elite Naytiba called Corrupter. This naytiba can deal huge physical damage through its charged attacks while also being capable of hitting you from a distance by spewing acid. Focus on observing its head movements to determine its next attack! |
| 6 |  Make Your Way Through the Shopping Alley After defeating the Corrupter, you can then begin making your way through the Shopping Alley. |
| 7 | 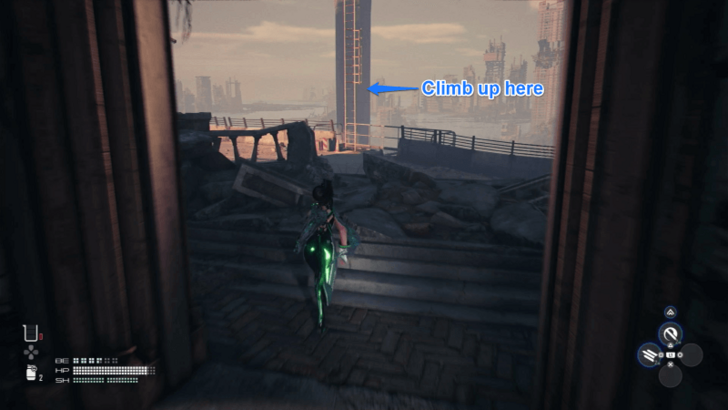 Climb Up the Collapsed Highway Outside the shopping alley, you should be able to spot a ladder leading up another collapsed highway. Climb up here to get to the Construction Zone. |
Construction Zone Walkthrough
| Previous Section | Next Section |
|---|---|
| Memory Tower | City Underground Sector |
| # | Construction Zone Objectives |
|---|---|
| 1 |  Unlock the Supply Camp Once you climb the ladder, there will be a Supply Camp you can rest. Pressing forward into the Construction Zone itself, you can also find another Supply Camp that serves as the hub for this section. |
| 2 | 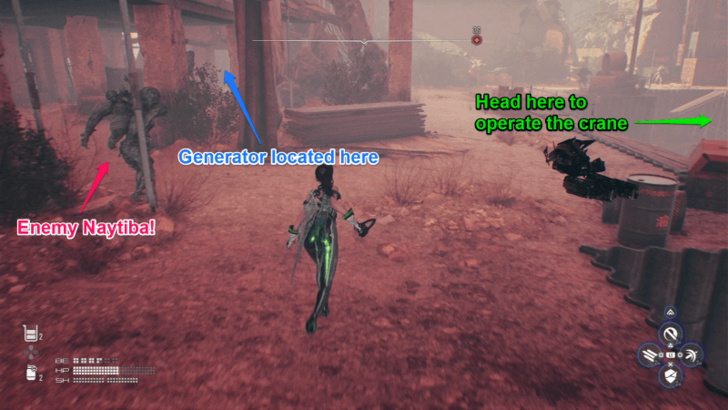 Power Up the Crane The first thing you need to do to use the crane is to find and switch on the high-voltage generator nearby. You can find this inside one of the buildings near the device used to operate the crane. |
| 3 | 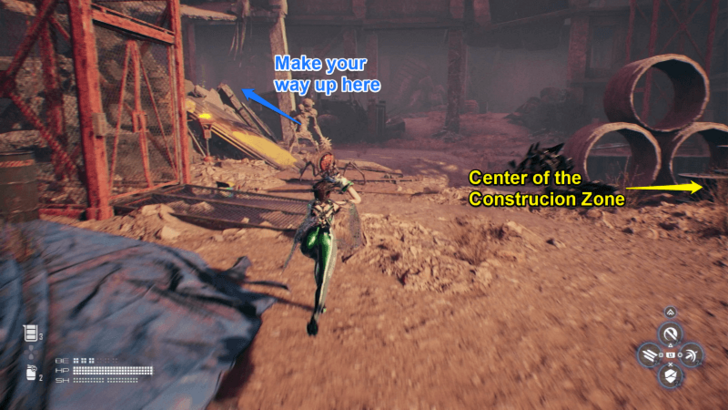 Obtain the First Crane ID Card After supplying power to the crane, you would now need three ID card to operate it. You can get the first Crane ID Card from a supply box on the top floor of the collapsed building located on the left side of the Construction Zone. |
| 4 | 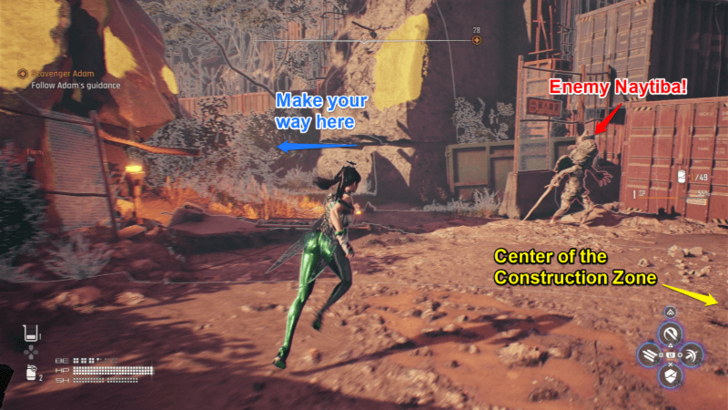 Obtain the Second Crane ID Card Obtain the Second Crane ID Card from a supply box on top of the abandoned warehouse in the area. Beware, as there are numerous Naytibas lurking around this area. |
| 5 |  Obtain the Third Crane ID Card The last Crane ID Card can be acquired from a building floor accessible by a lift in the area. |
| 6 | 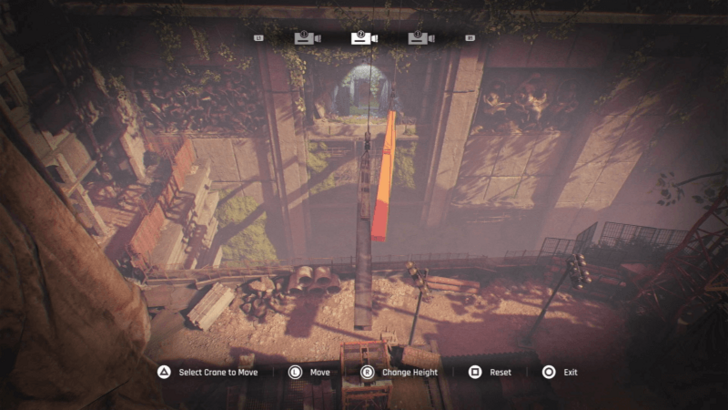 Use the Crane to Make a Path to the Sewers Upon obtaining all the ID cards, use the crane to make a path to the sewers. Position them low and close to each other so you can jump between them and reach the sewer entrance. |
City Underground Sector Walkthrough
| Previous Section | Next Section |
|---|---|
| Construction Zone | Crater |
| # | City Underground Sector Objectives |
|---|---|
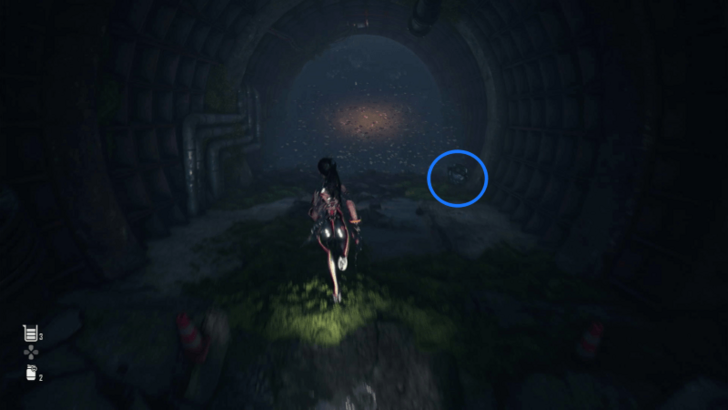
| 1 | 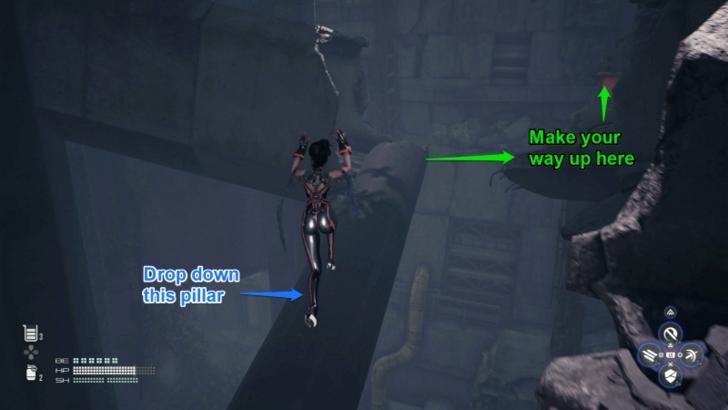 Navigate Through the Sewers Head down the lower levels of the sewer until you reach an area where you can jump down a collapsed pillar. From there, jump to the ledge on the right and climb up the marked path until you reach a new area that will take you down further. |
| 2 | 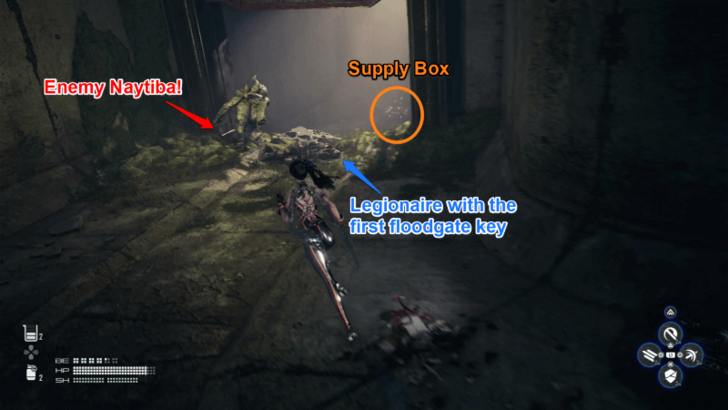 Obtain the First Floodgate Key Keep heading down until you reach a place where you would need to operate two floodgates to proceed. Get the first floodgate key from a legionaire's corpse down the path on the left. |
| 3 | 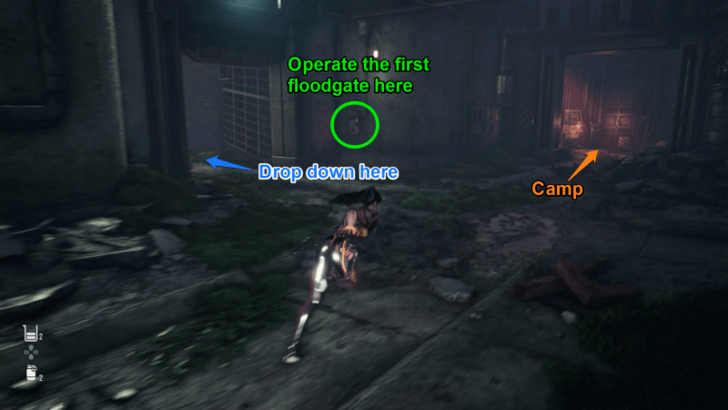 Open the First Floodgate After obtaining the floodgate key, activate the first floodgate by operating the control box. Drop down the newly submerged area to get to the second floodgate. |
| 4 | 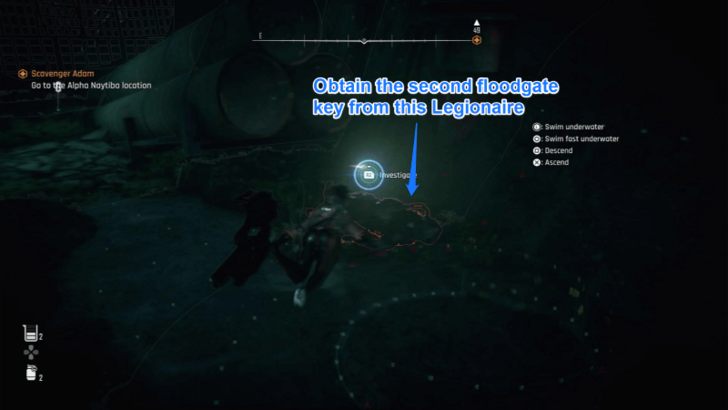 Obtain the Second Floodgate Key You can get the second Floodgate Key from a Legionaire's corpse submerged in the area before reaching the second floodgate. If you're having trouble looking for the corpse, use the scan feature to highlight its location. |
| 5 | 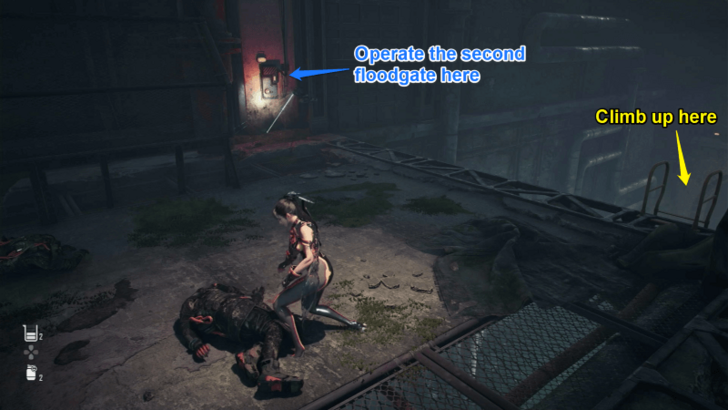 Open the Second Floodgate With the second key in hand, open the second floodgate, located further into the submerged area. This will increase the water level and allow you to reach the path leading out of the sewers. |
| 6 | 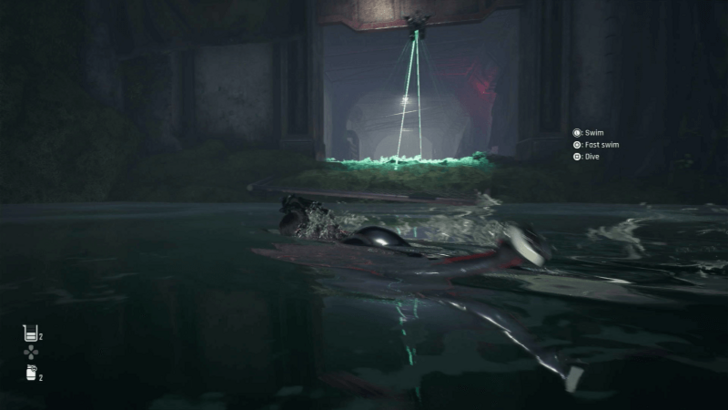 Exit the Sewers Dive down again and swim to a newly accessible area. Just follow the path until you reach the Alpha Naytiba's lair. |
Crater Walkthrough
| Previous Section | Next Section |
|---|---|
| City Underground Sector | - |
| # | Crater Objectives |
|---|---|
| 1 | 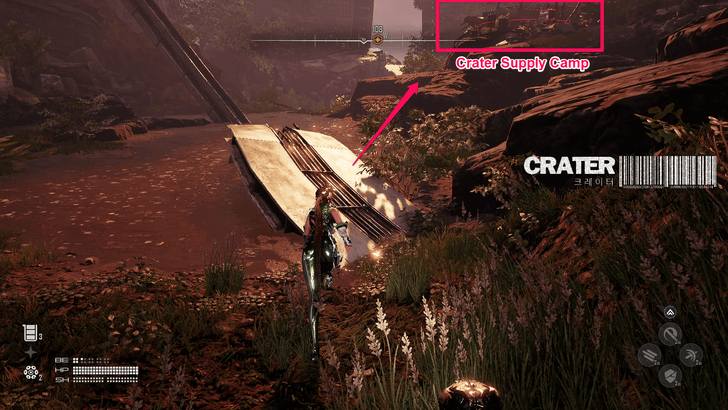 Unlock the Supply Camp Nearby Exiting onto the crater, you can find a Supply Camp above some rocks. This will serve as your respawn point if you die to the upcoming boss. |
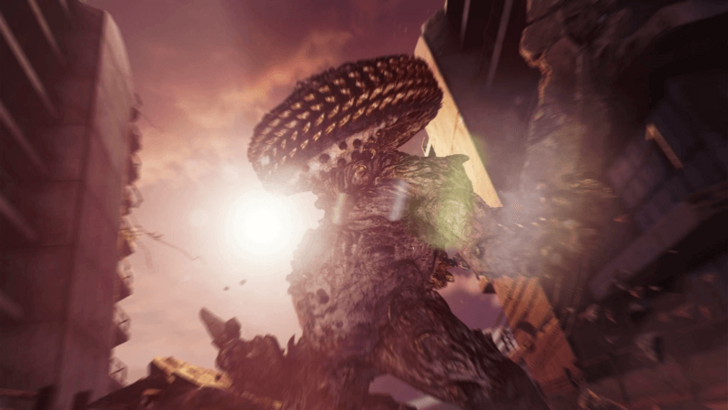
| 2 | 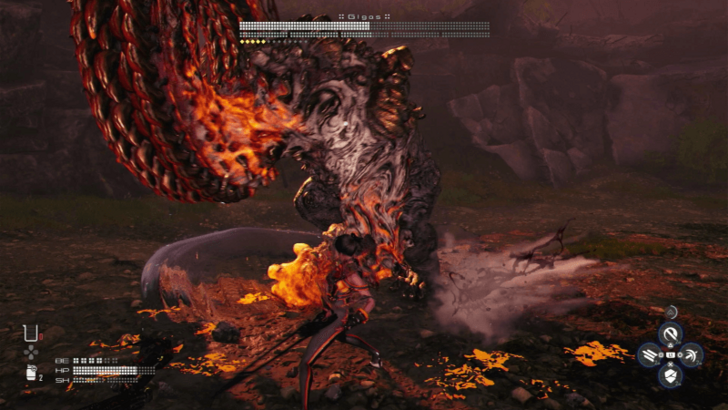 Defeat Gigas The final boss of this mission is an Alpha Naytiba called Gigas. This massive enemy is capable of dealing out continuous punches that can easily take you down if taken lightly. Be on the defensive and take your time to determine how you will counter each of its attacks. |
| 3 | 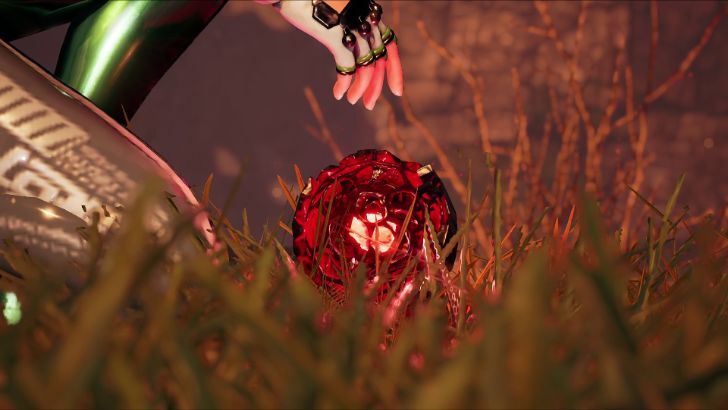 Retrieve the Alpha Core Once Gigas is defeated, pick up the Alpha Core it drops among other loot to finish the mission. |
Scavenger Adam Boss Fights
How to Beat Abaddon
| Abaddon Boss Fight Tips |
|---|
 |
|
|
Abaddon Location and How to Beat
How to Beat Corrupter
| Corrupter Boss Fight Tips |
|---|
 |
|
|
Corrupter Location and How to Beat
How to Beat Gigas
| Gigas Boss Fight Tips |
|---|
 |
|
|
Gigas Location and How to Beat
Scavenger Adam Passcodes
| Location | Passcode |
|---|---|
| Silent Street Gate | γθαγθα |
| Pharmacy Supply Box | βθακθγ |
| Abandoned Station Door | δβμκδβ |
| Gate 317 Passcode | ααμθβθ |
| Clocktower Passcode | 1225 |
| Memory Tower Passcode | λμακθκ |
Silent Street Gate Passcode
| Passcode Location | 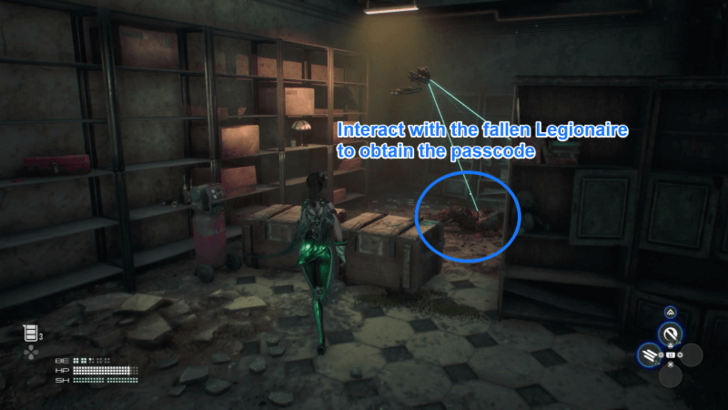 |
|---|---|
| Unlock | 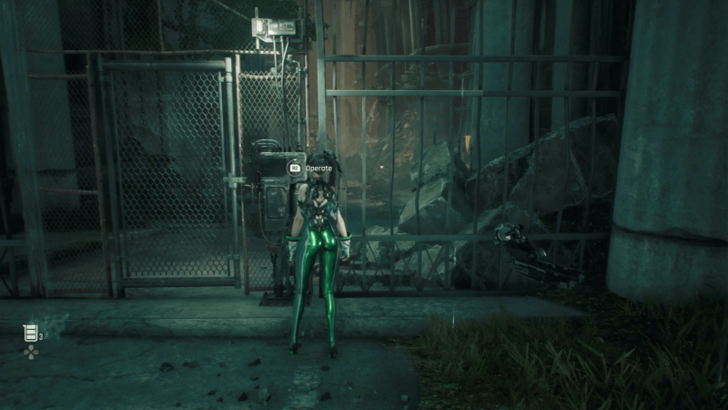 |
You can obtain the Silent Street Gate Passcode from one of the fallen legionaires near the area. The passcode is γθαγθα.
Pharmacy Supply Box Passcode
| Passcode Location | 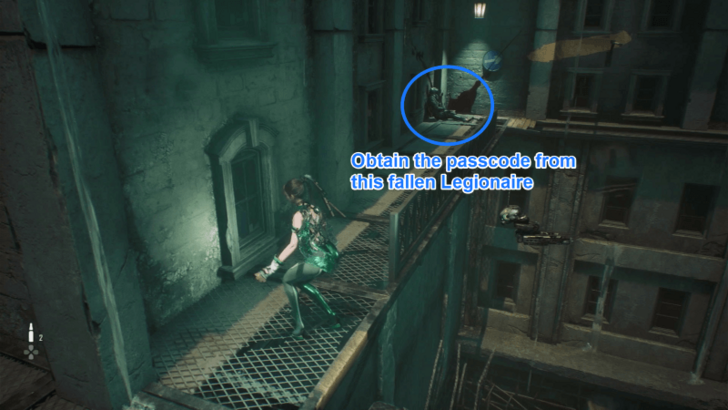 |
|---|---|
| Unlock | 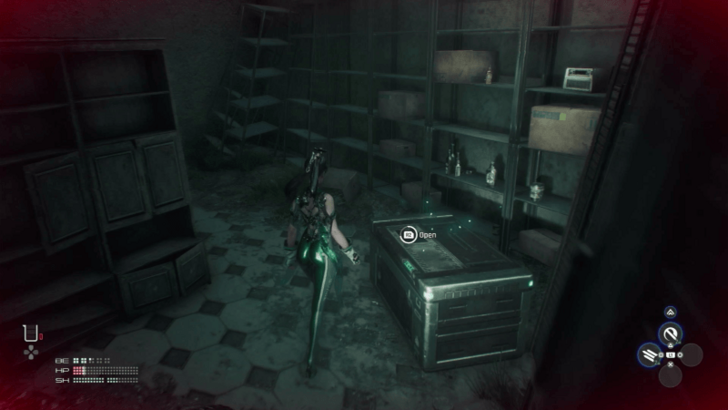 |
You can obtain the passcode for the Supply Box found in Silent Street's Pharmacy from one of the fallen Legionaires before reaching the second camp. The passcode is βθακθγ.
Abandoned Station Door Passcode
| Passcode Location | |
|---|---|
| Unlock | 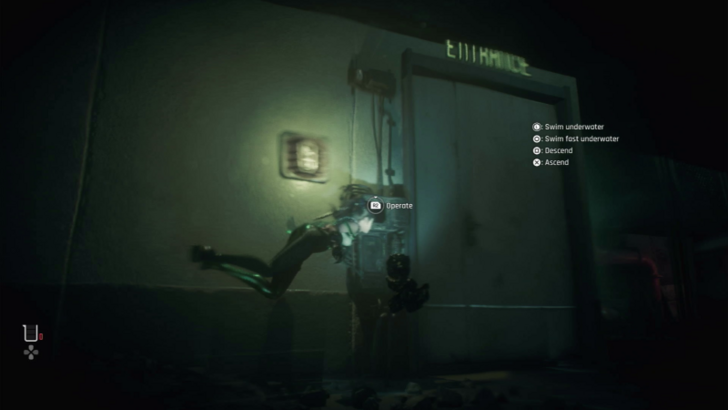 |
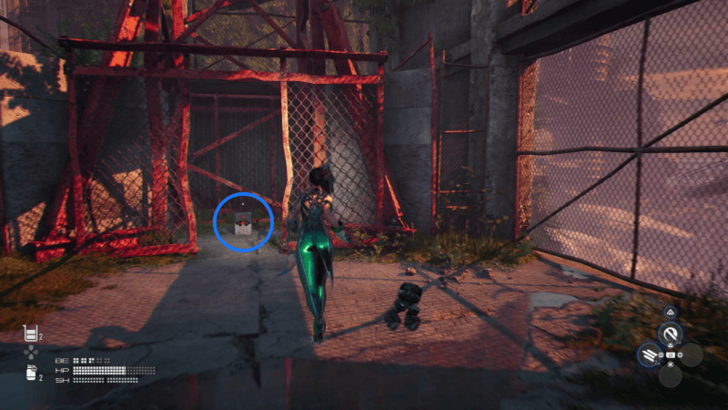
The passcode for the locked door in the Abandoned Station can be obtained from a submerged Legionaire's corpse just beside the locked door. The passcode is δβμκδβ.
Gate 317 Passcode
| Passcode Location | |
|---|---|
| Unlock | 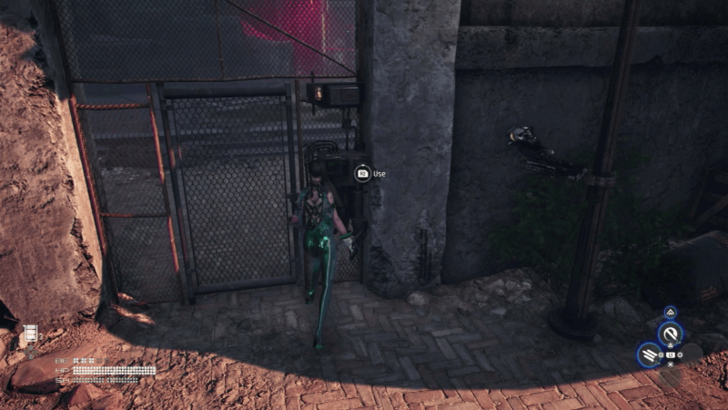 |
The passcode to open Gate 317 can be obtained from a Legionaire corpse hidden behind a group of Naytiba statues. This area can be found just across Gate 317. The passcode is ααμθβθ.
Clocktower Passcode
| Passcode Location | 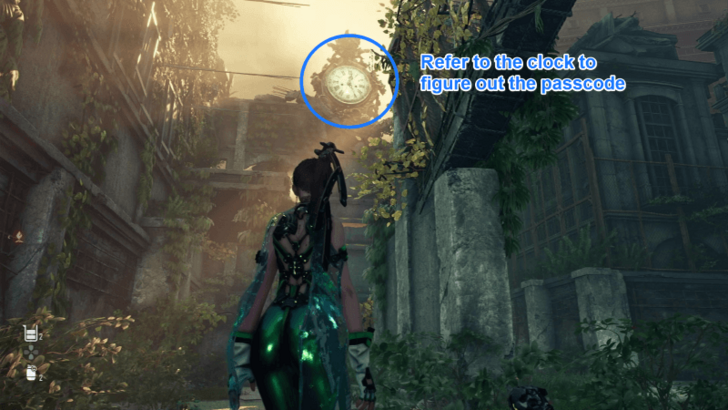 |
|---|---|
| Unlock | |
The Club BPEMЯ passcode can be determined by the time shown by the clocktower. The hands of the clock are stuck at 25 minutes past 12, so type in 1225.
Memory Tower Passcode
| Passcode Location | |
|---|---|
| Unlock | 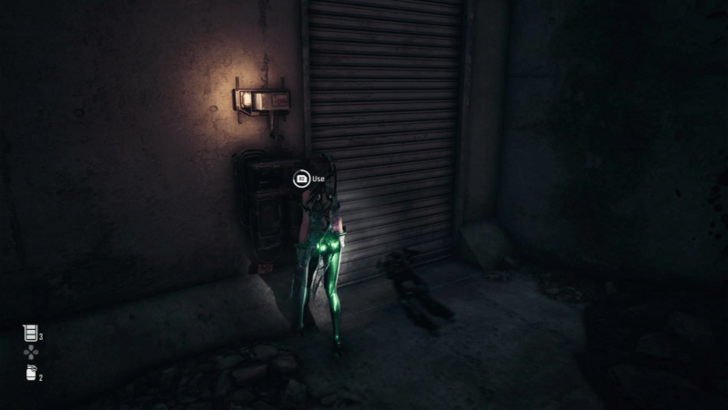 |
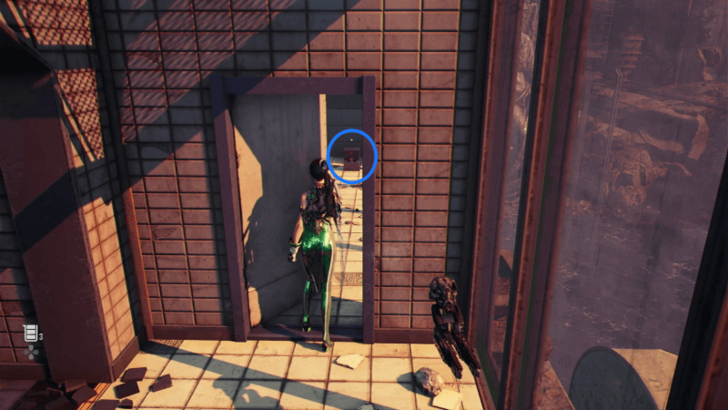
You can find a passcode on a fallen legionaire sitting on top of the stairs to the left of the victory monument. This will allow you to obtain a Fusion Cell that will power up the elevator leading to the Hall of Records. The passcode is λμακθκ.
Scavenger Adam Important Items
| Jump to an Important Item! | |||||||||||
|---|---|---|---|---|---|---|---|---|---|---|---|
| Omnibolts | Modules | Cores | |||||||||
| Exospines | Gear | Exterior | |||||||||
| Key Items | |||||||||||
Omnibolts
| Location | How to Get |
|---|---|
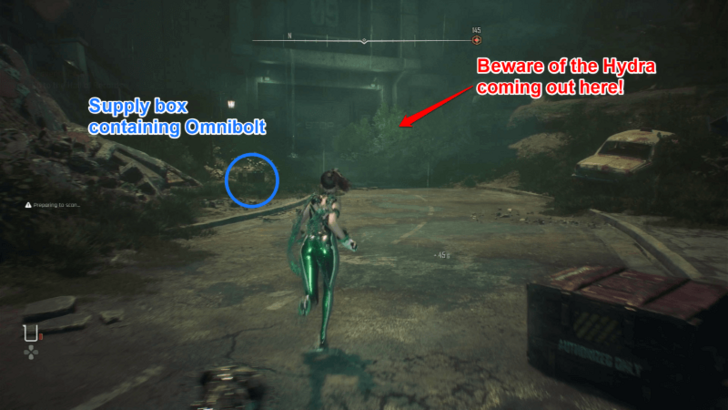 Silent Street - Area on the Left After Crossing the Bridge |
Obtain an Omnibolt by opening a golden lid supply box on Silent Street. This box can be located in the area left of the makeshift bridge. Be wary of the Hydra lurking nearby! |
 Silent Street - Breach Supply Box near the Pub |
Acquire an Omnibolt by breaching the supply box located an area after the Parking Tower. |
 Construction Zone - Supply Box Below the Crane Terminal |
An Omnibolt can be obtained from a supply box located at the area just below the crane operating terminal. |
 City Underground Sector - Near the First Floodgate Key Location |
You can get an Omnibolt from a supply box located near the first Floodgate Key location. |
Modules
Tumbler Expansion Module
| Location | How to Get |
|---|---|
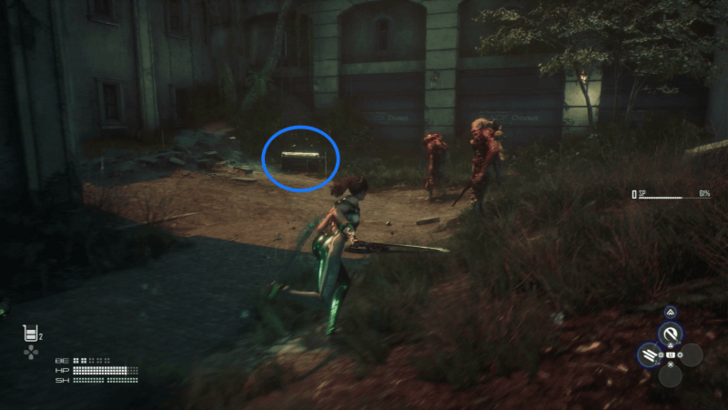
 Silent Street - Area After the Locked Gate |
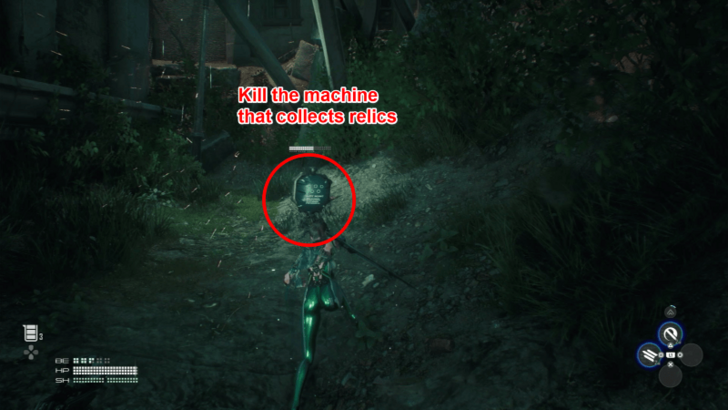
You can get a Tumbler Expansion Module by killing the relic-collecting machine in an alleyway. To get there, thread the path to the right upon opening the locked gate. |
 Memory Tower - Collapsed Highway |
A Tumbler Expansion Module can be obtained from the robot roaming at the edge of the collapsed highway, accessible after defeating the Corrupter. |
 Construction Zone - Abandoned Building |
Another Tumbler Expansion Module can be acquired from the robot hiding in one of the abandoned buildings in the Construction Zone. |
 City Underground Sector - Blocked Path |
The last Tumbler Expansion Module can be obtained from the robot hiding near the submerged path in the first area of the City Underground Sector. |
Drone Upgrade Module
| Location | How to Get |
|---|---|
 Silent Street - Near the Pub After Passing Through the Parking Tower |
A Drone Upgrade Module can be obtained by killing the gold relic-collecting robot in Silent Street. You can find it in an alley near the pub after the Parking Tower. |
 City Underground Sector - Near the Sewer Exit |
Another Drone Upgrade Module can be acquired from the gold robot near the exit of the City Underground Sector. |
Cores
Body Core
| Location | How to Get |
|---|---|
 Parking Tower - First Floor |
The first Body Core can be found on a corpse behind the stairs on the first floor of the Parking Tower. |
 Silent Street - Pub |
Another Body Core can be found on a corpse inside a small pub after descending from the Parking Tower. |
 Silent Street - Area After the Underpass |
The third Body Core can be obtained from a corpse lying in an open area accessible through an underpass. |
 City Underground Sector - First Area |
The last Body Core for this mission can be obtained from a corpse on the far edge of the City Underground Sector's first area. |
Beta Core
| Location | How to Get |
|---|---|
 Silent Street - Alley |
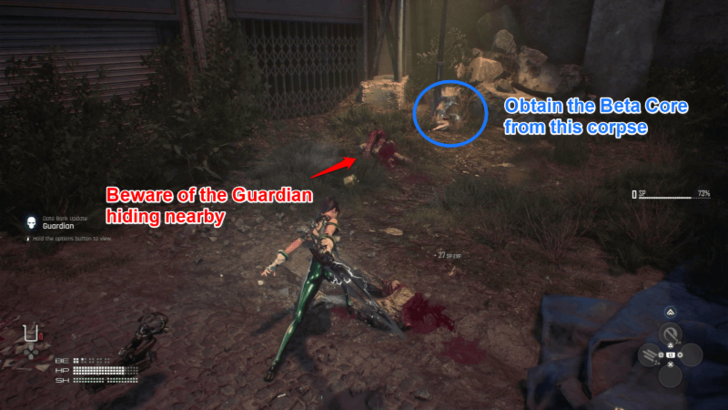
A Beta Core can be obtained from a corpse in an alleyway on Silent Street. This alleyway is located to the left of where you get ambushed by a group of Naytibas. |
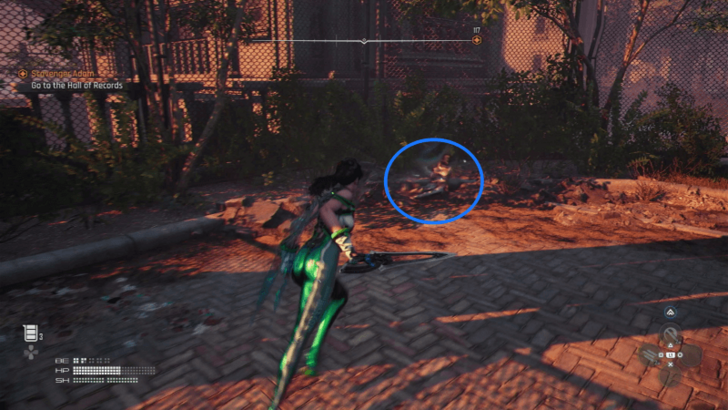 Flooded Commercial Sector - Plaza |
You can get a Beta Core from just below the other end of the monorail station in the Flooded Commercial Sector. |
 Flooded Commercial Sector - Hidden Path Before the Memory Tower |
Another Beta Core can be obtained in the Flooded Commercial Sector, in a hidden area before reaching the Memory Tower. |
 Memory Tower - Shopping Alley |
A Beta Core can also be acquired in the shopping alley after the Corrupter fight. |
 City Underground Sector - Before Reaching the Floodgate Area |
The last Beta Core for this mission can be obtained in the middle section of the City Underground Sector, just past the collapsed pillar. |
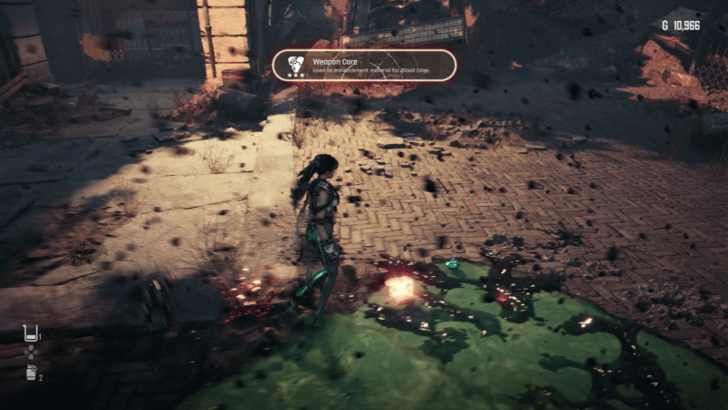
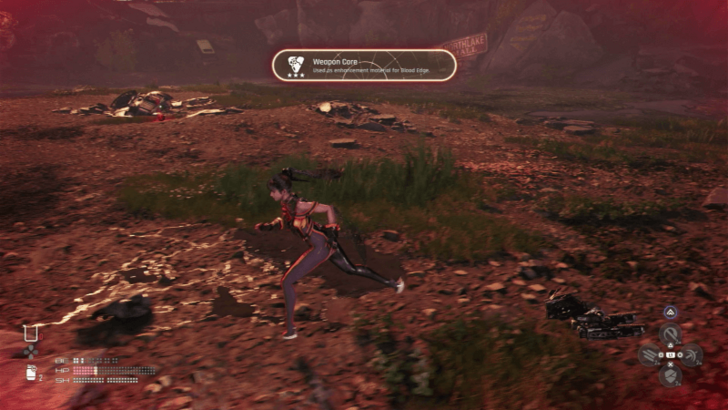
Weapon Core
| Location | How to Get |
|---|---|
 Parking Tower - Abaddon Drops |
A Weapon Core can be acquired after defeating Abaddon. This is extremely important as it upgrades your weapon's damage output. |
 Memory Tower - Corrupter Drops |
Another Weapon Core can be obtained as drops from the Corrupter boss fight. |
 Crater - Gigas Drops |
A third Weapon Core can be acquired after defeating Gigas. |
Exospines
Chain-Type Exospine
The Chain-Type Exospine can be obtained from a red briefcase in the second floor of the Parking Tower. You can access this locked area after defeating the Abaddon.
Grenadier-Type Exospine
The Grenadier-Type Exospine can be obtained from a hidden area in the Flooded Commercial Sector.
To get there, follow the left path after getting out of the monorail station. You will be able to see marked ledges you can climb to reach a new area. You'll find the Exospine on your left once you get there.
Protection-Type Exospine
The Protection-Type Exospine can be acquired on the floor just above the lift in the Construction Zone. You can climb up the stack of crates nearby to reach this area.
Gear
Combo Attack Enhancement Gear
The Combo Attack Enhancement Gear can be obtained from the same golden lid supply box where you can obtain an Omnibolt.
Protection Gear
| Gear | Effects |
|---|---|
 Protection Gear |
・Decreases Damage taken from enemies. |
You can obtain the Protection Gear after defeating Abaddon on the top floor of the Parking Tower. This gear is particularly useful if you're struggling to survive enemy attacks.
Beta Charge Gear
| Gear | Effects |
|---|---|
 Beta Charge Gear |
・Recharges more Beta Energy. |
The Beta Charger Gear can be acquired from the items dropped upon defeating Abaddon. This gear allows you to use skills more often.
Shield Destruction Gear
| Gear | Effects |
|---|---|
 Shield Destruction Gear |
・Increases damage to shields. |
The Shield Destruction Gear can be obtained after defeating the Corrupter in the Memory Tower. This gear will allow you to deal more damage to enemy shields.
Melee Protection Gear
| Gear | Effects |
|---|---|
 Melee Protection Gear |
・Decreases Melee Damage taken from enemies. |
You can also get the Melee Protection Gear as drops from beating the Corrupter. This gear will let you receive less damage from enemy melee attacks.
Shield Enhancement Gear
| Gear | Effects |
|---|---|
 Shield Enhancement Gear |
・Increases Max Shield Capacity |
The Shield Enhancement Gear can be acquired as loot from defeating Gigas in the last area of the mission. This gear will give additional value to your shield.
Crit Boost Gear
| Gear | Effects |
|---|---|
 Crit Boost Gear |
・Increases Crit. Rate. |
The Crit Boost Gear can also be obtained after beating the Gigas. This will significantly boost the critical damage of your attacks.
Exterior
Planet Diving Suit (7th) V2
The Planet Diving Suit (7th) V2 can be obtained from a black box inside one of the rooms in the monorail station of the Flooded Commercial Sector.
Armored Pack
A Drone Exterior known as the Armored Pack can be obtained in a hidden area in the Flooded Commercial Sector. You can get here by passing through the marked ledges before reaching the Memory Tower.
Key Items
Fusion Cell
| Location | How to Get |
|---|---|
Silent Street - Car |
The first Fusion Cell can be obtained from a car in Silent Street. Attack the car with a glowing hood to get access to the Fusion Cell. |
 Parking Tower First Floor - Red Supply Box |
The first Parking Tower Fusion Cell can be obtained from a red supply box on the first floor of the Parking Tower. |
 Parking Tower First Floor - Car |
The second Fusion Cell in the Parking Tower can be acquired from a car on the first floor of the Parking Tower. Similar to the previous Fusion Cell, look for and attack the car with a glowing hood. |
 Silent Street Area Near the Abandoned Station - Car |
The Fusion Cell to open the Abandoned Station can be found in a car with a glowing hood near the Abandoned Station. Beware of the Dozer guarding the area! |
 Memory Tower - Underground |
The Fusion Cell to power the Memory Tower can be found inside a locked gate near an underground area. |
Hyper Cell
One of the Important Items for this mission is the Hyper Cell, which you can obtain from the Hall of Records.
Stellar Blade Related Guides

Main Missions List
 7th Airborne Squad
 Xion, The Last Remaining City
 Altess Levoire
 Light of Hope
 Alpha Signal
 Hidden Truth
 Abyss Levoire
 Orcal's Testimony
 Secret Garden
 Eye of the Hurricane
 Burning Xion
 Last Fragment
 Selection of Species
 EVE Protocol
 All Endings
Post Game Guides
| Post Game Guides | ||
|---|---|---|
| Post Game | New Game+ | 100% Guide |
Comment
Author

Scavenger Adam Mission Guide
Rankings
- We could not find the message board you were looking for.
Gaming News
![Animal Crossing: New Horizons Review [Switch 2] | Needlessly Crossing Over to a New Generation](https://img.game8.co/4391759/47d0408b0b8a892e453a0b90f54beb8a.png/show)


Popular Games

Genshin Impact Walkthrough & Guides Wiki
Honkai: Star Rail Walkthrough & Guides Wiki
Arknights: Endfield Walkthrough & Guides Wiki
Umamusume: Pretty Derby Walkthrough & Guides Wiki
Wuthering Waves Walkthrough & Guides Wiki
Pokemon TCG Pocket (PTCGP) Strategies & Guides Wiki
Abyss Walkthrough & Guides Wiki
Zenless Zone Zero Walkthrough & Guides Wiki
Digimon Story: Time Stranger Walkthrough & Guides Wiki
Clair Obscur: Expedition 33 Walkthrough & Guides Wiki


Recommended Games
Fire Emblem Heroes (FEH) Walkthrough & Guides Wiki
Pokemon Brilliant Diamond and Shining Pearl (BDSP) Walkthrough & Guides Wiki
Diablo 4: Vessel of Hatred Walkthrough & Guides Wiki
Super Smash Bros. Ultimate Walkthrough & Guides Wiki
Yu-Gi-Oh! Master Duel Walkthrough & Guides Wiki
Elden Ring Shadow of the Erdtree Walkthrough & Guides Wiki
Monster Hunter World Walkthrough & Guides Wiki
The Legend of Zelda: Tears of the Kingdom Walkthrough & Guides Wiki
Persona 3 Reload Walkthrough & Guides Wiki
Cyberpunk 2077: Ultimate Edition Walkthrough & Guides Wiki


All rights reserved
© 2024 SHIFT UP Corporation. All rights reserved. Published by Sony Interactive Entertainment Inc.
The copyrights of videos of games used in our content and other intellectual property rights belong to the provider of the game.
The contents we provide on this site were created personally by members of the Game8 editorial department.
We refuse the right to reuse or repost content taken without our permission such as data or images to other sites.