Stellar Blade Story Walkthrough

This is a full Missions list and story walkthrough guide for Stellar Blade. Read our guide for a full progression walkthrough, available story difficulties, as well as game length, game modes, and details on the story!
List of Contents
Full Story Walkthrough
Main Missions Guide
| All Main Story Missions | ||||
|---|---|---|---|---|
| Mission 1 | Mission 2 | Mission 3 | Mission 4 | Mission 5 |
| Mission 6 | Mission 7 | Mission 8 | Mission 9 | Mission 10 |
| Mission 11 | Mission 12 | Mission 13 | Mission 14 | Mission 15 |
Main missions are the main content that EVE has to complete to progress the main story. Completing the main missions is mandatory to completing the game and will reveal the entirety of EVE's journey.
7th Airborne Squad Walkthrough
| Main Missions | |
|---|---|
| Previous Mission | Next Mission |
| Star Descent Guide | |
|---|---|
| 1 | 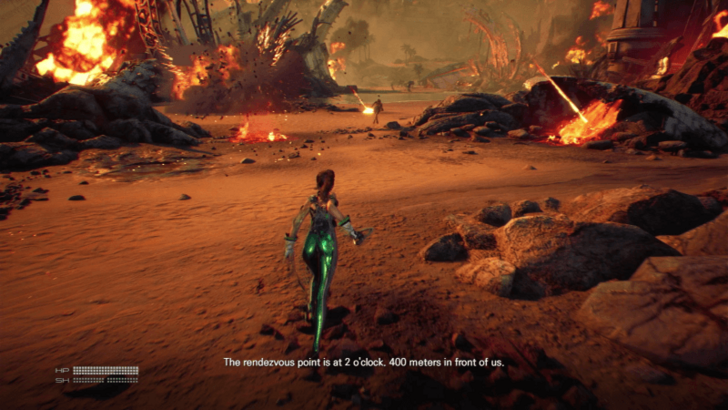 Follow Tachy while completing the game's tutorials. |
| 2 |  Avoid the red marks on the floor after you gain access to sprinting. |
| 3 |  Prepare for a boss fight against brute after the sprinting sequence. |
7th Airborne Squad Mission Guide
Scavenger Adam Walkthrough
| Main Missions | |
|---|---|
| Previous Mission | Next Mission |
| Silent Street Guide | |
|---|---|
| 1 | 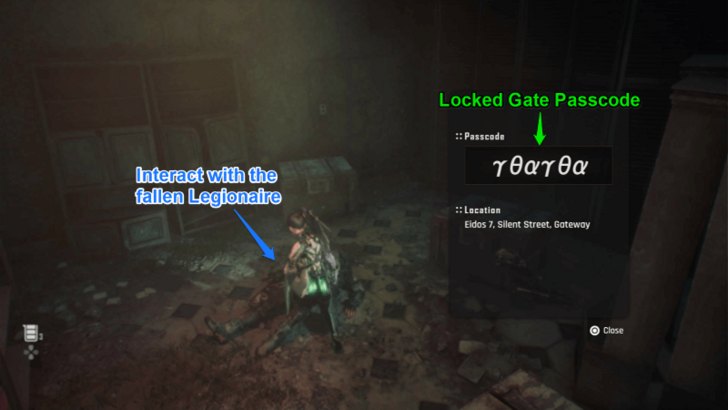 Open the Silent Street locked gate. You can obtain the passcode from a legionaire's corpse inside a building located to the left. |
| 2 | 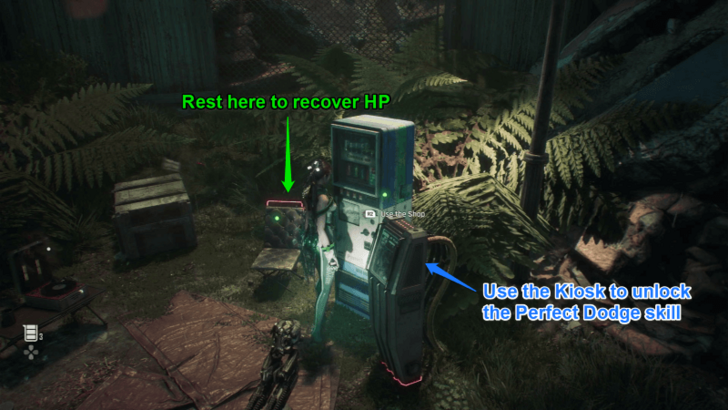 Unlock your first camp and use its features. |
| 3 | 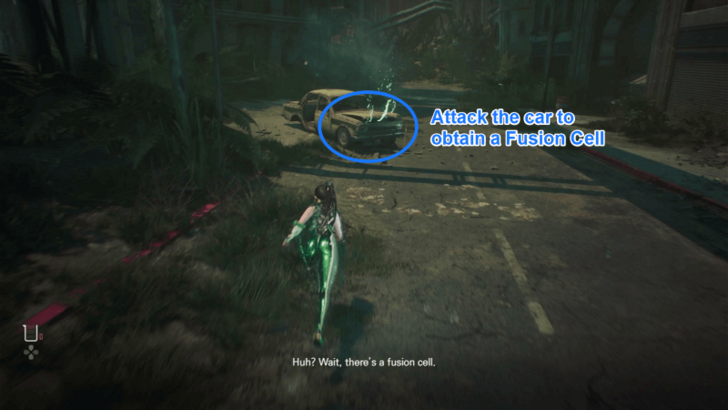 Acquire a Fusion Cell from a car with a glowing hood. |
| 4 | 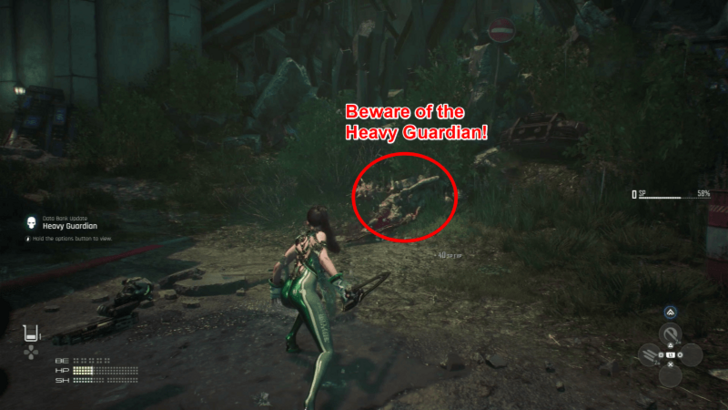 Survive the ambush set by a group of Naytibas. |
| 5 |  Climb up the path marked by the Legion. |
| 6 | 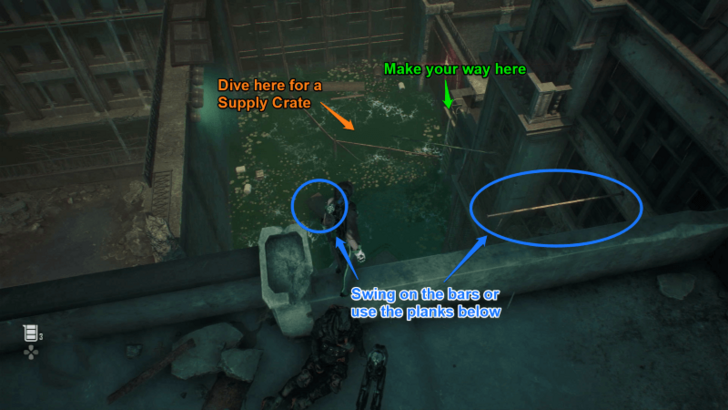 Make your way to the library. You can either use the planks below or climb up to use the bars instead. |
| 7 | 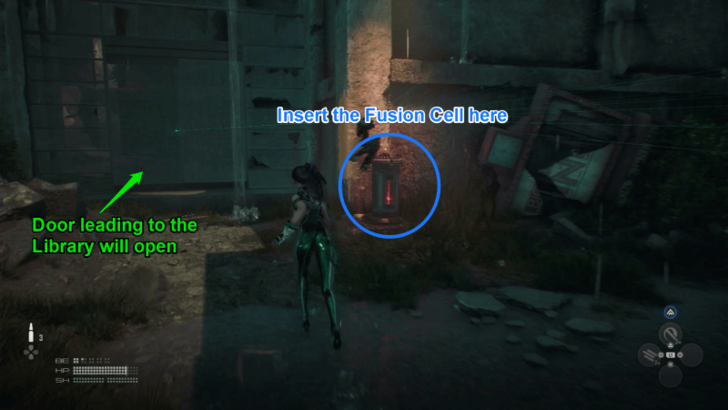 Use the Fusion Cell you obtained earlier to open the library. |
| Parking Tower Guide | |
| 1 | 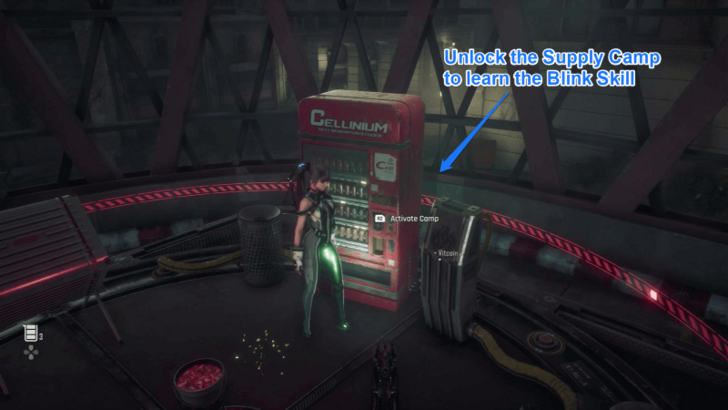 Unlock your first Supply Camp and use its features. |
| 2 | 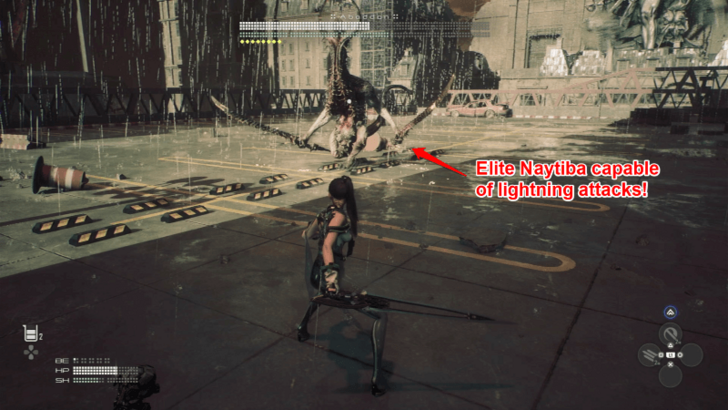 Defeat the Abaddon. |
| 3 | 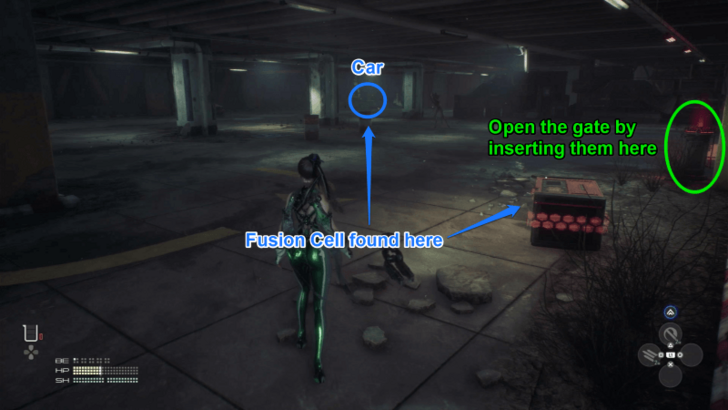 Open the Parking Tower gate. You can obtain the two fusion cells on the same floor, one from a car and the other from a red supply box. |
| 4 | 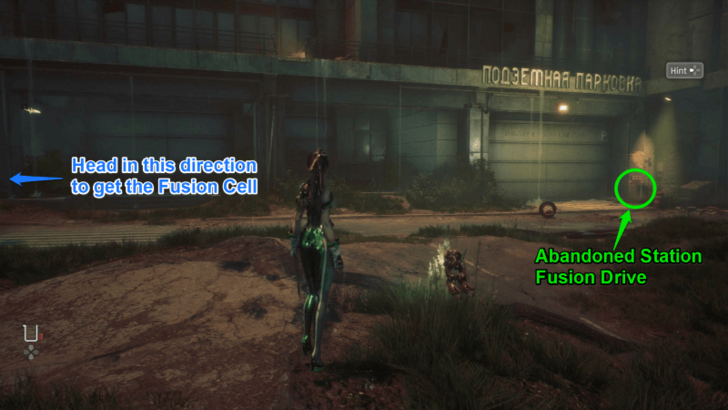 After exiting the Parking Tower, turn right and then left to reach Abandoned Station. You can access this area by obtaining a Fusion Cell nearby to power the Fusion Drive. |
| Abandoned Station Guide | |
| 1 | 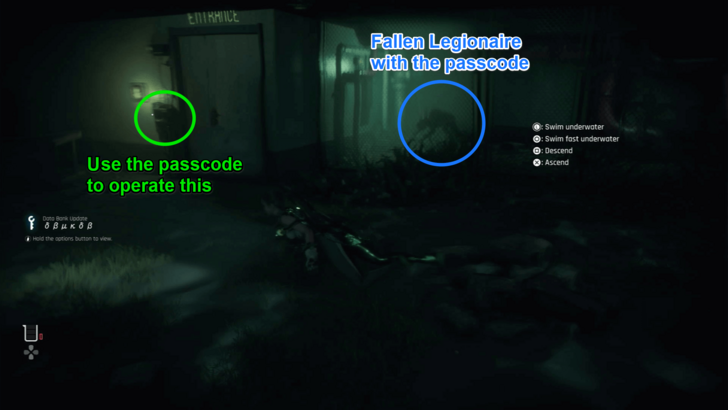 Open the locked door inside the Abandoned Station. Once you've unlocked that, use the elevator shaft inside to go up. |
| 2 | 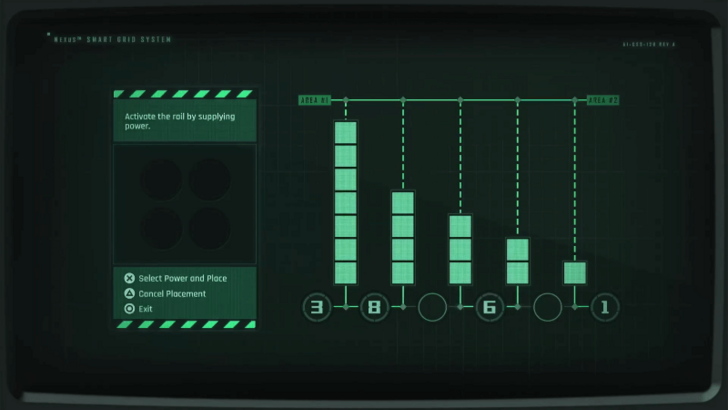 Solve the puzzle to provide electricity to the monorail. |
| Flooded Commercial Sector Guide | |
| 1 | 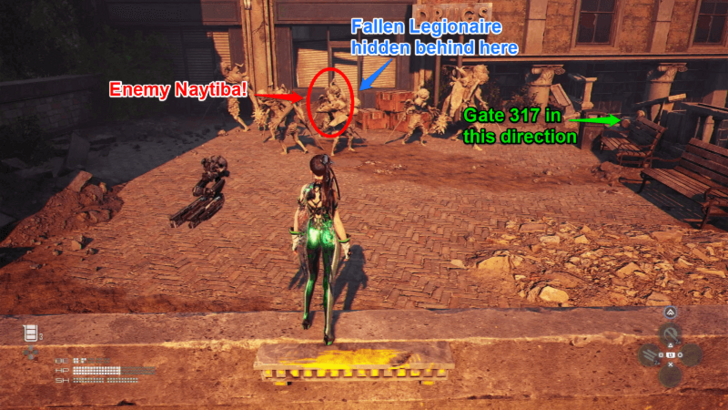 Obtain the passcode to open gate 317. You can obtain the passcode from a legionaire's corpse hidden behind a group of Naytiba statues just across the gate. |
| 2 | 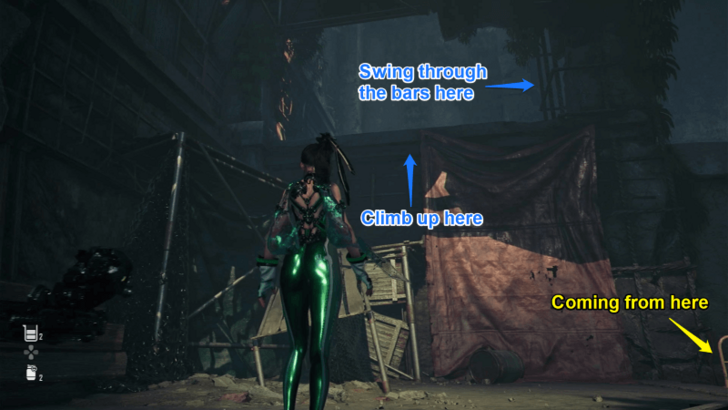 Make your way through the unlocked area by climbing up. |
| 3 | 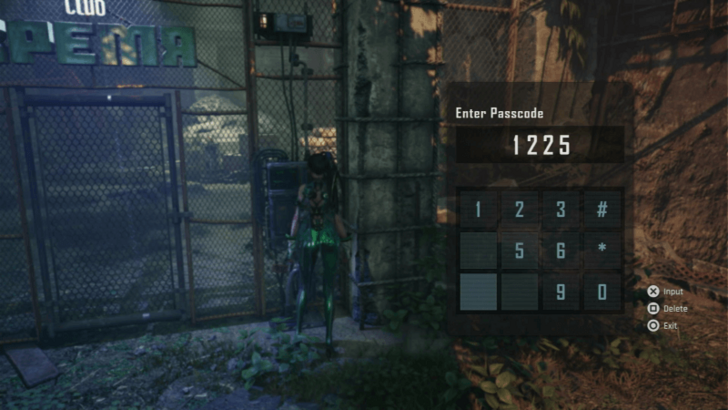 Open the Club BPEMЯ Gate and proceed to the Memory Tower. You can figure out the passcode by entering the time show by the clocktower: 1225. |
| Memory Tower Guide | |
| 1 | 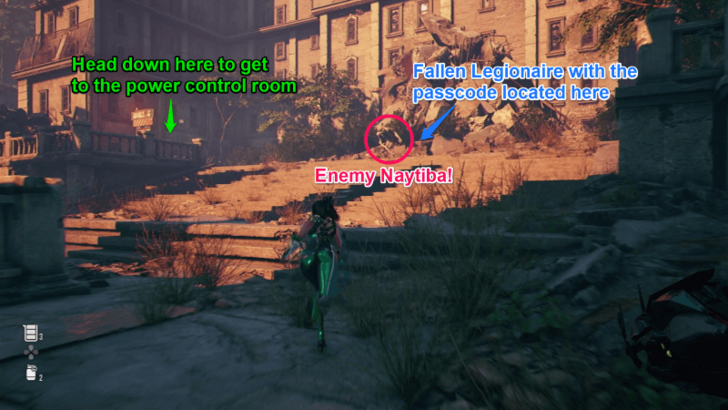 Unlock the power control room located underground. You can obtain the passcode from one of the fallen Legionaires located on the left side of the Memory Tower. |
| 2 | 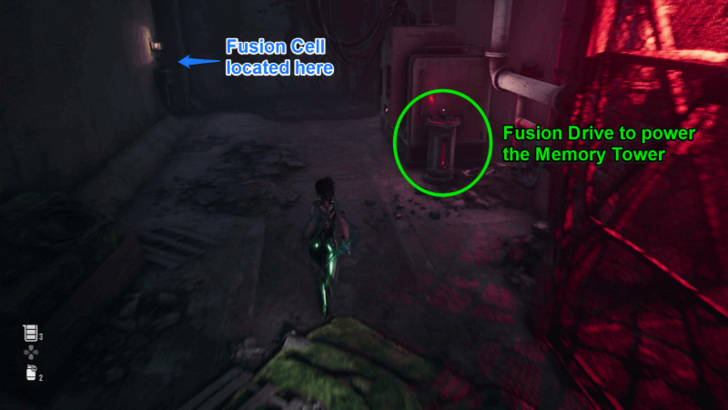 Obtain the Fusion Cell and use it to power up the Memory Tower. This will allow you to use the elevator found inside the victory monument to descend to the Hall of Records. |
| 3 | 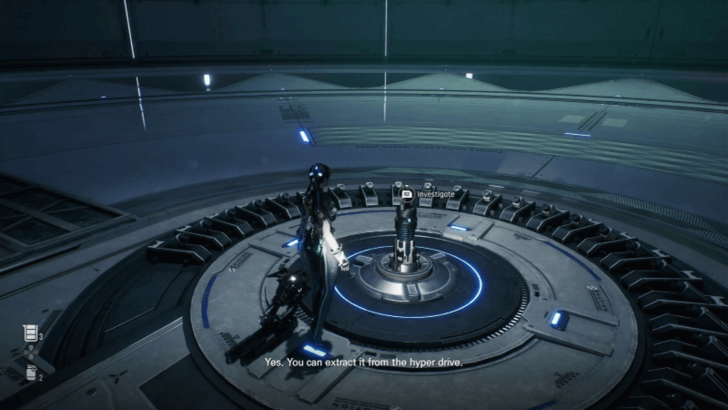 Obtain the Hyper Cell from the Hall of Records. |
| 4 | 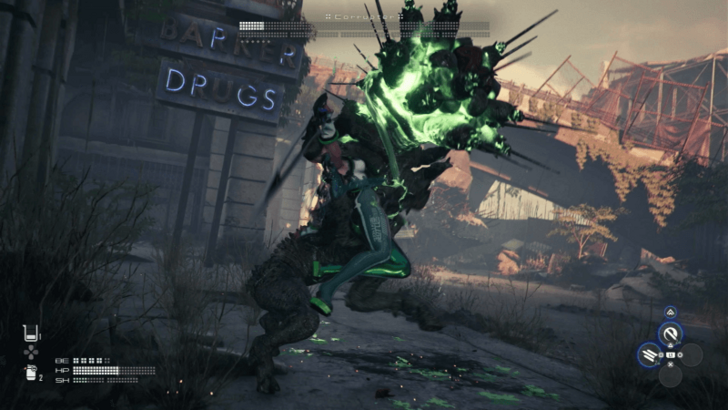 Carry on and defeat the Corrupter. |
| 5 | 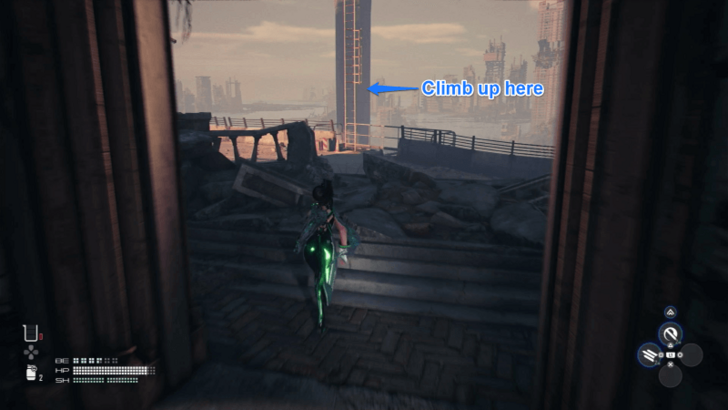 After defeating the Corrupter, make your way through a shopping alley and up the ladder on the collapsed highway. |
| Construction Zone Guide | |
| 1 | 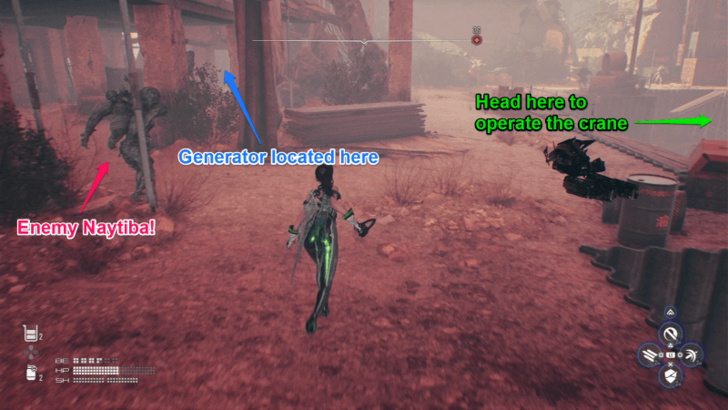 Provide electricity to the crane by switching on the high voltage generator in the area. |
| 2 | 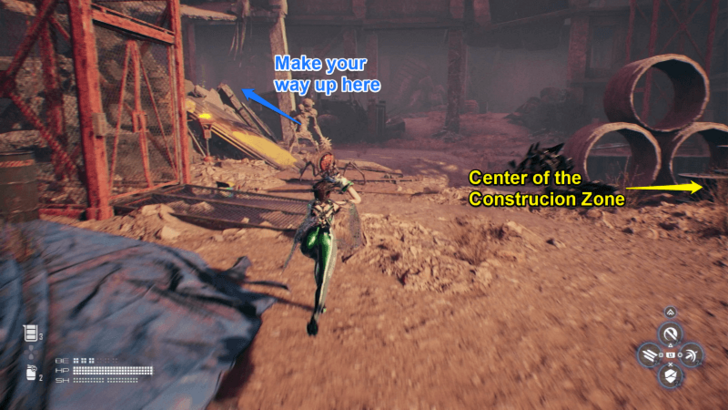 Obtain the first Crane ID Card. You can obtain this from a supply box on the top floor of the collapsed building located on the left side of the Construction Zone. |
| 3 | 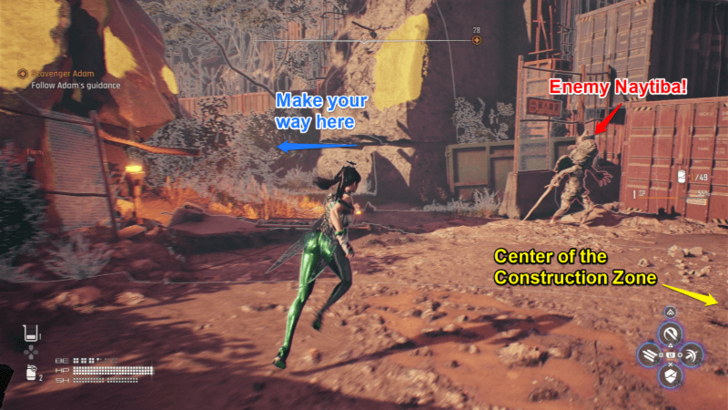 Obtain the second Crane ID Card. You can get this from a supply box on top of the abandoned warehouse in the area. |
| 4 |  Obtain the third Crane ID Card. You can acquire this from a supply box located on top of one of the buildings accessible by a lift. |
| 5 | 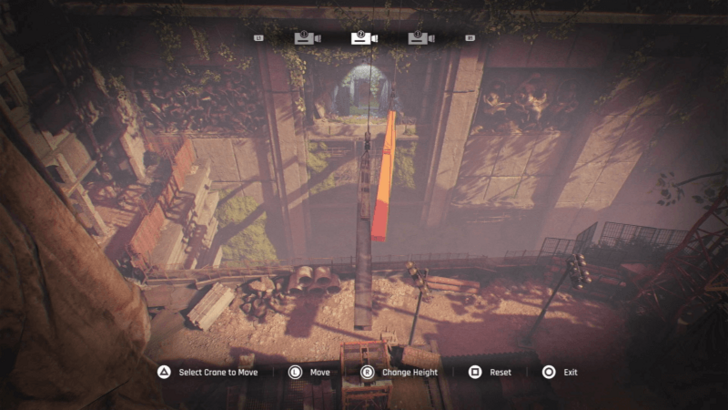 Use the Crane to make a path to the sewers. Position them low and close to each other so you can jump between them and reach the sewer entrance. |
| City Underground Sector Guide | |
| 1 | 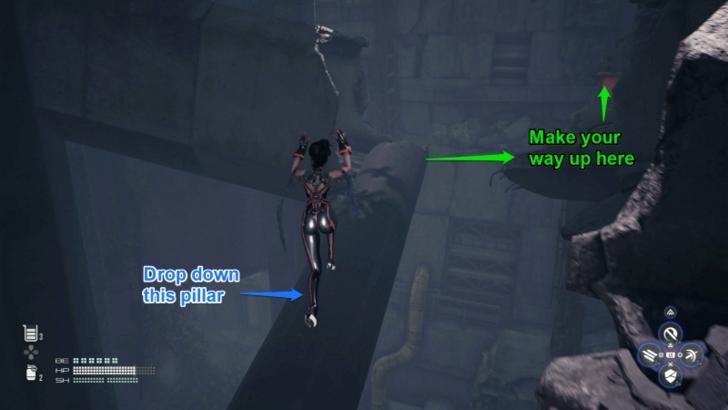 Navigate through the sewers. Head down the lower levels, through the collapsed pillar, and to the floodgate location. |
| 2 | 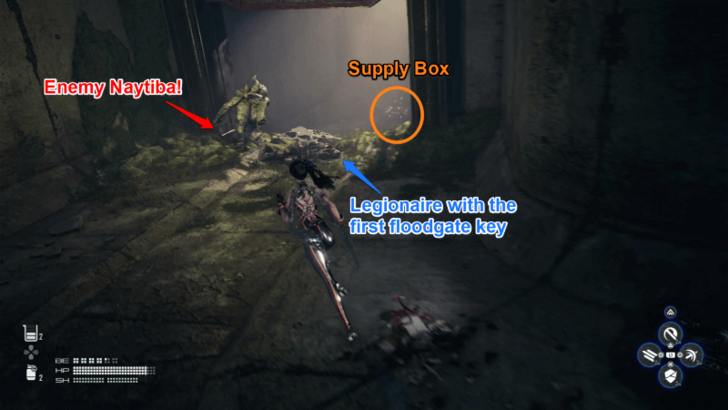 Obtain the first Floodgate Key. You can get this from the dead legionaire located on the path to the left of the first floodgate control box. |
| 3 | 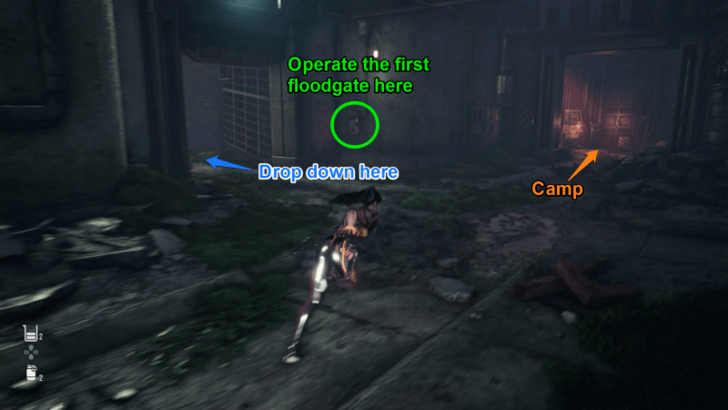 Open the first Floodgate by operating the control box. |
| 4 | 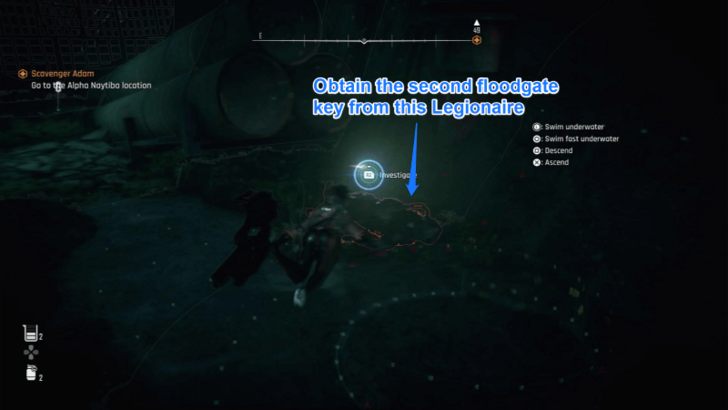 Obtain the second Floodgate Key from the Legionaire's corpse submerged in the water. |
| 5 | 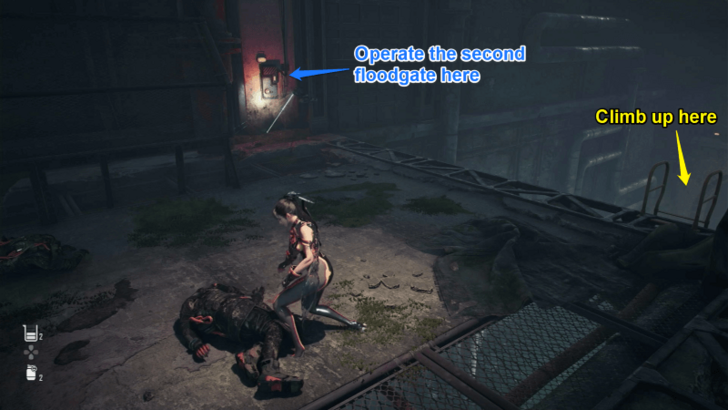 Open the second Floodgate located on the otherside of the floodgate area. |
| 6 | 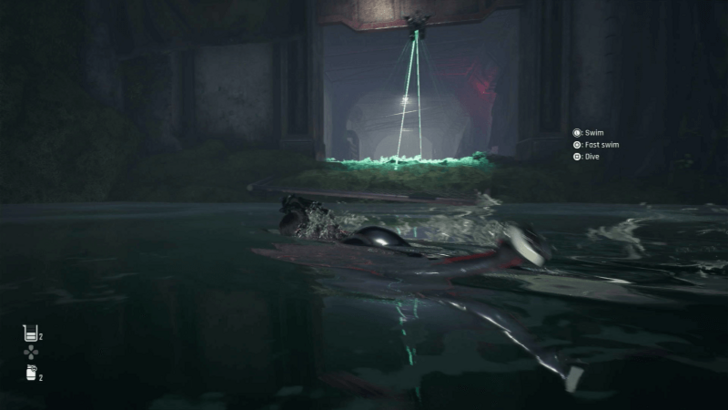 Dive down again and swim to a newly accessible area. Make your way out of the sewers. |
| Crater Guide | |
| 1 | 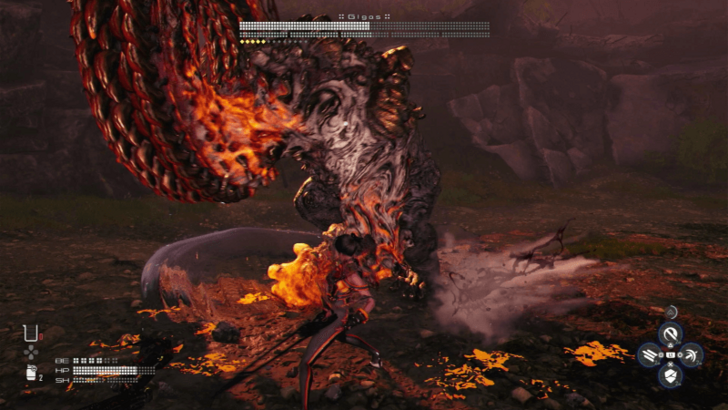 Defeat Gigas. |
Xion, the Last Remaining City Walkthrough
| Main Missions | |
|---|---|
| Previous Mission | Next Mission |
| Xion Objectives | |
|---|---|
| 1 | 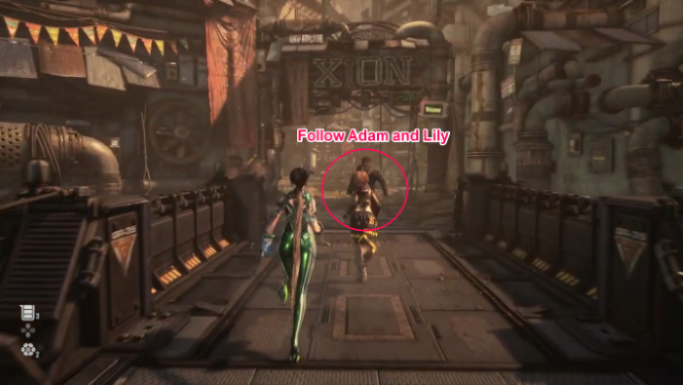 Follow Adam and Lily to the Cradle |
| 2 |  Follow Adam to Xion's plaza |
| 3 | 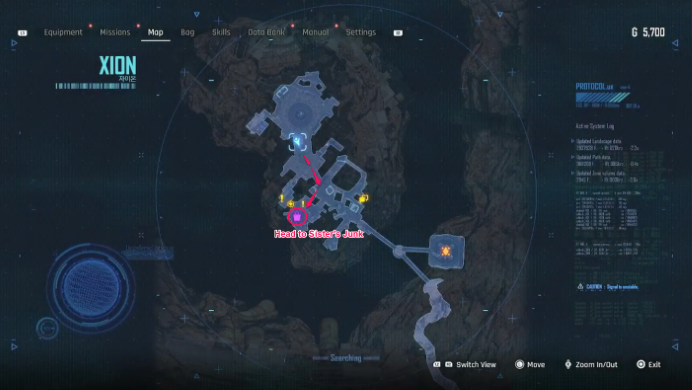 Use the map to head to Sister's Junk ┣ Talk to Kaya for a cutscene |
| 4 |  Head back to the safe house where you first landed |
| 5 |  Talk to Adam for a cutscene |
Xion, the Last Remaining City Mission Guide
Altess Levoire Walkthrough
| Main Missions | |
|---|---|
| Previous Mission | Next Mission |
| Wastelands Guide | |
|---|---|
| 1 | 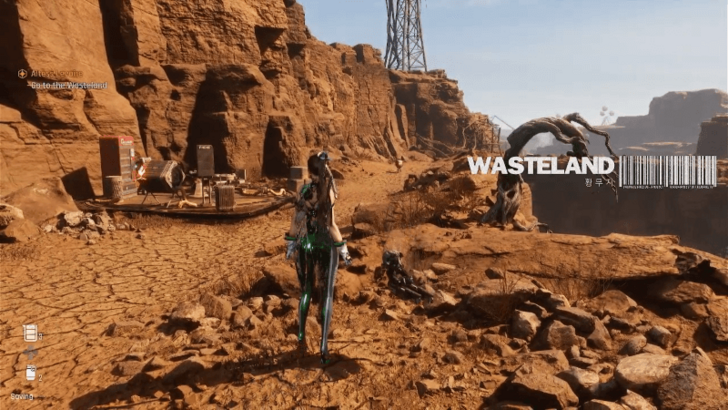 Interact with the first Wastelands Supply Camp. Finish the Reboot side mission to make use of the camps. ▶ Reboot Sidequest Guide |
| 2 | 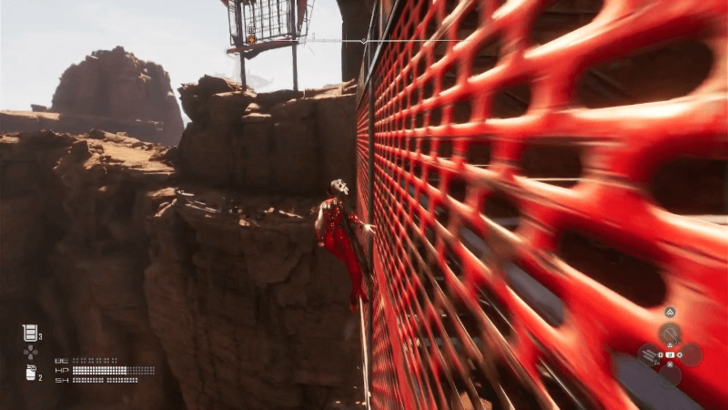 Use the wall run ability to traverse over specific marked areas. |
| 3 | 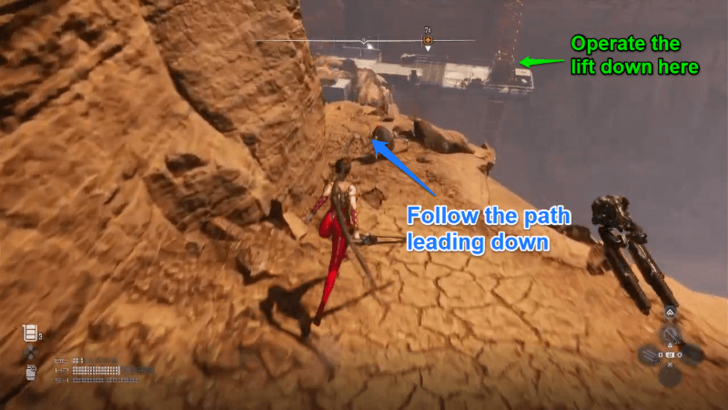 Make your way to the Scrap Plains and follow the narrow path leading to an elevator. |
| Altess Levoire Guide | |
| 1 | 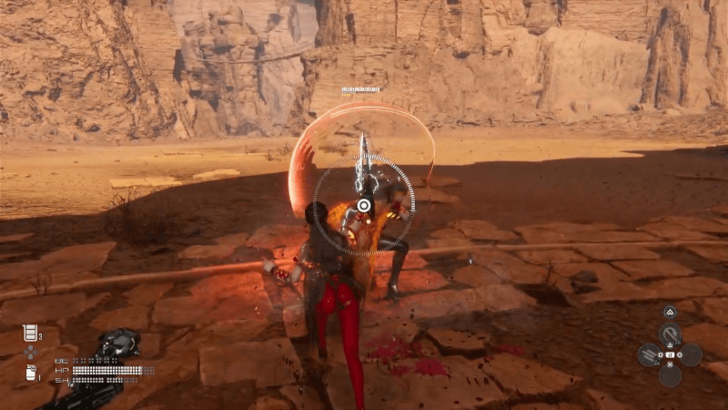 Defeat Quiel to prove you're capable to enter the Altess Levoire. |
| Research Lab Entrance Guide | |
| 1 | 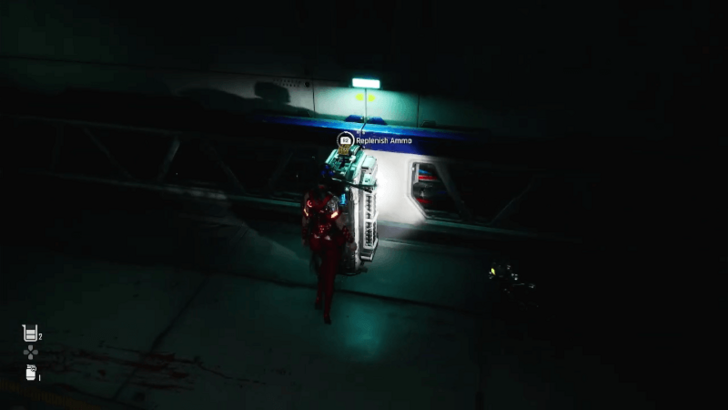 Enter the Altess Levoire, to find out that you can only use your gun during the mission. Take advantage of certain terminals to replenish your ammo along the way. |
| Purification Scanner Guide | |
| 1 | 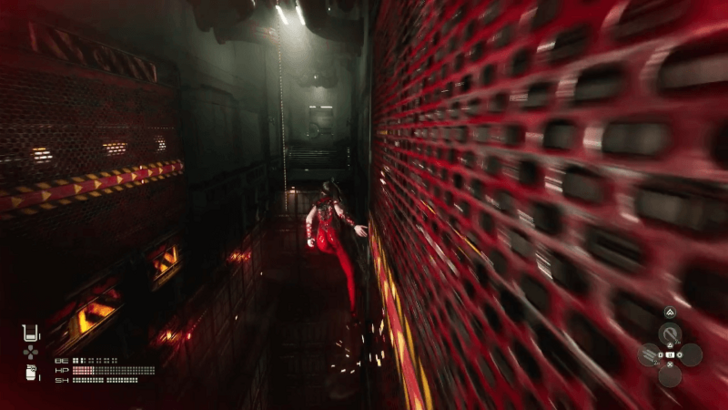 Use the wall run skill to grab the rope in the middle of the hallway and proceed deeper into the laboratory. |
| 2 | 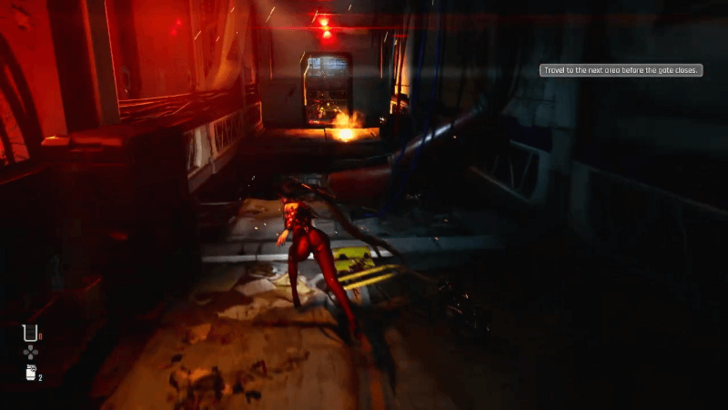 At the end of the sector, you'll have to rush towards a room before the gate closes. Dash after jumping to get pass the gap on the floor. |
| Security Center Guide | |
| 1 | 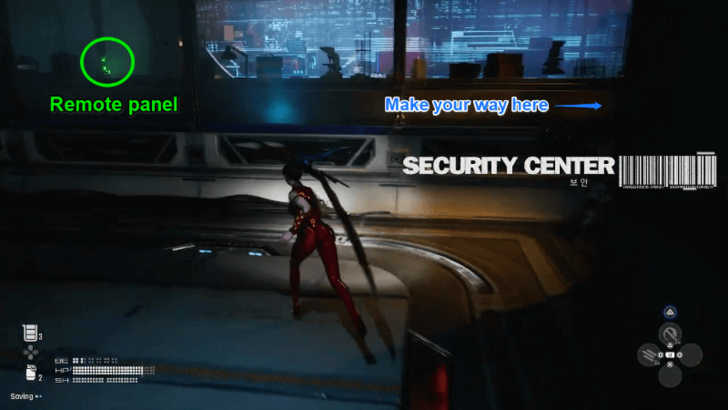 Operate the remote panel found inside the Security Center in order to open the door and proceed. |
| Sector A07 Guide | |
| 1 | 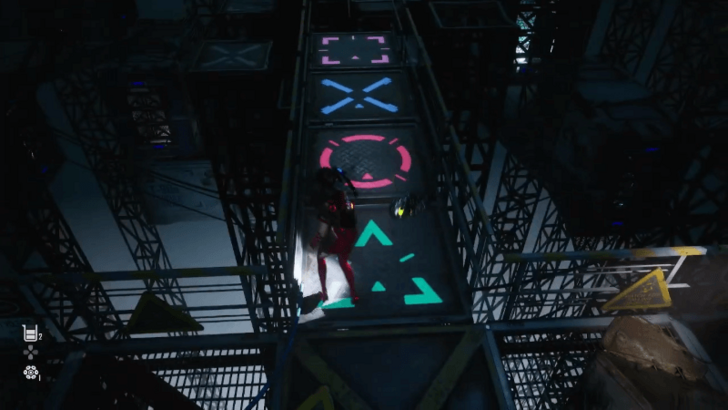 Solve the Sector A07 puzzle by stepping on the tiles while following the correct sequence of shapes. |
| Specimen Preservation Lab Guide | |
| 1 | 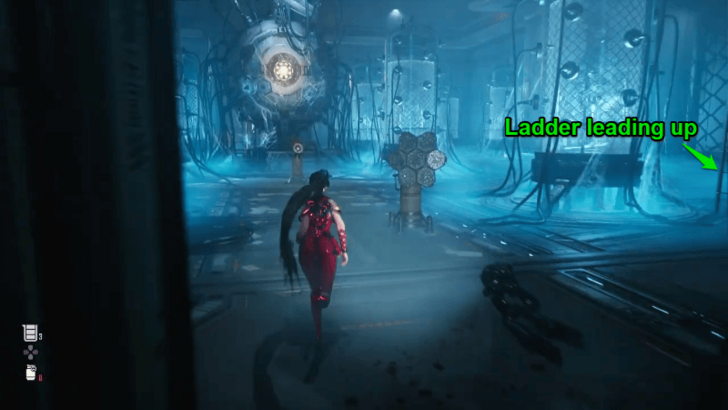 Enter the preservation lab and climb the ladder located on the right to get to the remote panel that will activate the lasers. |
| 2 | 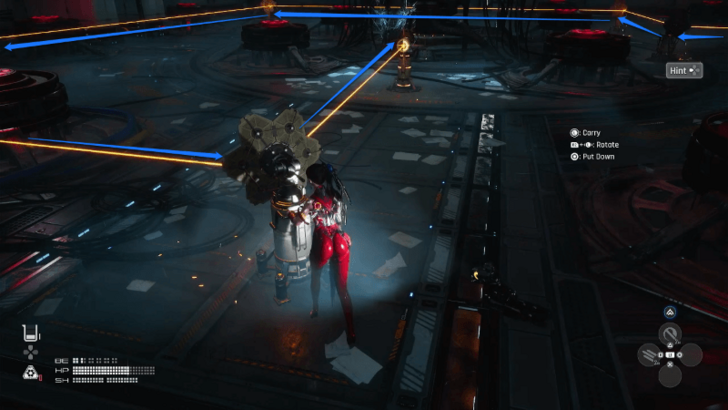 Align the reflactors to guide the lasers towards the generator in the middle of the lab. |
| Deteriorated Lobby Guide | |
| 1 | 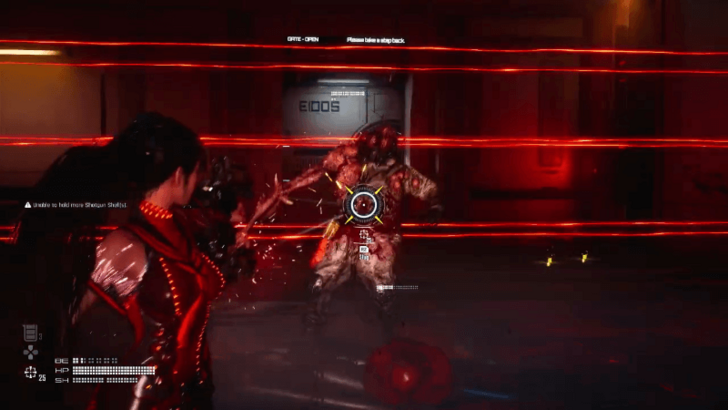 Defeat the enemies cornering you within the Deteriorated Lobby. Make sure to avoid the lasers as they can deal significant damage to you. |
| 2 | 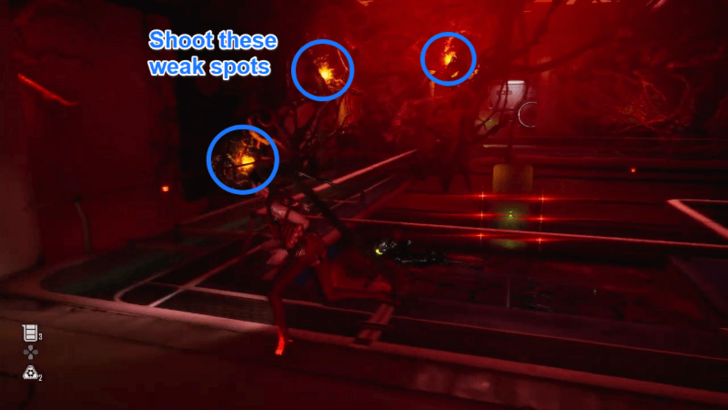 Shoot the contamination's weak points to destroy them and be able to proceed to the next area. |
| 3 | 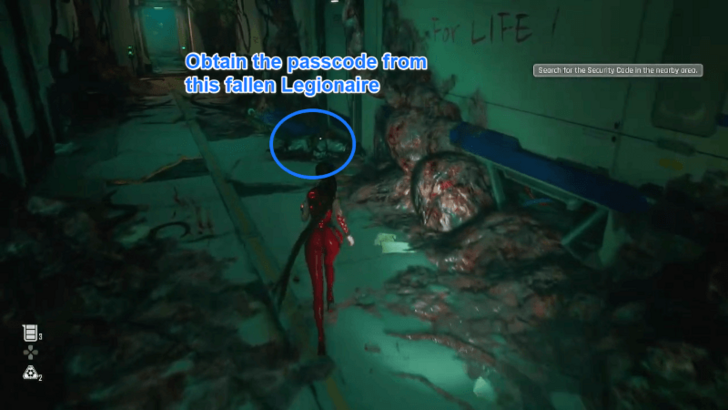 Obtain the passcode needed to proceed to the Air Vent from one of the fallen Legionaires in the area. |
| Air Vent Guide | |
| 1 | 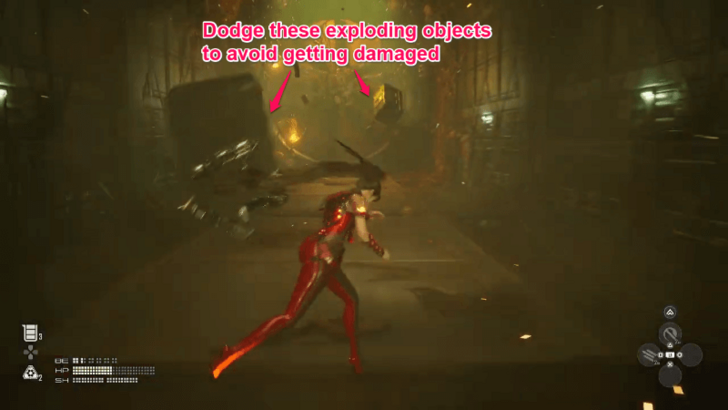 Avoid the objects hurling at you while traversing the Air Vent, as they would explode and deal huge damage upon impact. |
| 2 | 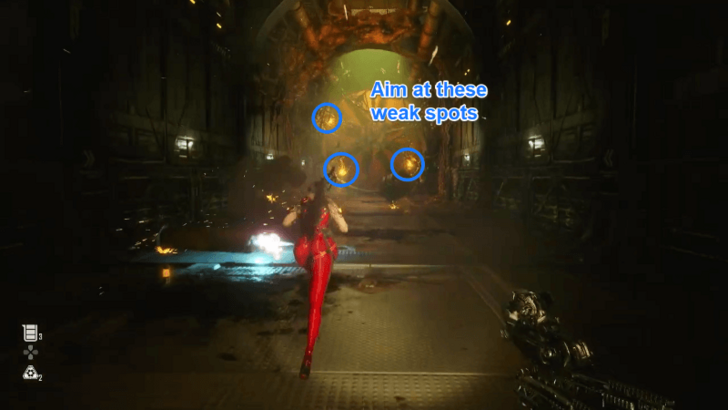 Shoot the weak spots of the contamination hanging on the huge fan blades inside the Air Vent. |
| 3 | 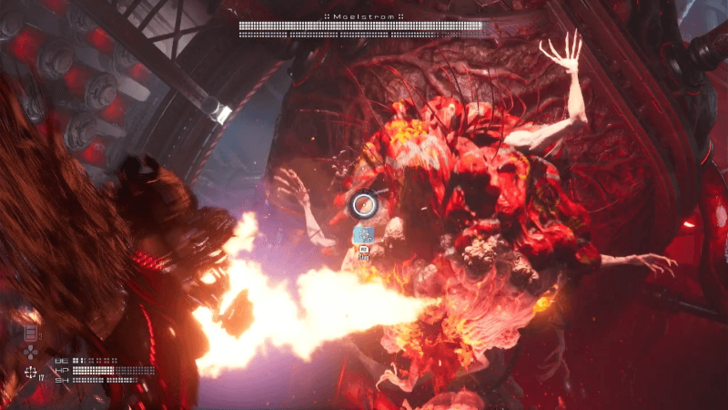 Defeat the Maelstrom waiting for you at the end of the Air Vent. ▶ Maelstrom Boss and How to Beat |
Light of Hope Walkthrough
| Main Missions | |
|---|---|
| Previous Mission | Next Mission |
| Xion Guide | |
|---|---|
| 1 |  From the Safehouse, proceed to the part of the city where you can take a lift to descend down the Presence Chamber and talk to Orcal. |
| 2 |  After your talk with Orcal, return to the Safehouse and talk to Adam about departing for Matrix 11. |
Alpha Signal Walkthrough
| Main Missions | |
|---|---|
| Previous Mission | Next Mission |
| Matrix 11 Guide | |
|---|---|
| 1 |  Upon arriving at Matrix 11, head towards a walkway leading underground. |
| Closed Off Platform Guide | |
| 1 | 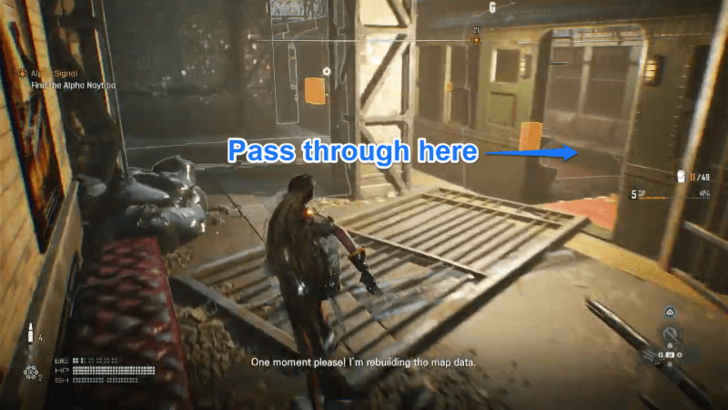 Cross through the trains to reaching the stairs leading to the other side of the platform. |
| 2 | 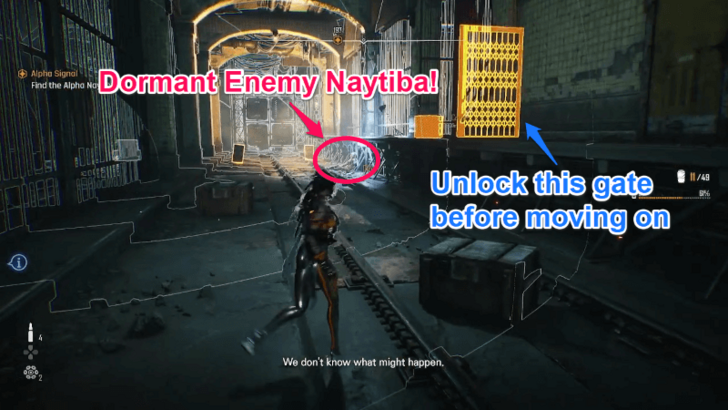 Open the gate to create a shortcut from the entrance. |
| 3 |  Defeat the Naytiba hanging on the walls to proceed deeper into the platform. |
| 4 |  Head towards railway tunnel. Be careful of the moving train, as this can instantly kill you. |
| 5 | 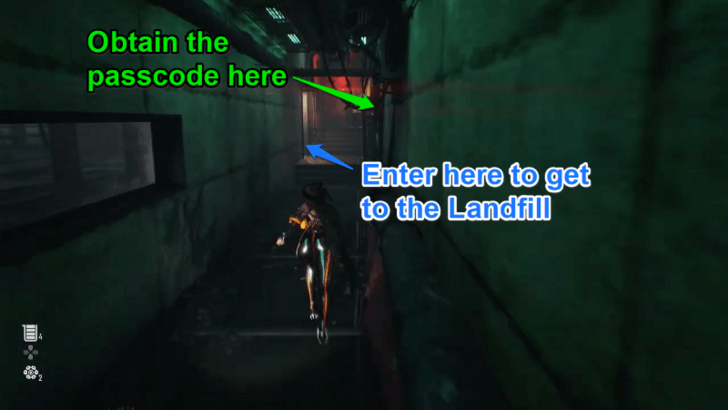 Walk down the path located on your right to get to the Landfill. Make sure to pick up the passcode at the end of the hallway. |
| Landfill Guide | |
| 1 | 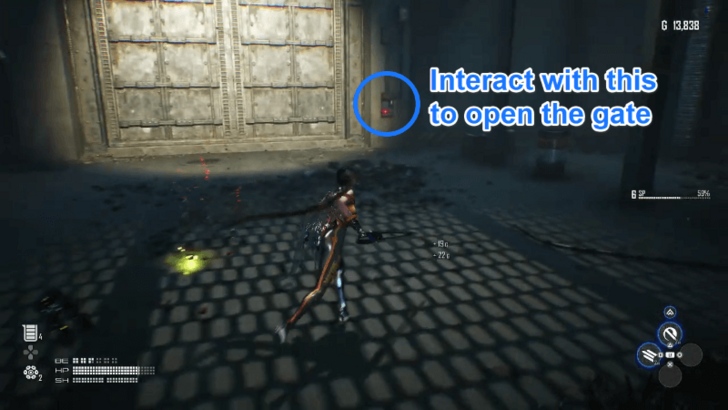 Head down to the lower floor of the Landfill and open the huge locked gate using the control box found on its right side. |
| 2 | 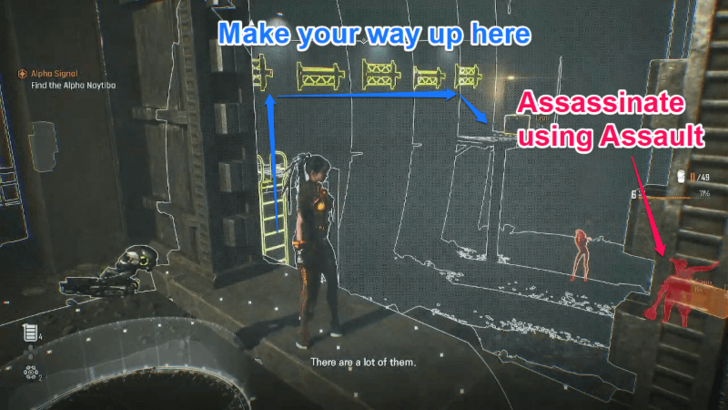 Defeat the enemies inside the Landfill. |
| 3 | 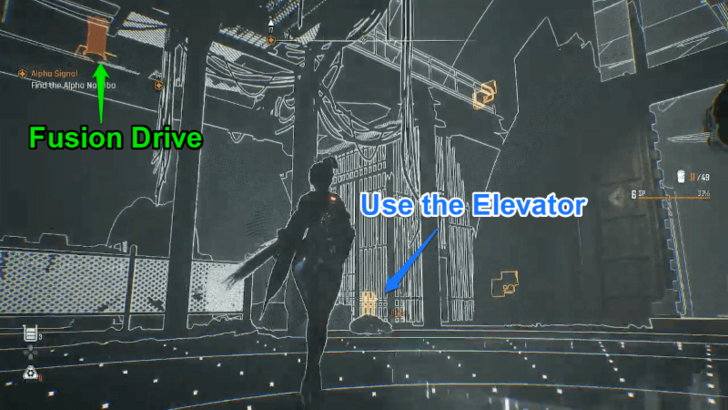 Take the elevator to return to the upper floor and operate the Fusion Drive. |
| Collapsed Rail Bridge Guide | |
| 1 |  Use the bridge stringers to get across the rail bridge. |
| 2 |  Use the hanging ropes to reach the upper sections of the rail bridge. |
| 3 | 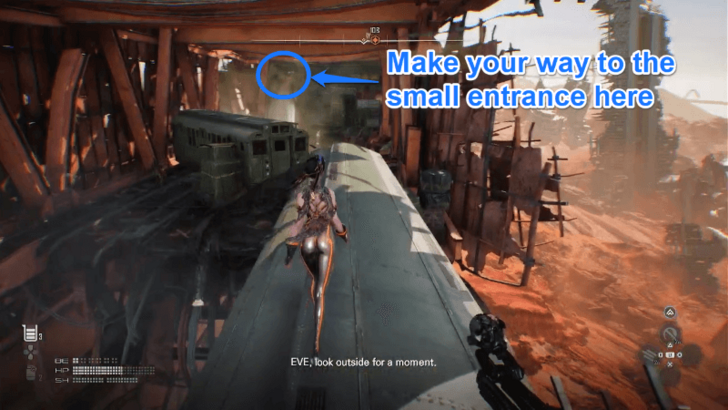 Make your way through the broken trains by passing through and above them. Head to the small gap located on the other side of the bridge, around the top left side corner. |
| 4 |  Descend the ladder located at the end of the railway and make your way to the Railyard. |
| Railyard Guide | |
| 1 |  Defeat the Stalker. |
| 2 | 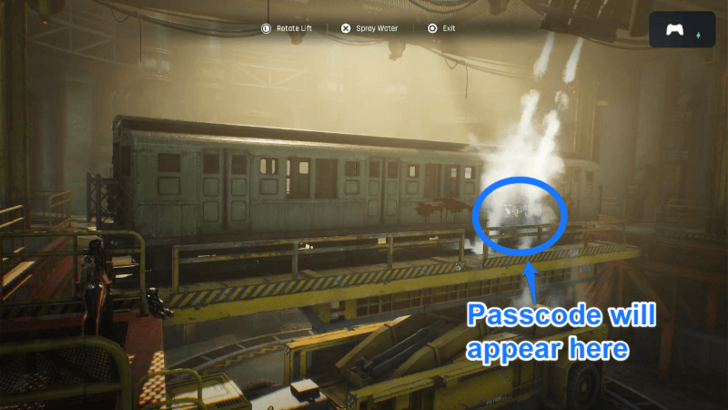 Obtain the passcode to the next area by revealing the code plastered on the lifted train. The passcode is N72R5. |
| 3 |  Once you've opened the locked gate, follow the path going down to get to the Underground Sewer. |
| Underground Sewer Guide | |
| 1 |  Obtain the passcode to get the Fusion Cell from the kneeling Legionaire located at the bottom of the sewer. |
| 2 | 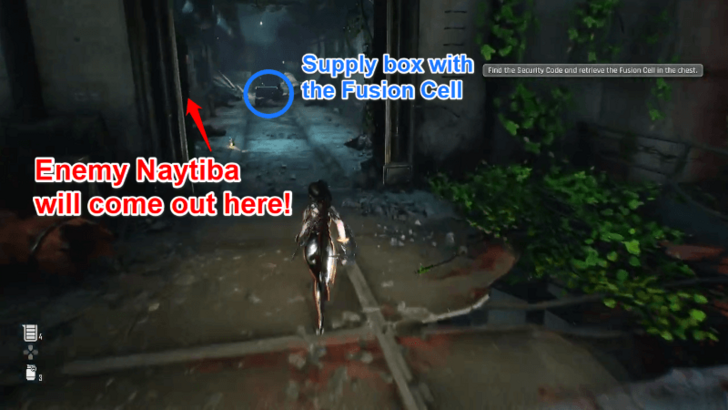 Open the locked supply box on the upper floor of the sewer to get the Fusion Cell. |
| 3 | 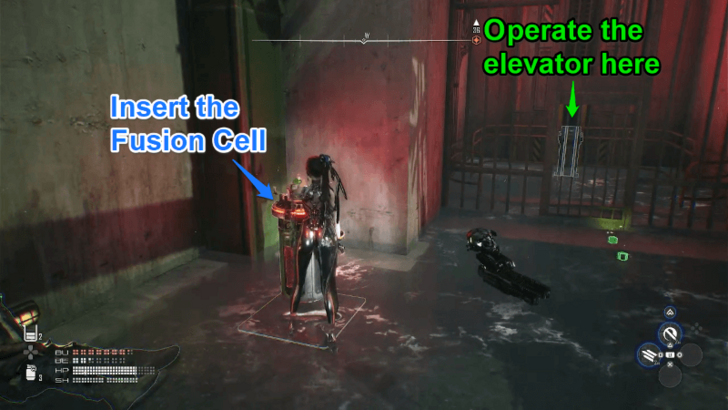 Operate the Fusion Drive to activate the elevator leading to the top floor. |
| 4 |  Solve the Underground Sewer puzzle. Rotate the octagons to connect the power supply. |
| Rotten Labyrinth Guide | |
| 1 |  Defeat the enemies inside the labyrinth. Take advantage of the upper floors to trigger the Assault skill and eliminate enemies in a single strike. |
| 2 | 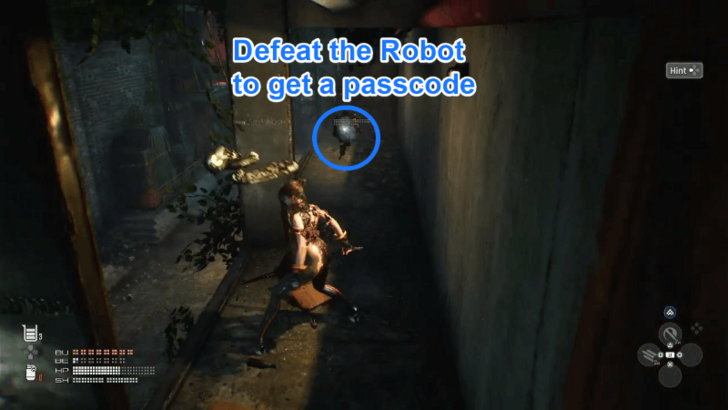 Obtain a passcode from one of the relic-collecting robots located on top of the second area. |
| 3 | 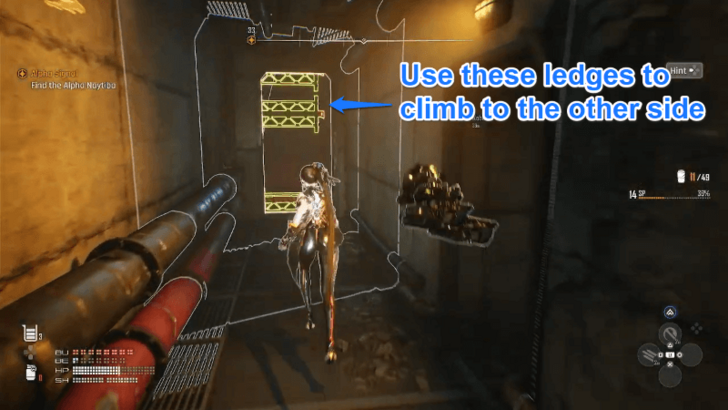 Head deeper into the second area until you reach the hallway, which has climbable ledges at the end. Using those ledges, make your way up and drop down to the side where you can access the supply box containing a Fusion Cell. |
| 4 | 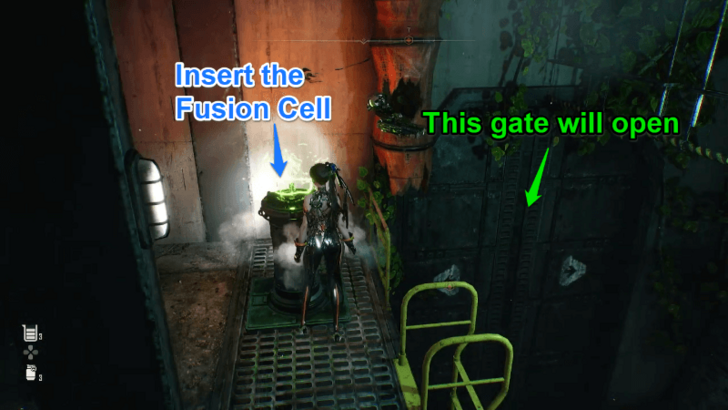 Return to the first area of the labyrinth to activate the Fusion Drive and head to the abandoned settlement. |
| 5 | 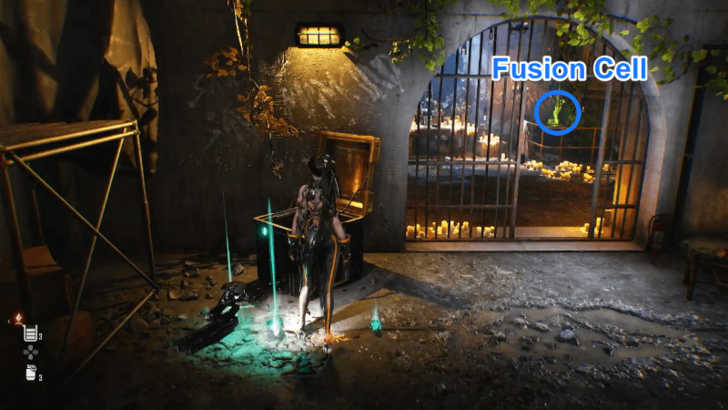 Obtain another Fusion Cell from the memorial shrine located inside the abandoned settlement. |
| 6 |  Using the Fusion Cell, open the path leading to another sewer. Follow the trail of enemies until you reach the end of the sewer. |
| 7 | 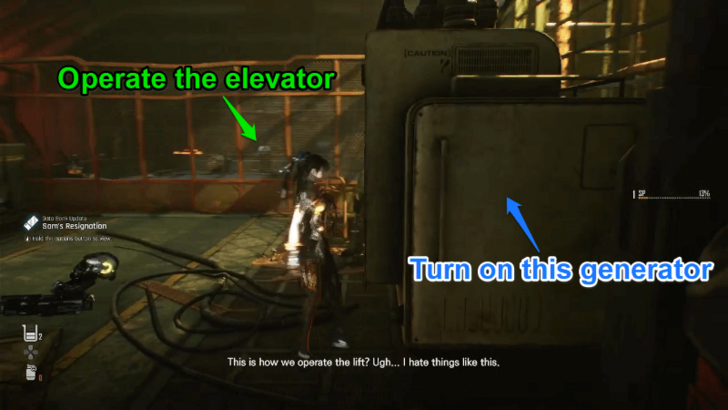 Operate the generator to power up the cargo elevator. Take the elevator down while dealing with enemies that will hinder the lift's path. |
| Temporary Armory Guide | |
| 1 |  Defeat the Juggernaut. |
| 2 | 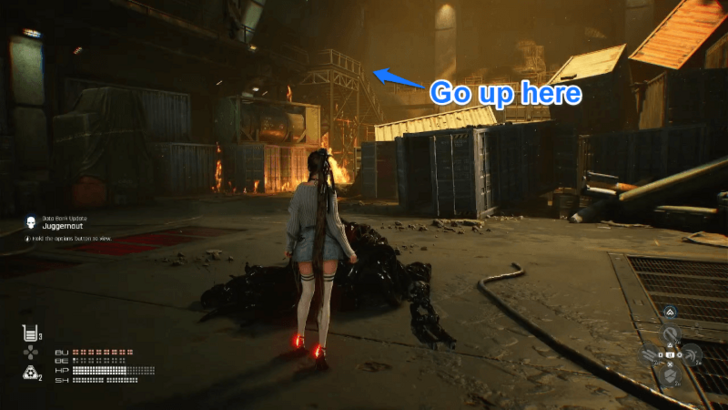 Make your way up the armory through the stairs located in the left corner. |
| 3 | 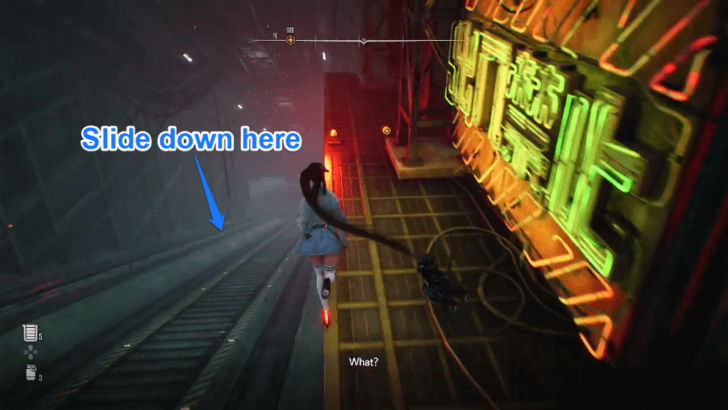 Slide down the lift route, then swim towards the path on the right. |
| Train Graveyard Guide | |
| 1 | 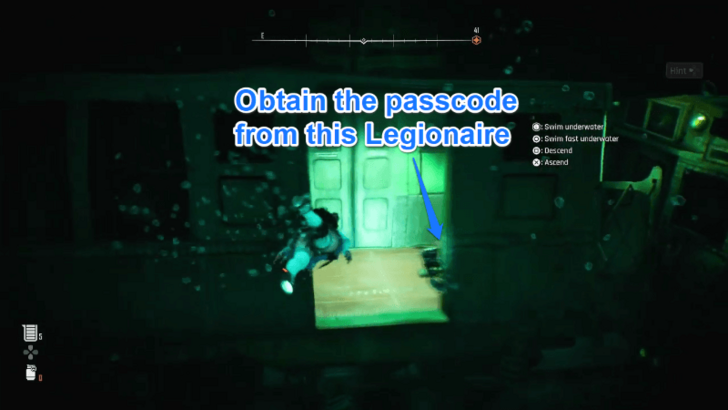 Obtain the train graveyard passcode to open the gate leading to the next area. You can acquire the passcode from the submerged Legionaire near the end of the tunnel. |
| 2 |  Press the square button to deal with the enemies that appeared after opening the gate. |
| 3 | 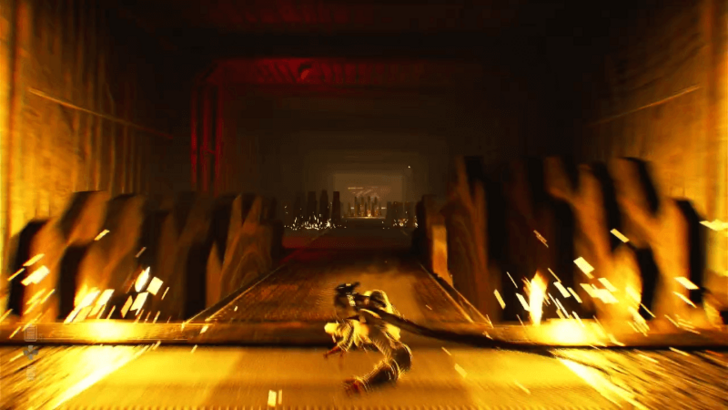 Slide down the collapsing tunnel while avoiding the grinders on the floor. |
| 3 | 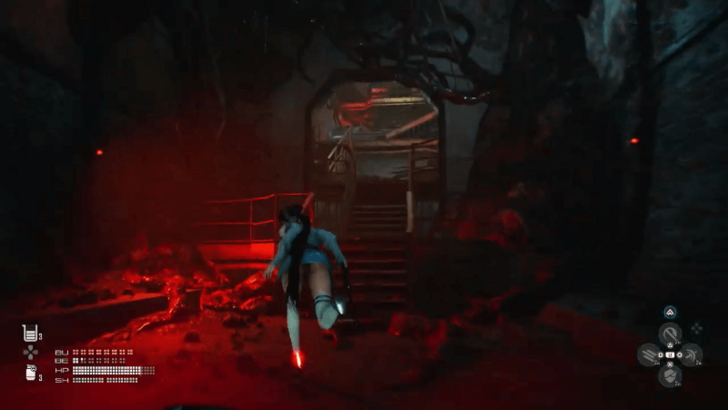 After surviving the trap, make your way up the flight of stairs to get to the next area. |
| Contaminated Water Purification Plant Guide | |
| 1 |  Defeat Tachy. |
Hidden Truth Walkthrough
| Main Missions | |
|---|---|
| Previous Mission | Next Mission |
| Xion Guide | |
|---|---|
| 1 | 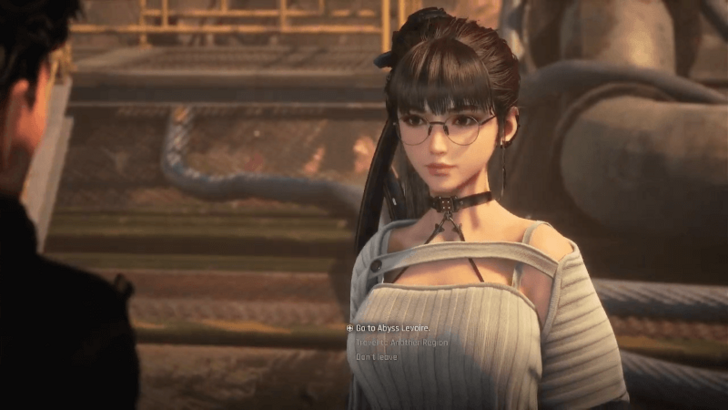 Speak with Adam to watch the Legacy you obtained from Matrix 11 and learn the truth about humanity's demise. Speak with him again to depart for Abyss Levoire. |
Abyss Levoire Walkthrough
| Main Missions | |
|---|---|
| Previous Mission | Next Mission |
| Great Desert Guide | |
|---|---|
| 1 | 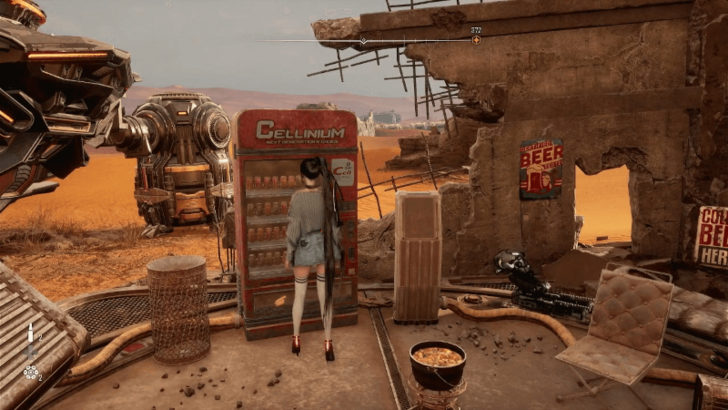
Unlock the first Supply Camp in the Great Dessert by completing the Reboot!!! side mission. ▶ Reboot!!! - Sidequest Guide |
| 2 | 
After unlocking the first camp, head northeast to get to the Abyss Levoire. |
| Abyss Levoire Guide | |
| 1 | 
Prove your worth against Shael to get access to the Abyss Levoire. |
| Emergency Exit Guide | |
| 1 | 
Similar to the Altess Levoire mission, you'll only have access to your gun. Make sure to take advantage of the terminals that can refill your ammos. ▶ Altess Levoire Mission Guide |
| 2 | 
Climb on the ledges on the right side of the room to proceed to the next area. |
| 3 | 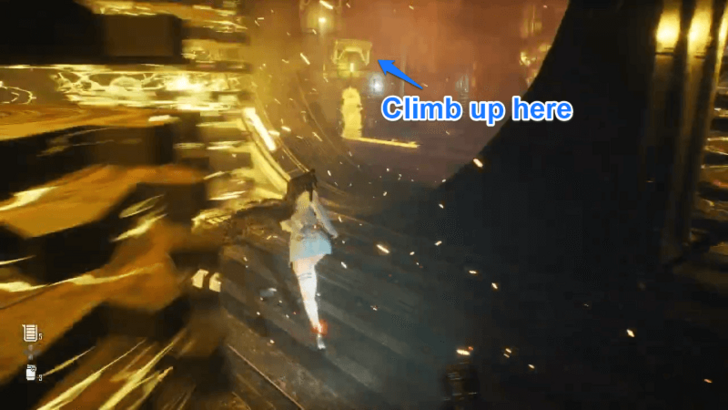
Make your way to the ledges found on the left side of the room to get close to the giant propeller. |
| 4 | 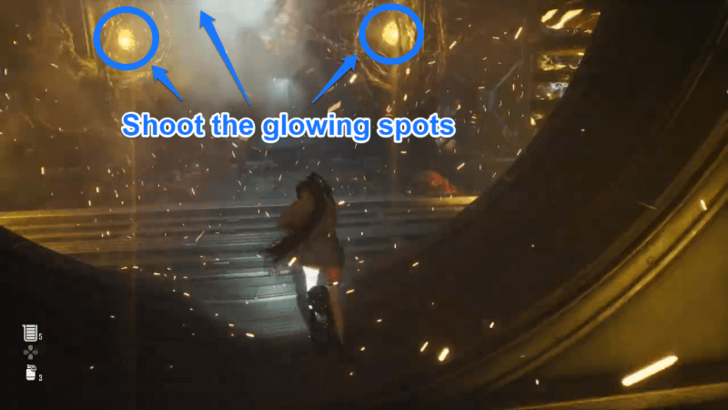
Shoot the contamination's glowing weak spots to disarm the propeller and the saw blades. |
| Closed Lobby Guide | |
| 1 | 
Move the cargo blocking your way to the next area. |
| 2 | 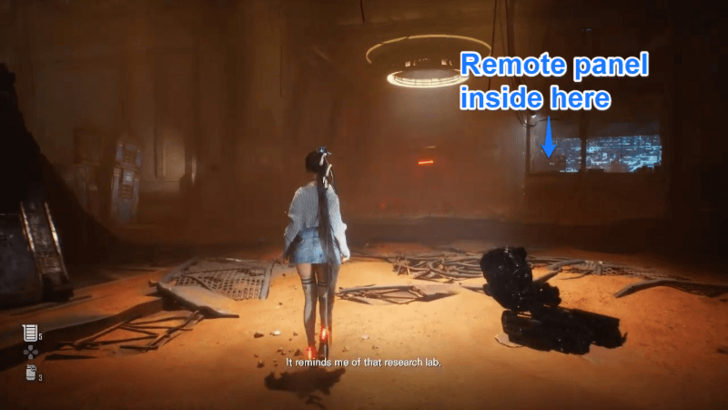
Proceed to the room located on the right to get to the remote panel you need to access. |
| 3 | 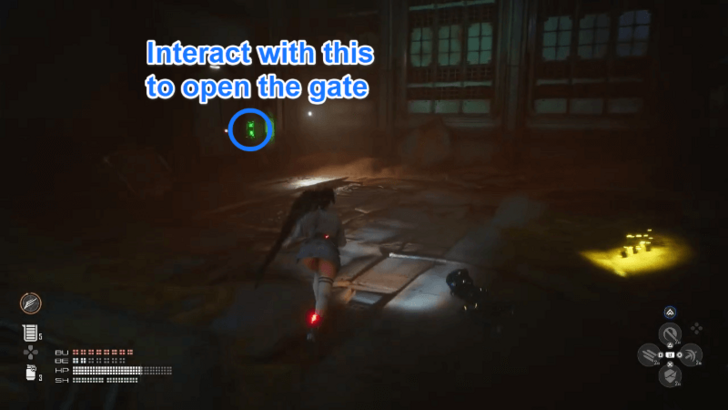
Make your way back to the previous corridor and head in the opposite direction to get to the gate leading to the next area. |
| Capsule Cluster Room Guide | |
| 1 | 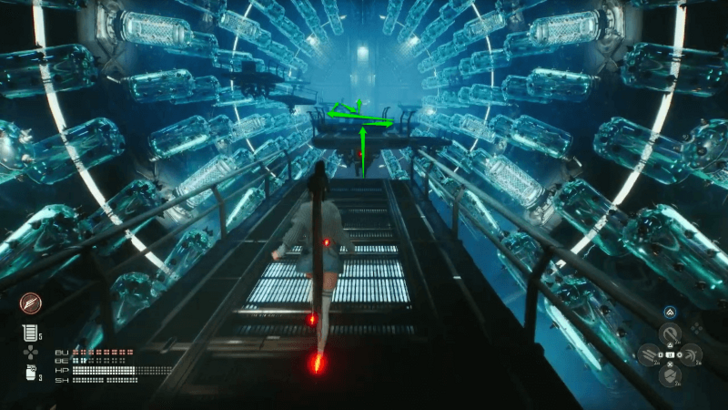
Jump on the floating platforms to get to the other side of the room. |
| 2 | 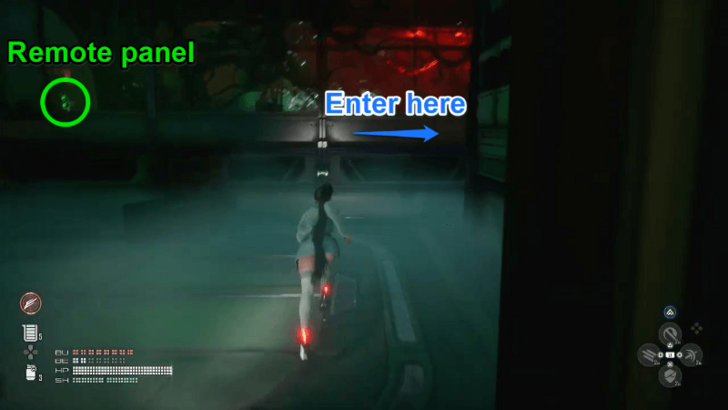
Proceed to the right side of the security room to get access to the remote panel needed to open the locked gate nearby. |
| Underground Passage Guide | |
| 1 | 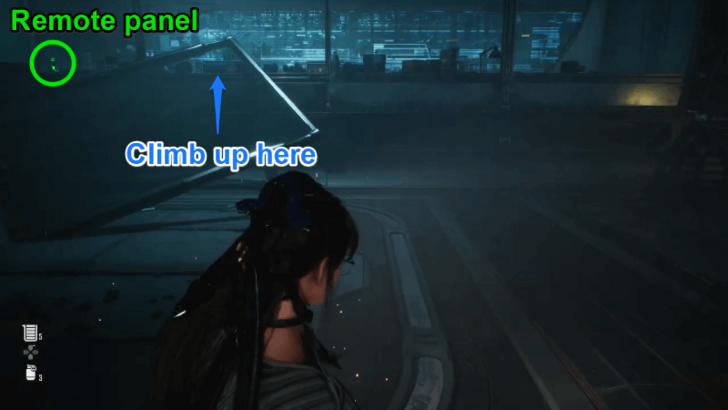
Jump over the broken window to get to the remote panel needed to open the barred gate. |
| 2 | 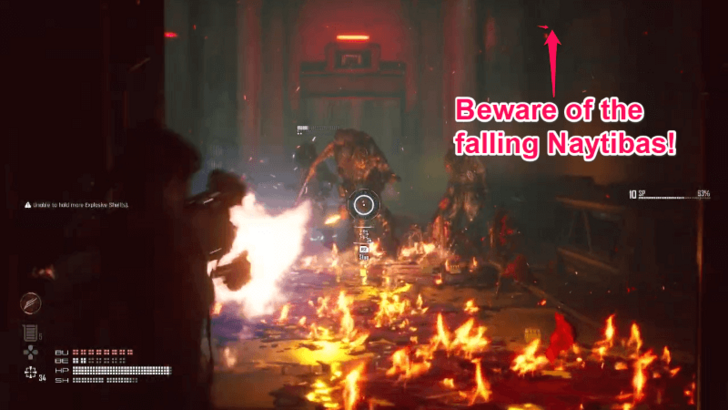
Defeat the enemies on the other side of the gate. |
| 3 | 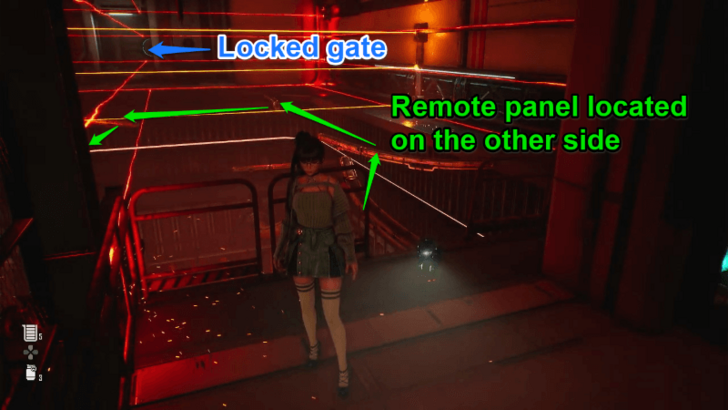
Pass through the room with moving lasers by using the stringers to get across. Get to the remote panel located on the left side of the room to disarm the lasers and open the locked door on the other side. |
| Laboratory Ruins Guide | |
| 1 | 
Climb on the ledges located on the left side. Make your way up until you reach the platform connected to the marked walls. |
| 2 | 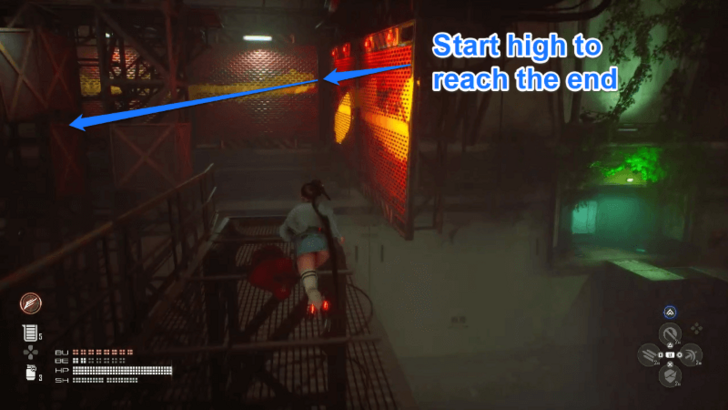
Run through the marked walls to get to the far left corner of the ruins. Make your way further up until you reach the top floor. |
| 3 | 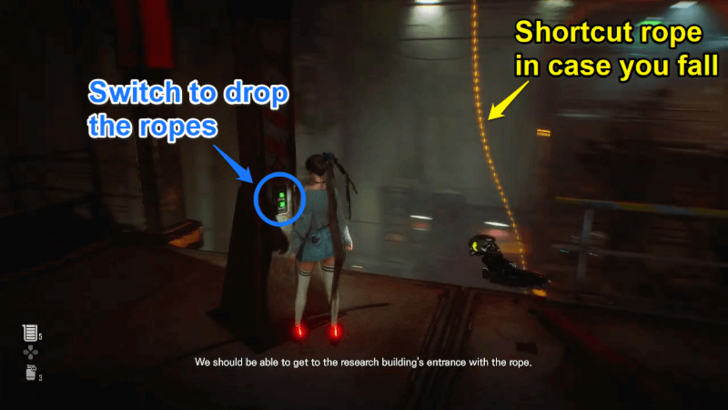
Locate and press the switch to drop down hanging ropes in the area. |
| 4 | 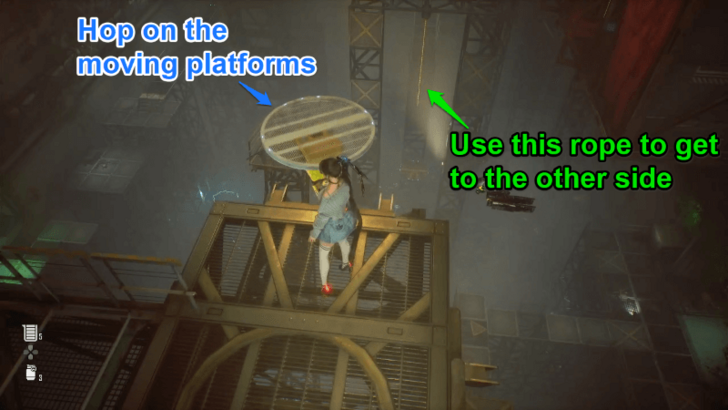
On the same floor as the switch, head to the right side until you see the moving platforms. Hop on to these platforms until you reach the other side of the ruins. |
| 5 | 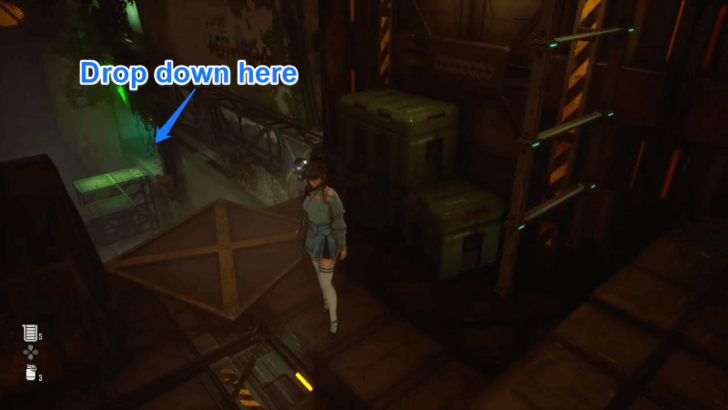
Continue making your way up through another set of ledges, marked walls, and hanging ropes. Eventually, you'll see a ladder followed by some platforms that will lead you to the laboratory entrance. |
| Heart of the Contamination Guide | |
| 1 | 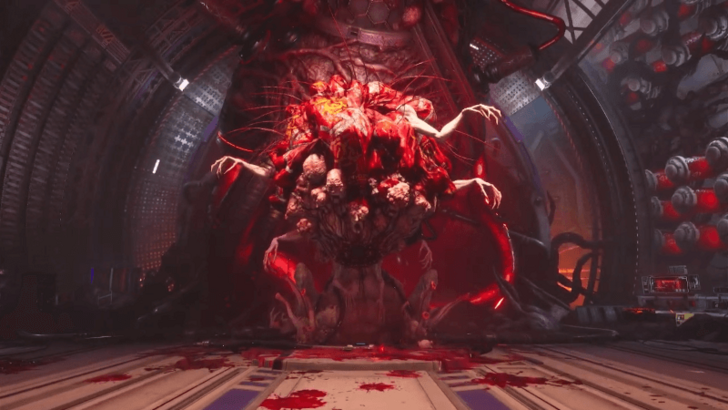
Defeat the Maelstrom. ▶ Maelstrom Boss and How to Beat |
Orcal's Testimony Walkthrough
| Main Missions | |
|---|---|
| Previous Mission | Next Mission |
| Xion Guide | |
|---|---|
| 1 |  Speak with Adam to depart for the Orbit Elevator. Note that this is a point of no return. If you push through with this mission, you'll be locked out of side contents and will be forced to finish the story up to the end. |
Orcal's Testimony Mission Guide
Secret Garden Walkthrough
| Main Missions | |
|---|---|
| Previous Mission | Next Mission |
| Sector 1 Guide | |
|---|---|
| 1 | 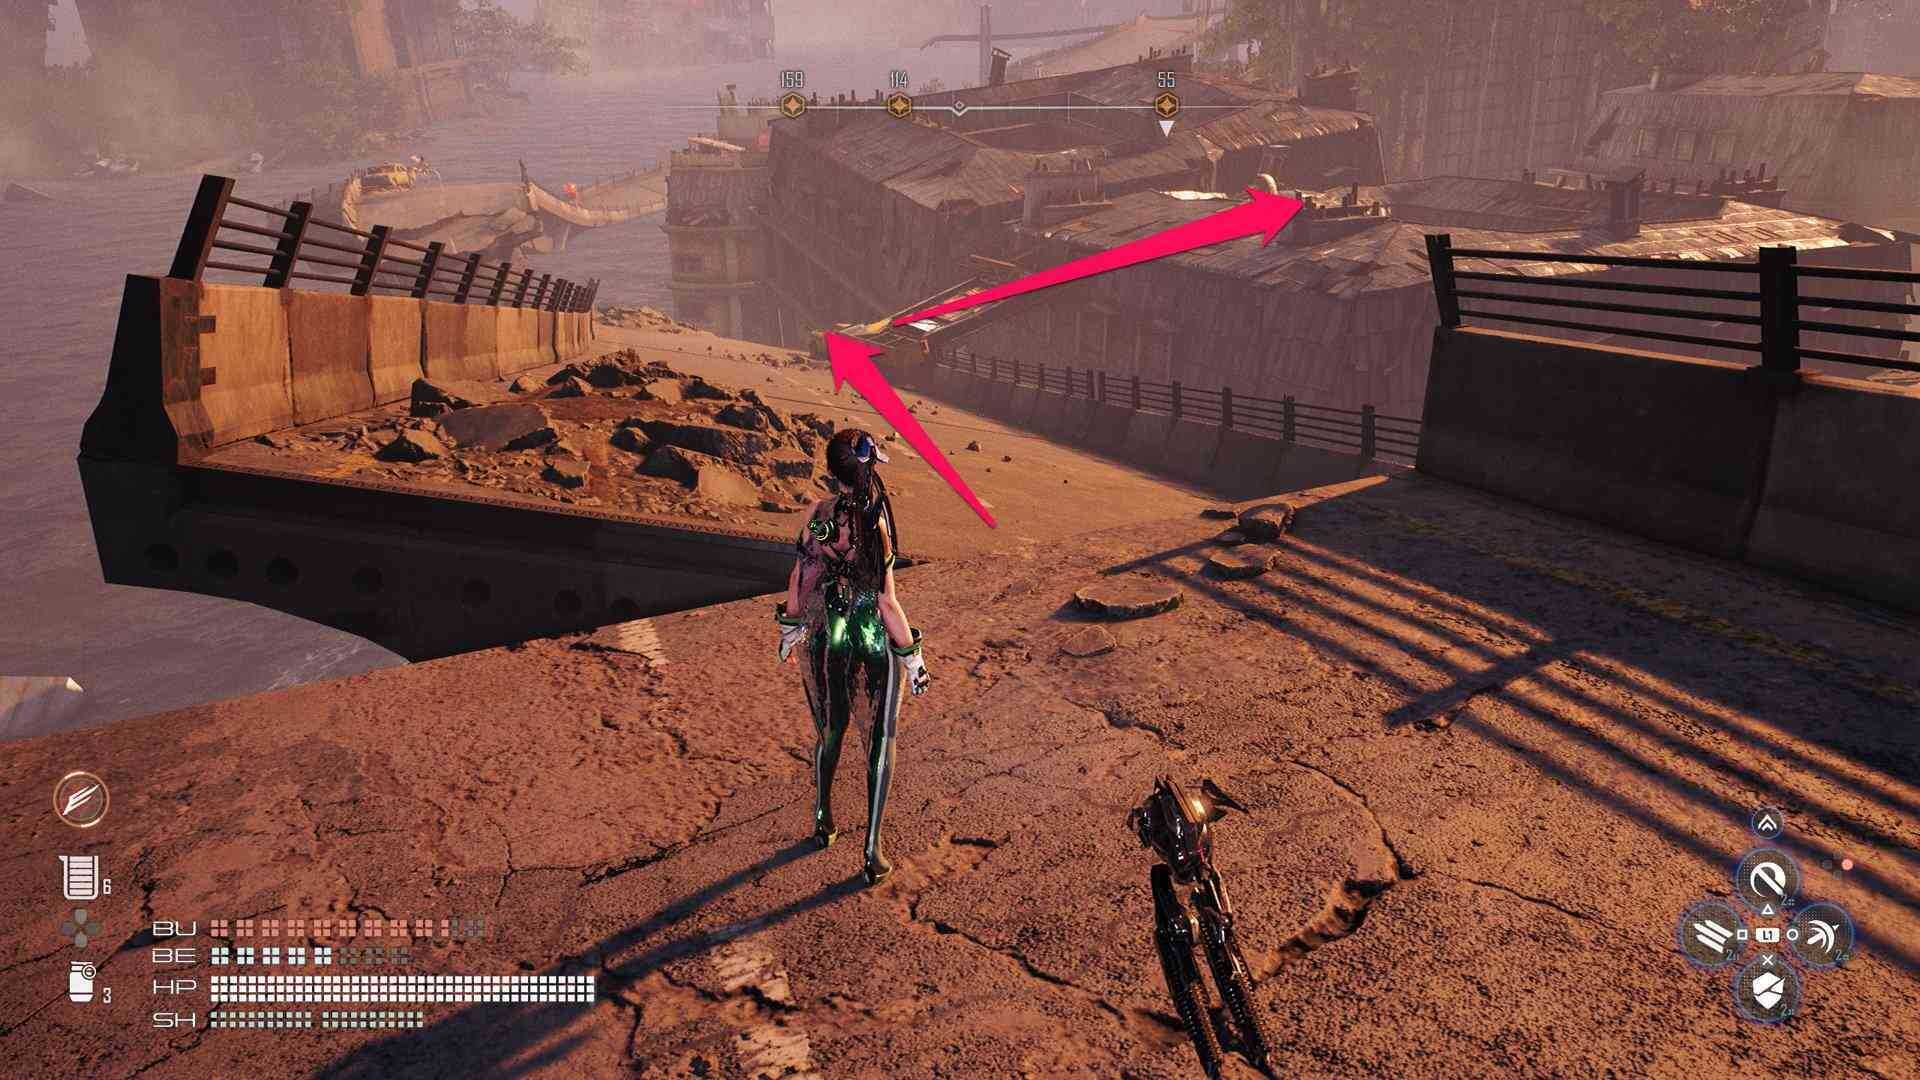
Proceed to the Fallen Overpass and follow the path to the right. |
| 2 | 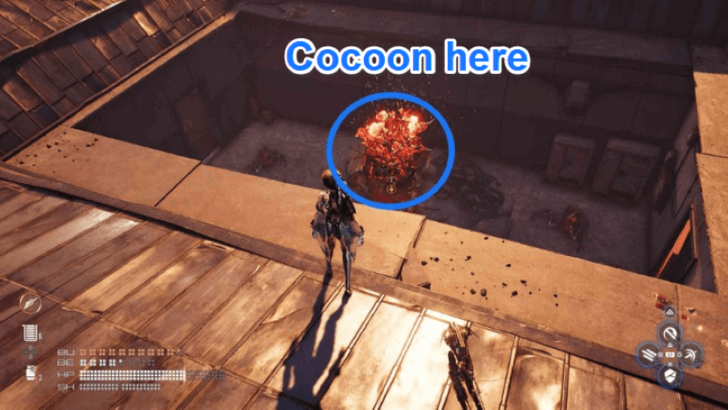
Defeat the first Cocoon in Sector 1. |
| 3 | 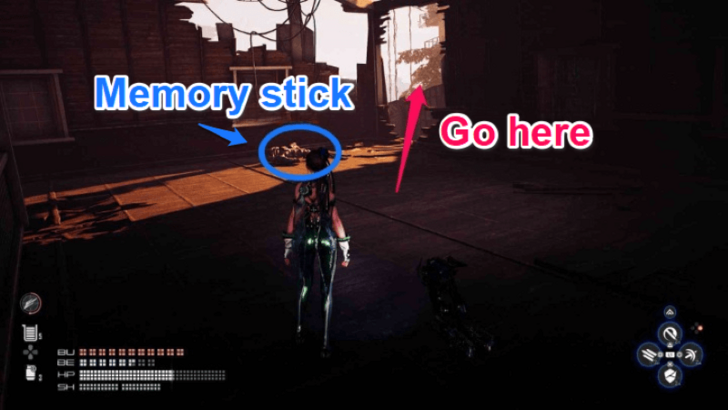
From the first Cocoon, pass inside the building to get to the next Cocoon. |
| 4 | 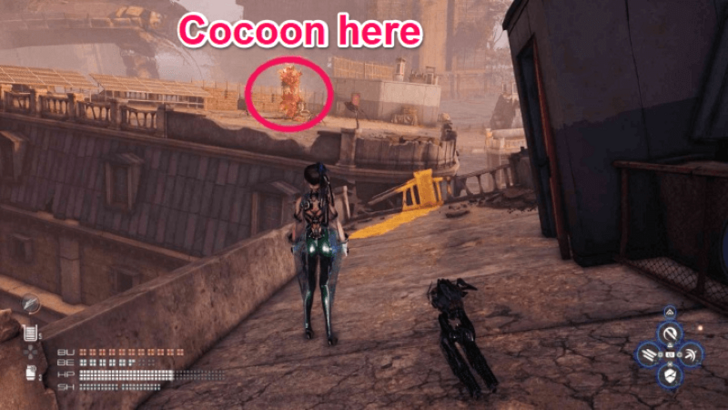
Defeat the second Cocoon located on the next building. |
| 5 | 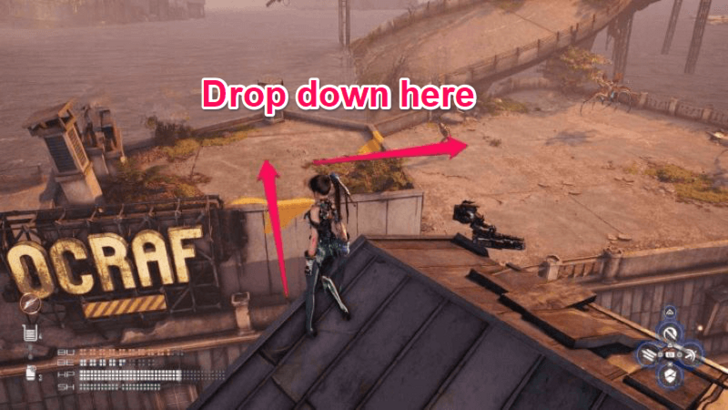
Jump through the rooftops on the right side until you reach a building with a sign saying "Ocraf". Once you're there, drop down to reach the collapsed road on your left. |
| 6 | 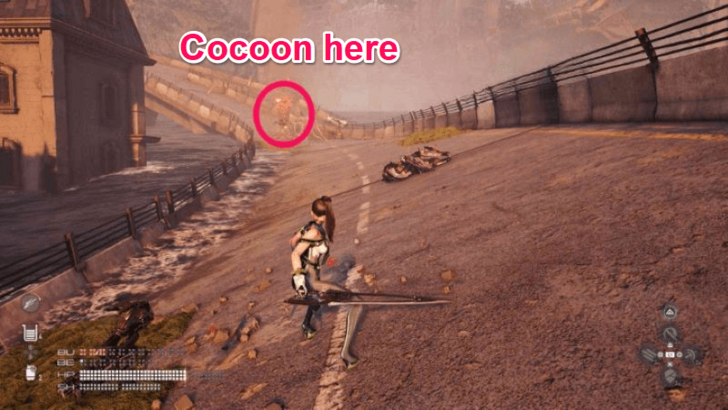
Defeat the third Cocoon in Sector 1. |
| Sector 2 Guide | |
| 1 | 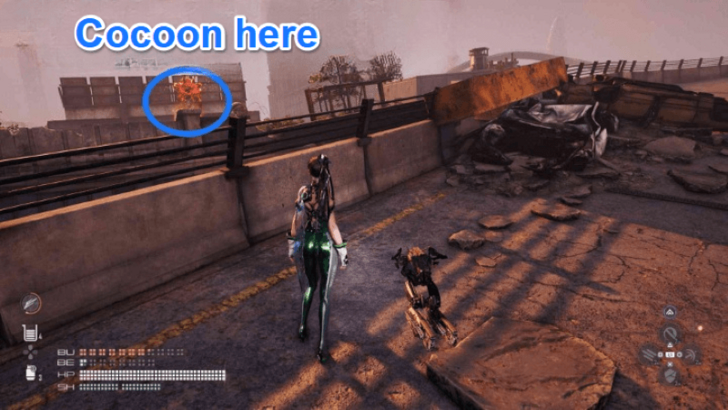
Go back up the previous building and proceed to the road on the right. This will lead you to the first Cocoon in Sector 2. |
| 2 | 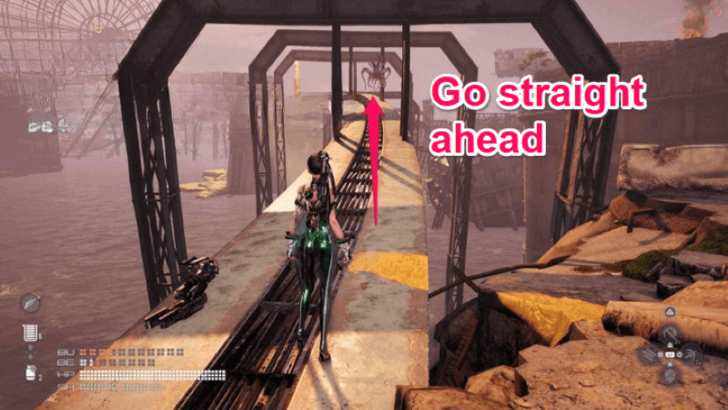
After killing the first Cocoon in Sector 2, traverse through the narrow bridge found on the left. |
| 3 | 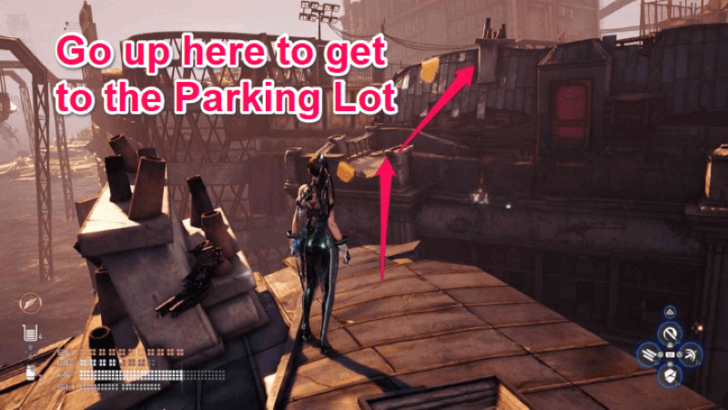
From the narrow bridge, drop down at a warehouse on your right and keep passing through the rooftops until you reach the parking lot. |
| 4 | 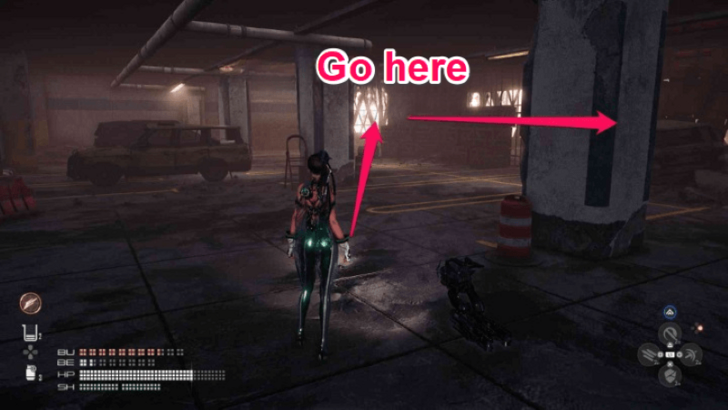
Go down the parking lot until you come across a wall opening with ledges that can take you to the other side of the building. Take the ledges going up the rooftop of the parking lot and defeat the enemies there. |
| 5 | 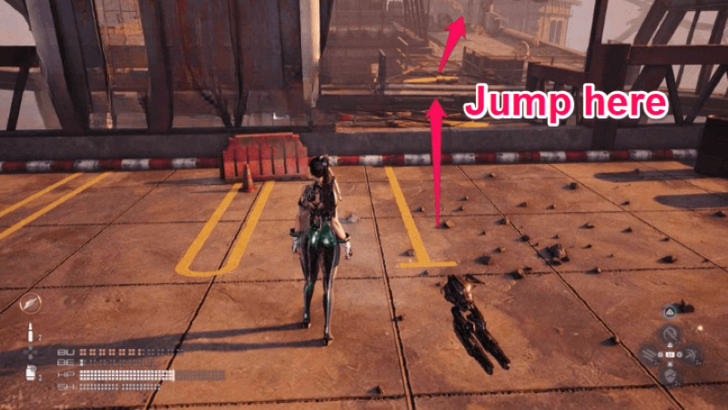
After defeat the enemies, jump on the building across the parking lot to kill the next Cocoon. |
| 6 | 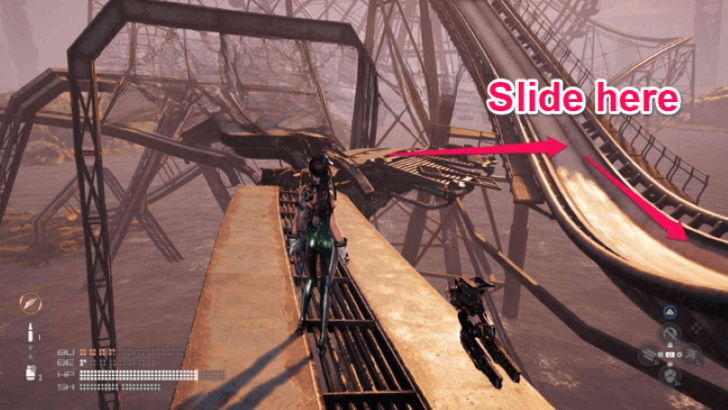
Follow the narrow bridge until you see a rollercoaster rail that can take you to a patch of land below. Here, you'll find the fourth Cocoon in Sector 2. |
| 7 | 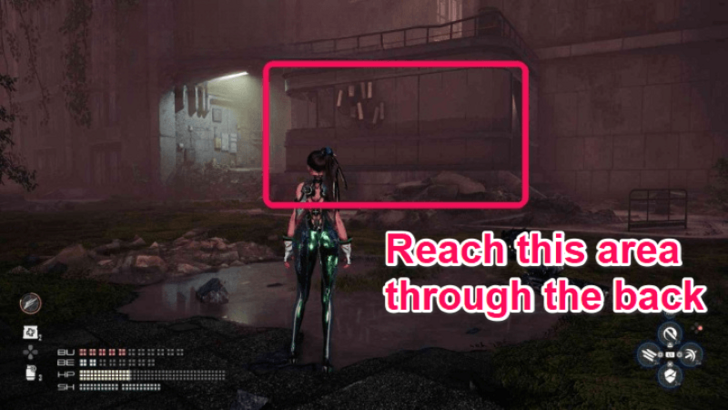
Get back up on the narrow bridge and keep going forward until you reach the Submerged City. Defeat the enemies and the area, and climb on the balcony of one of the buildings. Note: This is a detour going to the boss area. We recommend going down this path, but you can skip it if you want since it's not part of the main objectives. |
| 8 | 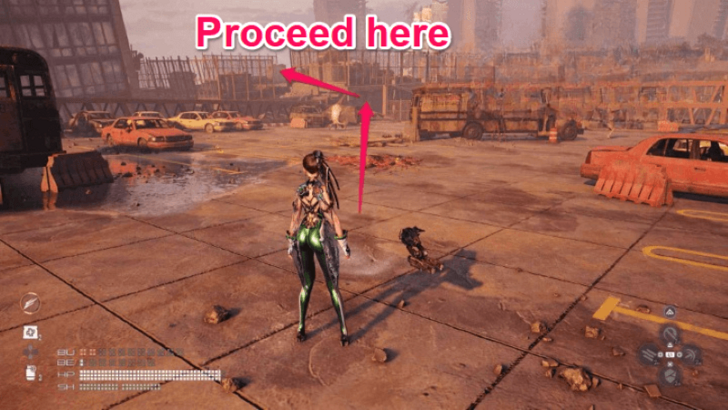
Follow the path from the balcony up to the top of the next building, where you'll encounter a Corrupter and a Dozer. Defeat both of them then drop down the red rollercoaster rail to get back to the previous parking lot. |
| 9 | 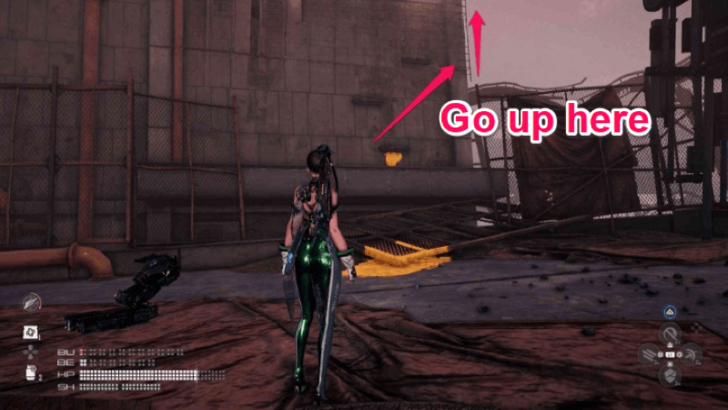
On the previous parking lot, head to the leftmost corner to locate the next fifth Cocoon in Sector 2. After that, climb up the building located on the left. |
| 10 | 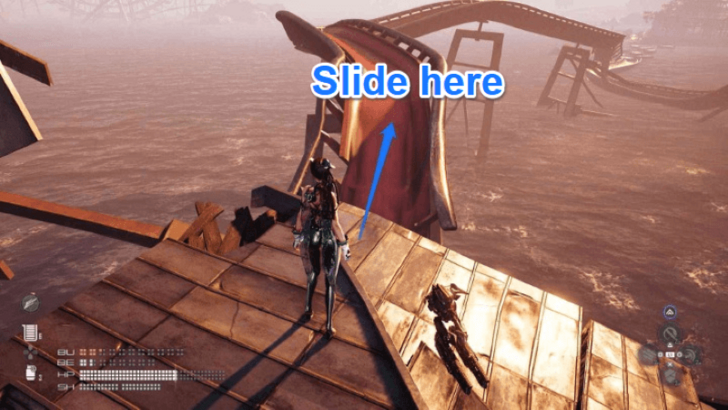
Once you've defeated all the Cocoons, slide through the red rollercoaster rail near the last Cocoon to rendezvous with Adam and Lily. |
Eye of the Hurricane Walkthrough
| Main Missions | |
|---|---|
| Previous Mission | Next Mission |
| Orca Space Complex Guide | |
|---|---|
| 1 | 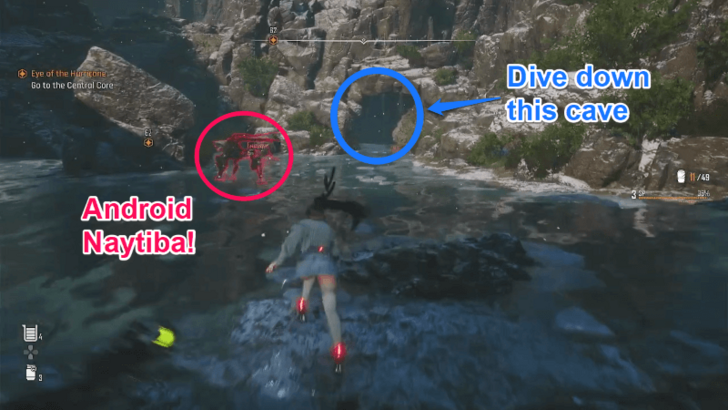
As you follow the path going to the Orbit Elevator, you'll see a small cave filled with water. Dive into it to get to the other side. |
| 2 | 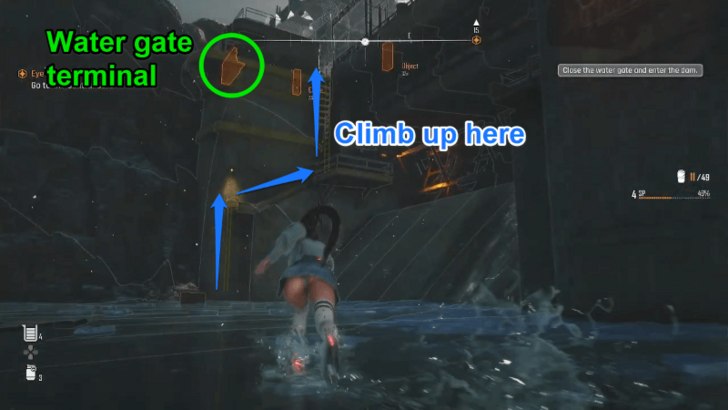
Climb on top of the dam to close the water gate. |
| 3 | 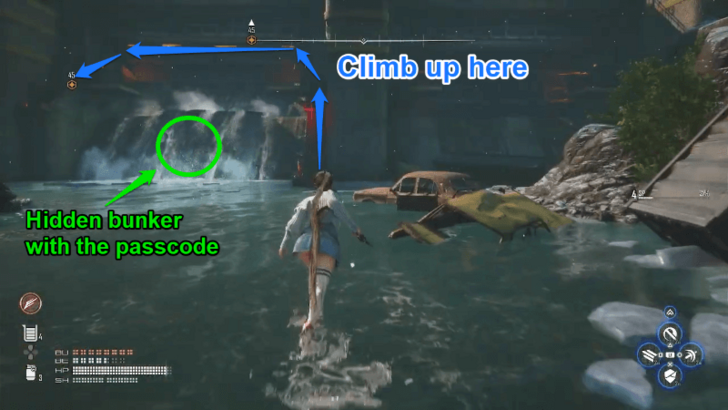
Obtain the passcode hidden behind the flowing water after closing the gate. Climb up and open the locked door. |
| 4 | 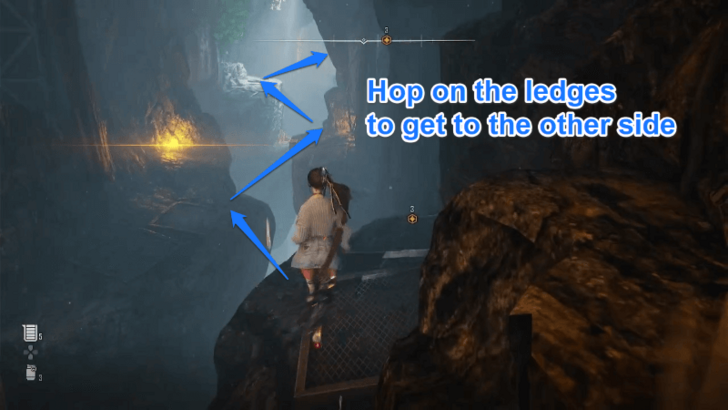
At some point within the cave following the water gate, you'll encounter an area with a crevice in the middle. Jump to the ledges on the sides to proceed. |
| Hypertube Guide | |
| 1 | 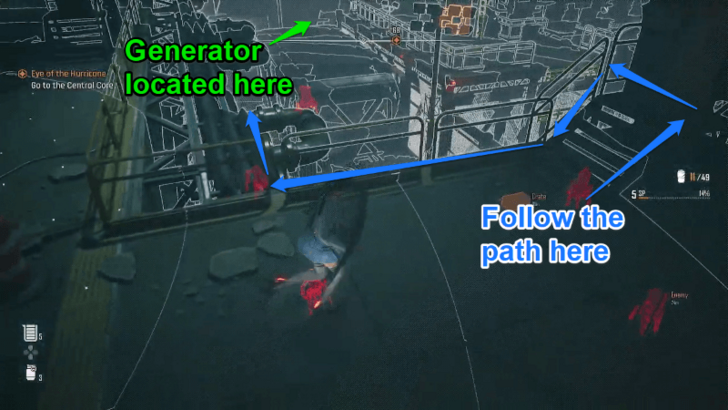
Turn on the generator inside the Hypertube. This is located on the left side of the lower floor. |
| 2 | 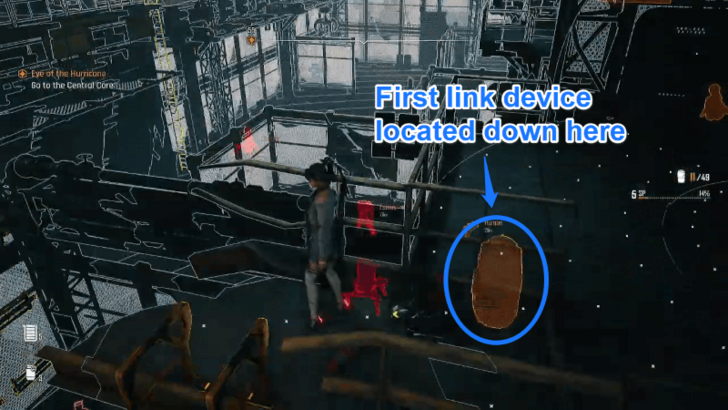
After turning on the generator, power up the first link device to open the Hypertube gate. |
| 3 | 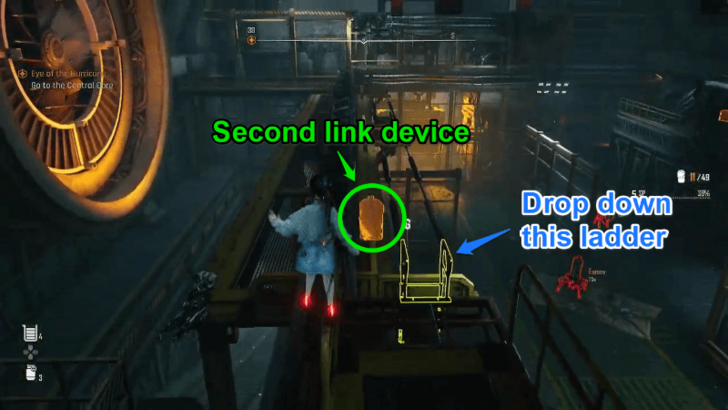
Look for the second link device around the upper left corner of the area. |
| 4 | 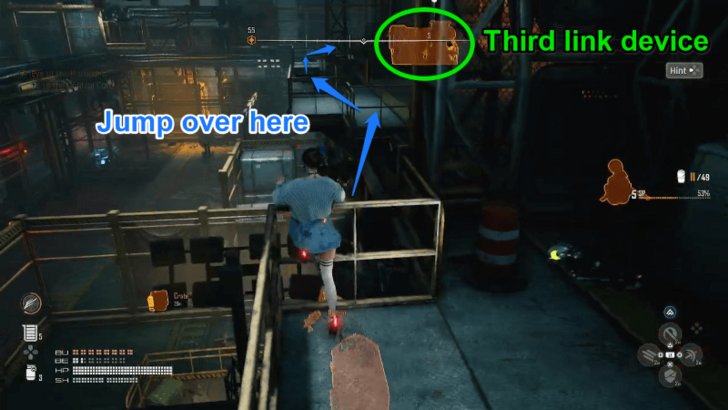
Activate the third link device located on the right side of the upper floor. |
| 5 | 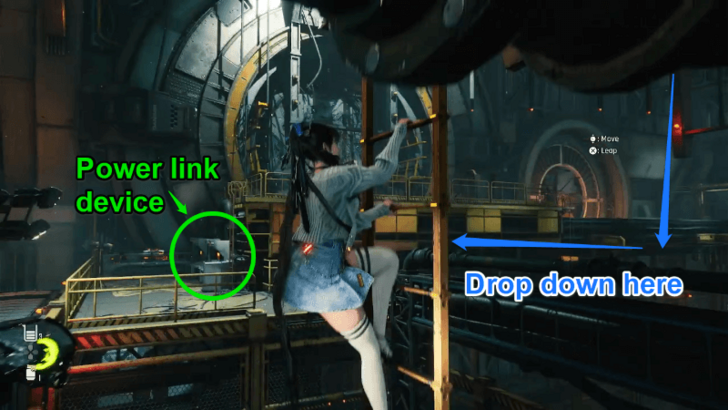
After activating all three link devices, operate the power link device to open the Hypertube. |
| 6 | 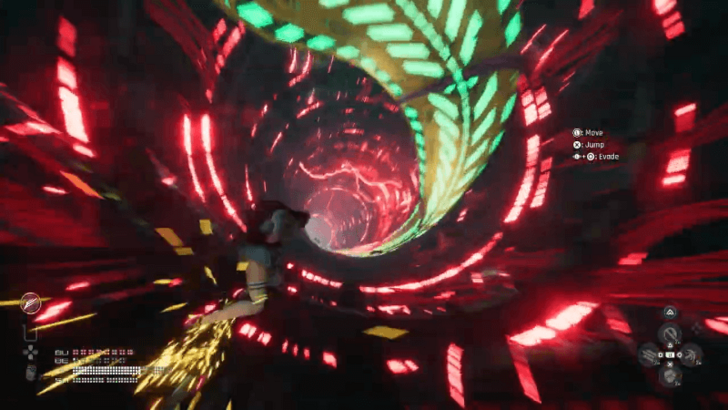
Surf through the Hypertube while avoiding obstacles along the way. |
| 7 | 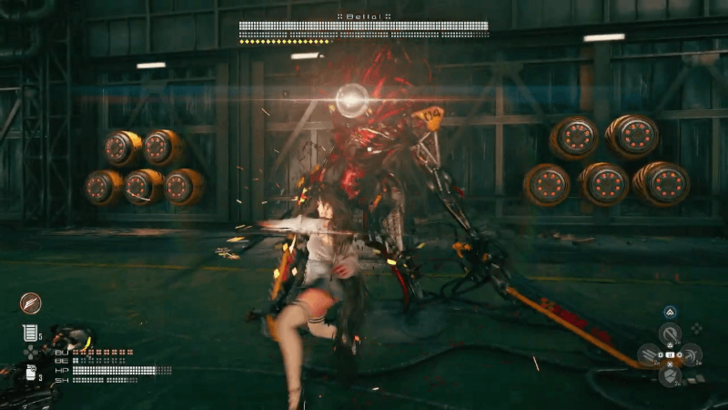
Beat Belial down to 70% HP. |
| Space Logistics Complex Guide | |
| 1 | 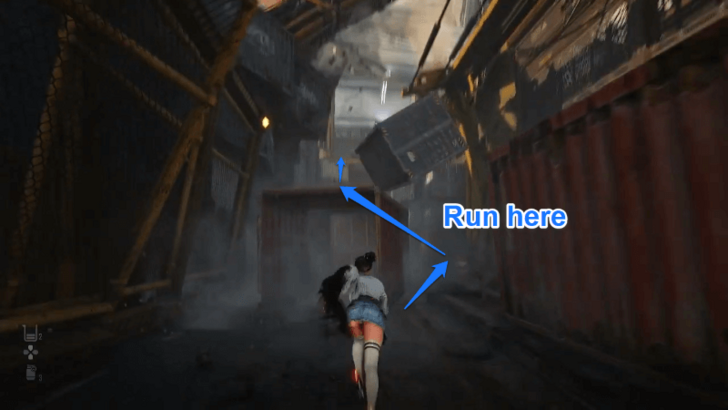
Run past the falling freights. |
| 2 | 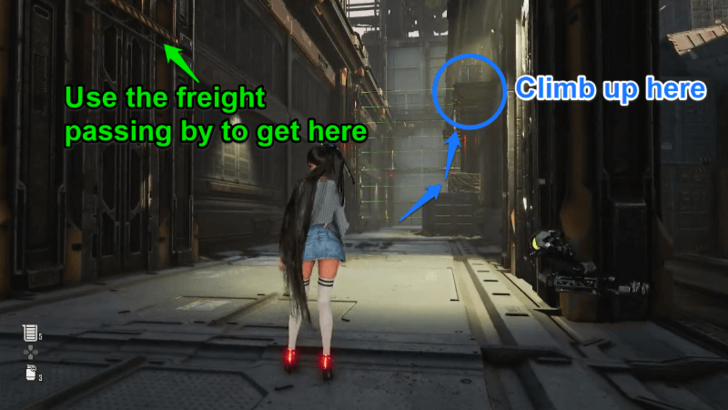
Climb up the ladder located on the right, then jump on the moving freight to get to the ledges on the left. |
| 3 | 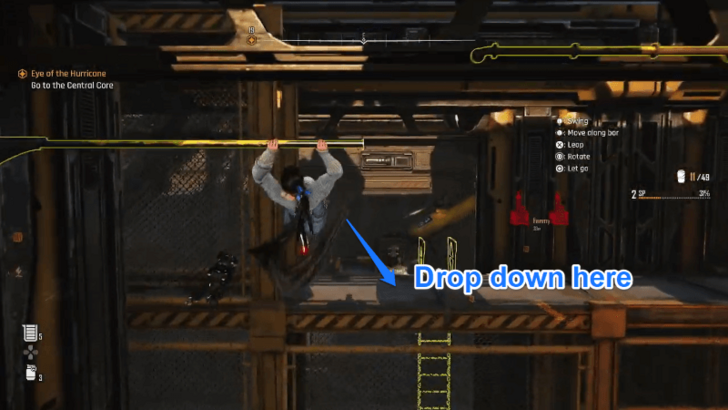
Climb up the ledges and onto the hanging bars to get to the next area. Jump on top of the second moving freight to get to the camp on the left. |
| 4 | 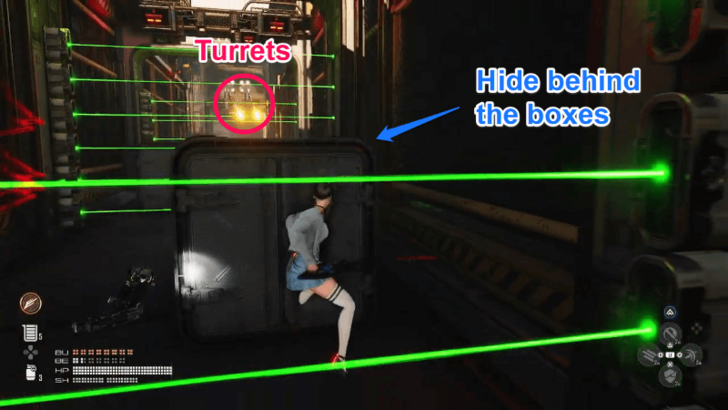
Pass through the conveyor system while hiding behind the metal boxes to avoid getting shot by the active turrets. |
| 5 | 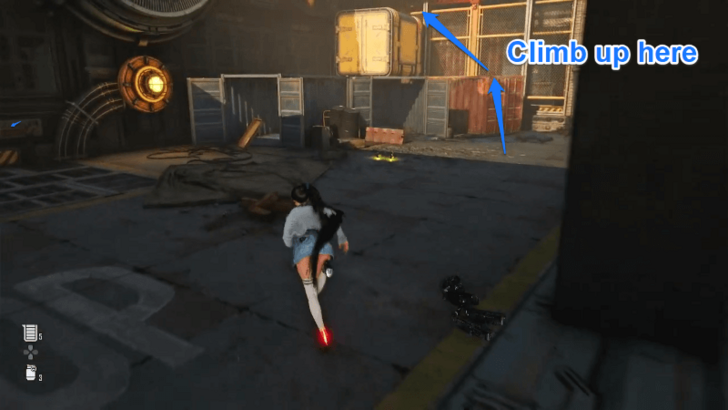
After unlocking the camp past the conveyor, climb up thef freights on the right to get to the next area. |
| 6 | 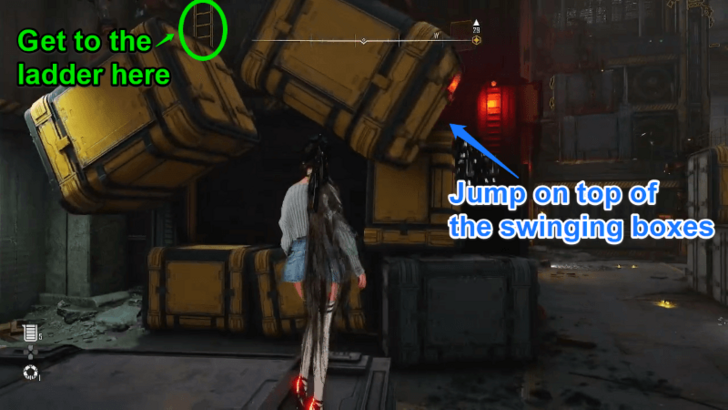
Use the swining boxes to reach the ladder attached high up the wall. |
| 7 | 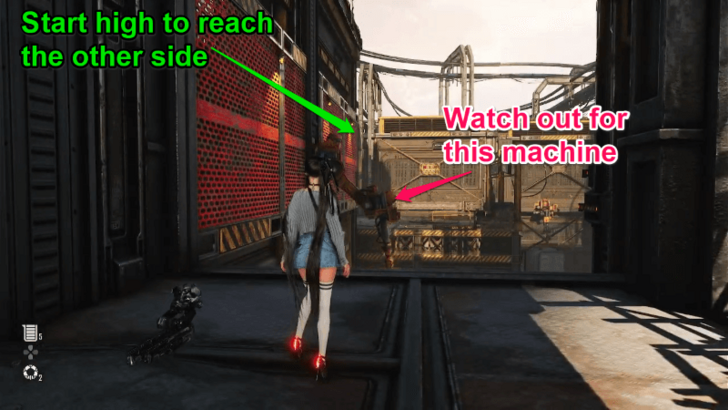
Pass through the series of marked walls to get to the next area. |
| 8 | 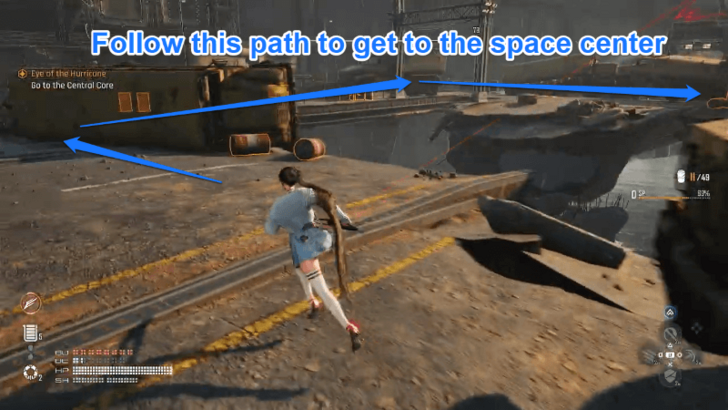
Proceed to the space center while hiding behind the vehicles along the way to prevent getting shot by the turrets in the area. |
| Raphael Space Center Guide | |
| 1 | 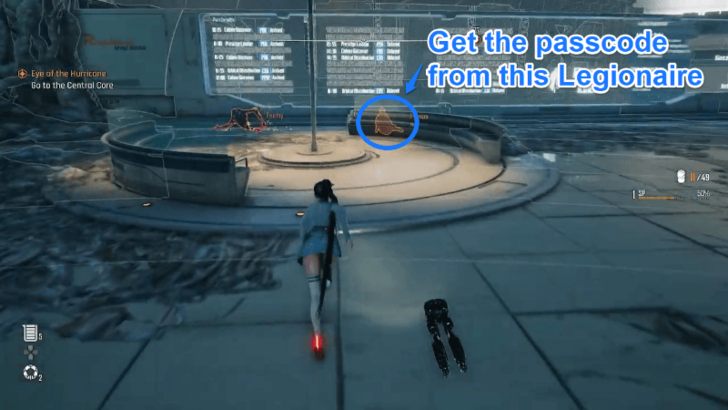
Obtain the Gate 2 passcode from the legionaire sitting behind the counter of the left side. |
| 2 | 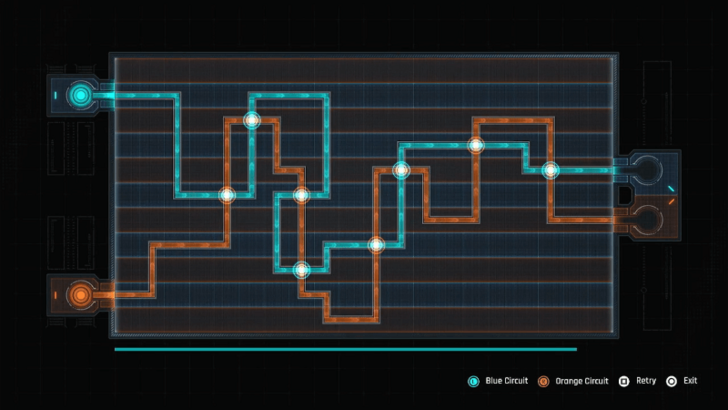
Solve the puzzle in the terminal found inside Gate 2 to supply power to Gate 3. Provide the proper pathing for each power supply within the time limit. |
| 3 | 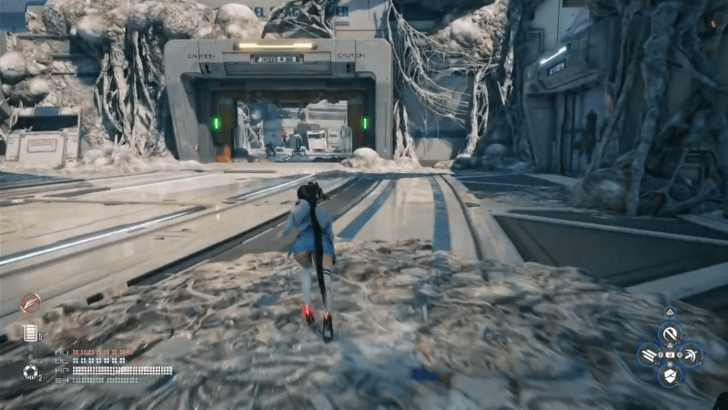
Proceed to Gate 3 while defeating the enemy reinforcements along the way. |
| 4 | 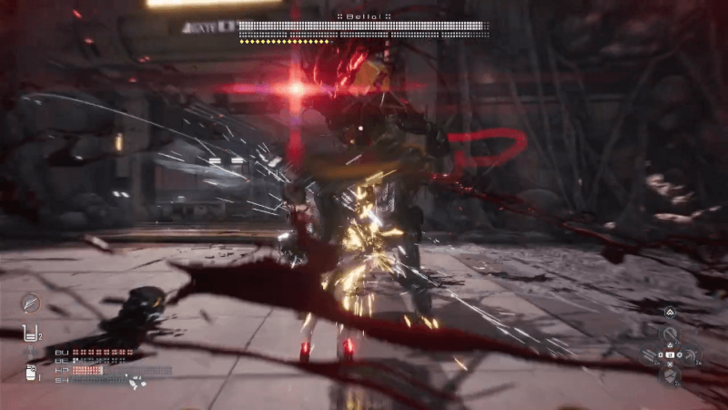
Take Belial down for good. |
| 5 | 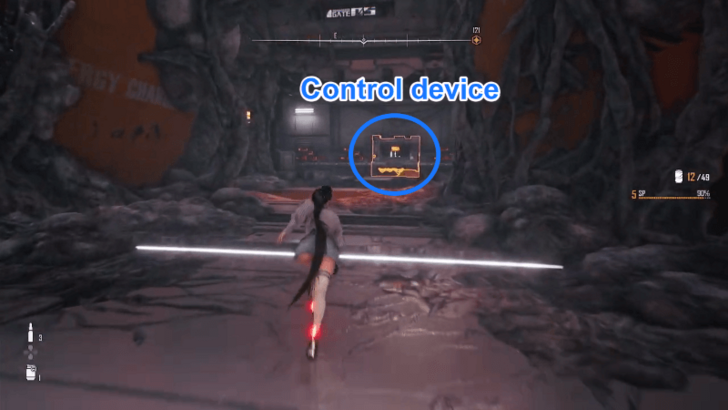
Operate the terminal inside Gate 3 to activate Cargo Lift 121. |
| Cargo Lift 121 Guide | |
| 1 | 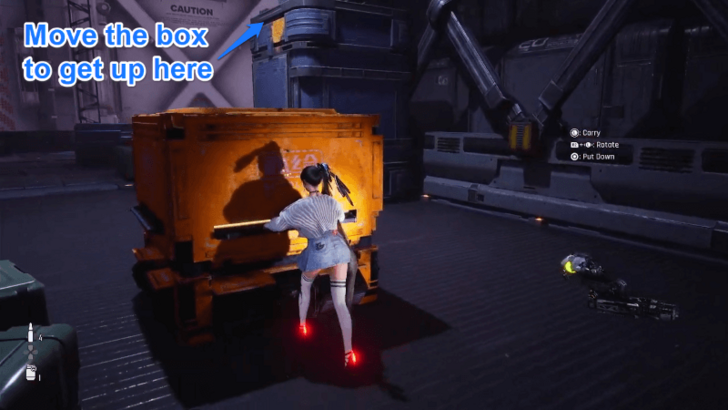
While going up, the cargo lift will stop due to a blockage in the shaft. Take one of the boxes found in the area and position it beside a freight box with a yellow marking to be able to climb up. |
| 2 | 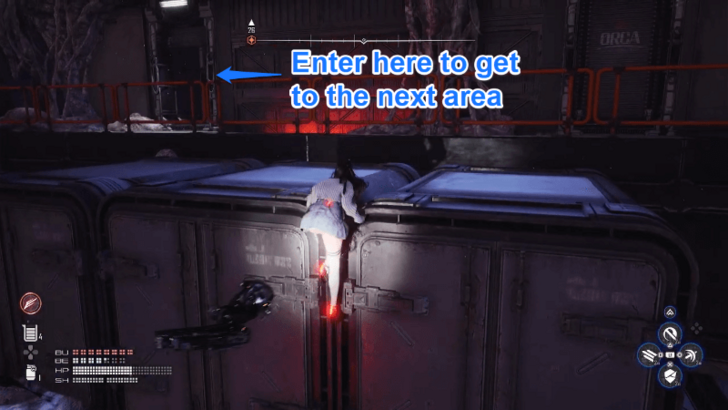
Continue making your way up on the other side of the cargo lift to reach the Maintenance Sector. |
| Maintenance Sector Guide | |
| 1 | 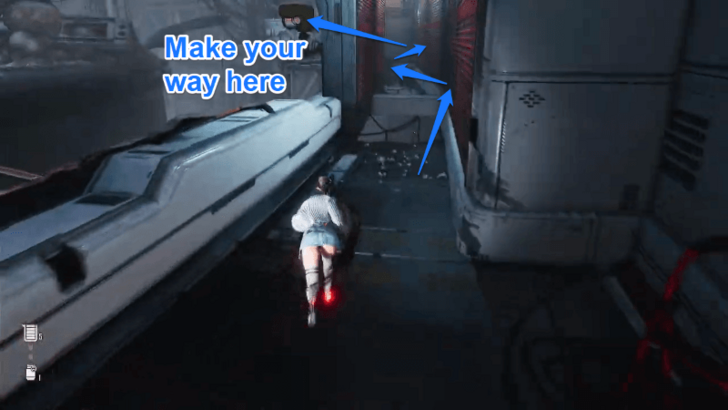
Make your way through the marked walls and onto the ledges on the wall to get to a door that will lead you outside the tower. |
| Tower Outer Wall Guide | |
| 1 | 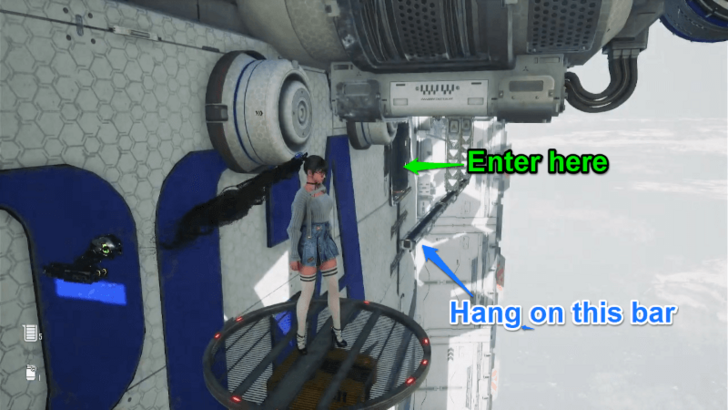
Use the moving platforms and hanging bars to get to a wall opening found on the outer wall. |
| 2 | 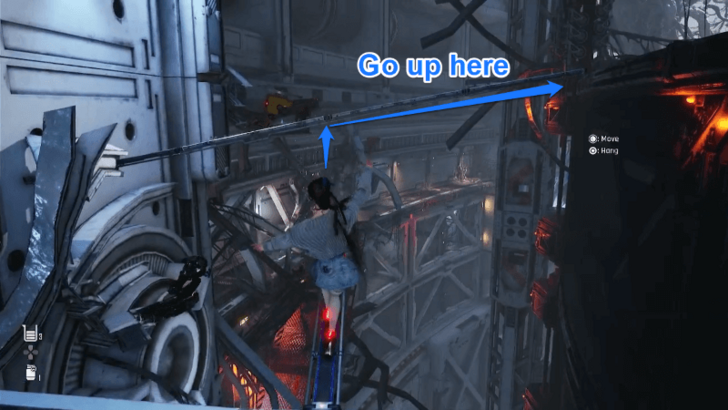
Continue making your way up the Maintenance Sector through the ledges and protruding bars. |
| 3 | 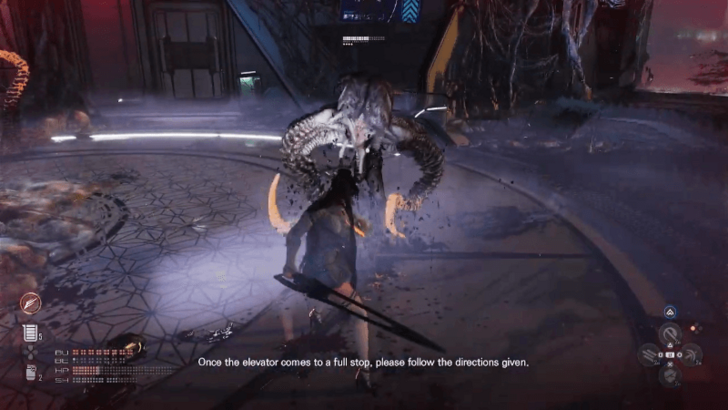
Enter the VIP Room and explore the area. Later on, you'll be invaded by numerous Naytibas that you will need to dispatch off to get to the next area. |
| Prestige Lounge Guide | |
| 1 | 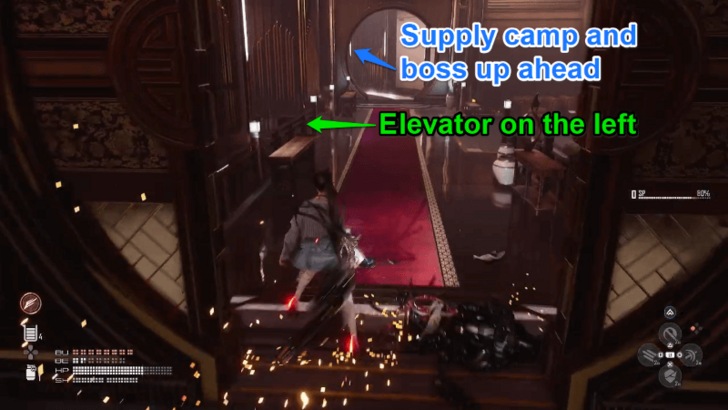
Go to the other side of the Prestige Lounge, where you'll see a Supply Camp and encounter the area boss. |
| Vermillion Garden Guide | |
| 1 | 
Defeat Karakuri. |
| 2 | 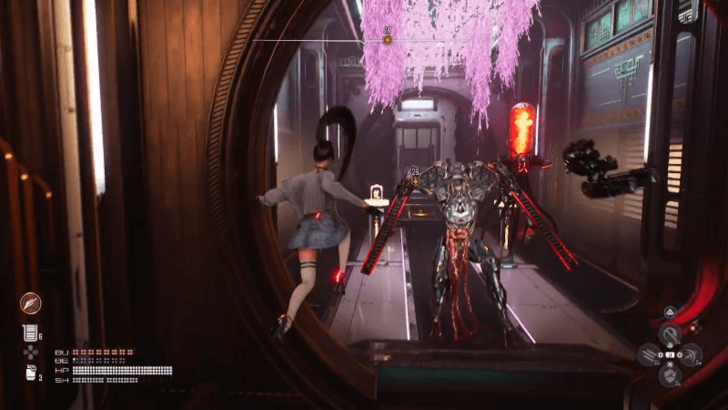
Return to the previous corridor in order to take the passenger lift going to Central Core. |
| High Orbit Station Guide | |
| 1 | 
Due to the poor condition of the Orbit Elevator, it won't be able to reach the Central Core. Head to the door on the left and make your way up by climbing on the ledges until you reach the top floor. |
| Central Core Guide | |
| 1 | 
Defeat Democrawler. |
| 2 | 
Defeat Demogorgon. |
Eye of the Hurricane Mission Guide
Burning Xion Walkthrough
| Main Missions | |
|---|---|
| Previous Mission | Next Mission |
| Xion Guide | |
|---|---|
| 1 | 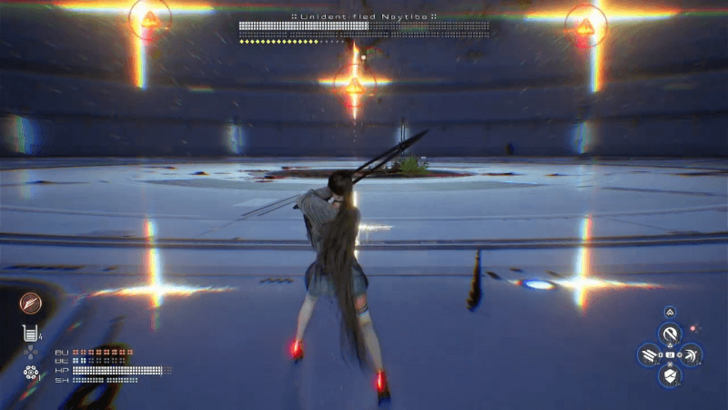
Defeat the Unidentified Naytiba. |
| 2 |  Speak with Lily at the Safehouse and choose to follow the signal of Adam's hover bike. Note: This is the last time that you can visit other regions. Make sure to conclude your business in these areas before pressing on. |
Last Fragment Walkthrough
| Main Missions | |
|---|---|
| Previous Mission | Next Mission |
| Wastelands Guide | |
|---|---|
| 1 | 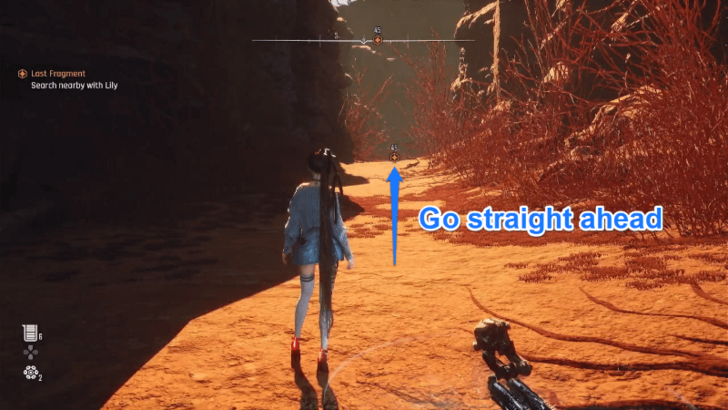
Follow the path leading to the Nest. |
| 2 | 
Defeat Raven. |
Selection of Species Walkthrough
| Main Missions | |
|---|---|
| Previous Mission | Next Mission |
| Nest Guide | |
|---|---|
| 1 | 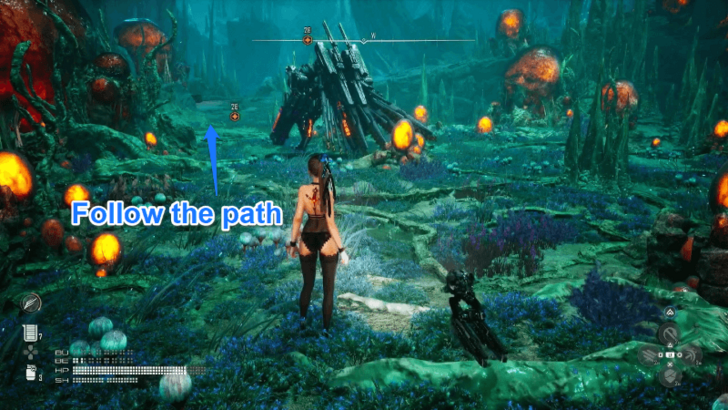
Proceed to the center of the Nest. |
| 2 | 
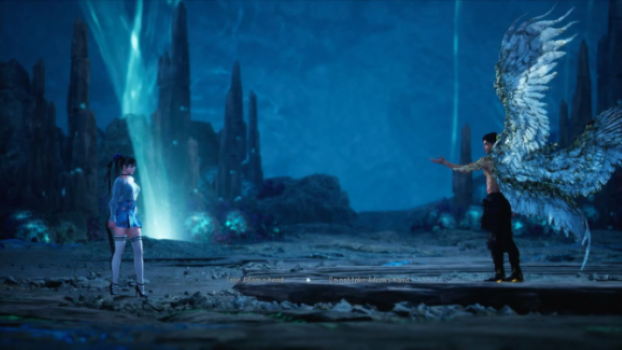
Adam reveals himself as the Elder Naytiba. He tells EVE of his plans to save both Naytibas and Andro-Eidos. You must now decide to accept or refuse Adam's offer. |
Selection of Species Mission Guide
EVE Protocol Walkthrough
| Main Missions | |
|---|---|
| Previous Mission | - |
| Cost of Lost Memories Ending | |
|---|---|
| 1 | 
You chose to take Adam's hand. With your fusion with the Elder Naytiba, the Colony sends a command to the Providence to take you down. Defeat the rampaging robot to see the end of your journey. |
| 2 | 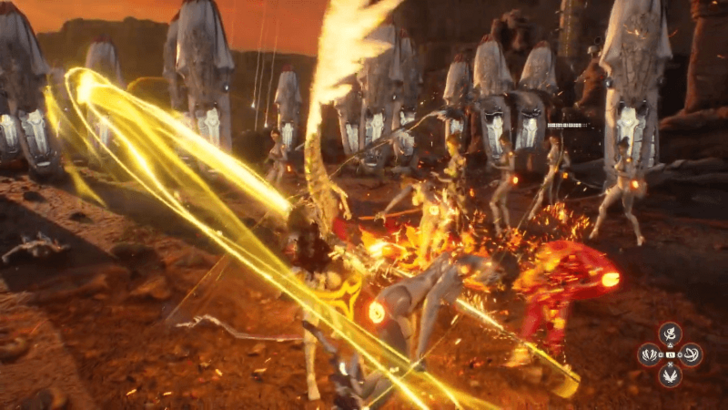
With Lily's death and Mother Sphere's betrayal, EVE takes on the deployed Airborne Squad Members with great hunger for revenge. Fight against the group until the lights disappear. |
| Return to the Colony Ending | |
| 1 | 
You refused Adam's offer. Both of you fight for what you believe in. |
| 2 | 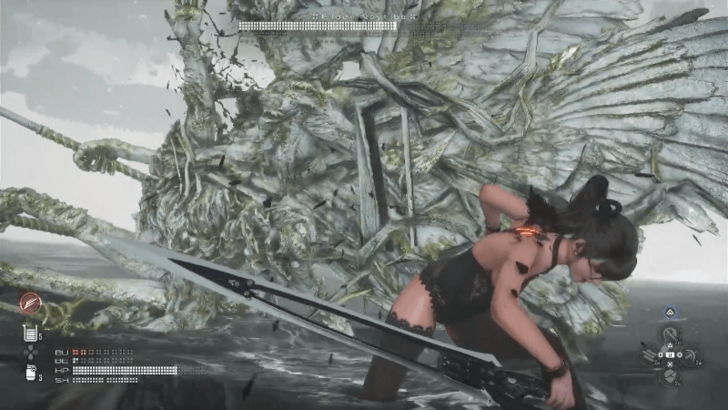
The real battle begins after defeating Adam. Take down the Elder Naytiba in order to fulfill your mission. In this ending, you've chosen to side with Mother Sphere and her ideologies. After defeating the Elder Naytiba, you and Lily will be granted a way back into the colony. |
| Making New Memories Ending | |
| 1 | 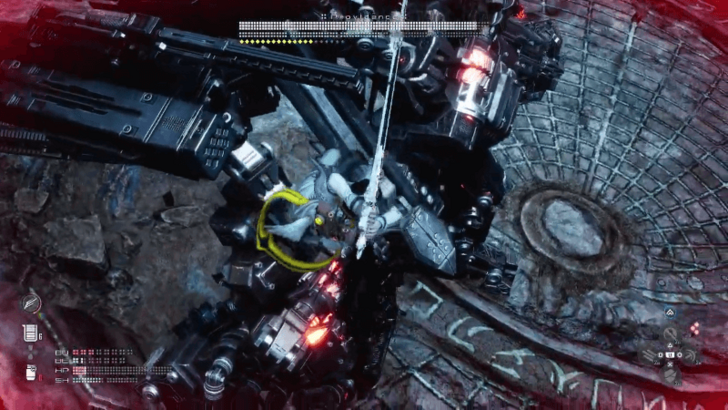
Similar to the Cost of Lost Memories ending, the Providence will start attacking you after your fusion with Adam. However, this time, Lily escapes Providence's grasps. Note: This is the true ending that is only accessible if you reach 100% affinity with Lily before reaching the Orcal's Testimony mission. ▶ How to Increase Lily's Affinity |
| 2 | Again, similar to the Cost of Lost Memories ending, you'll be attacked by Airborne Squad members. Battle with your newfound enemies to see the true ending of your journey. |
All Story Endings
Stellar Blade has three different endings that you can reach by picking certain choices in-game.
These endings shed light on the game's lore, revealing secrets in the storyline and discovering alternate paths that may lead to better or worse outcomes than your first playthrough.
All Post Game Content

| Post Game Content Unlockables |
|---|
Stellar Blade's Post Game unlocks many new features and collectibles, such as new new Outfits, the ability to unlock more Skills, and the New Game+ Feature.
All Side Missions
Side Missions Guide
Side Missions are optional content that Eve can complete to further flesh out the stories of NPCs and the world around EVE during her journey. Completing sidequests will net you several rewards as well as unlocking new features that EVE can use during her journey.
Xion Side Missions
| Side Quest | How to Start |
|---|---|
| The Scavenger's Story | Talk to Kaya after reaching the city of Xion. |
| Urgent Information | Talk to Hugh at the entrance of Xion City. Available after completing the Scavenger's Story Side Quest. |
| Looking at You | Talk to Su after reaching the city of Xion. |
| First Customer | Talk to Kasim. Available after accepting Urgent Information Sidequest. |
| Life of the Scavengers | Talk to Cyrus inside The Last Cup bar in Xion |
| Angel of Death | Talk to the Scavenger near the Alley |
| Stolen Treasure | Talk to Lyle inside his shop |
| The Words of Mother Sphere | Talk to Francis at the Library in Xion |
| Oblivion | Talk to the girl found on the small house located under the bridge at the entrace of Xion. |
| Taboo | Talk to Luther which is found near the bridge leading to the Wastelands in Xion |
| An Unknown Present | Encounter Inn just behind Gwen's Salon. |
| Keeping Secrets | Talk to Enya inside the bar in Xion. |
| A Treasure with a Name | Talk to June while in Xion |
| Memories in the Doll | Talk to Jett in the house full of teddy bears. |
| An Eye for an Eye, a Tooth for a Tooth | Talk to Min, one of the guards near the entrance of the elevator leading to the Great Desert |
| The King of the Tunnel | Talk to Cedric near the vending machine on the alley around Sisters' Junk in Xion |
| Encounter | Talk to Kaya after completing the Alpha SIgnal main mission. You must also have max affection with Kaya to start the quest. |
| An Offer You Can't Refuse | Talk to Roxanne after completing the Alpha Signal main mission. |
| I Won't Forget You | Talk to Beatrice who is idling by at the cross roads on the bridge leading to xion, the tetrapod, and the road to wastelands. |
| Lost Ark | Talk to Mann while on the Presence Chamber. |
| A United People Cannot be Defeated | Interact with the record at the table at the small restaurant in Xion. |
| Let There Be Light Again | Talk to Francis at the library in Xion |
| Madame Machine | After completing CNL - Communicate and Link, return to the Tetrapod. Su and Enya will approach you and initiate the quest. |
| Stubbornness | Talk to Barry in his still at Xion. |
| Barry and Wine | Talk to Barry in his still at Xion. |
| Barry in Trouble | Talk to Barry in his still at Xion. |
Wasteland Side Missions
| Side Quest | How to Start |
|---|---|
| Reboot | Interact with the supply camp on the entrance of the wasteland from Xion. |
| Plan to Clean the Earth | Approach the Scrap Yard and Listen to the Distress Signal |
| CNL - Communicate and Link | Improve D1G-g2r's affinity to 2 and listen to his “Fantabolous Theory”. |
| Incarceration | Talk to Jonny who's hiding in one of the containers in the Eastern Great Canyon. |
All Bulletin Board Requests
Optional Quests Guide
As opposed to Side Missions, Bulletin Board Requests are optional content that is only accessible from the Bulletin Board of the game. The quests posted on the Bulletin Board are from minor/nameless NPCs in the game. Completing these quests can be a good source of Vitcoin and Gold to purchase more items from the game's vendors and unlock new gear and even exteriors.
Bulletin Board Requests List
| Requests | Rewards | How to Unlock |
|---|---|---|
| Sleeping Beauty | ・Gold x 1400 | Unlocked by default |
| Find the Cat | ・Gold x 1000 | Unlocked by default |
| Looking for My Brother | ・Gold x3500 ・Vitcoin x2 |
Unlocked by default |
| Simple Puzzle | ・Gold x3500 ・ Vitcoin x2 |
Unlocked by default |
| Missing Husband | ・Gold x 1000 | Unlocked by default |
| Wisdom Puzzle | ・Gold x1000 ・Queen of Arithmetic Badge |
Unlocked after giving the 2nd Hyper Cell |
| Time for Revenge | ・Gold x 5000 | Unlocked after completing Missing Wife |
| Secret Request | ・Gold x 5000 | Unlocked after completing Missing Wife |
| Generous Drop Pod | ・Gold x 1000 | Unlocked after giving the 2nd Hyper Cell |
| Legion's Secret Stash | ・Gold x 1000 | Unlocked after giving the 2nd Hyper Cell |
| Missing Wife | ・Gold x 1300 | Unlocked after completing Sleeping Beauty |
| Lost Device | ・Gold x 1000 | Unlocked after completing Sleeping Beauty |
| Source of the Nightmare | ・Gold x3600 ・Vitcoin x4 |
Unlocked after completing Wisdom Puzzle |
| Recruit Passcode Specialists | ・Gold x 20000 | Acceptable in the request board after obtaining a “Chapter of Trial” document. |
| Valuable Cargo | ・Gold x2100 ・Vitcoin x2 |
Unlocked after completing Lost Device |
| The Diary's Revenge | ・Gold x 10000 | Unlocked after giving the 2nd Hyper Cell |
| Where's the Item | ・Gold x2500 ・Vitcoin x4 |
Unlocked after completing Alpha Signal |
| Lurker Hunt | ・Gold x 4600 | Unlocked after completing Alpha Signal |
| Precious Hunter | ・Gold x 1000 | Unlocked after completing Where's the Item |
| The Last Wine | ・Gold x 2000 | Unlocked after giving the 2nd Hyper Cell |
| Wife's Water Tank | ・Gold x 2000 ・Vitcoin x4 |
Unlocked after the Looking Glass sidequest |
| Unforgettable Fish Dish | ・Gold x 3000 | Unlocked after the Wife's Water Tank sidequest |
| Fish Research | ・Gold x 4000 | Unlocked after the Unforgettable Fish Dish sidequest |
| A Gift for a Fishing Maniac | ・Gold x 5000 | Unlocked after the Fish Research sidequest |
| Where is the Fantastic Bait | ・Gold x 6000 | Unlocked after the A Gift for a Fishing Maniac sidequest |
| The Fish of Legends | ・Gold x 7000 | Unlocked after Where is the Fantastic Bait sidequest |
| Photography Club | FourSeconds Everyday | Unlocked by default |
| Like Butterflies | FourSeconds Black Denim | Unlocked after completing the Photography Club |
How Long is the Story?
Main Story Will Take 25 Hours to Complete
Based on Ruliweb's interview (External Link) with Shift Up's CEO, Kim Hyeong-tae, you can expect to finish the main campaign in around 25 hours of playtime. However, if you aim to get all collectibles and achievements, you can easily bump that number up to around 30 to 50 hours in total.
All Story Difficulties
Available Game Modes
| Modes | How to Unlock |
|---|---|
| Story | Unlocked by default |
| Normal | Unlocked by default |
These are the difficulties that are available right from the start of the game. Both offer the same content and progression, with the Normal Mode being slightly more difficult due to fiercer enemy encounters.
Stellar Blade Story Plot
Mission to Restore Civilization
Set on a post-apocalyptic Earth, Eve, a member of the 7th Airborne Squad, is tasked with a mission to search for and kill the infamous Elder Naytiba in an attempt to restore what little is left of civilization.
In this journey, you'll encounter numerous foes and allies that will drive you towards your goal in a thrilling action-combat RPG experience!
Play as EVE and Exterminate the Naytibas

Eve is a doll-like entity and their purpose is the extermination of the Naytibas, Alien creatues that have taken over the civilization.
Stellar Blade Related Guides

Stellar Blade Story Walkthrough
All Stellar Blade Guides
| Stellar Blade Wiki Contents | |
|---|---|
 News News |
 Missions Missions |
 Tips and Tricks Tips and Tricks |
 Combat Tips and Tricks Combat Tips and Tricks |
 Enemy Naytiba Enemy Naytiba |
 Items Items |
 Exterior (Outfits) Exterior (Outfits) |
 Exospines Exospines |
 Gear Gear |
 Skills Skills |
 Collectibles Collectibles |
 Maps and Locations Maps and Locations |
 Characters Characters |
 Puzzles Puzzles |
 Hairstyles Hairstyles |
 Fishing Fishing |
 Shops Shops |
 NieR: Automata DLC NieR: Automata DLC |
 Nikke DLC Nikke DLC |
|
Comment
Author

Stellar Blade Story Walkthrough
Rankings
- We could not find the message board you were looking for.
Gaming News

![Star Savior Review [First Impressions] | Engaging, Entertaining, and Expensive](https://img.game8.co/4447603/8f500e9bf666bdb8adb1af478e9dfdbd.png/show)


Popular Games

Genshin Impact Walkthrough & Guides Wiki
Umamusume: Pretty Derby Walkthrough & Guides Wiki
Crimson Desert Walkthrough & Guides Wiki
Monster Hunter Stories 3: Twisted Reflection Walkthrough & Guides Wiki
Honkai: Star Rail Walkthrough & Guides Wiki
Pokemon Pokopia Walkthrough & Guides Wiki
The Seven Deadly Sins: Origin Walkthrough & Guides Wiki
Wuthering Waves Walkthrough & Guides Wiki
Zenless Zone Zero Walkthrough & Guides Wiki
Arknights: Endfield Walkthrough & Guides Wiki


Recommended Games
Fire Emblem Heroes (FEH) Walkthrough & Guides Wiki
Diablo 4: Vessel of Hatred Walkthrough & Guides Wiki
Cyberpunk 2077: Ultimate Edition Walkthrough & Guides Wiki
Yu-Gi-Oh! Master Duel Walkthrough & Guides Wiki
Super Smash Bros. Ultimate Walkthrough & Guides Wiki
Pokemon Brilliant Diamond and Shining Pearl (BDSP) Walkthrough & Guides Wiki
Elden Ring Shadow of the Erdtree Walkthrough & Guides Wiki
Monster Hunter World Walkthrough & Guides Wiki
The Legend of Zelda: Tears of the Kingdom Walkthrough & Guides Wiki
Persona 3 Reload Walkthrough & Guides Wiki


All rights reserved
© 2024 SHIFT UP Corporation. All rights reserved. Published by Sony Interactive Entertainment Inc.
The copyrights of videos of games used in our content and other intellectual property rights belong to the provider of the game.
The contents we provide on this site were created personally by members of the Game8 editorial department.
We refuse the right to reuse or repost content taken without our permission such as data or images to other sites.