Eye of the Hurricane Mission Guide
Eye of the Hurricane is the eleventh main mission in Stellar Blade. Read our guide for a full walkthrough on how to complete Eye of the Hurricane, including all passcode and important item locations in Spire 4, as well as enemies encountered and boss fight tips!
| ◄ Previous Mission | Next Mission ▶ |
|---|---|
| Secret Garden | Burning Xion |
Eye of the Hurricane Mission Summary
 |
|
|---|---|
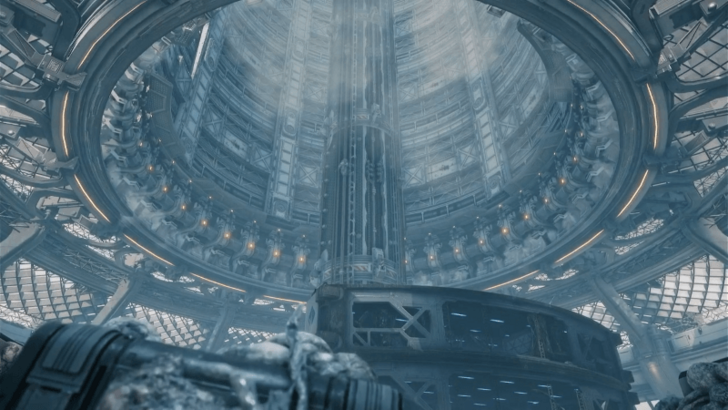
| The crew makes its way to the Orbit Elevator to reach the Central Core, located in outer space. Little did they know that they're about to face their biggest threat yet. | |
| Objectives | 1. Go to the Central Core
2. Defeat Alpha Naytiba Demogorgon |
| Bosses | •
 Belial •
 Karakuri • Democrawler • Demogorgon |
| Locations | • Orca Space Complex
• Hypertube • Space Logistics Complex • Raphael Space Center • Cargo Lift 121 • Maintenance Sector • Tower Outer Wall • Prestige Lounge • Vermillion Garden • High Orbit Station • Central Core |
Naytiba Enemies in Eye of the Hurricane
| Enemies |
 Broken Droid |
 Aid Drone |
 Kokeshi |
|---|---|---|
 Machine Hive |
 Houndborg |
 Sentryborg |
 Droid |
 Heavy Droid |
 Battle Droid |
Eye of the Hurricane Walkthrough
Orca Space Complex Walkthrough
| # | Orca Space Complex Objectives |
|---|---|
| 1 | Follow the Path Leading to the Orbit Elevator |
| 2 | 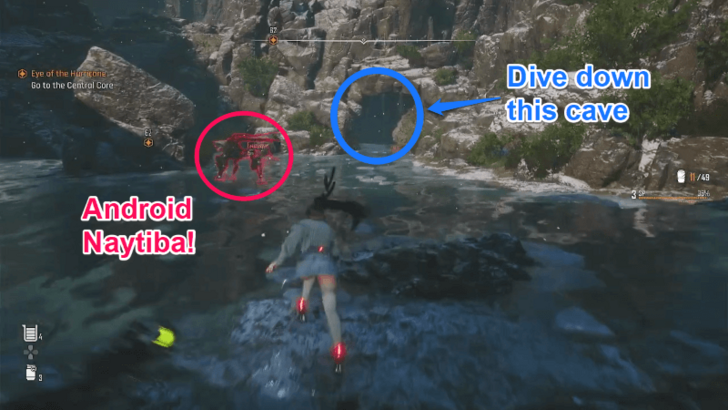 Dive Through the Cave As you follow the path going to the Orbit Elevator, you'll see a small cave filled with water. Dive into it to get to the other side. |
| 3 | 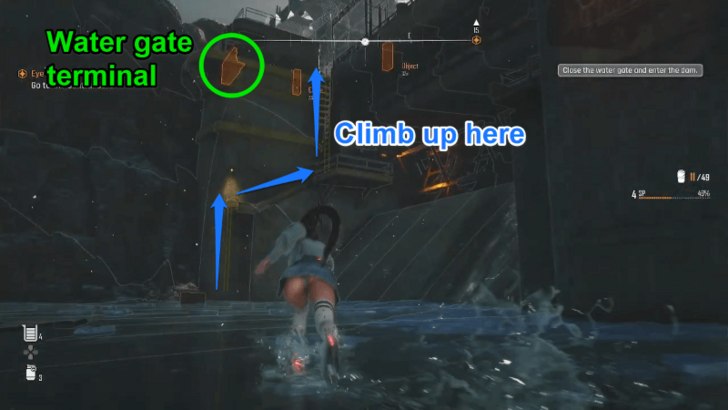 Close the Floodgate To get through the area, you must first close the water gate to reveal the path leading to the passcode. Climb on the set of ladders located on the left side of the wall to find the terminal that closes the water gate. ▶ List of Passcodes |
| 4 | Unlock the Camp near the Floodgate |
| 5 | 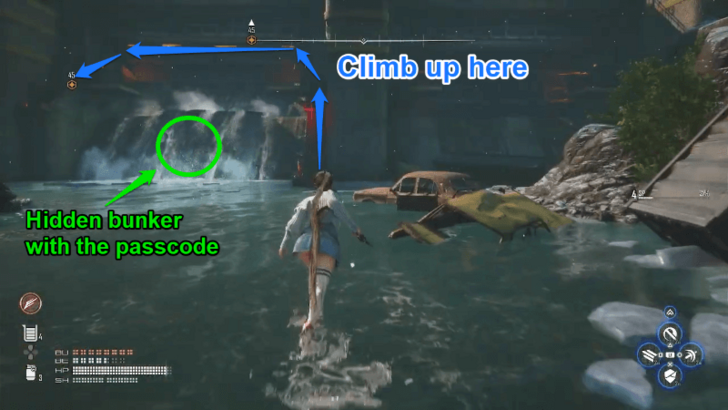 Obtain the Passcode Once the water gate has been closed, a bunker hidden behind the flowing water will be revealed. Enter the bunker to get the passcode from the Legionaire; however beware of the Naytiba waiting to pounce on you inside. After you get the passcode, make your way up the water gate to open the locked door. ▶ List of Passcodes |
| 6 | 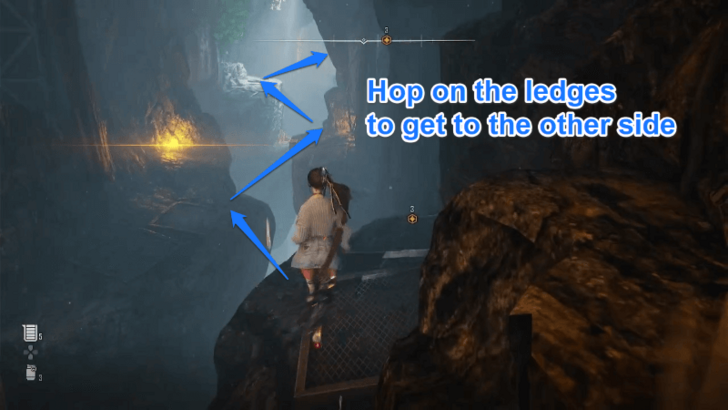 Hop on the Ledges At some point within the cave following the water gate, you'll encounter an area with a crevice in the middle. Jump to the ledges on the sides to proceed. |
Hypertube Walkthrough
| ◄ Previous Section | Next Section ▶ |
|---|---|
| Orca Space Complex | Space Logistics Complex |
| # | Hypertube Objectives |
|---|---|
| 1 | 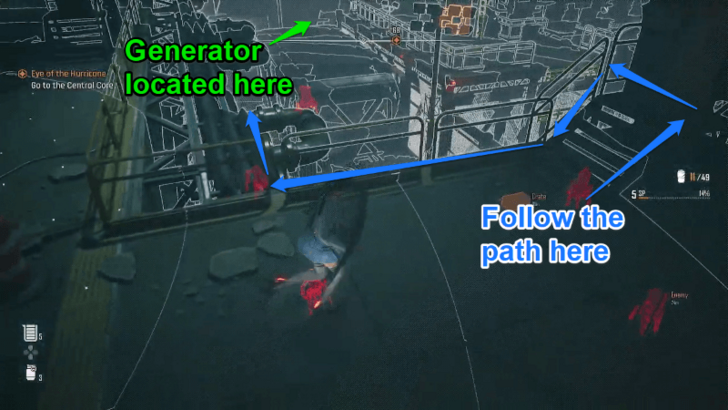 Switch the Generator on Upon entering the Hypertube facility, look for the generator to get the power link device started. You will find this on the left side of the lower floor. Take the ladder in front of you and follow the path below. |
| 2 | 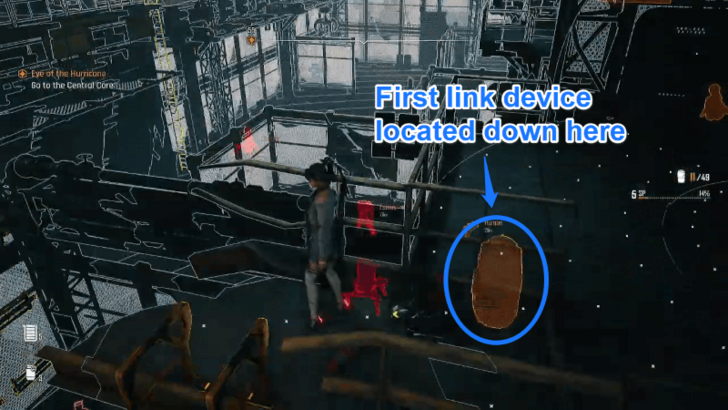 Turn on the First Link Device After turning on the generator, you must now find three link devices to power up the Hypertube. You can find the first link device on the right side of the lower floor. Climb back up to the first area and jump over the wall to get there. |
| 3 | 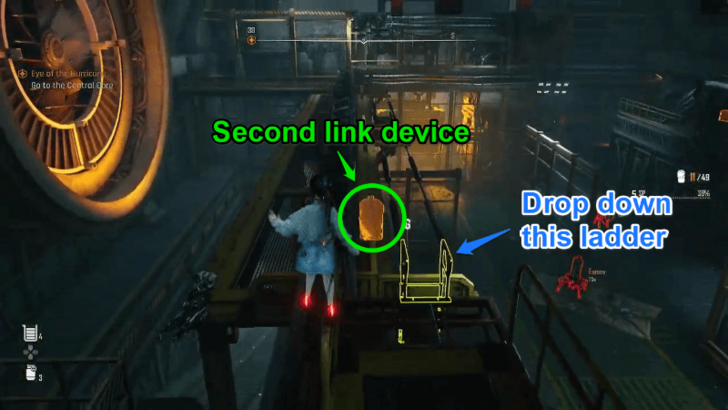 Turn on the Second Link Device The second link device can be found in the left end corner of the lower floor. |
| 4 | 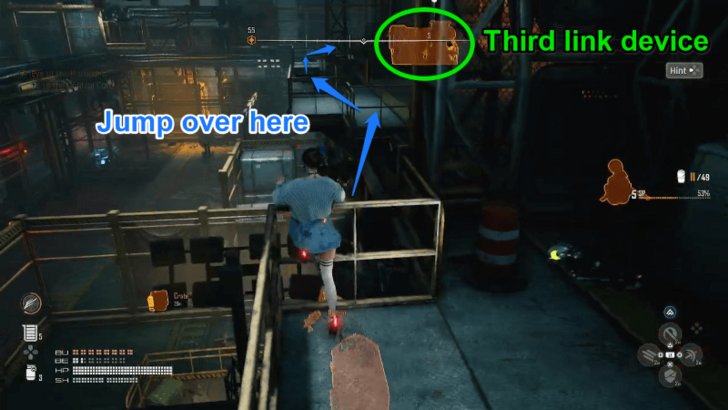 Turn on the Third Link Device The last link device can be found in an area above the first link device. Make your way back up, and then jump over the metal railings to get to the area. |
| 5 | 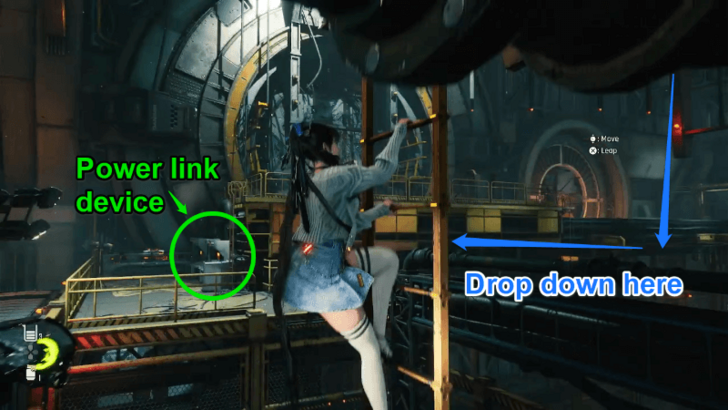 Operate the Power Link Device Once you've activated all the link devices, head to the power link device to get the Hypertube running. |
| 6 | 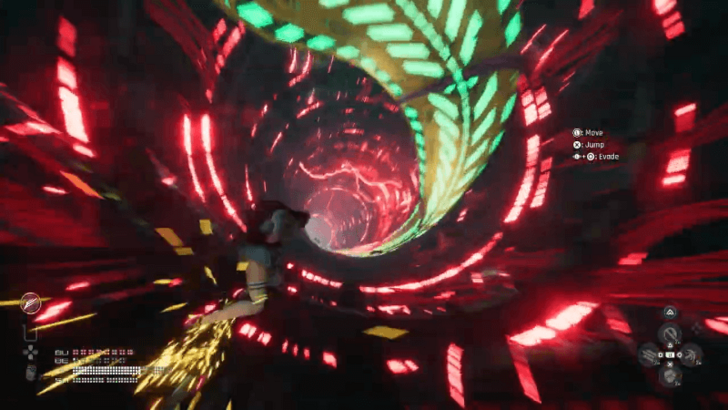 Surf Through the Hypertube Entering the Hypertube will lock you into a surfing animation. The goal is to avoid obstacles within the tube so you can safely reach the other side. |
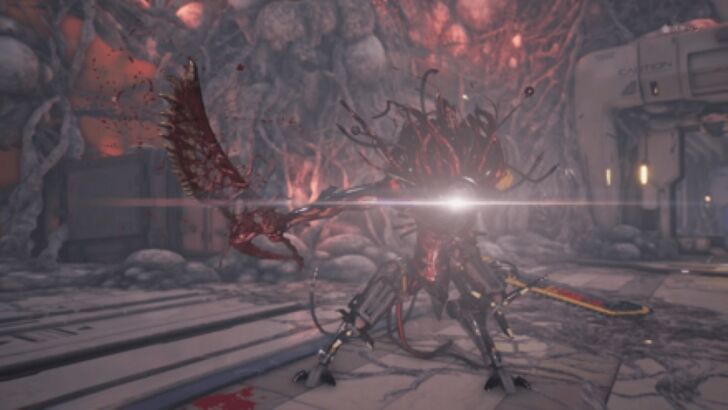
| 7 | 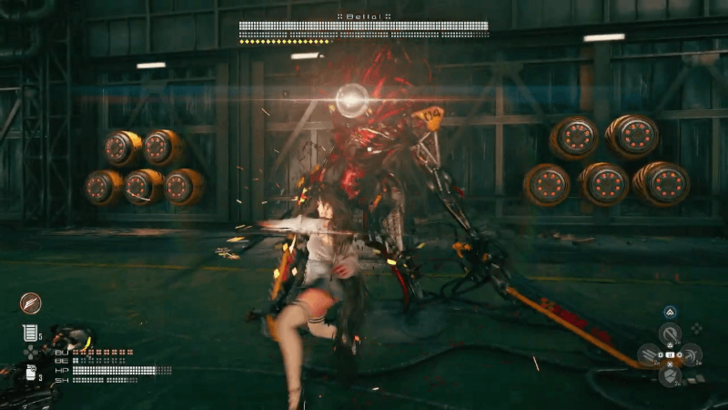 Fight Belial While traveling through the Hypertube, you'll be ambushed by an Elite Naytiba called Belial. In this first encounter, Belial will escape once his HP goes down to around 70%. ▶ How to Defeat Belial |
| 8 | Unlock the Supply Camp After the Battle |
Space Logistics Complex Walkthrough
| ◄ Previous Section | Next Section ▶ |
|---|---|
| Hypertube | Raphael Space Center |
| # | Space Logistics Complex Objectives |
|---|---|
| 1 | Shoot the Hanging Freight to Destroy the Turret |
| 2 | 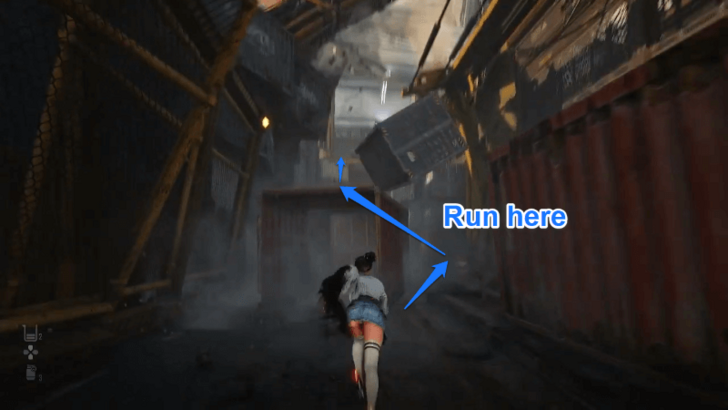 Dodge the Falling Freights After destroying the Plasma Turret, the first area of the complex will begin to collapse. Make your way through the falling freights by sprinting towards the right and then jumping on the fallen pillar on the left. |
| 3 | 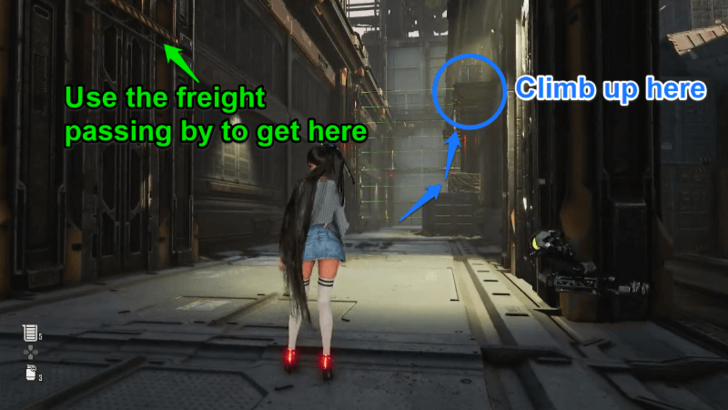 Climb up the Ladder on the Right Climb to the ladder located on your right to get to a small hanging platform. Once you're on top, jump on the passing freight to get to the ledges on the opposite wall. |
| 4 | 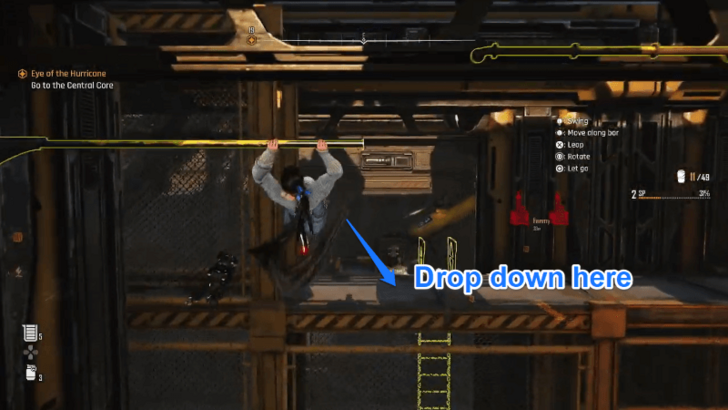 Jump on the Next Moving Freight Climb up the ledges and onto the horizontal bars. Move towards the left until you reach a small opening you can jump to. Similar to the first area, jump on the moving freight to reach the supply camp located on your left. |
| 5 | Unlock the Camp in the Middle of the Complex |
| 6 | 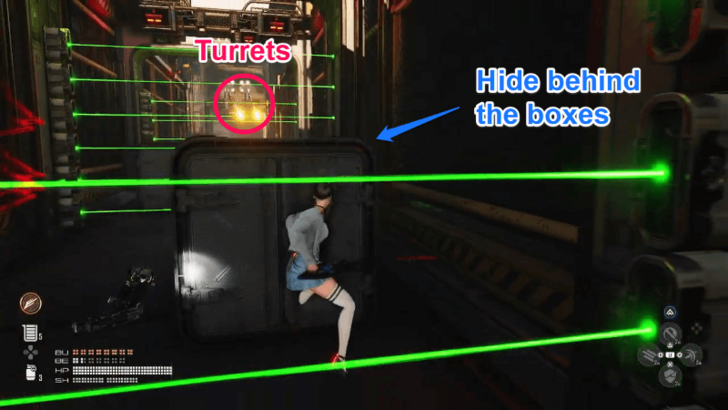 Pass Through the Conveyor System Make your way through the conveyor system while avoiding the green lasers which will activate the plasma turrets that can instantly kill you. To do so, simply hide beside the metal boxes as they pass through the lasers. The correct path to get out of the conveyor is as follows: Turn right > Turn right > Turn left climbing up > Turn left towards the exit |
| 7 | Unlock the Supply Camp Past the Conyevor |
| 8 | 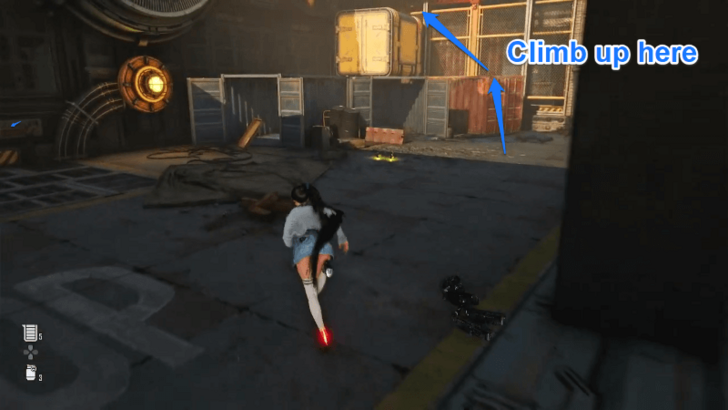 Climb up the Stack of Freights After unlocking the camp, make your way up the next area by climbing on top of the stacked freights. Use the hanging rope on top to get to the next area. |
| 9 | 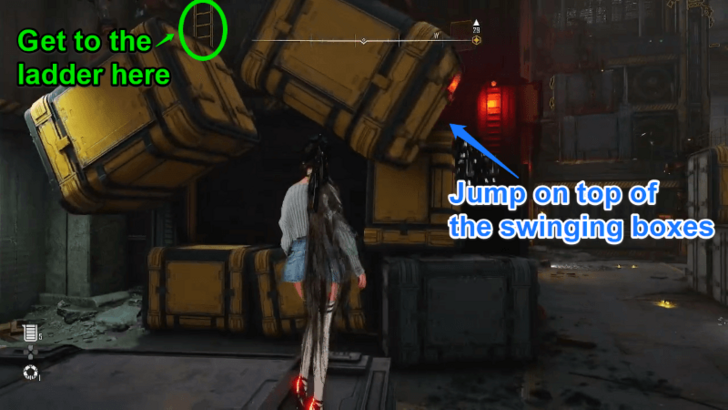 Use the Swinging Boxes to Reach the Ladder Jump past the swinging boxes to get to a ladder located high on the wall. Continue on that path until you reach the area with marked walls you can run through. |
| 10 | 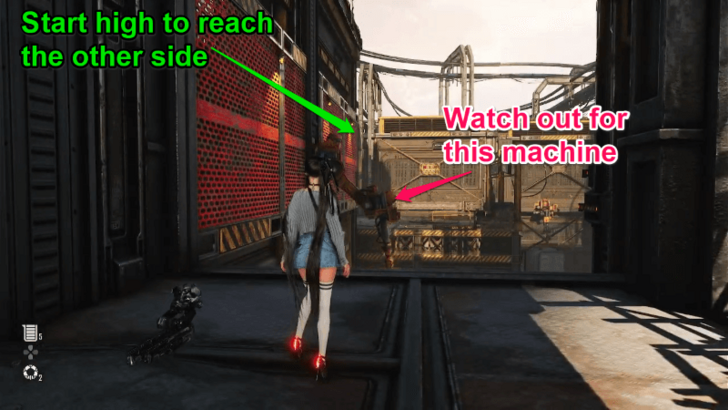 Run Through the Marked Wall Run through the series of marked walls to get to the next area. Avoid getting hit by the machine moving vertically in the middle of the final set of walls. |
| 11 | 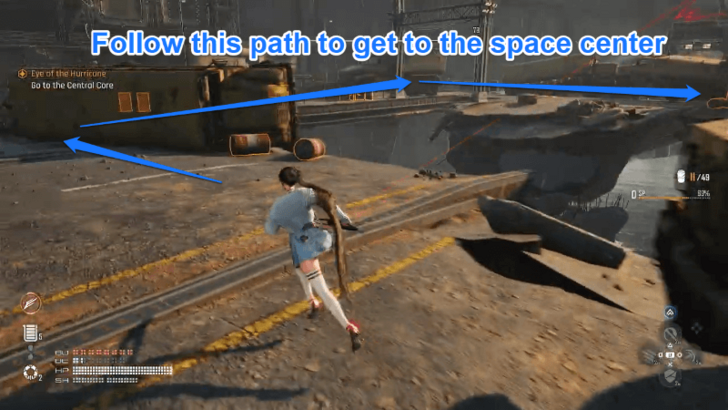 Make Your Way to the Space Center Run through the open space while using the vehicles as cover against the firing turrets. Head towards the left to get to the space center. |
| 12 | Unlock the Camp Inside the Center |
Raphael Space Center Walkthrough
| ◄ Previous Section | Next Section ▶ |
|---|---|
| Space Logistics Complex | Cargo Lift 121 |
| # | Raphael Space Center Objectives |
|---|---|
| 1 | 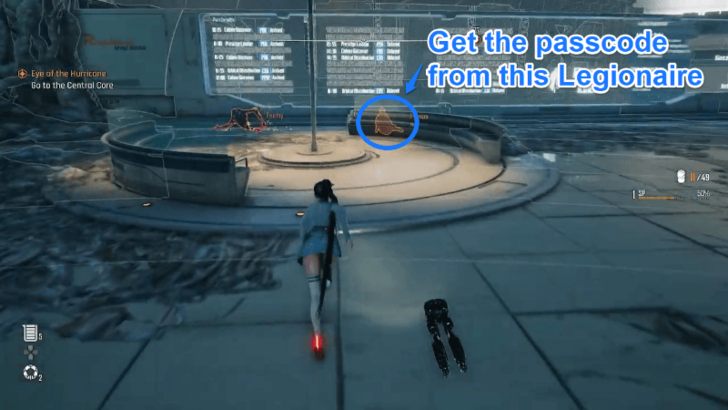 Obtain the Gate 2 Passcode Head inside the space center, and in front of you, around the left side area, you will see a fallen legionaire sitting behind a counter. Approach this legionaire to get the passcode for the locked gate on the left side of the center. ▶ List of Passcodes |
| 2 | Defeat the Naytibas Inside the Terminal |
| 3 | 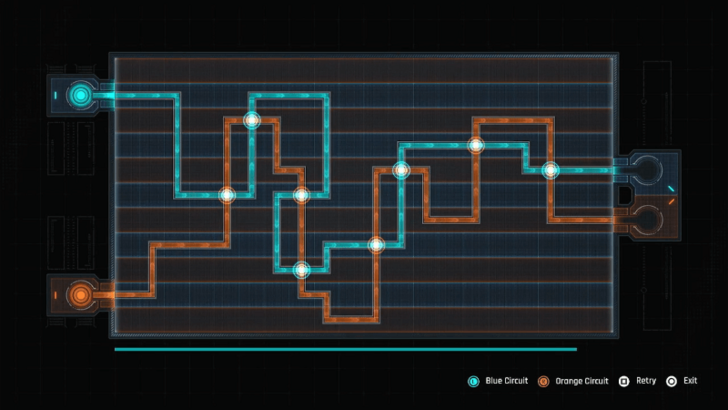 Solve the Gate 2 Puzzle After dealing with the Naytibas inside the terminal, approach the device found on the left. This will present you with a puzzle you must solve to open the next gate. Solve the puzzle by connecting the wires to the other side. Do this while making sure that the wires similar to the color of the circle at each intersection pass through first. Complete the task within the time limit to succeed. |
| 4 | 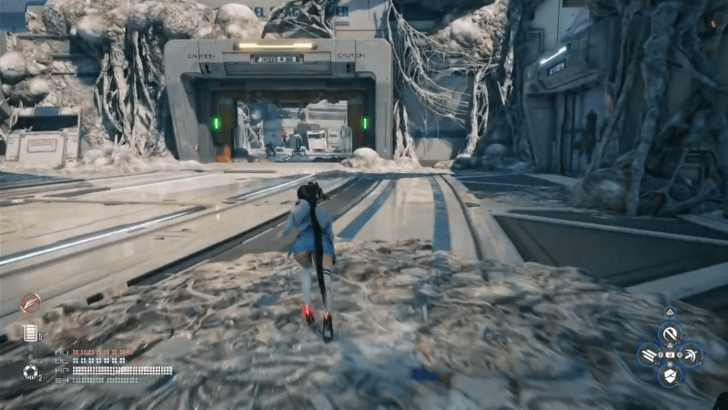 Make Your Way to Gate 3 After solving the puzzle, now make your way to Gate 3, which is located on the opposite side of the gate you're at. Follow the path leading to the end of that gate while dealing with enemy reinforcements along the way. |
| 5 | Unlock the Supply Camp near Gate 3 |
| 6 | 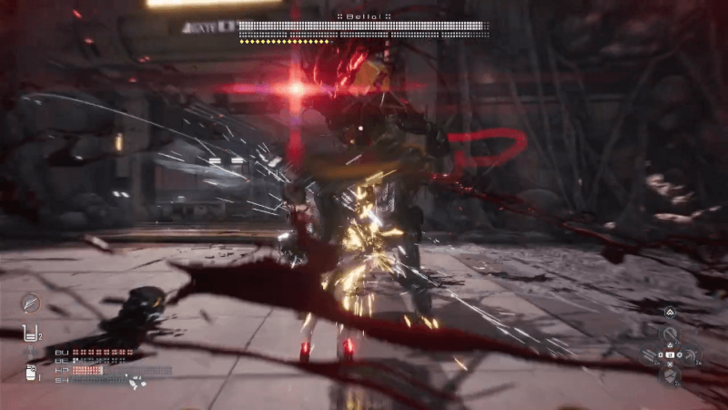 Defeat Belial Face Belial for a second time. In this encounter, however, you must take him down in order to proceed. ▶ How to Defeat Belial |
| 7 | 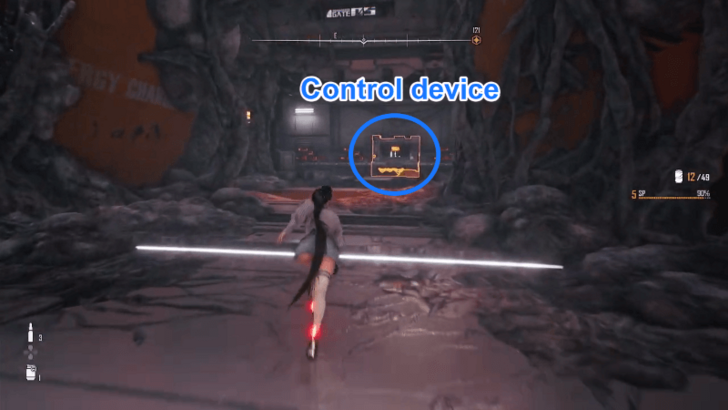 Power up the Elevator Leading to the Cargo Lift Once you've defeated Belial, turn on the control device found nearby. This will activate the lift located in the previous area, which will take you up the space center. |
Cargo Lift 121 Walkthrough
| ◄ Previous Section | Next Section ▶ |
|---|---|
| Raphael Space Center | Maintenance Sector |
| # | Cargo Lift 121 Objectives |
|---|---|
| 1 | Take the Cargo Lift Going Up |
| 2 | Unlock the camp Inside the Lift |
| 3 | 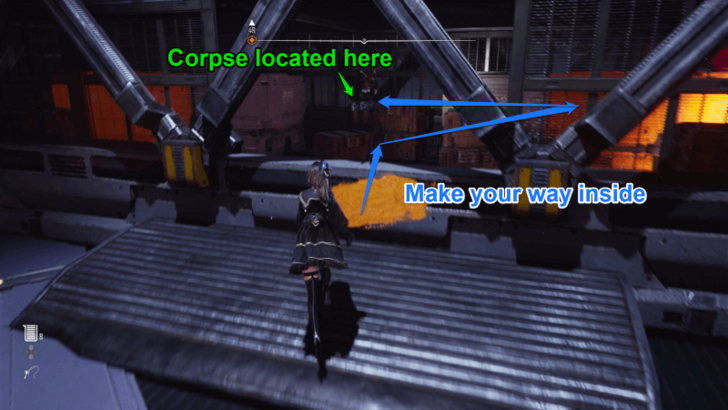 Obtain the Credentials to Open the Door After unlocking the camp inside the Cargo Lift, make your way into the middle area of the lift through the yellow movable contrainers. Here you'll find a corpse holding the credentials to open the door going up the second floor. |
| 4 | 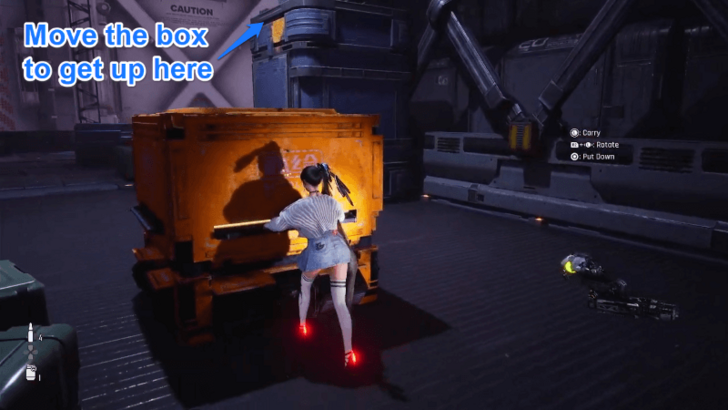 Make Your Way up the Cargo Lift While going up, the cargo lift will stop due to a blockage in the shaft. Take one of the boxes found in the area and position it beside a freight box with a yellow marking. Follow the path going up until you reach the other side of the cargo lift. |
| 5 | 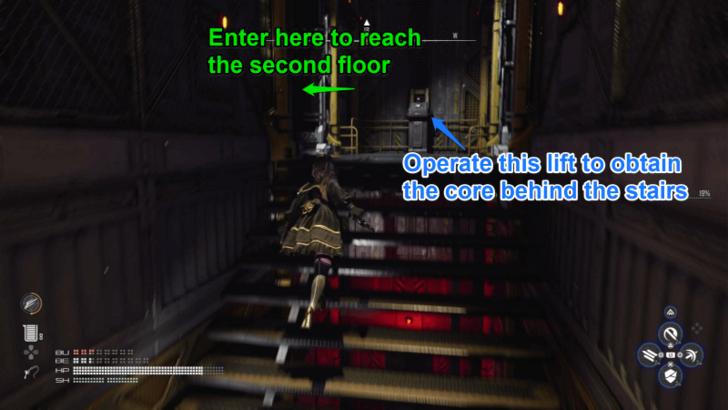 Proceed to the Second Floor of the Lift Continue making your way up on the other side of the cargo lift while dealing with enemies along the way until you reach the Maintenance Sector. |
Maintenance Sector Walkthrough
| ◄ Previous Section | Next Section ▶ |
|---|---|
| Cargo Lift 121 | Tower Outer Wall |
| # | Maintenance Sector Objectives |
|---|---|
| 1 | Unlock the Camp in the Sector |
| 2 | 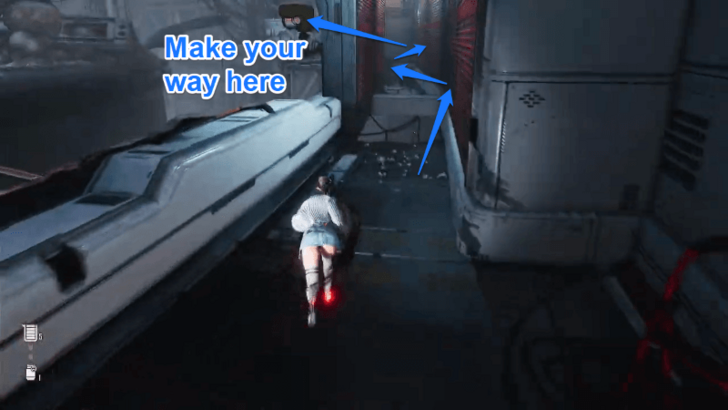 Make Your Way Outside After unlocking the camp, pass through the marked walls and onto the ledges attached to the wall to get to a door that will take you outside of the tower. |
Tower Outer Wall Walkthrough
| ◄ Previous Section | Next Section ▶ |
|---|---|
| Maintenance Sector | Passenger Lift 161 |
| # | Tower Outer Wall Objectives |
|---|---|
| 1 | 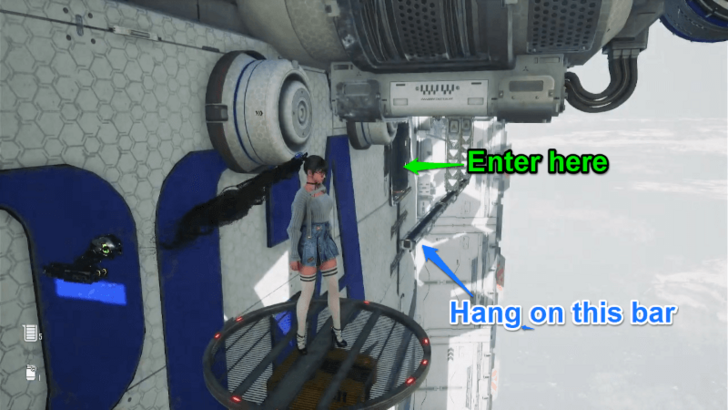 Traverse Through the Outer Wall Make use of the moving platforms to get to the wall opening on your left. This path will allow you to continue climbing up the maintenance sector. |
| 2 | 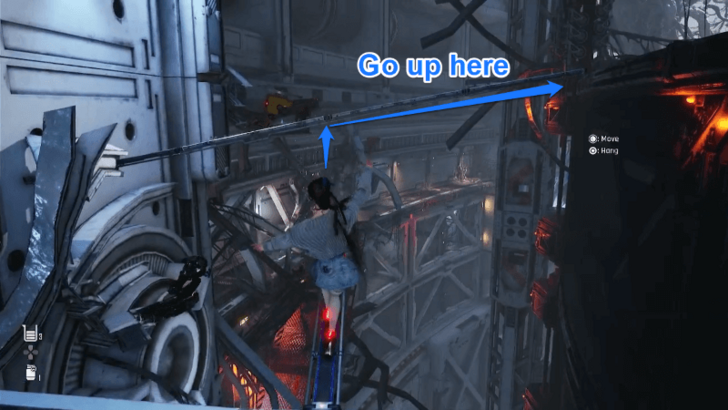 Make your Way to the Passenger Elevator Through the ledges and protruding metal bars, continue going up the tower until you reach the platform on top. |
| 3 | Look Around the VIP Room |
Passenger Lift 161 Walkthrough
| ◄ Previous Section | Next Section ▶ |
|---|---|
| Tower Outer Wall | Prestige Lounge |
| 1 | 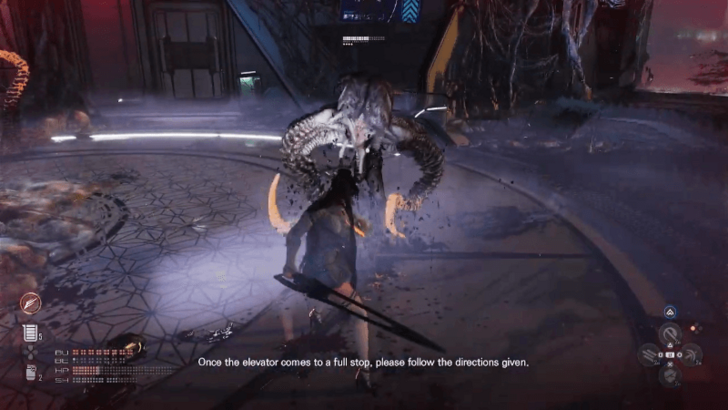 Defeat the Enemies that Spawn With Arisa's guidance, make your way up the VIP room. At the top floor, Naytibas will get inside the lift and attack you. Take them down and proceed to the next area. |
| 2 | 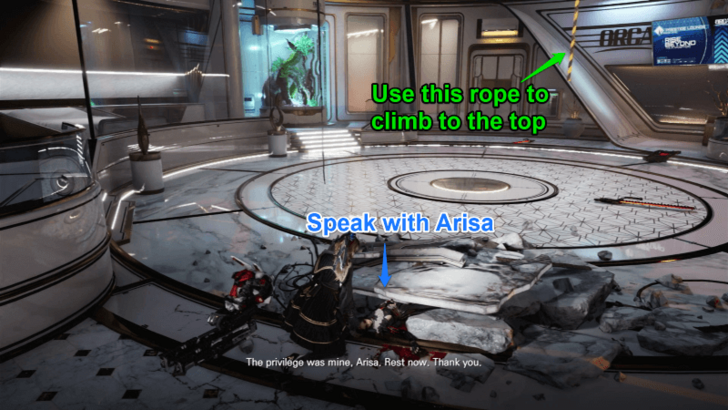 Climb to the Top Floor of the Passenger Lift Use the hanging rope brought about by the invading Naytibas to reach to the top floor and get to the Prestige Lounge. |
Prestige Lounge Walkthrough
| ◄ Previous Section | Next Section ▶ |
|---|---|
| Passenger Lift 161 | Vermillion Garden |
| # | Prestige Lounge Objectives |
|---|---|
| 1 | 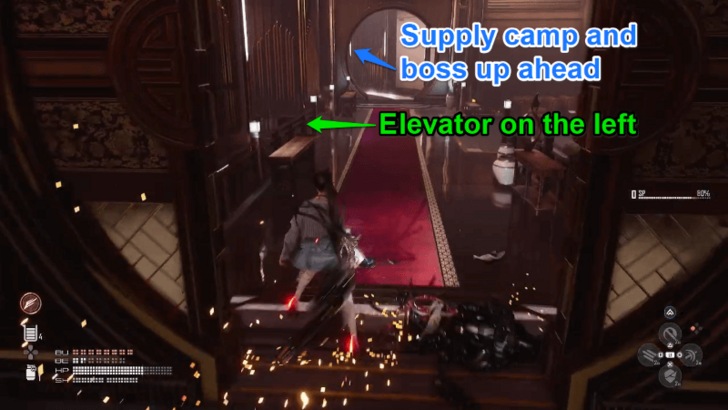 Reach the Other End of the Lounge Proceed to the other end of the lounge until you reach a supply camp. Rest there before proceeding to the next room, which will take you to the area boss. |
| 2 | Unlock the Supply Camp to the Right |
Vermillion Garden Walkthrough
| ◄ Previous Section | Next Section ▶ |
|---|---|
| Prestige Lounge | High Orbit Station |
| # | Vermillion Garden Objectives |
|---|---|
| 1 | Defeat Karakuri Entering the Vermillion Garden, players will encounter Karakuri. Defeat it to progress further. ▶ How to Defeat Karakuri |
| 2 | 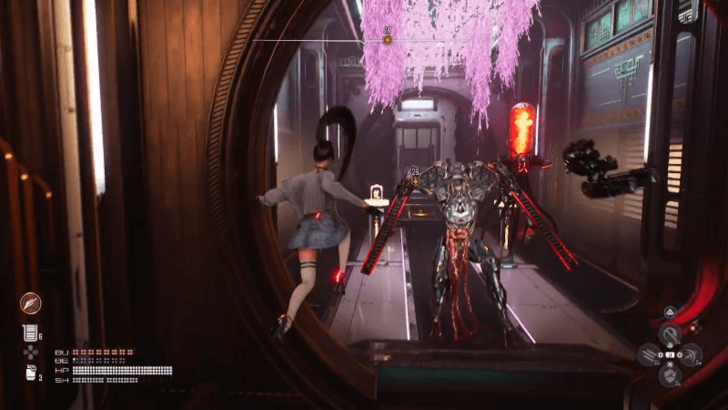 Take the Elevator Going Up the Central Core After defeating Karakuri, head back to the previous area to take the elevator that will take you to Central Core. |
High Orbit Station Walkthrough
| ◄ Previous Section | Next Section ▶ |
|---|---|
| Vermillion Garden | Central Core |
| # | High Orbit Station Objectives |
|---|---|
| 1 | 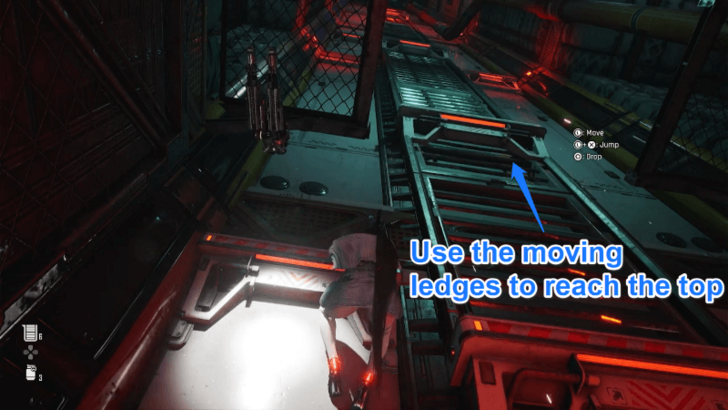 Climb Up the Moving Ledges Due to the poor condition of the Orbit Elevator, it won't be able to reach the Central Core. Head to the door on the left and make your way up by climbing on the ledges until you reach the top floor. |
| 2 | Proceed to the Central Core |
Central Core Walkthrough
| ◄ Previous Section | Next Section ▶ |
|---|---|
| High Orbit Station | - |
| # | Central Core Objectives |
|---|---|
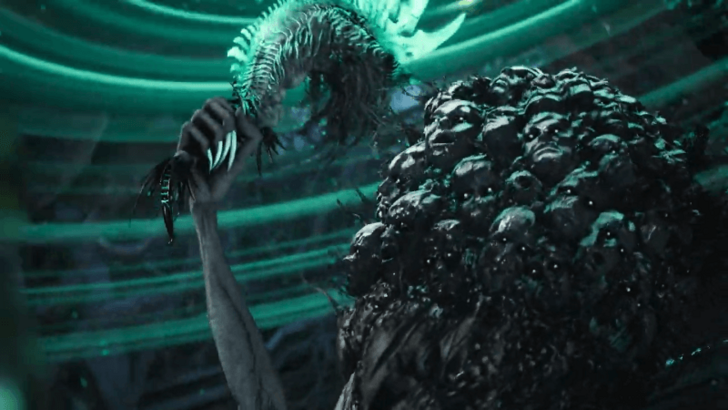
| 1 | Defeat Democrawler Upon entering the Central Core, players will have to defeat the Democrawler to proceed. Defeating it will initiate the final fight of the mission. ▶ How to Defeat Democrawler |
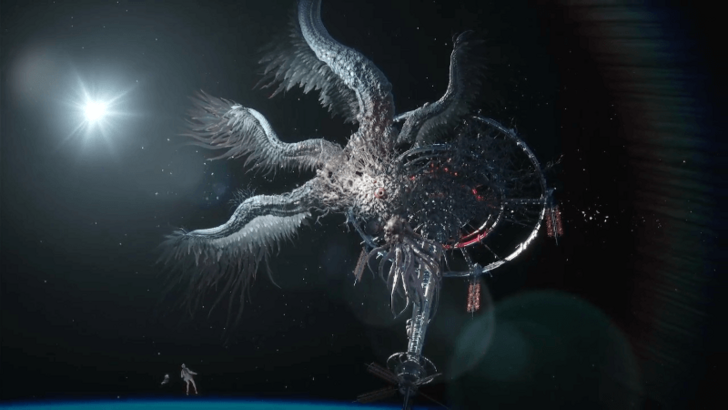
| 2 | Defeat DemogorgonThe last fight of this mission is a scripted fight. Players will have to shoot the eyes and weak points of the Demogorgon to complete the mission. ▶ How to Defeat Demogorgon |
Eye of the Hurricane Boss Fights
How to Defeat Belial
| Belial Strategy |
|---|
 |
|
|
How to Defeat Karakuri
| Karakuri Strategy |
|---|
 |
|
|
How to Defeat Democrawler
| Democrawler Strategy |
|---|
 |
|
|
Democrawler Boss and How to Beat
How to Defeat Demogorgon
| Demogorgon Strategy |
|---|
 |
|
|
Demogorgon Boss and How to Beat
Eye of the Hurricane Passcodes
| Location | Passcode |
|---|---|
| Water Gate | ιθγηκλ |
| Space Center Gate 2 | ηεγβεγ |
Landfill Supply Box Passcode
| Passcode Location | 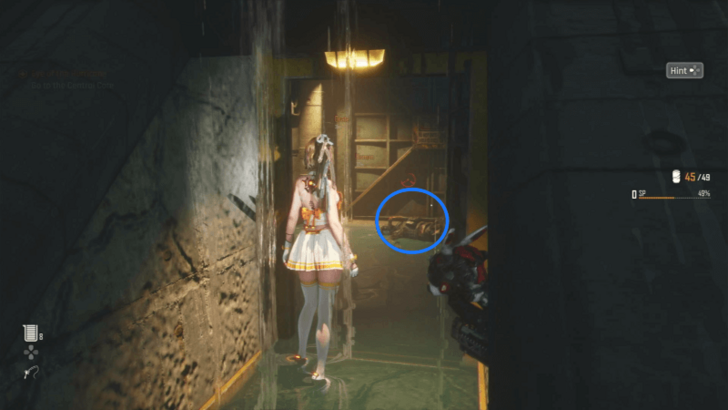 |
|---|---|
| Unlock | 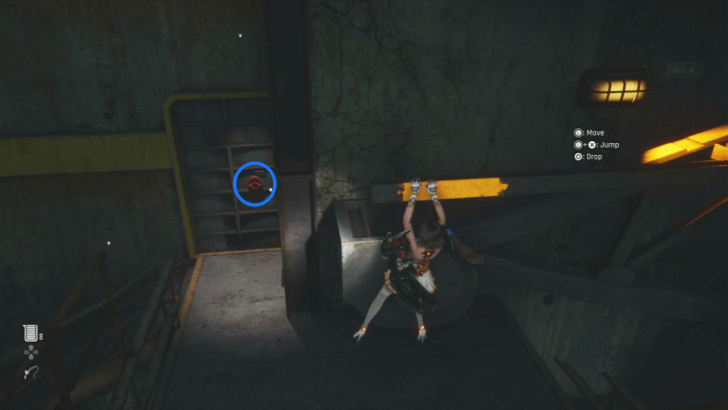 |
You can obtain the Water Gate Passcode from the fallen Legionaire inside the hidden room behind the gushing water. The passcode is ιθγηκλ.
Space Center Gate 2 Passcode
| Passcode Location | 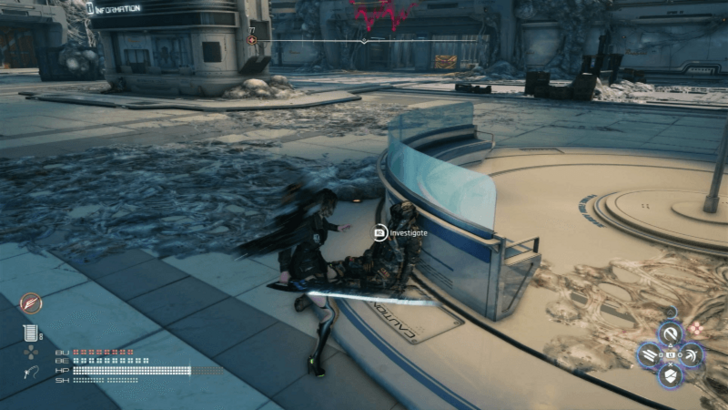 |
|---|---|
| Unlock | 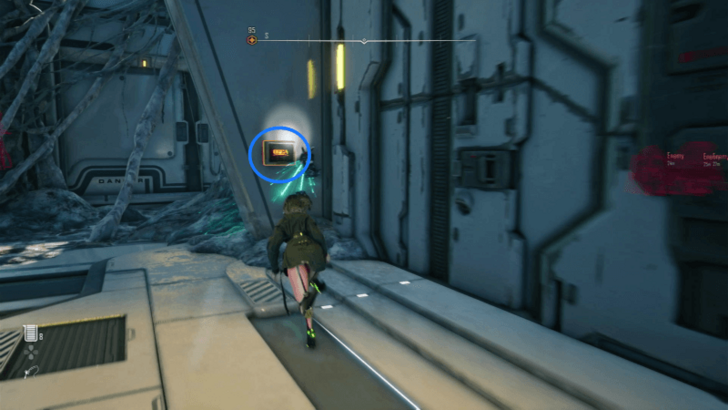 |
Get the Space Center Gate 2 Passcode from the fallen Legionaire behind ones of the counters in the space center. The passcode is ηεγβεγ.
Eye of the Hurricane Important Items
| Jump to an Important Item! | |||||
|---|---|---|---|---|---|
| Omnibolts | Cores | Modules | |||
| Cans | Exospine | Gears | |||
| Exteriors | |||||
Omnibolts
| Location | How to Get |
|---|---|
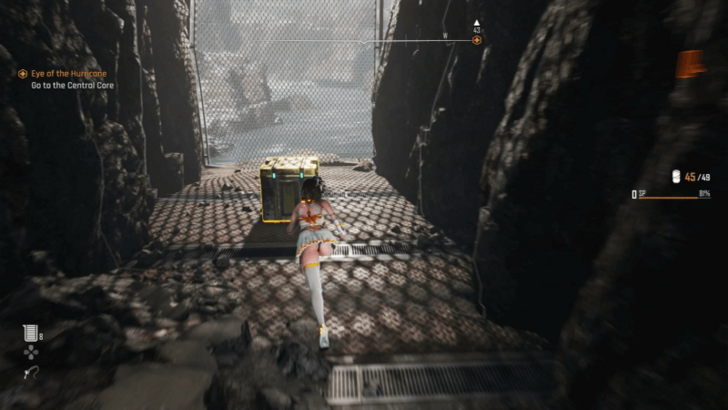 Orca Space Complex - Hidden Path on the Way to the Hypertube |
An Omnibolt can be obtained from a supply box located on a path on the left side after passing through the cave. |
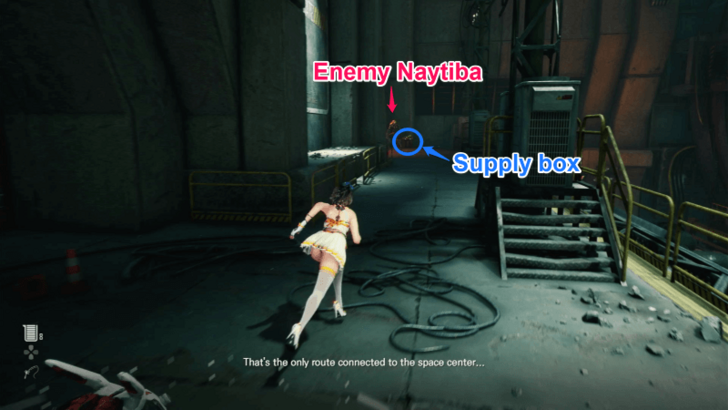 Hypertube - Left Side of the Facility |
Another Omnibolt can be obtained from a supply box to your left upon entering the Hypertube facility. |
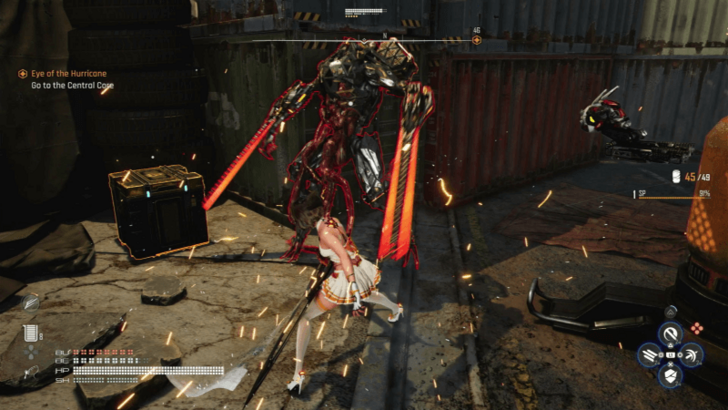 Space Logistics Complex - Left Side of the First Area |
Obtain an Omnibolt via the supply box guarded by an android Naytiba on your left upon arriving at the Space Logistics Complex. |
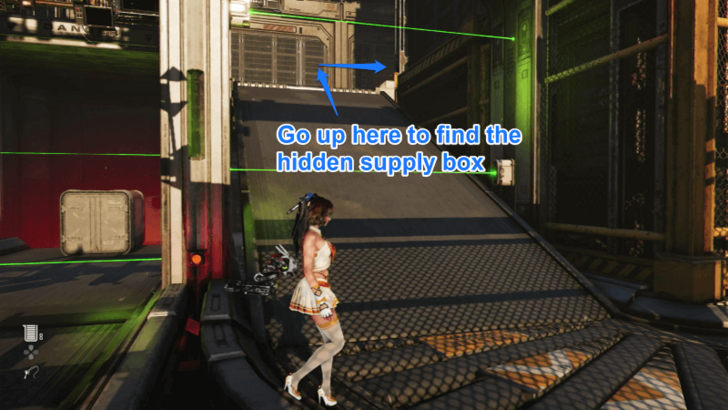 Space Logistics Complex - Conveyor System |
You can get another Omnibolt from a supply box located on the top floor of the conveyor system. To get there, simple turn right then take the conyevor belt going up on your left. |
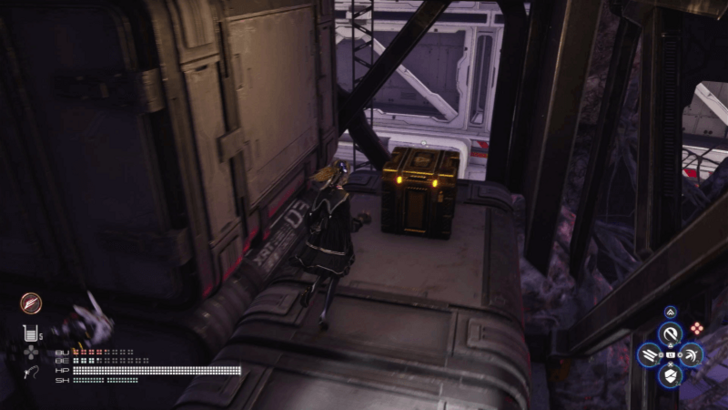 Cargo Lift 121 - Middle Section on the Other Side of the Lift |
You can obtain an Omnibolt from a supply box located on the middle section of the opposite side of the lift. You can get here by passing through the gaps on the side. |
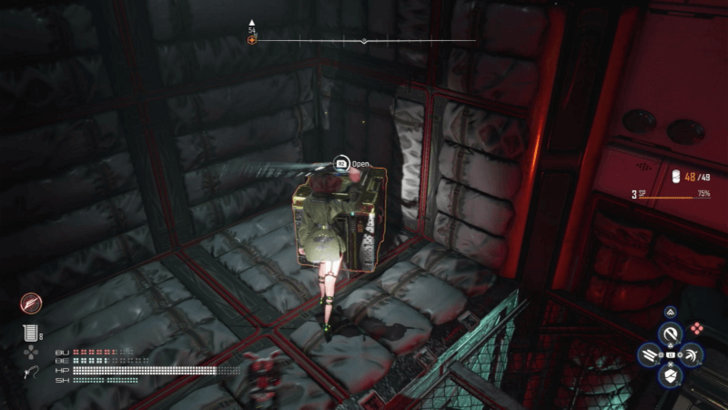 High Orbit Station - Platform on the Left |
The last Omnibolt for this area can be obtained from a supply box located on a platform to your left as you make your way up the ledges to get to the Central Core. |
Core Locations
Body Core Locations
| Location | How to Get |
|---|---|
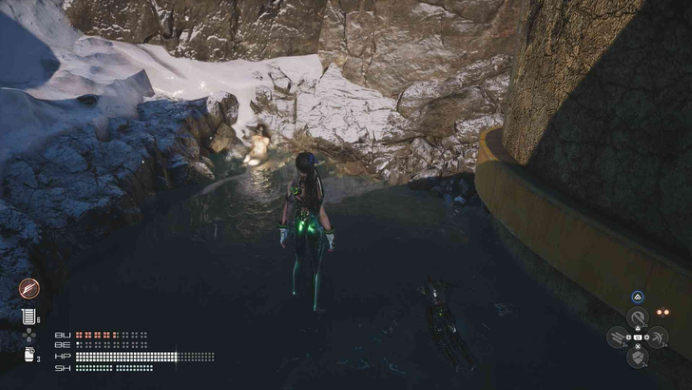 |
After arriving at the Orca Space Complex, go through the submerged cave and it can be found by the fork on the road to the right. Video Guide |
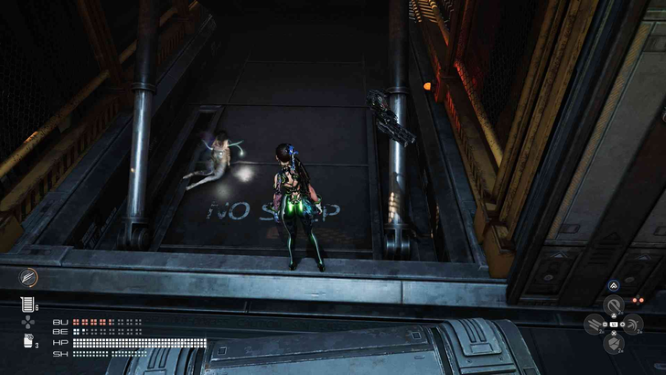 |
From the Space Logistics Center, head for the conveyor area and look behind the first conveyor you run backwards on. It will fall from a conveyor from above. |
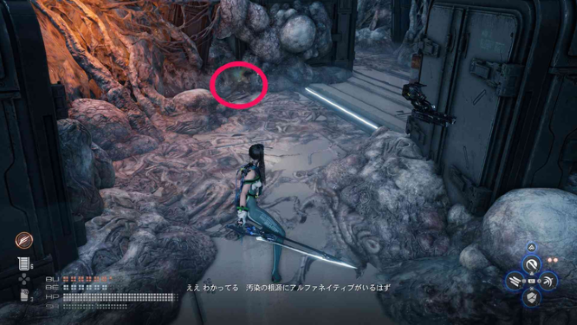 |
Open the gate on the left side of the Space Logistics Center and you will find it in the center of the room with the backup power source. |
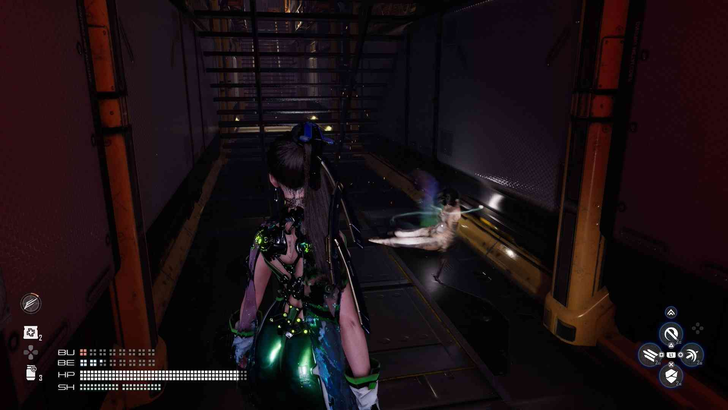 |
When the freight elevator stops, go to the passage on the second floor, climb the stairs on the left, and get it from the corpse when you get off the elevator. |
Stellar Blade Body Core Locations
Beta Core Locations
| Location | How to Get |
|---|---|
 |
Found after jumping over the wall in front of you from the Hypertube Entrance. Video Guide |
 |
Found at the entrance of the area where the turrets are firing on you, all the way along the right wall. Video Guide |
 |
After a battle occurs on the 3rd floor of the passenger elevator, grab the rope, and go to the 4th floor to get it from the corpse behind the bed. |
 |
Found near the last supply camp Central Core Entrance |
Stellar Blade Beta Core Locations
Weapon Core Location
| Location | How to Get |
|---|---|
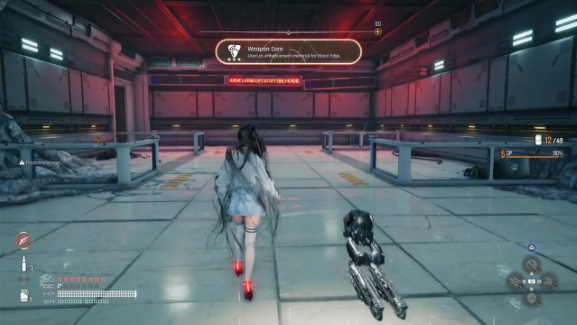 |
Obtained after defeating Belial. |
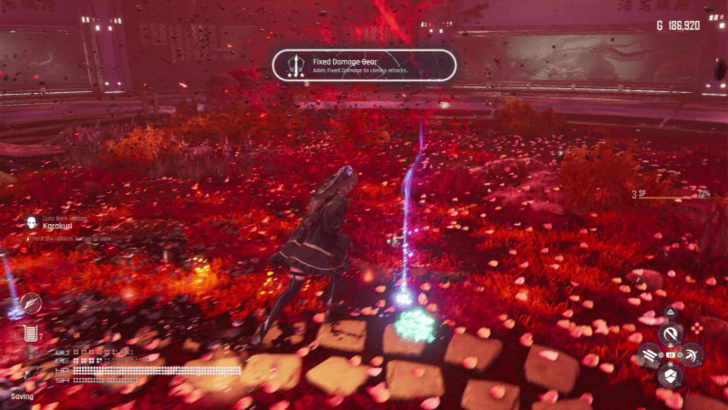 |
Acquired after defeating Karakuri. |
 |
The last Weapon Core for this mission can be obtained after defeating Demogorgon. |
Module Locations
Tumbler Expansion Module Location
| Location | How to Get |
|---|---|
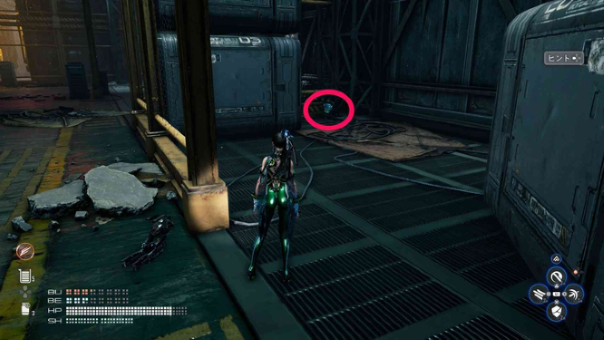 |
Enter the Hypertube Entrance and get it from the robot in the behind the center of the space on the first floor. Video Guide |
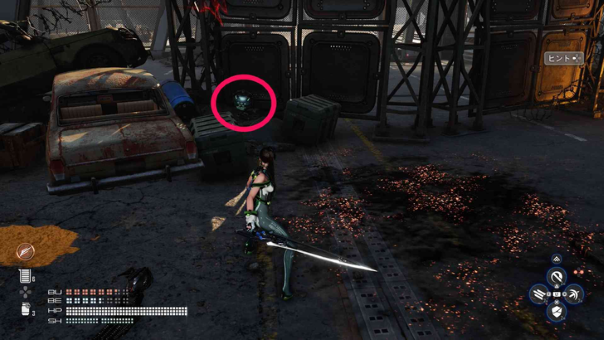 |
Go through the area where the turret fires and get it from the robot on the left before the entrance to the Space Center. Video Guide |
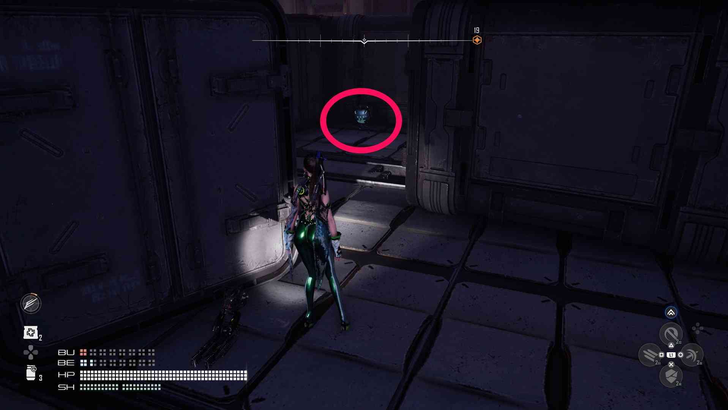 |
Obtained from the drone that jumped onto the large container from the second floor inside the elevator. Video Guide |
Drone Upgrade Module Locations
| Overworld Image | How to Get |
|---|---|
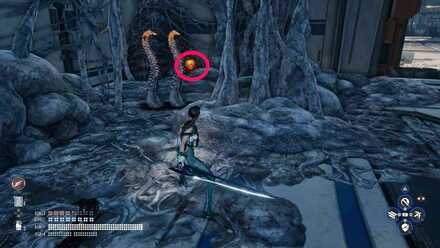
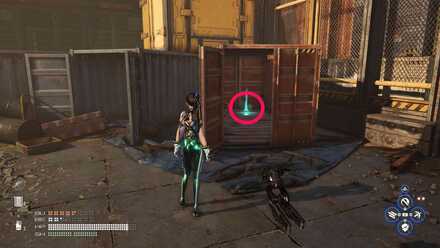 Module #1 Module #1(Spire 4) |
Found inside the red cargo container in the area where 2 Houndborgs come out. |
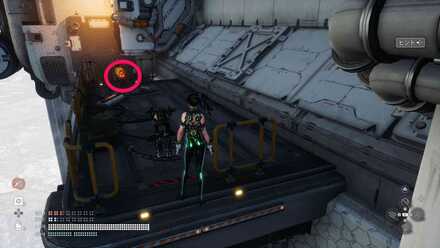
 Module #2 Module #2(Spire 4) |
Obtained by defeating the robot guarded by two Tentacles. Area is right next to the entrance of Raphael Space Center Lobby. |
 Module #3 Module #3(Spire 4) |
Once outside, jump from the first beam to the other beam and reach the end, from here climb the ledge to find a robot and defeat it to get the module.
Video Guide |
Can Locations
| Can Name and Location | How to Get |
|---|---|
|
Milky Pop #7 |
Jump over the ledge to the pipes then to the oppposite side of the camp's wall. The can is at the end of the platform.
|
|
Nectar Apple #23 |
This is hidden behind one of the round benches in the ship's main lobby.
|
|
Liquid Lightning #31 |
This can be found behind the blue containers beside the supply camp.
|
|
Moonwell #37 |
After defeating the Machine Hive, jump over to the right section of the ship to reach the vending machine with this can. Note: If you miss this while going up the Maintenance Sector, you can visit the Oasis after the Burning Xion main mission and fish for the can using Strange Bait. |
Exospine
Judgement-Type Exospine
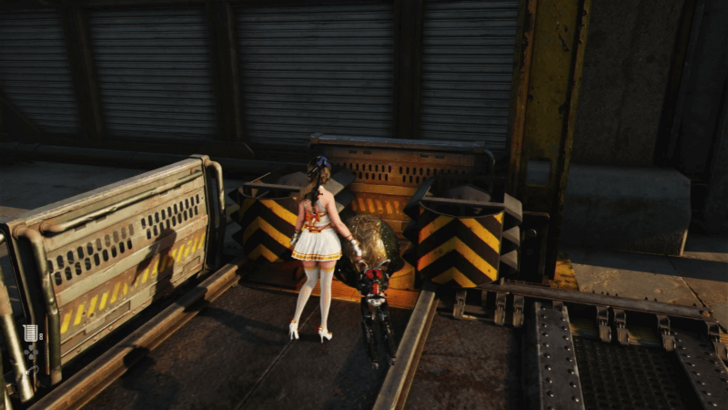
Acquire the Judgement-Type Exospine by solving the ball puzzle located in the first area of the Space Logistics Complex. To solve the puzzle, simply locate the three remaining balls and guide them to their designated terminals.
Gear Locations
Perfect Combat Gear

The Perfect Combat Gear ★★★ can be obtained from a supply box located on a path to your left as you pass through the cave and make your way to the Hypertube.
Melee Protection Gear

The Melee Protection Gear ★★★ can be acquired from a supply box located on your left as you enter the Hypertube facility.
Beta Recovery Gear

You can get the Beta Recovery Gear ★★★ in a supply box being guarded by an android Naytiba on your left side as you enter the Space Logistics Complex.
Burst Charge Gear

The Burst Charge Gear ★★★ can be acquired from a supply box on the top floor of the conveyor system. Immediately turn left as you make your first right to get to this hidden area.
Shield Destruction Gear
| Gear | Effects |
|---|---|
 Shield Destruction Gear |
・Increases damage to shields. |
The Shield Destruction Gear ★★★ can be obtained after defeating Belial.
Ranged Enhancement Gear
| Gear | Effects |
|---|
The Ranged Enhancement Gear ★★★ is acquired after defeating Belial.
Burst Enhancement Gear

You can obtain the Burst Enhancement Gear ★★★ by opening the supply box found in the middle section of the second area in Cargo 121. Jump over the gaps on the sides to get inside this area.
Fixed Damage Gear
| Gear | Effects |
|---|---|
 Fixed Damage Gear |
・Adds Fixed Damage to combo attacks. |
The Fixed Damage Gear ★★★ can be obtained after defeating Karakuri
Risk Taking Gear

You can get the Risk Taking Gear ★★★ from a supply box located on a platform while going up the ledges that will take you to the Central Core.
Burst Recovery Gear
| Gear | Effects |
|---|---|
 Burst Recovery Gear |
・Recharges Burst Energy per 1% of HP lost when taking a hit. |
The Burst Recovery Gear ★★★ is acquired after defeating the Demogorgon.
Beta Charge Gear
| Gear | Effects |
|---|---|
 Beta Charge Gear |
・Recharges more Beta Energy. |
The Beta Charge Gear ★★★ can also be obtained after defeating the Demogorgon.
Exterior Locations
Lop Bunny Pack
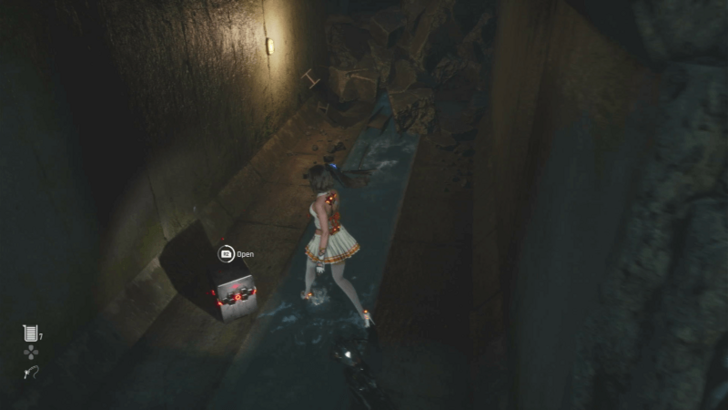
You can obtain this Drone Exterior by making your way on top of the ledges located on the left side of the dam area.
Large Round Glasses
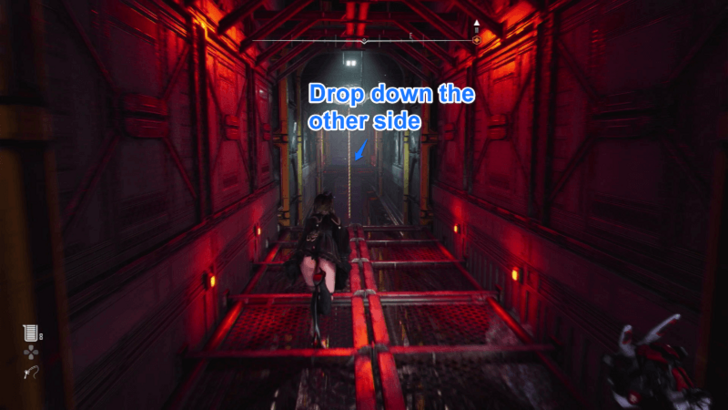
The Large Round Glasses can be obtained behind a locked gate in the path connecting both sides of the Cargo Lift 121.
You can get through the gate by climbing on the ledges found on the sides of the small lift and then using the rope to swing on the other side.
Silver Tooth
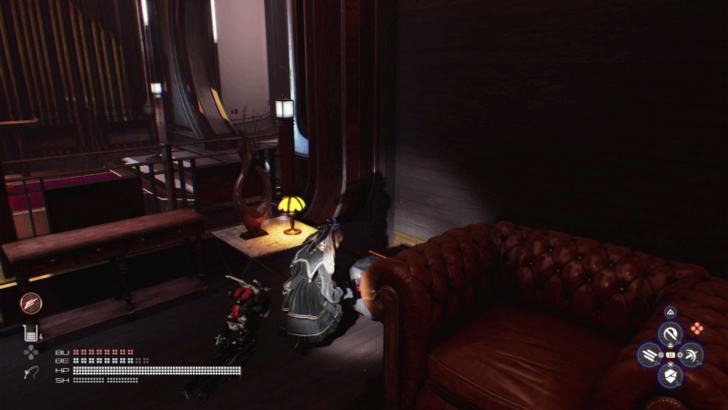
The Silver Tooth can be obtained from a black container located in the room before taking the elevator to the Central Core.
Orca Engineer Location
| Video Location |
|---|
| Orca Engineer |
Black Rose Location
| Video Location |
|---|
| Black Rose |
Photogenic Location
| Image Location |
|---|
 |
| Photogenic Found in the room after you defeat Karakuri. |
Stellar Blade Related Guides
Main Missions List
Post Game Guides
| Post Game Guides | ||
|---|---|---|
| Post Game | New Game+ | 100% Guide |
Comment
Author
Eye of the Hurricane Mission Guide
Rankings
- We could not find the message board you were looking for.
Gaming News
Popular Games

Genshin Impact Walkthrough & Guides Wiki

Honkai: Star Rail Walkthrough & Guides Wiki

Arknights: Endfield Walkthrough & Guides Wiki

Umamusume: Pretty Derby Walkthrough & Guides Wiki

Wuthering Waves Walkthrough & Guides Wiki

Pokemon TCG Pocket (PTCGP) Strategies & Guides Wiki

Abyss Walkthrough & Guides Wiki

Zenless Zone Zero Walkthrough & Guides Wiki

Digimon Story: Time Stranger Walkthrough & Guides Wiki

Clair Obscur: Expedition 33 Walkthrough & Guides Wiki
Recommended Games

Fire Emblem Heroes (FEH) Walkthrough & Guides Wiki

Pokemon Brilliant Diamond and Shining Pearl (BDSP) Walkthrough & Guides Wiki

Diablo 4: Vessel of Hatred Walkthrough & Guides Wiki

Super Smash Bros. Ultimate Walkthrough & Guides Wiki

Yu-Gi-Oh! Master Duel Walkthrough & Guides Wiki

Elden Ring Shadow of the Erdtree Walkthrough & Guides Wiki

Monster Hunter World Walkthrough & Guides Wiki

The Legend of Zelda: Tears of the Kingdom Walkthrough & Guides Wiki

Persona 3 Reload Walkthrough & Guides Wiki

Cyberpunk 2077: Ultimate Edition Walkthrough & Guides Wiki
All rights reserved
© 2024 SHIFT UP Corporation. All rights reserved. Published by Sony Interactive Entertainment Inc.
The copyrights of videos of games used in our content and other intellectual property rights belong to the provider of the game.
The contents we provide on this site were created personally by members of the Game8 editorial department.
We refuse the right to reuse or repost content taken without our permission such as data or images to other sites.

 7th Airborne Squad
 Scavenger Adam
 Xion, The Last Remaining City
 Altess Levoire
 Light of Hope
 Alpha Signal
 Hidden Truth
 Abyss Levoire
 Orcal's Testimony
 Secret Garden
 Burning Xion
 Last Fragment
 Selection of Species
 EVE Protocol
 All Endings


![Neverness to Everness (NTE) Review [Beta Co-Ex Test] | Rolling the Dice on Something Special](https://img.game8.co/4414628/dd3192c8f1f074ea788451a11eb862a7.jpeg/show)


