Beginner's Guide: Tips and Tricks for New Players
Start strong in MementoMori with our Beginner's Guide. Read on to learn what's the right world to start your account in, how to get the best reroll, how to form the best team, what trials you should clear for resources, and more.
| MementoMori Progression Guides | |
|---|---|
| Beginner's Guide | Intermediate Guide |
List of Contents
 Enjoying the wiki? We’d love to hear from you! Enjoying the wiki? We’d love to hear from you! Take part in our quick survey and help us make the wiki even better. ▶︎ MementoMori Wiki Survey |
Beginner's Guide Directory
Before Chapter 1
Overview
Welcome to the world of MementoMori! Whether you're here for the art, the music, or the gameplay, this AFKRPG can be tough for the uninitiated. Resource management and vertical investment are critical in this game, especially when you're starting out.
Your goal at this stage is to clear the Main Quest until you reach Chapter 13. This way, you will unlock most of the important features of the game such as shops, alternate game modes, and gacha banners - especially the Invocation of Chance. To get there as soon as possible, you will need the right witches to start out with, know what Runes to get, and which witch you should put most of your limited resources into.
Getting it wrong with any of these choices and others can result in lost progress. That's why we outlined all the important steps in our guide. Each section discusses the essentials, and if you want to know more about a particular topic, you can click on the links under each section for more in-depth information.
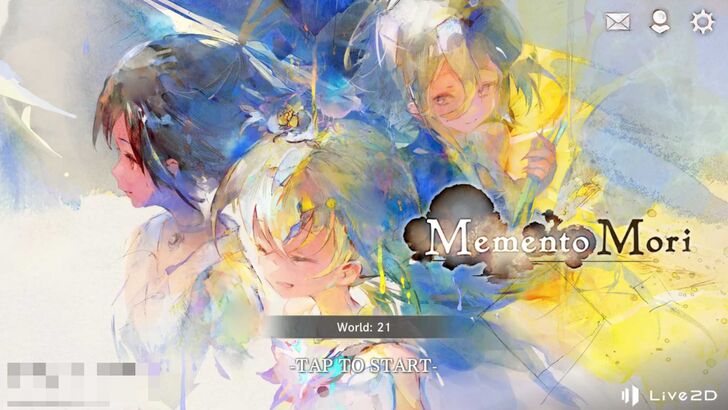
Choosing the Right World to Start In
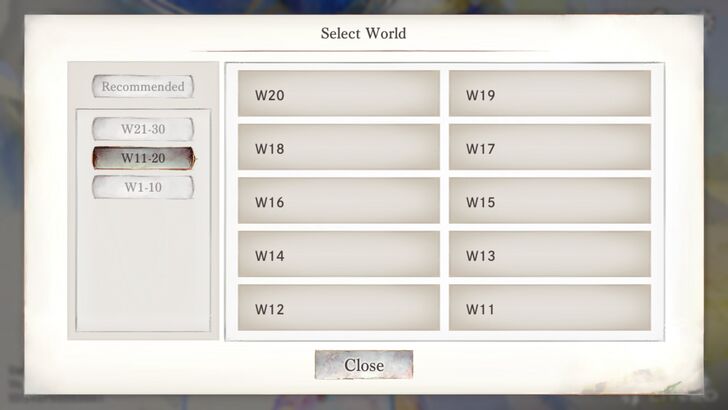
Even before starting out in MementoMori, your early progress in the game can be affected by which world you decide to start out in. For most beginners, starting out in the newest world is the best because of how it's more probable for you to encounter other new MementoMori players. Climbing up the ranks of Battle League quickly and finding a good guild is easier in newer worlds compared to older ones.
However, there is an exception to this. If you have friends who are playing on older worlds and they say they will support you, do so. Having friends in the best guilds can give you access to resources that only they can get. Also, if they happen to be online at the same time you are, you can ask them to carry you through the Temple of Illusions to farm the materials you need.
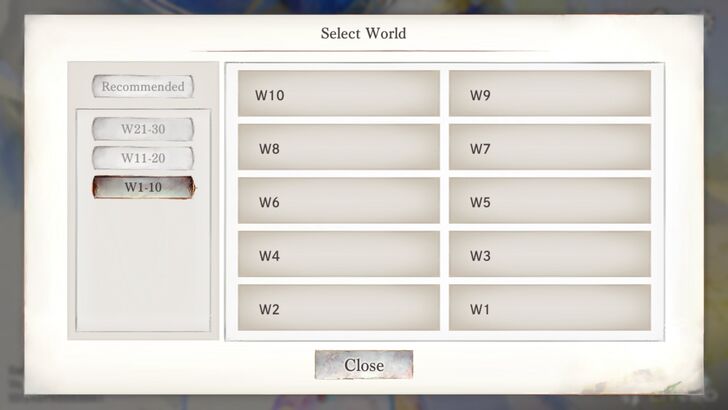
Of course, the caveat to starting out in an older world is that you'll be up against established players in the Battle League (so advancement through the ranks is tougher). Also, without the right connections, it can be tough to join the most powerful guilds - especially for newcomers.
So weigh your options a little before tapping on the "Tap to Start" option on the title screen. If a friend invites you to play the game, make sure to find out what world they're playing on and send a friend request as soon as you can. We will discuss making friends and getting Friend Points in MementoMori further down below.
The Best World To Play In for Beginners
Chapter 1-1 to Chapter 2-2
Getting the Best Reroll
Once you've decided on the world in which you want to make an account, get ready to reroll a few times.
| How to Reroll | |
|---|---|
| 1 | Complete the Tutorial (Chapter 1) |
| 2 | Go to the Main Menu and claim your Presents |
| 3 | Using Invoke, Roll for SR Heroes |
| 4 | Reset the game data in the in-game settings |
| 5 | Repeat until desired results are achieved |
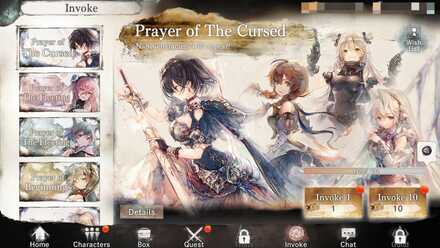
Like with other gacha games, MementoMori gives players some of its own currency (Diamonds) for them to spend on its gacha or "invocation" banners. Normally you can get up to 40 or more invocations' worth of Diamonds and Tickets of the Cursed (tickets for free pulls at the game's permanent invocation banner, the Prayer of the Cursed), though you may end up getting more if you sign up when the game has a new event (like the game's anniversary every October).
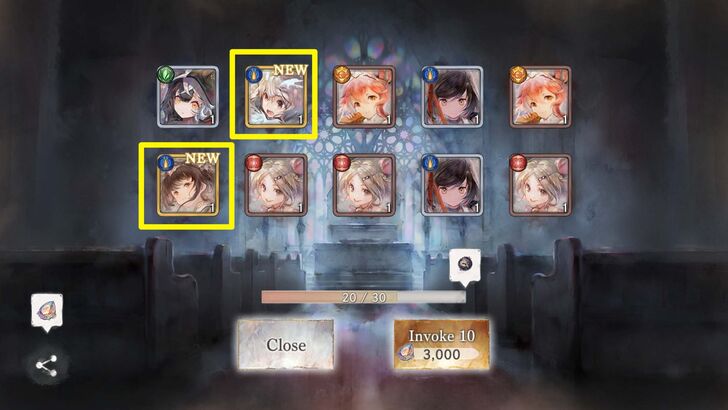
The reroll process can take 10 to 15 minutes as you will need to clear the Main Quest tutorial. Here, you will have four witches: Illya, Monica, Iris, and Rosalie. You will be taught how to level up your witches, and we suggest leveling up Iris (only level up Illya when the game forces you to) for faster progression. You can keep leveling up Iris until you finish Chapter 1-8.
From there until you finish Chapter 2-2, put all your leveling materials toward Rosalie. Don't worry about the resources for now; you will be able to get all of them back later. Once you've gotten past Chapter 2-2 and the game lets you navigate the menus, collect all the free pulls from the "Presents" tab in the Home Screen then go to the "Invoke" tab. Then, do your pulls.
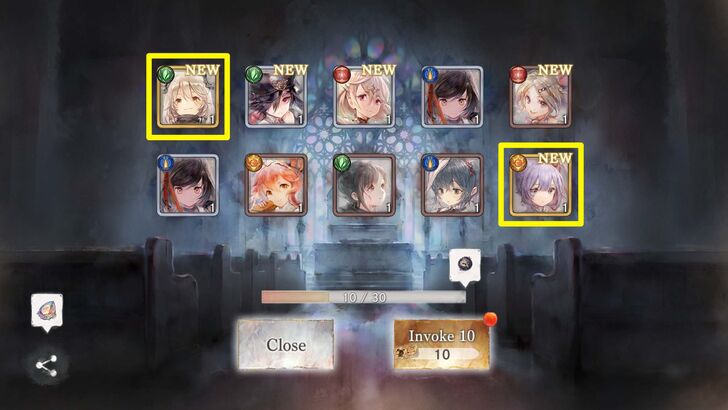
For reroll targets, aim to get one or two copies of good DPS plus one or two supports. We recommend getting either Cordie or Florence as your main attacker, and Mimi or Primavera (or both) as your supports.
| SR Characters | Role | Soul Affinity |
|---|---|---|
| Florence ★★★★★ |
DPS | Azure |
| Cordie ★★★★★ |
DPS | Emerald |
| Merlyn ★★★★ |
Support | Emerald |
| Primavera ★★★★ |
Support | Amber |
| Mimi ★★★★ |
Support | Amber |
| Amleth ★★★ |
Tank | Azure |
| Soltina ★★★ |
Tank/Support | Azure |
| Dian ★★★ |
Support | Crimson |
Florence deals massive damage by increasing the number of attacks she makes with every critical attack she makes with her first active skill, while Cordie deals high burst damage with both her active skills. These are the two best main DPS witches you can get your hands on at this point in the game, with Cordie being easier to upgrade than Florence since you can buy Cordie copies from the Cave of Space-Time shop without having to spend any Diamonds or pull from any of the gacha banners.
Mimi meanwhile lets them deal extra damage with her Resonance debuff (the enemy with the highest DEF receives damage equal to 50% of the damage taken by the enemy with the lowest DEF), and Primavera stuns enemies directly in front of her (while providing SPD and ATK buffs to your team).
You can also aim to get Merlyn, one of the best support units in the game, who can increase your Cordie or Florence's damage by boosting their CRIT with her damage. However, just like Cordie, you can buy her through the Cave of Space-Time later. So, it's alright to focus on getting the other witches we mentioned first.
Forming the Best Team to Start Out With
Assuming you've gotten a good reroll, you will probably have at least 1 DPS to carry your team and at least one or two useful supports. This is how your teams will be built in the early game of MM: One attacker to carry the team, and four other witches that will provide support and other utility.
Unless you're ready to spend, you will not be able to field more than one attacker because of just how many resources you will need to properly strengthen a witch. EXP Orbs ("Green Orbs"), Kindling Orbs ("Red Orbs"), and Gold are the primary resources you will need to level up your witches aside from getting copies of them to increase their level cap through Awakening.
So in our case, a team comp based on our reroll targets earlier could look like this:
| Support | DPS | Support | Support | Support |
|---|---|---|---|---|
 Merlyn Merlyn
|
 Cordie Cordie
|
 Mertillier Mertillier
|
 Mimi Mimi
|
 Primavera Primavera
|
With Cordie being the main damage dealer, Merlyn and Mertillier (another Emerald-soul unit) providing buffs, and Mimi and Primavera being your main debuff supports. Remember to reposition Primavera in front of any particularly tough enemies so she can stun them for a turn, giving your team more time to deal more damage.
A team like this should reliably be able to get through the main quest except when you run into stages with Soltina in them. Soltina is a tanky Azure-soul witch who can shield herself with Multi-Barriers. Each layer can nullify damage, and she has four of them. Cordie, meanwhile, only hits 4 times with her first active skill and once with her second active skill, so she'll have a tough time breaking those barriers by herself.
In those cases, Primavera and Mimi should be able to deal enough hits to Soltina so that by the time Cordie attacks she'll be able to break the Multi-Barrier (she will probably just need one more attack to get through).
But if that fails, you can change out Mertillier with Dian, a Crimson-soul witch that can boost Cordie's evasion - allowing her to live until she finally manages to destroy Soltina's barrier on her own. It will still take a fair amount of RNG, however, so retry, retry, and retry until you succeed.
If you got Florence at the start instead, you can simply replace Cordie with her. Your team will look like this:
| Support | DPS | Support | Support | Support |
|---|---|---|---|---|
|
Merlyn
|
 Florence Florence
|
Mertillier
|
Mimi
|
Primavera
|
Functionally the same as a Cordie team, however, you will have an easier time dealing with Soltina stages (Florence makes enough hits to destroy Soltina's barrier and then some). However, the trade-off is that it's harder to raise Florence's level cap compared to Cordie (the Cave of Space-Time Shop does not sell Florence copies).
With both teams, Mertillier can be replaced by other witches (especially if you don't have her). Aside from Dian, Fenrir is a good early-game alternative as she lowers the skill cooldown of one ally by 1 turn. Soltina is also a good choice if you need an early-game tank (you can get a copy of Soltina at the end of the Start-Dash Missions).
Chapter 2-3 to Chapter 5-20
Clear the Cave of Space-Time for Witch Copies

Once you get past Chapter 2-4, you will unlock the Cave of Space-Time, which is - to put it succinctly - a survival trial board game where your party goes from one tile to the next. Each tile contains various events such as a fight, a tree that heals your party, or even a market stall that will sell you items. Your party's HP carries over between events, so you will have to work on keeping them alive while you progress.
If one of your party members falls before you can make it to the end, you will have to replace them with another witch in your roster (which may or may not be powerful enough to help push through the rest of the Cave of Space-Time).
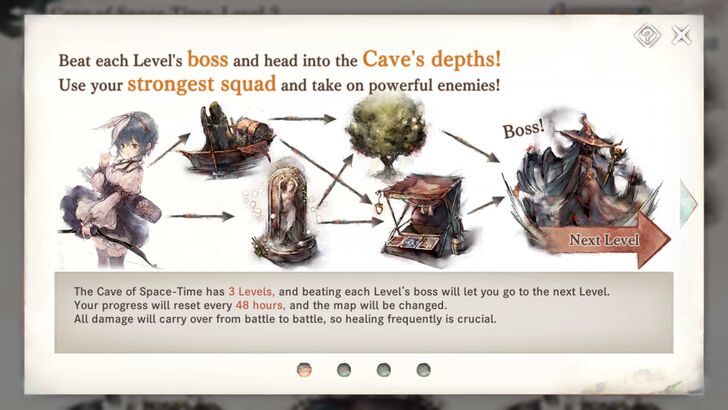
Fortunately, after every battle, the Cave gives your party Blessings, which have different buffs that range from healing to extra DEF to higher ATK or even straight-up damage dealt to the enemy party at the start of the fight. Also, remember that there are tiles that offer healing to your entire party, and you can see what tiles are coming up in advance - so plan your progress accordingly.
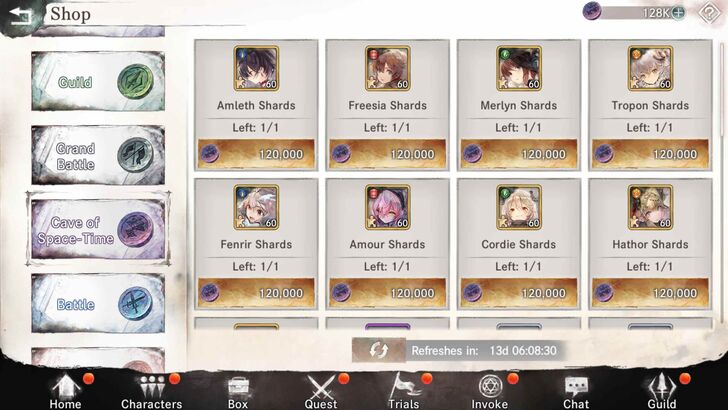
Once you've cleared the Cave, you will be rewarded with Cave of Space-Time coins, which can then be used to buy copies of certain witches. These include Cordie, Merlyn, and Fenrir. Other witches are available, and you will also want to eventually get copies of them later on to raise your Level Link (more on that later).
The Cave resets every 48 hours, so make sure to complete a run within that time. If you play the Cave of Space-Time consistently, you should be able to buy one or two copies a month.
As for which unit to get through the Cave of Space-Time, we suggest getting Cordie if you don't have her yet, then Merlyn, and then enough copies to raise both their rarities. Afterward, you can get Fenrir or Amleth, then the rest of the available witches.
How to Clear the Cave of Space-Time Trial
Complete the Start-Dash Missions for a Witch's Invitation

Within the first week of playing the game, you will have access to the "Start-Dash Missions." These missions are like the Daily and Weekly Missions that are available to you in the "Missions" tab in the home screen. However, at the end of the Start-Dash Missions, you will also get two free copies of Soltina - a reliable tank in the early game - as well as a Witch's Invitation, which you can use to get a free non-limited SR rarity witch.
You can also get more than 3,000 Diamonds, as well as Witch's Shards, Rune Tickets, Upgrade Panaceas, Tickets of The Cursed, and other rewards.
As for who to pull using your first Witch's Invitation, we recommend either Primavera or Mimi if you don't have them yet. You could also get Lunalynn, a Chaos soul witch that can Silence enemies if she deals them a critical hit with her first active skill. She will become useful in later quests and is tough to get via normal means (she has a low pull rate in the Prayer of the Cursed banner), though you don't have to get her now if you still need to get the other witches we've already mentioned.
Who to Pull Using Witch's Invitation
Join a Guild to Get Holy Fragments, Other Rewards
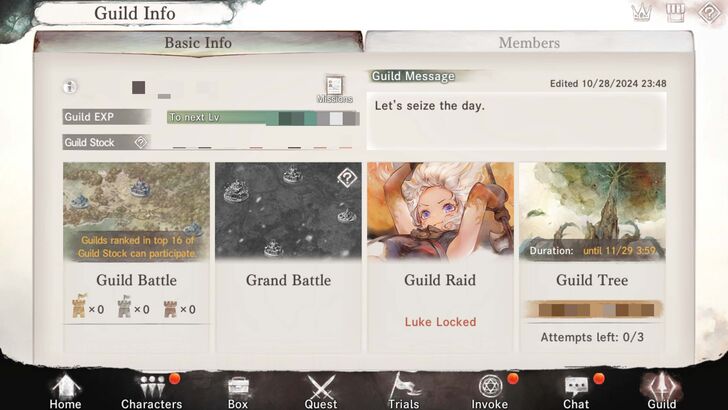
After completing Chapter 3-4, you will be allowed to join a Guild. Joining a guild is, so far, one of the few ways you will get Holy Fragments in the early game - the usefulness of which will be tackled later on in this guide. Just know that Holy Fragments are an important currency and you will want to get as much as you can.
To get Holy Fragments along with other rewards like Gear and Diamonds, participate in guild activities such as the Guild Raid. The Guild Raid is MementoMori's version of a "Boss Raid" mode where your party will go up against a particularly powerful boss. The more damage you deal to the raid boss by the end of the match, the more rewards you will get.
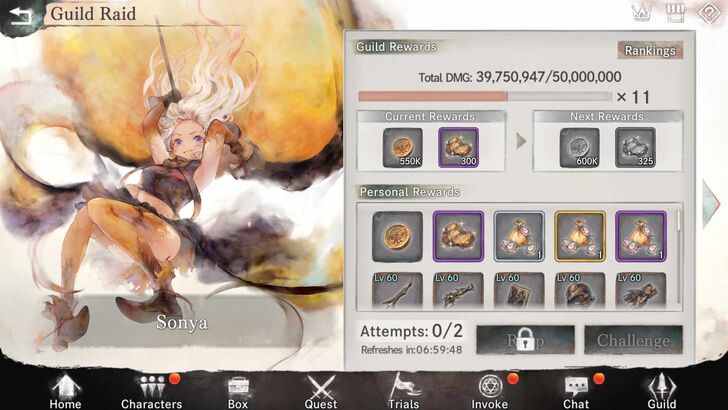
Since the Guild Raid only has players go up against one powerful foe, you may want to alter your team slightly to prioritize maximizing damage above everything else. This means fielding witches that are otherwise sub-optimal to use in the main quest.
For example, a character like Luke is not that essential to have in the Main Quest but becomes great in Guild Raid as she can increase the damage the Raid Boss takes from your team. Mertillier also becomes more useful as she is less likely to die by the second turn (thus increasing her chance to give your main attacker her Maintenance buff).
Fight in the Battle League for Diamonds, Holy Fragments
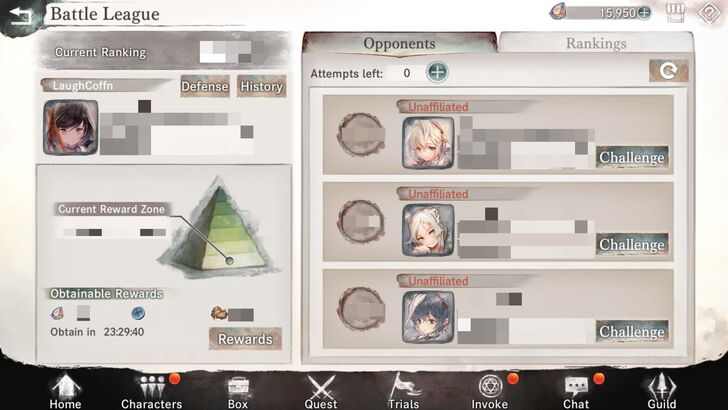
After finishing Chapter 4-4, you will unlock the Battle League, which is MementoMori's PvP mode (yes, Legend League and Guild Battle/Grand Battle exist, but you will be going into those a bit later). Here, you can rise through the ranks and, depending on the rank you have, receive daily rewards in the form of Diamonds, Holy Fragments, and Battle Coins. You will also win Holy Fragments and Battle Coins for every fight you win.
You'll first have to set a Defense team that other players will fight. Then, to the right-hand side of the screen, you will get to select who you want to fight with your own team. You should have at least 5 free attempts per day. Try to fight more than that, and you will have to pay with Diamonds for extra attempts.
Though teams at lower ranks of PvP are nothing much to worry about, you will face tougher and tougher teams as you climb the ranks (since their teams are made with specific purposes in mind unlike teams in PvE modes that are usually just more overpowered in terms of stats).
These teams will likely be designed to counter most threats, but not all of them. Remember: There is no such thing as an invincible team in MementoMori. It's your job as a player to figure out exactly how to counter a certain team and prepare accordingly. Think of it like a puzzle - get the right pieces (your characters) in the right places with the right gear and runes, and you will eventually beat an enemy team.
Still, at this stage, just play Battle League to gain a steady income of Holy Fragments, Diamonds, and Battle League Coins - which you can use to buy Gold Keys, Gold Chests, and Tree of Life's Dews (Gold Chests give important rewards while Tree of Life Dews become important much later on). For now, keep stockpiling your coins.
Learn What Gear to Upgrade and Augment
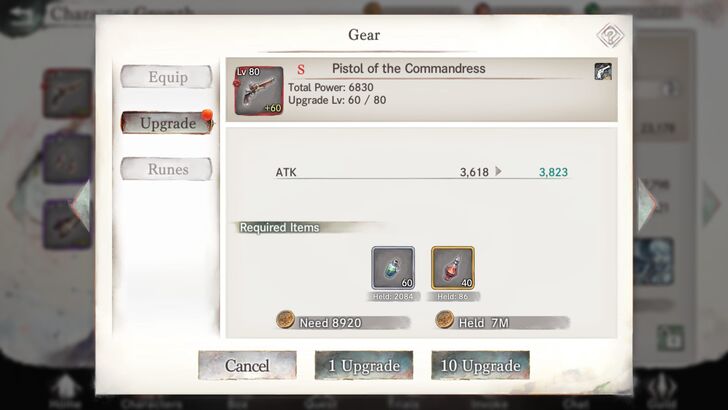
After finishing Chapter 3-20, you will be taught how to Upgrade your gear, and after finishing Quest 6-20, you will be taught how to Augment your gear. Since they're both methods used to strengthen one's gear, we will discuss them in one place.
Upgrading is, as the name suggests, the process of strengthening your Gear. Your Gear has base stats that it raises for your witch:
| Gear | Stat Boosted |
|---|---|
| Weapon | ATK |
| Accessory | Debuff RES |
| Gloves | DEF |
| Head gear | P.DEF |
| Chest armor | M.DEF |
| Boots | DEF |
Among these items, prioritize upgrading your witch's Weapon, followed by her Gloves and Boots. You can upgrade the other pieces as you see fit, but always make sure that these three pieces of gear are upgraded first.
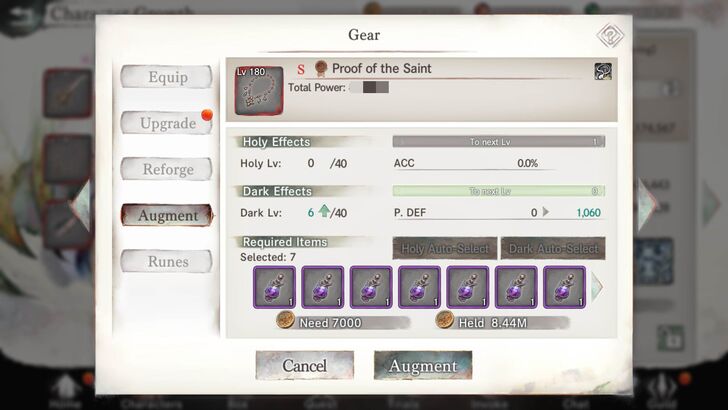
As for Augmenting gear, it's essentially giving your Gear piece a secondary stat that will boost that stat for your witch. There are two types of Augments: Holy Augments and Dark Augments.
For now, the only thing you need to know is that when you get your hands on Dark Gear or Dark Perfume, use them to Augment your Chest Armor, since it raises PM DEF Break, the best stat in the game when it comes to increasing a witch's overall damage.
If you noticed us mention "Holy" in this guide, it's because this is where all those Holy Fragments come in. Holy Fragments are used to buy Holy Equipment from the Shop, which you can then use to augment your Gear with Holy Levels.
For now, all you need to know is that you will want to augment your witch's Gloves with Holy levels to increase her CRIT DMG Boost, which affects the damage she deals when she makes critical hits.
Get PM DEF Break Runes From the Shop
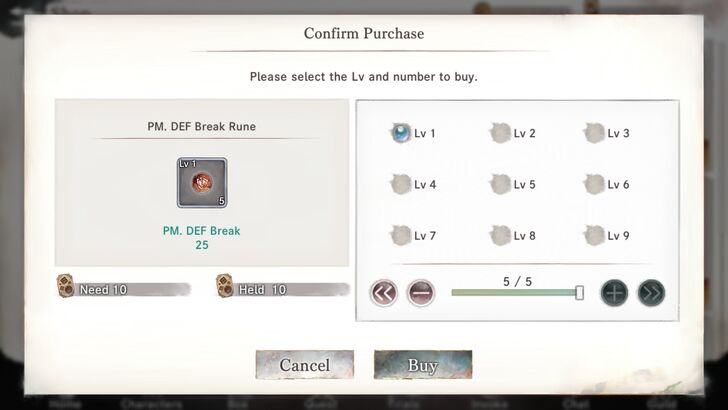
After clearing Chapter 4-16, you will unlock the ability to buy and mount Runes. Think of Runes as items you can attach to your witch's gear, which then give specific stat boosts.
There are Runes that raise ATK, runes that raise DEF, and other main stats, but the most important Runes are PM. DEF Break and, to a lesser extent, SPD. It just so happens that these are the only Runes that can't be obtained for free; you will have to buy them from the Runes Shop with Rune Tickets.
As for how many Runes you should have, always have 3 PM. DEF Break runes on your witch (one for each piece of left-side gear - Weapon, Accessory, and Gloves), preferably all at the same level. Having them on the same level should give an overall higher stat boost than just having one high-level rune on a single piece of gear.
Over the course of your playthrough, aim to get 9/9/9 or three level 9 PM. DEF Break Runes by Chapter 18. From there, you can work on getting your PM DEF Break runes to level 12 or 13, though it may take a longer time to get there.
As for Runes that boost other stats, you can get them from the Mystery Rune item dropped by the Fountain of Prayers, Sealed Chests, and even certain Gacha Banners. Remember to invest all your best runes in your main DPS carry first, as they will be responsible for most of your progress in the early game.
Farm the Tower of Infinity, Fountain of Prayers, and Temple of Illusions for Materials
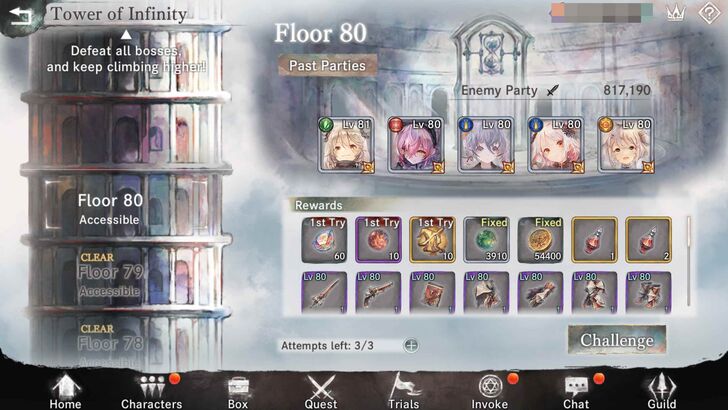
The Main Chapter will be your primary way of getting leveling resources and gear for your witches early on. But after Chapter 2-14, you will unlock the Tower of Infinity, a PvE mode that's largely similar to the Main Quest with the special exception of it not having any "NPC" enemies. All enemies you will face in the tower are other witches, which means they are stronger than the average NPC enemy since they can use Active Skills.
Still, the Tower of Infinity is a great source of Diamonds, Witch's Shards, EXP Orbs, Gold, Gear, and - most importantly (at this stage of the game) - Kindling Orbs. We recommend going back and forth between the Main Quest and the Tower often, as the resources you gain from both of these modes feed into each other.
If you level up a witch with resources from the Main Quest, you can use the witch to climb the Tower of Infinity, and the resources from the Tower of Infinity can help you progress through the Main Quest.
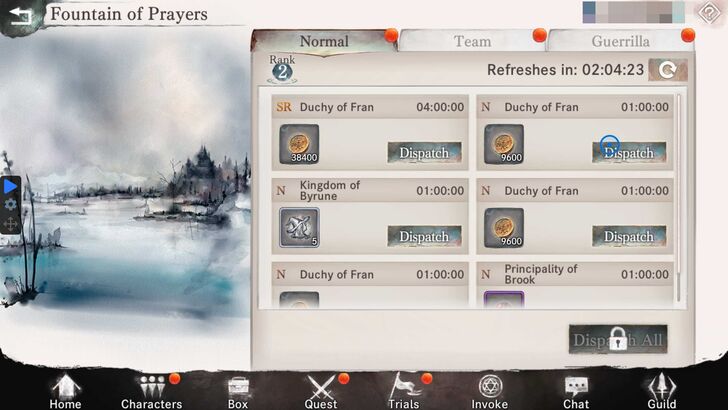
After beating Chapter 3-12, you will then unlock the Fountain of Prayers, where you can send witches out on "Dispatch Missions." These Dispatch Missions give out different rewards based on the locales they are set in, and they give different amounts depending on what your "Fountain Rank" is. The more dispatch missions you do at the Fountain, the more rewards you will eventually get per dispatch.
For starters, start doing Principality of Brook missions on the "Normal" tab - these ones give out Kindling Orbs, which you will need a lot of in the early game. The next priority would be Diamonds (for pulling characters plus other expenses, one of which we will talk about in a bit).
Pick out all the Diamond and Kindling Orb missions you can, then hit the "Refresh" button. It costs 20 Diamonds per refresh. Do this until you get at least four missions dispatched for either Kindling Orbs or Diamonds. This way, you will maximize your Kindling Orb gains from this mode. Remember that this process costs Diamonds, so make sure you are not spending too much for too little gain.
Later on, once you have ways to get Kindling Orbs through other means (such as the Invocation of Chance), use the Fountain exclusively for farming Diamonds.
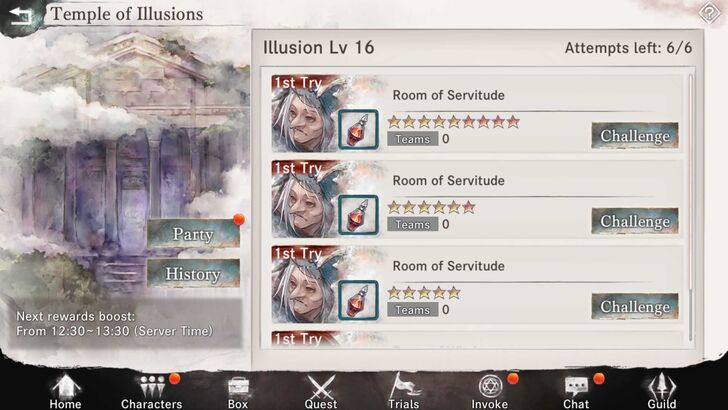
After you finish Chapter 5-20, you will unlock the Temple of Illusions, which is another dungeon raid-style PvE mode where you cooperate with other players to beat boss teams in dungeons. If you manage to beat the boss team, you will win a certain reward.
You will see from the get-go that the BP or Battle Power of these boss teams is very high. However, depending on what world you are in, you may get carried by more powerful players so don't be afraid of fighting these difficult bosses.
Rewards from the Temple of Illusions are typically EXP Orbs, Kindling Orbs, Upgrade Waters, and Upgrade Panaceas. But there are also bosses that drop Rune Tickets, and you will want Rune Tickets when you unlock the ability to mount them on your witch's gear. So, if you see a boss that drops Rune Tickets, try your hand at beating them; there's a chance that other interested players are also there and they can carry you through the battle (and you might eventually carry other players in this mode before long).
Chapter 5-21 to Chapter 11-28
Awaken Your Main DPS Past Level 100
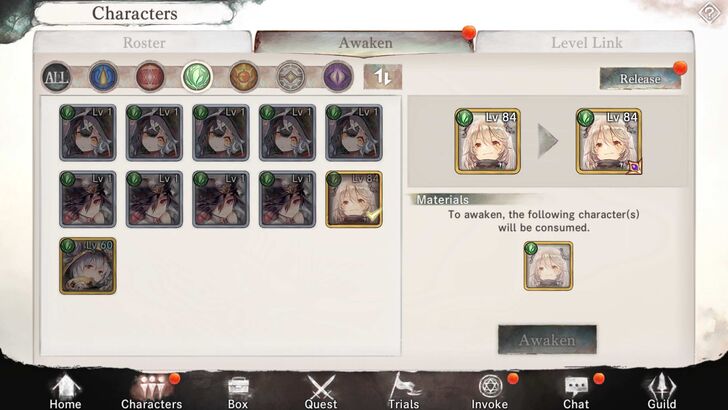
As you progress past Chapter 5 and beyond, there is a good chance you will hit your main DPS carry's basic level cap of Level 100. This is where you will have to start Awakening them.
Awakening is how you raise your witch's rarity. Raising the rarity of your witches is important as it raises their level caps. So, the higher your witch's rarity, the higher you can level them up. Effectively raises your Level Link as well (more on this later).
Awakening can be a bit complicated for beginners, but remember this: There are six Soul types in the game (Azure, Crimson, Emerald, Amber, Radiance, and Chaos). Azure, Crimson, Emerald, and Amber witches can be partly awakened with copies of other witches, while Radiance and Chaos witches can only be awakened with their own copies.
There are three base rarities a witch can have: N, R, and SR. For Azure/Crimson/Emerald/Amber witches, you can raise their rarity with awakened R rarity characters.
For example, if you want to awaken Cordie to raise her level cap, you will need one more copy of her to get her to SR+. However, to get her to SSR rarity, you only need to use two R rarity characters of the same soul type awakened to SR+ (such as Rosalie and Zara).
We first recommend to gather at least four copies of your main DPS carry and prepare two R characters awakened to SR+. Awaken your DPS carry to SR+, use the two R characters to get her to SSR, then use the two other copies to Awaken your character into SSR+. This will bump up your DPS carry's stats and raise their level cap.
Using R characters (or fodder
) does not work with Radiance or Chaos witches, however, so it's typically a lot harder to awaken them (hence why characters like Natasha fall off in terms of strength in the early game unless you get really lucky).

Focus on awakening characters whose copies are available at the Cave of Space-Time Shop (like Cordie, Merlyn, Fenrir, etc.). Since you will need a lot of fodder to awaken your characters, try to focus on awakening one witch for each soul.
So, for example, use all your Emerald fodder on Cordie, use all your Crimson fodder on Freesia (or another Crimson if you have them), use all your Azure fodder on Amleth/Fenrir, and use your Amber fodder on Primavera/Tropon.
This will allow you to raise their level caps evenly, making it easy to make use of another MementoMori feature: the Level Link.
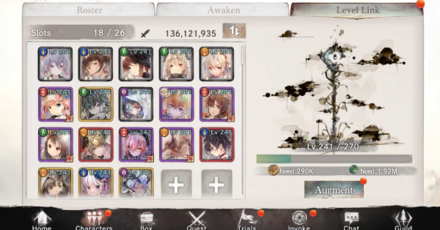
The Level Link essentially raises the level of whoever is in it to the level of your 5th most powerful witch. For example, if Cordie is at level 100 and your fifth most powerful witch is at level 60, all characters in the level link will also be at level 60.
This is why it's important to awaken five witches at this part of the game - The limit of your Level Link will be determined by the Level Cap of 5th most powerful witch.
Pour your leveling materials into into witches whose copies you can easily obtain (such as the characters from the Cave of Space-Time), and put powerful witches you don't have copies for (likely Florence or Natasha and limited SR witches) in the Level Link. This way, they can still level up beyond their level caps (though they won't get the stat boosts that come with Awakening), and you can use them in battle.
Unlock the Invocation of Chance
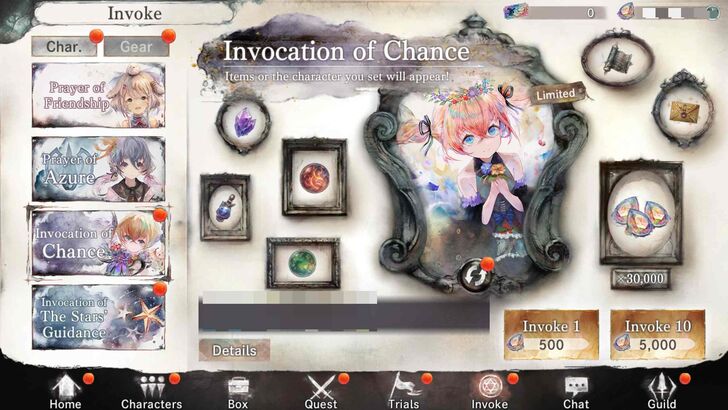
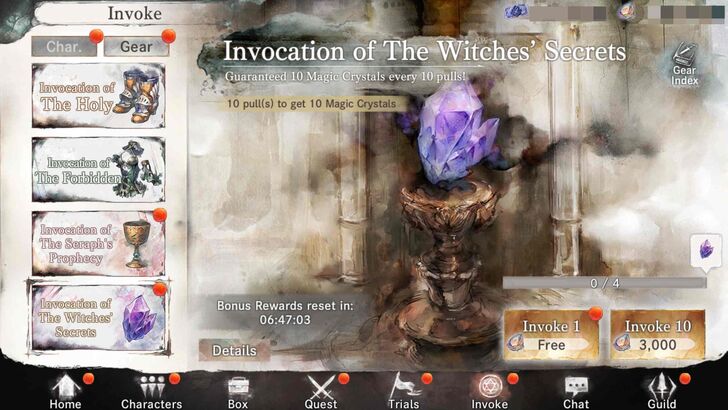
Once you get the hang of the different ways you can strengthen your witches, we recommend getting past Chapter 11-28 as soon as you can. Once you clear that stage, you will come across one of the better gacha banners in the game so far: The Invocation of Chance.
Here, not only can you pull for a specific character with an increased drop rate, but you can also get important materials to make your witches stronger including Kindling Orbs, Gold, EXP Orbs, Upgrade Water, and Dark Perfume, as well as Gear Scrolls and Magic Crystals (more on that later). Each pull also gives a Chest of Chance, which you can use to get either 8 hours' worth of EXP or Kindling Orbs.
Before unlocking the Inovcation of Chance, you may have gone through a drought of Kindling Orbs, which can stall your progress. This is the best place to get them, so pull from the Invocation of Chance Banner whenever you can and make your witches stronger.
What Is the Invocation of Chance?
Start Stockpiling Diamonds, Gold, Dews, and Adamantite
From Chapter 13 and beyond, there are four resources that you will want to keep your eye on and accumulate as much as possible:
- Diamonds
- Gold
- Dews
- Adamantite
Diamonds are always important, as well as Kindling Orbs, but Gold also becomes slowly more important as you will need more and more of it to level up your characters and raise your Level Link - to the point that you might end up in a Gold drought. Remember that Gold can be obtained from the Main Quest, Tower of Infinity, Sealed Chests, and the Invocation of Chance among other options.
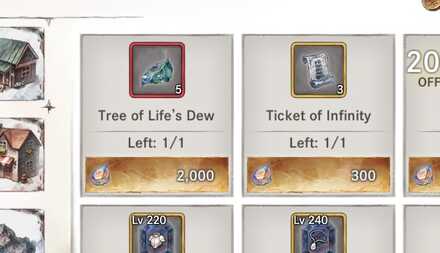
Meanwhile, Dews, or Tree of Life's Dews, are important because they're one of the two resources you need to raise the rarity of your Gear Sets (the other resource being Adamantite). To get Tree of Life's Dews, you can buy them at the Shop in packs of 5 for 2000 Diamonds.
Sometimes, they are available for a slight discount, so always take a look at the Shop to see if there's a deal going on (and set some Diamonds aside just to refresh the Shop's selection until you get the Dews).
Adamantite is somewhat easy to get, though you'll have to go on quests in the Main Quest that drop Adamantite that's applicable for the Gear Set you're upgrading (they can only be used on a specified piece of gear, and can only raise that gear to the level specified).
Beyond Chapter 11-28
Get Your First Named Gear Sets and Unique Weapons
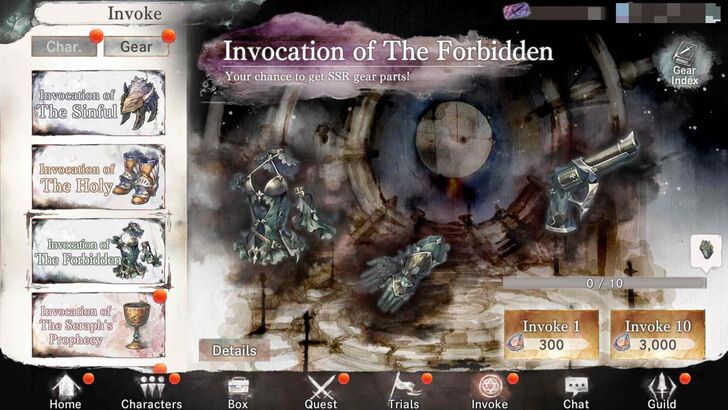
Around Chapter 13-22, you will unlock Gear Gacha banners. These banners give out Scrolls, which you can then use to create Gear Parts. Think of Gear Parts like Character Pieces - if you have enough parts for a certain gear, you can craft that gear.
Named Gear Pieces are powerful not just because of their better stats compared to normal gear (the gear you can get just by playing PvE), but because having 2, 4, or 6 pieces of a certain Gear Set will give your witch added stat bonuses.
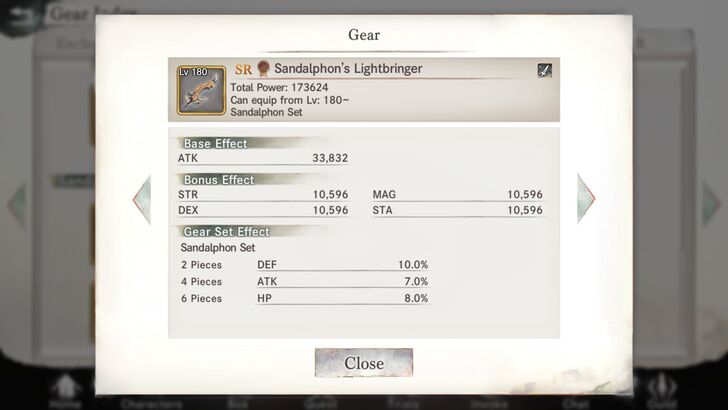
You will most likely get Naamah or Sandalphon Gear first since Sandalphon Scrolls drop from the Invocation of Chance. Two pieces of Sandalphon Gear give a witch 10% more DEF, while 4 pieces also give her 7% more ATK. A complete 6-piece set will give her an additional 8% HP.

You might also get Scrolls for Astaroth Gear, which is much much better than Sandalphon Gear because you can eventually upgrade it into Satan Gear - one of the best (and relatively affordable) Gear Sets in the game. A complete set of Astaroth Gear gives +9% ATK, +15% HP, and (most important of all) +1,500 DEF Break.
Which Gacha Gear Set Should You Build?
By now, you will also get access to Magic Crystals from the Invocation of Chance banner. You can use these crystals to buy pieces of Unique Weapons from the Shop. Unique Weapons are special weapons for your witches that have Skill Effects. These Skill Effects strengthen a witch's skills, making them more powerful in battle.
Your main attacker should always have a Unique Weapon, so prioritize getting theirs first. The rest of your team will not need it except maybe your best support witch if the Unique Weapon strengthens their main function in a way (for example, Merlyn's unique weapon, Staff of Sylvan's Harvest, lets her give her allies CRIT DMG Boost buffs, heal them, and increases the number of allies she can remove debuffs from).
| What Level Your Witch is At | What Named Gear to Get |
|---|---|
| Lv. 180 | • Astaroth Gear x2 (Boots, Unique Weapon) • Sandalphon Gear x4 OR • Namaah Gear x4 |
| Lv. 200 | • Lucifugus Gear x2 (Boots, Unique Weapon) • Astaroth Gear x2 (Chest, Gloves) • Gabriel Gear x2 (Accessory, Helmet) |
| Lv. 220 | • Beelzebub Gear x2 (Boots, Unique Weapon) • Lucifugus Gear x2 (Chest, Gloves) • Astaroth Gear x2 (Accessory, Helmet) |
For now, aim to get two pieces of Astaroth Gear, prioritizing Chest gear and your Unique Weapon (which would be Astaroth Gear by default). The other pieces can either be four pieces of Naamah gear or four pieces of Sandalphon gear.
When you get your main attacker to Level 200, aim to get two pieces of Lucifugus Gear (chest and unique weapon, upgraded from your old Astaroth Gear), two pieces of Astaroth Gear, and two pieces of Gabriel Gear (upgraded from your old Sandalphon Gear). This should give you +3000 DEF Break, +8% ATK, and another +8% ATK respectively.
When you get your main attacker to Level 220, aim to get 2 pieces of Beelzebub Gear (upgraded from your Lucifugus Gear), 2 pieces of Lucifugus Gear, and 2 pieces of Astaroth Gear. This should give you +12% ATK, +3000 DEF Break, and an additional +8% ATK.
Level 240 is when you start getting access to Satan Gear, as well as the endgame Michael and Metatron Gear, which we will discuss in the Intermediate Guide.
Aim to Unlock Party Level Link
At this point, you should already be around Chapter 14 or 15, maybe even 17 or 18 if you've been upgrading your witches properly. Congratulations! You're about done with what can be considered the "early game" of MementoMori!
Your goal for now is to get to Level 240, because that's when you will unlock the Party Level Link feature. Essentially, all the characters in the Level Link become the same level as your most powerful witches - who would all be at the same level. The level cap is dictated by how many witches you have at LR rarity.
You level up by spending EXP Orbs, Kindling Orbs, and Gold, and Gold will be the most important resource for a while until you unlock the Alchemy Workshop (which is unlocked when you get to Chapter 27 in the Main quest). The Alchemy Workshop gives out Gold in exchange for a variety of items, which should make your potential gold drought at this stage easier to manage.
MementoMori Related Guides
Beginner's Guides
Gear Guides
Farming Guides
Game Mechanics
Intermediate Guides
Gacha Guides
Trial Guides
| Trial Guides | |
|---|---|
| List of All Trials and Their Rewards | Cave of Space-Time Guide |
| Tower of Infinity Guide | Fountain of Prayers Guide |
| Tower of Souls Guide | Temple of Illusions Guide |
Guild Guides
PvP Guides
| PVP Guides | |
|---|---|
| When Should You Start Playing PvP | Battle League PvP Guide |
| Legend League PvP Guide | PvP Team Building Guide |
FAQs
Comment
Author

Beginner's Guide: Tips and Tricks for New Players
Rankings
- We could not find the message board you were looking for.
Gaming News


![Monster Hunter Stories 3 Review [First Impressions] | Simply Rejuvenating](https://img.game8.co/4438641/2a31b7702bd70e78ec8efd24661dacda.jpeg/thumb)
Popular Games

Genshin Impact Walkthrough & Guides Wiki
Honkai: Star Rail Walkthrough & Guides Wiki
Umamusume: Pretty Derby Walkthrough & Guides Wiki
Pokemon Pokopia Walkthrough & Guides Wiki
Resident Evil Requiem (RE9) Walkthrough & Guides Wiki
Monster Hunter Wilds Walkthrough & Guides Wiki
Wuthering Waves Walkthrough & Guides Wiki
Arknights: Endfield Walkthrough & Guides Wiki
Pokemon FireRed and LeafGreen (FRLG) Walkthrough & Guides Wiki
Pokemon TCG Pocket (PTCGP) Strategies & Guides Wiki


Recommended Games
Diablo 4: Vessel of Hatred Walkthrough & Guides Wiki
Cyberpunk 2077: Ultimate Edition Walkthrough & Guides Wiki
Fire Emblem Heroes (FEH) Walkthrough & Guides Wiki
Yu-Gi-Oh! Master Duel Walkthrough & Guides Wiki
Super Smash Bros. Ultimate Walkthrough & Guides Wiki
Pokemon Brilliant Diamond and Shining Pearl (BDSP) Walkthrough & Guides Wiki
Elden Ring Shadow of the Erdtree Walkthrough & Guides Wiki
Monster Hunter World Walkthrough & Guides Wiki
The Legend of Zelda: Tears of the Kingdom Walkthrough & Guides Wiki
Persona 3 Reload Walkthrough & Guides Wiki


All rights reserved
Game Copyright© Bank of Innovation, Inc. All rights reserved.
The content we provide on this site were created personally by members of the Game8 editorial department.
We refuse the right to reuse or repost content taken without our permission such as data or images to other sites.
© Bank of Innovation, Inc. (Provider)