The Pirate Set Main Quest Walkthrough and Guide
The Pirate Set is a Main Quest in Rayman in the Phantom Show, the 3rd DLC for Mario + Rabbids Sparks of Hope. Read on for the quest guide which includes rewards, battle quests, recommended heroes and Sparks as well as how to complete it.
List of Contents
The Pirate Set Walkthrough and Objectives
Quest Objectives
| Objectives |
|---|
|
1. Reach the Pirate Set
2. Defeat the Sea Stooge guarding the pier! (All Hands Ahoy!) 3. Destroy the 4 Kraken Eyes 4. Defeat the Kraken (The Kraken) |
Quest Walkthrough
| Step-by-Step Guide | |
|---|---|
| 1 |  After completing an Unlikely Team-Up, the Phantom will invite you to visit 3 sets. You can complete them in any order. To head to the main area go through the big door at the top of the stairs. In the next room, use the jump pad and Rayman’s charged punch to get the green square. Place it in its slot on the other side of the stairs to open the path. |
| 2 |  All Hands Ahoy! (Battle Quest) Head to the Pirate Set and defeat the Sea Stooge you encounter on the Pier. This will be for the battle quest, All Hands Ahoy! Make sure to equip Sparks with the Splash Protector passive. |
| 3 |  Use the jump pads on the other end of the pier and the next jump pads to head to the ship. Use the Darkmess Egg to destroy the Eye on the right side of the ship. |
| 4 |  Head up the ladder near the teleport flag of the ship and use the scan ability to make a yellow bridge. Follow the jump pads on the next few platforms. |
| 5 | 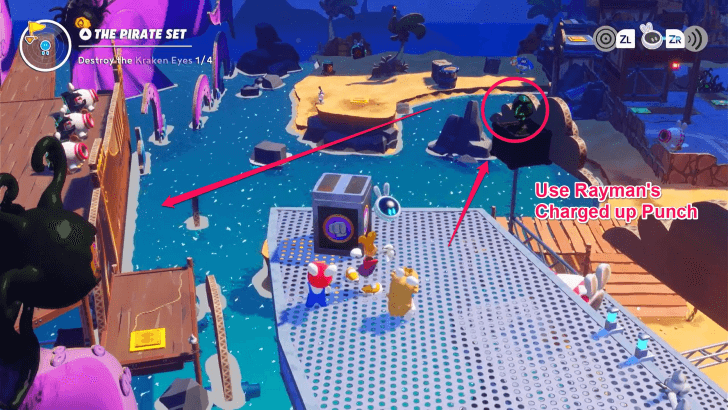 At the topmost platform, use Rayman’s charged attack to get the Darkmess Egg and destroy the nearby Darkmess Eye. Head back down using the ladder and cannon. |
| 6 |  Use the blue ledge near the teleport flag to jump down. Destroy the nearest box to reveal a blue sphere. |
| 7 | 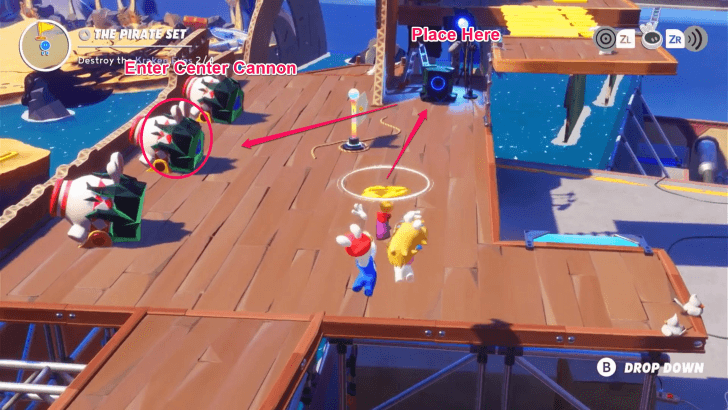 Head back up using the ramp with a jump pad on the left side. Place the blue sphere inside its slot near the teleport flag. This will open up the three cannons. Enter the center cannon. |
| 8 |  Destroy the large box to reveal a jump pad. Use this to jump to the side with the crate on it. Use the scanning abilities to reveal a yellow bridge. |
| 9 | 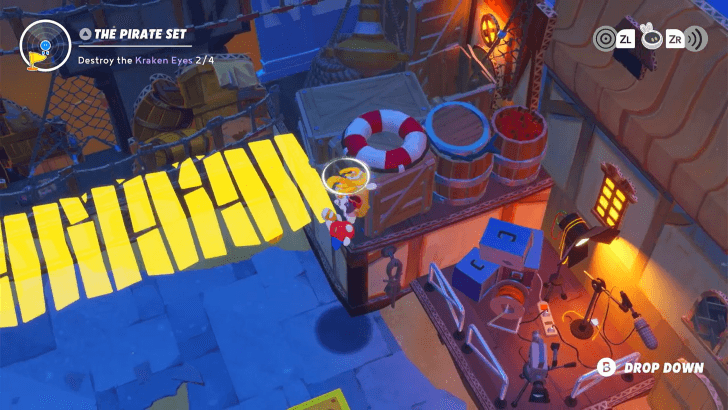 There will be another jump pad you can use. Use it to jump to the yellow bridge you just revealed then head to the left side. |
| 10 |  Destroy the box on the other side and use the jump pad underneath. Follow the jump pads. To the crate on top and push it to the lower level. |
| 11 | 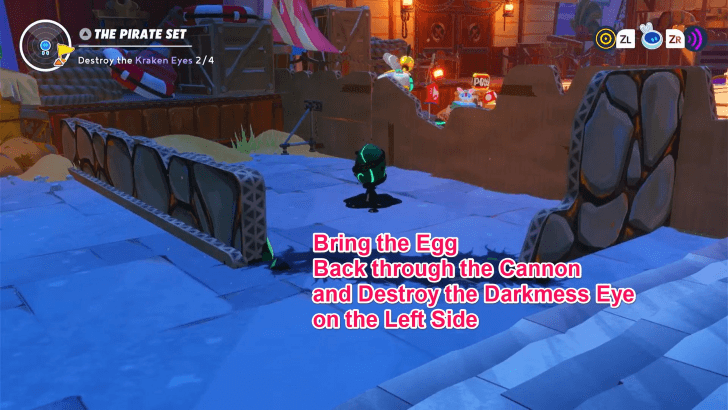 Push this crate on the green switch. Then, pull the other crate to the orange switch. This will reveal the Darkmess Egg. Take it back using the nearby cannon. Use this Darkmess Egg on the Darkmess Eye on top of the Kraken’s face, on the right side of the ship. |
| 12 | 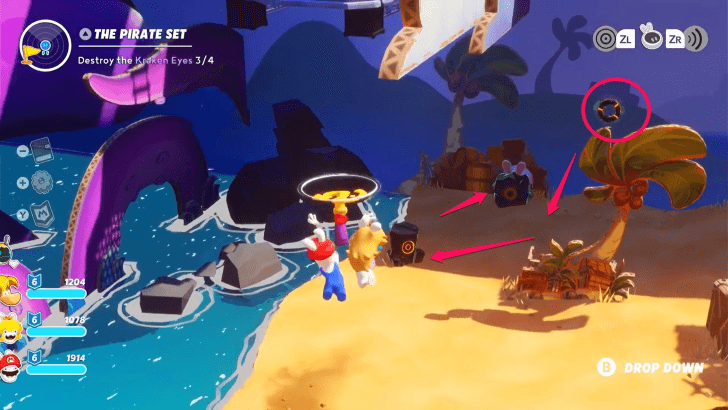 Take the leftmost cannon. Use the two jump pads on the beach with Rayman’s charged up punch to get the orange circle. Place this circle in its nearby slot. |
| 13 |  Use the pipe that just opened. This will lead you to more jump pads and platforms. Follow them to get to the back area. |
| 14 |  Use the jump pad and Rayman’s charged punch to get the Darkmess Egg. Use it to destroy the last Darkmess Eye. |
| 15 | 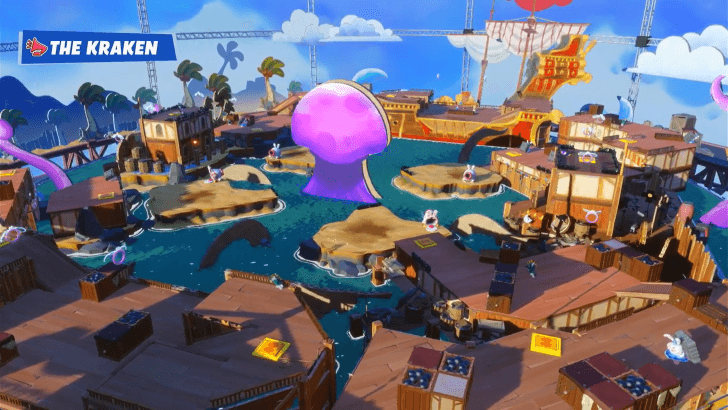 The Kraken (Battle Quest) After destroying all Darkmess Eyes, the challenge will be at the center of the ship. The Kraken will rotate its head and attack the characters on the lower islands periodically. It’s best to split up your team into 2 and 1, with the other character anticipating The Kraken’s head turning. Remember, you can also use certain spark attacks to destroy the Darkmess Eyes. |
The Pirate Set Battle Quests and Recommended Teams
| Battle Quest | Overview |
|---|---|
| All Hands Ahoy! |
Objectives: Defeat the 7 Sea Stooges
Rewards: ・Skill Prisms ・30 Coins ・110 Star Bits ・"The Golden Tickets" Memory |
| The Kraken |
Objectives: Destroy the 9 Darkmess Eyes
Rewards: ・Skill Prisms ・75 Coins ・330 Star Bits |
Recommended Heroes and Sparks
All Hands Ahoy!
| All Hands Ahoy! Recommended Team | ||
|---|---|---|
| Hero 1 |  Rayman |
- |
| - | ||
| Hero 2 |
 Rabbid Peach Rabbid Peach
|
 Aquanox Aquanox
|
 Glitter Glitter
|
||
| Hero 3 |
 Rabbid Mario Rabbid Mario
|
 Aquaquake Aquaquake
|
 Electroquake Electroquake
|
||
The Kraken
| The Kraken Recommended Team | ||
|---|---|---|
| Hero 1 |  Rayman |
- |
| - | ||
| Hero 2 |
 Rabbid Peach Rabbid Peach
|
 Aquanox Aquanox
|
 Selfie Selfie
|
||
| Hero 3 |
 Rabbid Mario Rabbid Mario
|
 Aquaquake Aquaquake
|
 Electroquake Electroquake
|
||
Previous and Next Guides
| ◀ Previous Quest | Next Quest ▶ | Golden Ticket to Fame | The Medieval Set |
|---|
How to Unlock The Pirate Set
The quest unlocks after finising the Golden Ticket to Fame
main quest.
Related Guides
Comment
Author
The Pirate Set Main Quest Walkthrough and Guide
improvement survey
03/2026
improving Game8's site?

Your answers will help us to improve our website.
Note: Please be sure not to enter any kind of personal information into your response.

We hope you continue to make use of Game8.
Rankings
- We could not find the message board you were looking for.
Gaming News
Popular Games

Genshin Impact Walkthrough & Guides Wiki

Resident Evil Requiem (RE9) Walkthrough & Guides Wiki

Honkai: Star Rail Walkthrough & Guides Wiki

Monster Hunter Wilds Walkthrough & Guides Wiki

Umamusume: Pretty Derby Walkthrough & Guides Wiki

Pokemon TCG Pocket (PTCGP) Strategies & Guides Wiki

Arknights: Endfield Walkthrough & Guides Wiki

Wuthering Waves Walkthrough & Guides Wiki

Zenless Zone Zero Walkthrough & Guides Wiki

Digimon Story: Time Stranger Walkthrough & Guides Wiki
Recommended Games

Fire Emblem Heroes (FEH) Walkthrough & Guides Wiki

Yu-Gi-Oh! Master Duel Walkthrough & Guides Wiki

Super Smash Bros. Ultimate Walkthrough & Guides Wiki

Diablo 4: Vessel of Hatred Walkthrough & Guides Wiki

Pokemon Brilliant Diamond and Shining Pearl (BDSP) Walkthrough & Guides Wiki

Elden Ring Shadow of the Erdtree Walkthrough & Guides Wiki

Monster Hunter World Walkthrough & Guides Wiki

The Legend of Zelda: Tears of the Kingdom Walkthrough & Guides Wiki

Persona 3 Reload Walkthrough & Guides Wiki

Cyberpunk 2077: Ultimate Edition Walkthrough & Guides Wiki
All rights reserved
MARIO + RABBIDS SPARKS OF HOPE © 2022 Ubisoft Entertainment. All Rights Reserved. Rabbids, Sparks of Hope, Ubisoft and the Ubisoft logo are registered or unregistered trademarks of Ubisoft Entertainment in the U.S. and/or other countries. Nintendo properties are licensed to Ubisoft Entertainment by Nintendo. SUPER MARIO characters © Nintendo. Trademarks are property of their respective owners. Nintendo Switch is a trademark of Nintendo.
The copyrights of videos of games used in our content and other intellectual property rights belong to the provider of the game.
The contents we provide on this site were created personally by members of the Game8 editorial department.
We refuse the right to reuse or repost content taken without our permission such as data or images to other sites.


