How to Beat Projector | Boss Guide

This is a guide to beating the mini-boss Projector in the game Final Fantasy 7 Remake (FF7R) from the INTERmission DLC in the Intergrade PS5 version. This article explains Projector's attack patterns, weaknesses, and tips and strategies for defeating them.
List of Contents
Projector Basic Information
| Projector | ||
|---|---|---|

|
Species | Movement | Type |
| Mechanical | Flying | Mini-Boss |
Description
A small device that floats inside Shinra's now-obsolete combat simulator. It contains stores of monster and weaponry data, which it uses to virtually contruct training exercises.
Assess (Tips)
It projects data of a diabolical creation to shield itself, and the creature must be dealt with before this device can be attacked.
Projector Stats
| Easy | Normal | Hard | |
|---|---|---|---|
| HP | Currently Unknown | 17880 | Currently Unknown |
Projector Weaknesses & Resistances
| Weakness / Status Ailments | - | |
|---|---|---|
| Lesser Resistances | - | |
| Greater Resistances | - | |
| Immunities | Poison, Silence, Sleep, Slow, Stop, Berserk | |
| Absorbed Elements | - | |
Rewards
| Easy/Normal | Hard | |
|---|---|---|
| Gil | 378 | |
| AP | 10 | |
| Exp | 1334 | |
| Items Dropped | - | |
| Rare Items Dropped | - | |
| Steal | - | |
Best Characters, Equipment, Materia for This Boss
Available Characters
 Yuffie Yuffie
|
 Sonon Sonon
|
You can only use Yuffie and Sonon for this fight.
Recommended Characters
 Yuffie Yuffie |
Weapon: 4-Point Shuriken Armor: Chthonian Armlet Accessory: Ribbon |
|---|---|
 Sonon Sonon |
Weapon: Marshalist's Staff Armor: Ninja Armlet Accessory: Kindred Cord |
Don't focus too much on magic
The Diabolic Creation is weak to Ice, but it's arm is immune to magic damage. You want to have a lot of physical damage to make sure you cripple its arm to stagger it then throw the Ice magic at it. A balance of magic and physical damage is recommended for this fight.
Best Materia for Yuffie
| Weapon (4 Slots) | ||
|---|---|---|
| Armor (4 Slots) | ||
| Summon | ||
Best Materia for Sonon
| Weapon (3 Slots) | |
|---|---|
| Armor (4 Slots) | |
Tips & Strategies for Beating Projector
| ★ Strategy Checklist ★ (Click to jump) |
||
|---|---|---|
|
|
Defeat the Diabolic Creation

The Projector is surrounded by an unbreakable barrier that won’t disappear unless you defeat the Diabolic Creation it is projecting. The Diabolic Creation is an enemy you will have to deal with, it acts as the Projector's bodyguard and will be continuously summoned until the Projector is defeated.
Focus on the Diabolic Creation's Arm

To defeat the Diabolic Creation as soon as possible you will want to focus down its right arm. Once crippled, it will be more susceptible to staggering! Beside's its arm, the Diabolic Creation is weak to the Ice element. You will want to use physical attacks on its arm then switch to ice attacks once it is crippled! Synergize with Sonon and break its arm in a flash!
Bring Antidote

You might want to bring a lot of antidotes when fighting the Projector. The Diabolic Creation has an impossible to avoid poison attack so you'll be taking a lot of damage from poison without antidotes.
Antidote Location and Effects
Throw everything at the Projector
Once you do take out the shield of the project, throw everything you got at it! If you don't destroy it while it is staggered it will recover its shield and summon the Diabolic Creation again. If you can deal enough damage you will only have to fight the Diabolic Creation once, so save up some ATB right before you beat the Diabolic Creation and use it all up on the Projector!
Scarlet & The Crimson Mare Attack Phases
Diabolical Creation
Tentacle Slam

The Diabolical Creation raises and slams its right tentacle arm in front of it. Deals pretty good damage but has a long wind-up time when it's raised, giving you time to react.
Ensnare

The Diabolical Creation disappears then reappears and grabs its target. The attack is unblockable and fairly quick so it is tough to avoid. The upside is that this attack doesn’t deal too much damage. You can avoid this attack by running away whenever you see it disappear.
Tentacle Drill
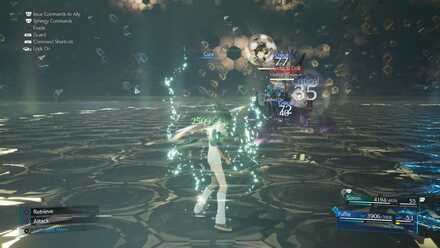
The Diabolical Creation shoves its tentacles into the ground and resurfaces below its target. It is a fast and hard-to-see attack. Hold block when you see the name of the ability come up.
Poison Shroud

The Diabolical Creation shrouds itself in a poison veil. Try not to attack close-range or you will be poisoned for sure.
Tentacle Reconstruction
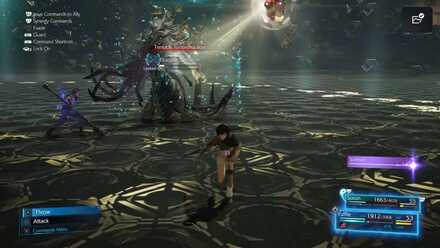
If you destroy the Diabolical Creation’s right arm, it will regenerate it with this move after it recovers from its pressured or staggered state.
Firaga

It fires a Firaga spell at the target. It can deal a lot of damage and tough to avoid. If its target is Yuffie, use the Booomerang ability Brumal Form.
Projector
Shield Deployment

After recovering from its staggered state, the Projector is going to activate another shield. No attacks can touch the Projector until this shield is broken.
Projection Sequence

The projector summons a Diabolical Creation to protect it. Defeating the Diabolical Creation is the only way to break the Projector's barrier and put it into a staggered state.
Projector: Hard Mode Guide
Projector Hard Mode Video Guide
Recommended Materia
| Materia | Reason |
|---|---|
Required ・Try and give 2 to each character ・Attach 4 to the Ninja Armlet to level them up ・Try to start leveling them up as early as possible |
|
Required ・Link to Magnify for best effects ・Still useful without Magnify |
|
Required ・Only give to Yuffie ・Sonon will revive Yuffie by sacrificing himself if she dies |
|
Helpful ・A way to heal without using MP ・Heals more based on how much HP you've lost |
|
Helpful ・Heal all party members without using HP ・Requires 2 ATB so it can prevent you from using other attacks |
|
Helpful ・Gives you a boost to your MP ・Great for Hard Mode where you can't recover MP easily ・Equip 2 to each character if possible |
|
Helpful ・Fills the ATB Gauge when blocking attacks ・Sonon can also make use of it |
|
Helpful ・Equip on Sonon ・Every time Yuffie uses a command Sonon will follow up with the weakest linked magic ・Does not require ATB or MP |
Not Much Different from Normal
The attacks used by the Diabolic Creation on Hard Mode are the same as on Normal. This means you can follow the same strategies as Normal mode, though you may have to defeat it a few times to get rid of the Projector for good.
Your Remaining MP is the Biggest Challenge
As you'll have fought a few bosses and a gauntlet of enemies up to this point, depending on how you used your magic in previous fights your MP might be on the lower side with no way to recover it. Take advantage of Chakra or Prayer to heal and save MP for when you're in a pinch. Yuffie's Boomerang also has an increased MP regen rate that can be useful.
FF7 Remake Intergrade Related Links
Intergrade and INTERmission Guide
Intergrade Story Walkthrough
| Chapter 1 | Chapter 2 |
|---|---|
 Chapter 1: Wutai's Finest Chapter 1: Wutai's Finest
|
 Chapter 2: Covert Ops Chapter 2: Covert Ops
|
Intergrade Boss Fights
| Chapter 1 | Levrikon Gigantipede Ramuh |
|---|---|
| Chapter 2 | Scarlet & The Crimson Mare Projector Nero the Sable |
| Shinra Combat Simulator | vs. Shinra's Dark Secrets vs. Midgarian Monsters Weiss the Immaculate Pride and Joy Mk 0.5 (Top Secrets) |
Intergrade Side Content
 Happy Turtle Flyers Happy Turtle Flyers
|
 Shinra Box Buster Shinra Box Buster
|
Fort Condor Minigame
 Fort Condor Guide Fort Condor Guide
|
Condor Coin Farming |
| Fort Condor Units | |
| Fort Condor Boards |
Intergrade Guides
Author
How to Beat Projector | Boss Guide
Rankings
- We could not find the message board you were looking for.
Gaming News
Popular Games

Genshin Impact Walkthrough & Guides Wiki

Honkai: Star Rail Walkthrough & Guides Wiki

Arknights: Endfield Walkthrough & Guides Wiki

Umamusume: Pretty Derby Walkthrough & Guides Wiki

Wuthering Waves Walkthrough & Guides Wiki

Pokemon TCG Pocket (PTCGP) Strategies & Guides Wiki

Abyss Walkthrough & Guides Wiki

Zenless Zone Zero Walkthrough & Guides Wiki

Digimon Story: Time Stranger Walkthrough & Guides Wiki

Clair Obscur: Expedition 33 Walkthrough & Guides Wiki
Recommended Games

Fire Emblem Heroes (FEH) Walkthrough & Guides Wiki

Pokemon Brilliant Diamond and Shining Pearl (BDSP) Walkthrough & Guides Wiki

Diablo 4: Vessel of Hatred Walkthrough & Guides Wiki

Super Smash Bros. Ultimate Walkthrough & Guides Wiki

Yu-Gi-Oh! Master Duel Walkthrough & Guides Wiki

Elden Ring Shadow of the Erdtree Walkthrough & Guides Wiki

Monster Hunter World Walkthrough & Guides Wiki

The Legend of Zelda: Tears of the Kingdom Walkthrough & Guides Wiki

Persona 3 Reload Walkthrough & Guides Wiki

Cyberpunk 2077: Ultimate Edition Walkthrough & Guides Wiki
All rights reserved
© SQUARE ENIX CO., LTD. All Rights Reserved.
CHARACTER DESIGN:TETSUYA NOMURA/ROBERTO FERRARI
The copyrights of videos of games used in our content and other intellectual property rights belong to the provider of the game.
The contents we provide on this site were created personally by members of the Game8 editorial department.
We refuse the right to reuse or repost content taken without our permission such as data or images to other sites.


![Neverness to Everness (NTE) Review [Beta Co-Ex Test] | Rolling the Dice on Something Special](https://img.game8.co/4414628/dd3192c8f1f074ea788451a11eb862a7.jpeg/show)


