E-1 Front-Door Key Gems and Boo Location Guide
Play Time | Graphics Comparison| New Features
★ Mansion Guides | Interactive Maps | 100%
☆ Locations: Gems | Boos | Ghosts | Gold Bones
★ ScareScraper Multiplayer Guide | Solo?!
┗ High Score Boards ▶︎ Missions | SkyScraper
This is a walkthrough for all gems in E1 Front-Door Key, as well as how to clear the level and find the boo in Luigi's Mansion 2 HD for the Nintendo Switch. Read on for a detailed guide for E-1 Front-Door Key, including how to get 3 stars, gem locations, the location of the boo, as well as the secret door location.
| Previous Mansion | Current Mansion | Next Mansion | ||||||||||||||||||
|---|---|---|---|---|---|---|---|---|---|---|---|---|---|---|---|---|---|---|---|---|
| Secret Mine | Treacherous Mansion | King Boo's Illusion | ||||||||||||||||||
| E-1 | E-2 | E-3 | E-4 | E-5 | E-Boss | E-Bonus | ||||||||||||||
List of Contents
E-1 Front-Door Key Gems and Boo Location Map
| Jump to a Section! | ||||
|---|---|---|---|---|
These are all of the Gems available within this Mansion, however some Gems are exclusive to specific Missions.
Interactive Map of All Mansions
E-1 Front-Door Key Walkthrough
| Jump to a Section! | ||||
|---|---|---|---|---|
E-1 Front-Door Key How to Get 3-Stars
| Min. Clear Time | Min. Ghosts Captured | Max. Health Lost | Min. Treasure |
|---|---|---|---|
| 17:55 | 12 | 20 or Less | 2100 |
These numbers are values we got based on our runs. If you got 3-Stars with better scores, take pride in it and share a picture in our Missions Record Boards!
E-1 Front-Door Key Objectives
| Goal | Use the Front-Door Key to open the Front Entrance of the Treacherous Mansion. Once inside, start looking for the Dark Moon piece. Follow the Polterpup, and recover the Front-Door Key. |
|---|---|
| Description | The paranormal activity in this mansion is completely off the charts! Stay on your toes, and start looking for the Dark Moon piece. |
- Reach the Mansion Entrance
- Head Down to the Bottom of the Well
- Head to the Ceremonial Chamber
- Light All Four Fuse
- Follow the Footprints in the Haunted Catacombs
- Search the Underground Lab
- Reach the Cliffside
- Explore the Cliffside
- Reach the Dungeon Cells
- Retrieve the Front-Door Key
Reach the Mansion Entrance
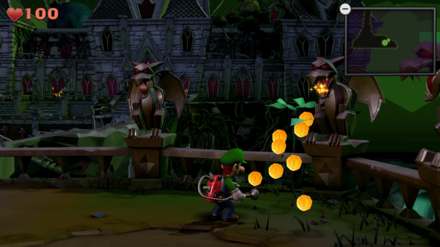
Once the mission starts, have Luigi carefully travel across the narrow path onto the entrance of the Treacherous Mansion. Upon reaching the entrance of the Mansion, interact with the Mansion door, which will trigger a cutscene.
Head Down to the Bottom of the Well
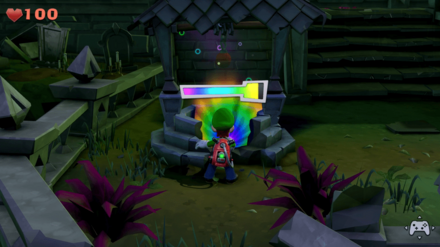
After the cutscene, take a peek at the window on the right side of the Mansion door by interacting with it. Then head over to the bottom-left corner of the Veranda and go down the staircase there. At the foot of the stairs is an archway with a hole on it, have Luigi interact with it. Luigi will take a peak at the hole and get a glimpse of what's on the other side, which is the Guard Tunnel.
Afterwards, go to the well that's on top of the staircase. Use the Dark-Light Device on the well, which will turn the gray ball into red. Have Luigi grab on to the chain and descent into the bottom of the well.
Head to the Ceremonial Chamber
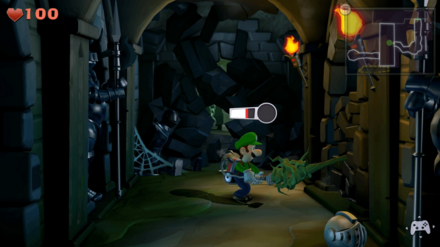
Once at the bottom of the well, have Luigi explore the area further while collecting treasure along the way. Go first to the Guard Tunnel and interact with the fallen debris at the top of the area. Afterwards, use the Poltergust on the plant that's crushed between stones on the right side of the area to tug on it and create an opening. This will lock down the area and trigger ghosts to appear. Capture all the ghosts, then enter the archway where the plant was earlier.
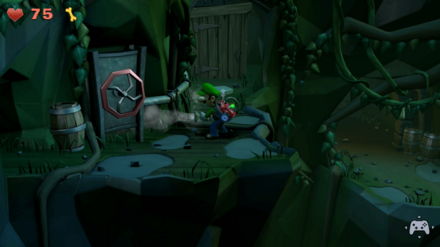
Just move across the new area and onto the Cliffside. Upon reaching the Cliffside, retrieve a gold bone by interacting with the barrel near the entrance. Afterwards, have Luigi use the Poltergust on the contraption with a wheel on it to raise the gate, then quickly enter it before the gate closes again. This will lead Luigi into the Ceremonial Chamber
Light All Unlit Scones
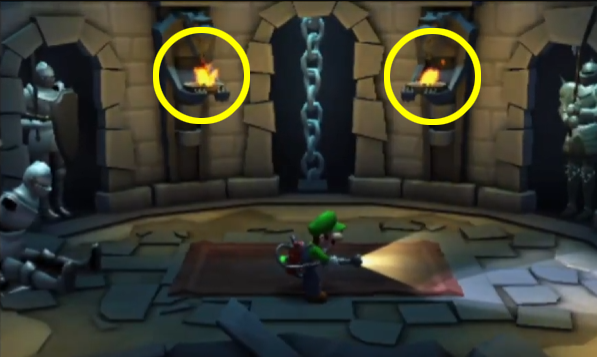
Once inside the Ceremonial Chamber, go deeper into the area first and grab the web-ball that's beside a suit of armor sitting on the ground. Take the web-ball and light it by putting it close to the lantern on the floor that's beside a suit of armor near the entrance of the area. Once lit, use the web-ball to light up the unlit scones, which are the pillars with gargoyle heads on it. Afterwards, a cutscene will trigger.
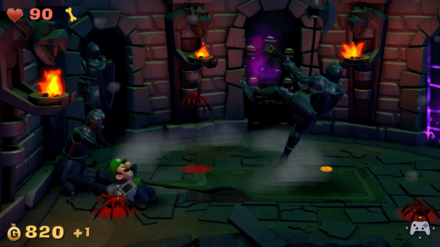
After the cutscene, defeat the ghost-possessed suits of armor by luring them on to the rug at the middle of the chamber, then vacuuming one of the rug's corner off. Doing so makes them fall and forces the ghost that's possessing the suit to come out. Have Luigi capture all the ghosts.
After capturing all the ghosts, have Luigi sit on the throne in the north wall by interacting with it. This will bring Luigi down to the Haunted Catacombs.
Follow the Polterpup's Trail in the Haunted Catacombs
| Throne to the Underground Lab |
|---|
| South → South → East → East → North → North → East → South |
While in the Haunted Catacombs, have Luigi use the Dark-Light Device and aim it at the ground. This will reveal Polterpup's trail that Luigi can follow to navigate through the area and collect the treasure along the way, since the map will be unavailable while in the Haunted Catacombs.
| Throne to the Bonus Challenge |
|---|
| South → South → East → East → North → North → West |
When Luigi reaches the next intersection, look for the suspicious coffin in the background. Before following Polterpup's trail, have Luigi move north and interact with the coffin. It will be revealed that the coffin is actually a painting. Use the Poltergust to vacuum the painting to further reveal that there is in fact a coffin against the north wall, but it's blocked by a set of bars. Luigi must then find another path to the coffin.
After vacuuming the coffin painting, move one intersection to the south, one intersection to the east, then two intersections to the north. Luigi will have to pass two sword-swinging suits of armor to get to the north wall. Then, move one intersection to the west and interact with the coffin. When Luigi interacts with the coffin, it will transport him into an unknown area, which is a bonus challenge. In this challenge, Luigi must collect eight red coins within the time limit.
How to Beat the Bonus Challenge
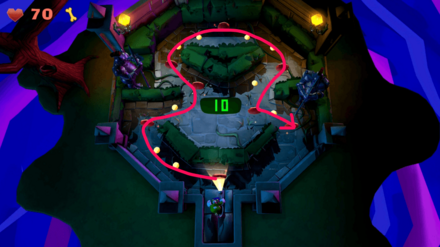
Once the challenge starts, grab the red coin directly in front of Luigi, then follow the trail to the left. Cut across the center of the maze and follow a figure-eight pattern to collect the remaining red coins. After collecting all the red coins, a chest will appear at the center of the maze. Open the chest and collect the treasure to complete the challenge and return to the Haunted Catacombs.
After completing the Bonus Challenge, move two intersections to the east, then one intersection to the south to find the door to the Underground Lab. Before entering, move one intersection to the south and use the Dark-Light Device to reveal a hidden chest on the southeast of the area. Afterwards, move one intersection to the north to return to the door of the Underground Lab and enter it.
Search the Underground Lab
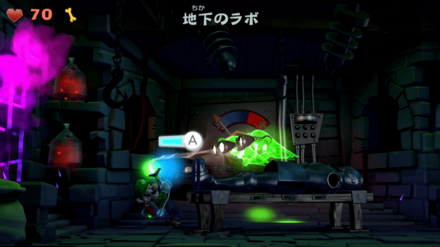
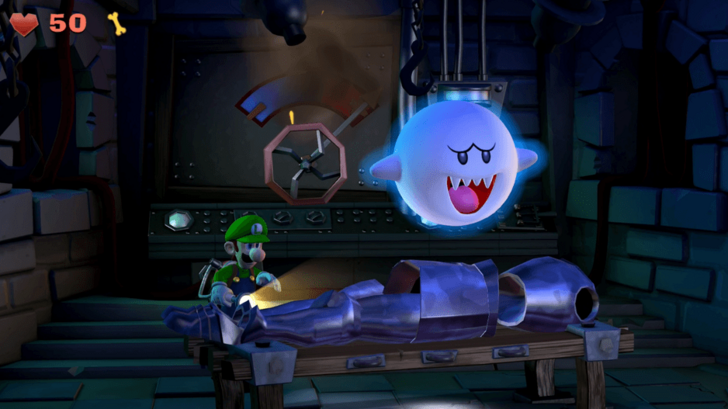
Upon entering the Underground Lab, a cutscene triggers. After the cutscene, have Luigi clear the room by capturing the ghosts there. Once the room is cleared, vacuum the valve on the north wall until the armor on the table gets blasted by electricity, revealing a hidden Boo. Capture the Boo and collect the treasure it drops.
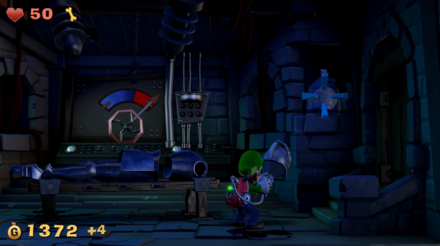
Afterwards, find the helmet that fell from the table when the armor fell apart. Use the Poltergust to vacuum the helmet and move near the door on the east wall. Aim the Poltergust at the nearby shelf until the targeting reticle appears. Then, launch the helmet to destroy the glass jar, then vacuum the Circle Diamond down from the shelf. Do this again to destroy the glass jars on the west wall, finish searching the room, then head through the door in the east wall, which leads into the next half of the Haunted Catacombs.
Reach the Cliffside
| Underground Lab to the Framed Sketch |
|---|
| East → North → East → South → East → North → East |
Upon entering the second half of the Haunted Catacombs, have Luigi interact with the suit of armor that's entangled by vines near the Underground Lab door. The armor will then point its sword to the right. Move one intersection to the east where there's another suit of armor on the north wall. Before interacting with it, move one intersection to the south to find a chest and open it. Then move north to return to the suit of armor and interact with it.
Afterwards, move one intersection to the east where there are large webs on the north wall and a suit of armor in the foreground. Interact with the suit of armor, then move one intersection to the east. Use the Dark-Light Device to reveal the suit of armor on the north wall. Capture the Spirit Balls, interact with the suit of armor, then move one intersection to the east to find the framed sketch. Use the Dark-Light Device to pull a ball of webbing out of the sketch. Use the Poltergust to vacuum the web-ball and use the lantern on the ground to light it on fire.
| Framed Sketch to the Large Webs |
|---|
| West → South → West → North |
With the lit web-ball on hand, move one intersection to the west, one intersection to the south, one intersection to the west, then one intersection to the north. This will lead Luigi back to the intersection with a large web and a suit of armor in the foreground. Use the web-ball to burn the large web and retrieve the gem hidden there.
After retrieving the gem, move two intersections to the south. Luigi will find a door on the east wall that leads to the Cliffside. Go through the door to enter the Cliffside.
Explore the Cliffside

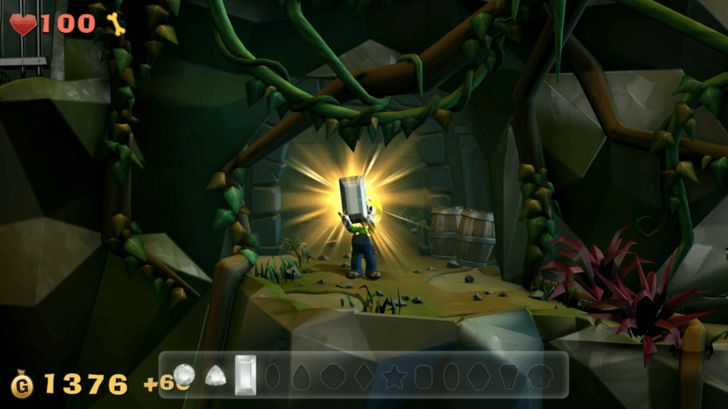
Upon entering the B2 level of the Cliffside, Luigi will encounter a gem hanging on a vine. Use the Poltergust to vacuum and collect the gem, then head over to the north wall and use it again to rip off the false bricks and reveal the hidden treasure inside. Collect the treasure, then search the barrels nearby.
Afterwards, follow the narrow path. As Luigi moves along the path, he will encounter a crevice between two pairs of purple weeds. When Luigi moves near the crevice, a group of bats will burst out of the opening and fly across his path. Moving further into the path, look for the crevice just past the second pair of purple weeds. Approach it slowly and flash the gold bats that fly out. At the end of the path is a chest, interact with it, then head back into the Haunted Catacombs.
Reach the Dungeon Cells
| Cliffside to the Dungeon Cells |
|---|
| West → South → South → West |
After exploring the Cliffside and going back inside the Haunted Catacombs, return to the intersection where the door to the Underground Lab is located. The easiest way to return to the starting point is to just head straight after entering the Haunted Catacombs from the Cliffside. Once back at the starting point, follow Polterpup's trail from there using the Dark-Light Device, which will lead Luigi to the door that leads to the Dungeon Cells.
Retrieve the Front-Door Key
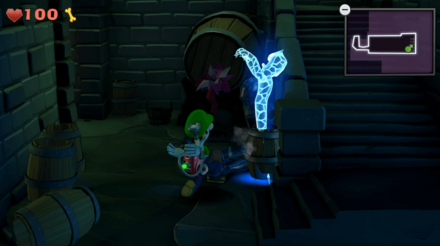
Upon entering the Dungeon Cells, Polterpup will run away towards another area. Before following Polterpup, search the barrels at the bottom of the steps to find a Strong Hider, and capture it. Afterwards, use the Poltergust to pull the blockage from the cask. Vacuum the nearby bucket, pass it under the water spilling from the cask, then carry the filled bucket down the hall to the west.
Down the hall, Luigi will find the first cell. Go inside the cell and water the sprout on the east wall of the cell by holding down the L-Button to drop the bucket. When a purple flower appears, flash it to earn some treasure. Then, search the nearby barrels, then leave the cell and continue down the hall.
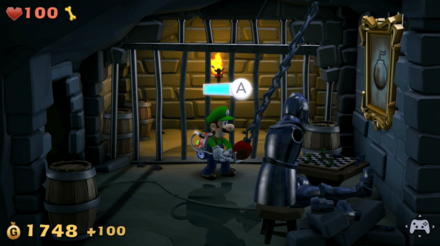
Go first to the west-most cell. Use the Poltergust to pull the false bars off the cell, then go inside. Use the Dark-Light Device to pull an explosive out of the framed sketch. Wait for the explosive to go off and create an opening on the west wall of the cell. Before entering the opening, use the Poltergust to pull the chain that's hanging near the framed sketch. This will rotate a section of the wall, moving the sketch into the middle cell. Search the nearby barrels, then head through the opening.
Once inside the opening, use the Poltergust to vacuum along the passage until Luigi reaches the ledge at the end of the path. Flash the purple flower to find some treasure, then head back to the Dungeon Cells.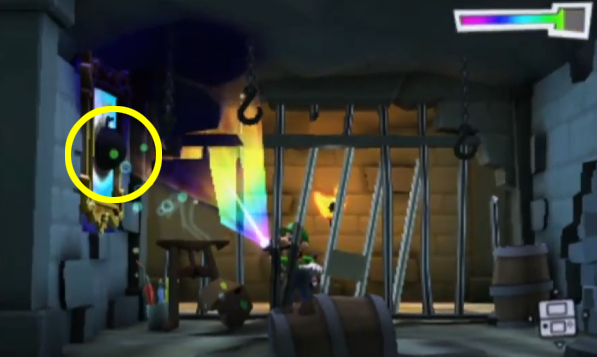
Head over to the middle cell, then use the Dark-Light Device to pull an explosive out of the framed sketch. Move over to the east cell and go through the opening on the wall that's created once the explosive goes off. Once inside the middle cell, interact with the barrel that's lying on the ground.
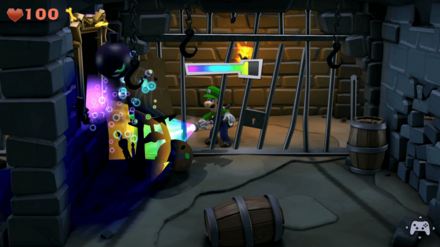
This will make Polterpup appear and knock Luigi down. When Luigi recovers, flash Polterpup, then latch on it and capture it. Afterwards, retrieve the Front-Door Key from the floor, then answer the Duel Scream to complete the mission and return to the Bunker.
E-1 Front-Door Key Gem Locations
| Jump to a Section! | ||||
|---|---|---|---|---|
| Available Gems | |||||||||||||||||||
|---|---|---|---|---|---|---|---|---|---|---|---|---|---|---|---|---|---|---|---|
|
|
|
|
|
||||||||||||||||
|
|
|
|
|
||||||||||||||||
|
|
|
|
|
|
|||||||||||||||
Grayed out Gems are unavailable on this mission.
Gem #1 (Circle Diamond)

| Gem |
|
|---|---|
| Where to Find | Underground Lab |
Head into the Underground Lab, defeat all the enemies and the Boo, use the iron helmet to shoot the glass bottle up on the wall on the east, and grab the Circle Diamond as it drops down.
Gem #2 (Triangle Diamond)
| Gem |
|
|---|---|
| Where to Find | Haunted Catacombs |
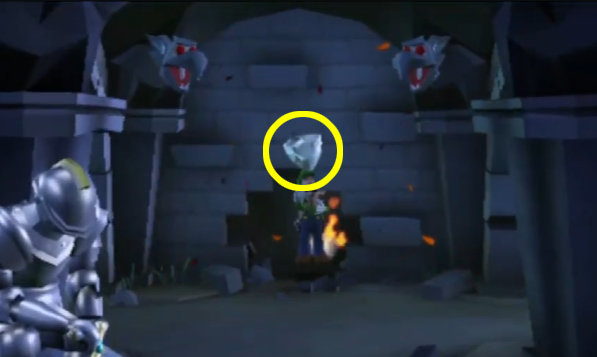
Head into the Haunted Catacombs past the Underground Lab, head towards the very northeast corner, and use the Dark-Light Device on the painting on the wall to grab a flaming web ball. Then head towards the west until you find a web and burn it down to obtain the Triangle Diamond hidden behind.
Gem #3 (Rectangle Diamond)
| Gem |
|
|---|---|
| Where to Find | Cliffside |
Head towards Cliffside through the door on the southeast corner in Haunted Catacombs. Then use the Poltergust to suck the Rectangle Diamong hanging on a vine.
Gem Locations: How to Find All Gems
E-1 Front-Door Key Boo Location
| Jump to a Section! | ||||
|---|---|---|---|---|
Booll Location
| Boo | Where to Find |
|---|---|
| Booll | Underground Lab |
Enter the underground lab, defeat all the enemies inside, turn the valve on the north wall to shock the armor on the table, and the Boo will appear.
All Boo Locations: Where to Find All Boos
E-1 Front-Door Key Secret Door
| Jump to a Section! | ||||
|---|---|---|---|---|
| Location | How to Find the Secret Door |
|---|---|
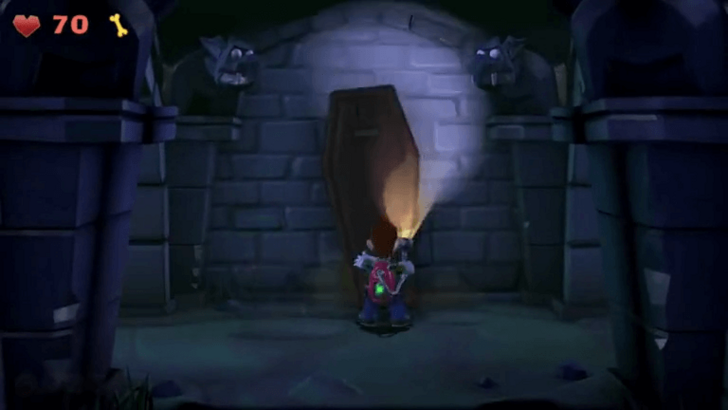 |
From the throne room, move south, south, east, east, north, north, then west where you will find the coffin leaning of the north wall. |
How to Beat the Challenge
When the challenge starts, grab the Red Coin directly in front of you, then follow the trail to the left. Cut across the center of the maze and follow a figure-eight pattern to collect the remaining Red Coins.
All Secret Door Locations and Rewards
E-1 Front-Door Key Enemies
| Jump to a Section! | ||||
|---|---|---|---|---|
Enemies Encountered in E-1 Front-Door Key
 Strong Greenie Strong Greenie
|
 Strong Slammer Strong Slammer
|
 Strong Hider Strong Hider
|
 Strong Sneaker Strong Sneaker
|
 Gold Greenie Gold Greenie
|
 ??? ???
|
 Polterpup Polterpup
|
 Gold Mouse Gold Mouse
|
 Spider Spider
|
 Gold Spider Gold Spider
|
 Bat Bat
|
Luigi's Mansion 2: Dark Moon Related Guides

All Mission Guides
Post-Game
| Post-Game Guide | ||
|---|---|---|
| ScareScraper Guide | Ending and Post-Game Content | 100% Checklist |
Comment
Author
E-1 Front-Door Key Gems and Boo Location Guide
Rankings
- We could not find the message board you were looking for.
Gaming News
Popular Games

Genshin Impact Walkthrough & Guides Wiki

Honkai: Star Rail Walkthrough & Guides Wiki

Umamusume: Pretty Derby Walkthrough & Guides Wiki

Pokemon Pokopia Walkthrough & Guides Wiki

Resident Evil Requiem (RE9) Walkthrough & Guides Wiki

Monster Hunter Wilds Walkthrough & Guides Wiki

Wuthering Waves Walkthrough & Guides Wiki

Arknights: Endfield Walkthrough & Guides Wiki

Pokemon FireRed and LeafGreen (FRLG) Walkthrough & Guides Wiki

Pokemon TCG Pocket (PTCGP) Strategies & Guides Wiki
Recommended Games

Diablo 4: Vessel of Hatred Walkthrough & Guides Wiki

Cyberpunk 2077: Ultimate Edition Walkthrough & Guides Wiki

Fire Emblem Heroes (FEH) Walkthrough & Guides Wiki

Yu-Gi-Oh! Master Duel Walkthrough & Guides Wiki

Super Smash Bros. Ultimate Walkthrough & Guides Wiki

Pokemon Brilliant Diamond and Shining Pearl (BDSP) Walkthrough & Guides Wiki

Elden Ring Shadow of the Erdtree Walkthrough & Guides Wiki

Monster Hunter World Walkthrough & Guides Wiki

The Legend of Zelda: Tears of the Kingdom Walkthrough & Guides Wiki

Persona 3 Reload Walkthrough & Guides Wiki
All rights reserved
© Nintendo. Games are property of their respective owners. Nintendo of America Inc. Headquarters are in Redmond, Washington, USA
The copyrights of videos of games used in our content and other intellectual property rights belong to the provider of the game.
The contents we provide on this site were created personally by members of the Game8 editorial department.
We refuse the right to reuse or repost content taken without our permission such as data or images to other sites.




![Monster Hunter Stories 3 Review [First Impressions] | Simply Rejuvenating](https://img.game8.co/4438641/2a31b7702bd70e78ec8efd24661dacda.jpeg/show)


![Monster Hunter Stories 3 Review [First Impressions] | Simply Rejuvenating](https://img.game8.co/4438641/2a31b7702bd70e78ec8efd24661dacda.jpeg/thumb)


