This survey will take about 1 minute.
Your answers will help us to improve our website.
FF7 Remake
How to Beat Failed Experiment | Boss Fight Guide (Normal & Hard Mode)

This is a guide to beating the Boss Failed Experiment in the game Final Fantasy 7 Remake (FF7R). This article explains Failed Experiment's attack patterns, weaknesses, and tips and strategies for defeating it on both Normal and Hard Mode.
List of Contents
Failed Experiment Stats and Information
Basic Information
| Failed Experiment | ||
|---|---|---|

|
Species | Movement | Type |
| Artificial Life | Grounded | Boss |
Description
An experimental specimen kept in the Shinra underground research facility. It was human once, but cellular transplants from various large creatures have turned it ito a terrifying creature. It leads a group of failed test subjects.
Assess (Tips)
Ice spells rapidly fill its stagger gauge, while melee attacks have oly a slight effect on it, and long-range and other element attacks have no effect. Crippling its tentacles will cause it to reveal its heart, and attacking its heart will rapidly fill its stagger gauge.
Failed Experiment Stats
| Easy | Normal | Hard | |
|---|---|---|---|
| HP | 11229 | 20417 | 40086 |
| Attack | 184 | 391 | |
| Magic Attack | 156 | 328 | |
| Defense | 159 | 312 | |
| Magic Defense | 137 | 268 | |
Failed Experiment Weaknesses & Resistances
| Weakness / Status Ailments | Ice | |
|---|---|---|
| Lesser Resistances | - | |
| Greater Resistances | Sleep | |
| Immunities | Poison, Slow, Stop, Berserk, Fixed Damage, Proportional Damage | |
| Absorbed Elements | Lightning | |
How to Stagger Failed Experiment
Stagger Rates
| ×0.25 | ×No effect | ×1 | ×No effect |
| - | |||
| ×1.5 | ×No effect | ×No effect | - |
Stagger Length
| Stagger Length | 13 seconds |
|---|
Failed Experiment Abilities
| Catch and Release |
| Toxic Volley |
| Claim |
| Fling |
| Fury |
| Fling |
| Intimidate |
| Livewire |
| Energize |
| Plasma Discharge |
Rewards
| Easy/Normal | Hard | |
|---|---|---|
| Gil | 950 | 2250 |
| AP | 10 | 30 |
| Exp | 950 | 4500 |
| Items Dropped | Mythril Claws (100%) | |
| Rare Items Dropped | - | |
| Steal | Poison Materia (12%) | |
Learnable Enemy Skills
No Enemy Skills can be learned from Failed Experiment.
Failed Experiment Boss Fight Guide
Failed Experiment Abilities and Attack Patterns
| Name | Element | Blockable? | Knockdown? | Status |
|---|---|---|---|---|
|
|
- | Yes | No | - |
| Pulls an Unknown Entity towards itself and throws it at a target. Party members can take damage from the Unknown Entity while it's being held by the Failed Experiment. In phase 2 can grab up to 4 Unknown Entities. | ||||
|
|
- | Yes | Yes | - |
| Throws the claimed Unknown Entity at a target. | ||||
|
|
- | Yes | Yes | - |
| Lashes out twice with its tentacles. | ||||
|
|
- | Yes | Yes | - |
| Punches at a target. | ||||
|
|
- | Yes | Yes | - |
| Leaps towards a target. | ||||
|
|
- | No | Yes | - |
| Grabs a target with its tentacles, binding them, and hurls them at the ground. | ||||
|
|
- | Yes | No |
|
| Shoots poison orbs from its tentacles that turn into toxic gas when hitting the ground or a wall. The gas will persist for 10 seconds. | ||||
|
Rally
|
- | - | - | - |
| Summons more Unknown Entities. | ||||
|
|
- | No | Yes | - |
| Jumps into the air and crashes down onto the platform, breaking it and releasing a shockwave that damages allies and enemies. | ||||
|
|
- | Yes | No | - |
| Jumps at a target and smashes down on their position. | ||||
|
|
- | No | No |
Stun (7 sec)
|
| Screams and stuns anyone in range. | ||||
|
|
- | - | Yes | - |
| Grabs a target with its tentacles, binding them, and repeatedly strikes them with its claws. | ||||
|
Defensive Action
|
- | - | - | - |
| Has Unknown Entities cast Shield on themselves. | ||||
|
Reflective Action
|
- | - | - | - |
| Has Unknown Entities cast Reflect on themselves. | ||||
|
Voltaic Action
|
- | - | - | - |
| Has Unknown Entities cast Thundaga on itself. | ||||
|
|
|
Yes | Yes | - |
| Absorbs the Unknown Entities cast Thundaga to charge itself and heal. | ||||
|
|
|
Yes | Yes | - |
| Channels electricity around itself and prepares to use Plasma Discharge. | ||||
|
|
|
Yes | Yes | - |
| Releases large orbs of electricity that shoot across the arena, homing in on party members. | ||||
*Status Effects and Ailments Guide
Best Characters for This Boss
Available Characters
 Barret Barret
|
 Tifa Tifa
|
Recommended Characters
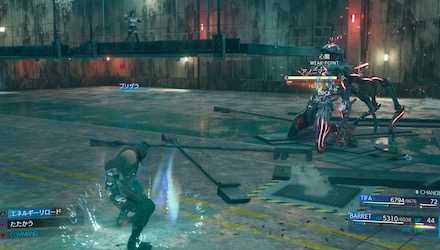
When the Failed Experiment shows up, Barret is the best for attacking its Appendages which are weak to his gun attacks. Once the weakpoint appears, switch to Tifa to quickly stagger it and lay down the hurt.
Failed Experiment Attack Phases
Phase 1
| Phase Point Summary | |
|---|---|
| 1 | Unknown Entities will attack the party in waves until Failed Experiment appears |
| 2 | Some will attack with Paralyzing Fluid from afar, paralyzing their target |
Phase 2
| Phase Point Summary | |
|---|---|
| 1 | Failed Experiment will begin by chipping away at the platform Tifa is on |
| 2 | It will use Rally to call more Unknown Entities to the battlefield |
| 3 | Jumps to characters and lashes out with Fury |
| 4 | Once it takes enough damage, it will destroy the platform Tifa is on and start phase 3 |
Phase 3
| Phase Point Summary | |
|---|---|
| 1 | Will stop calling more Unknown Entities and continue using phase 2 mechanics |
| 2 | Begins to pick up Unknown Entities and throw them at the party |
| 3 | Can heal itself with Voltaic Action and Shield the Unknown Entities with Defensive Action |
Tips & Strategies for Beating Failed Experiment
| ★ Strategy Checklist ★ (Click to jump) |
||
|---|---|---|
|
|
Equip Ice Materia
While physical damage may be more than enough for this boss, having ice magic is always safe. Shiva will do massive damage as well.
Take Out the Unknown Entities
Before the boss will even appear you will have to fight a few waves of these. They are weak but make up for it in numbers. Hit them with Barret's Focused Shot when grouped up or combo Tifa's Whirling Uppercut into Divekick to take them out quickly. Once the boss spawns you will want to keep taking them out, as during phase 3 Failed Experiment will use them to heal itself.
Shoot it in the Tentacles
With Barret, shoot its Appendages to briefly stun it, revealing its weakpoint. Dealing damage to the Heart will increase its stagger gauge much quicker so this should be your main goal throughout the fight.
Stagger For Massive Damage
Like every other enemy and boss before it, you can deal a huge amount of damage when it's staggered. If you have Tifa use Unbridled Strength twice and use her unique ability Rise and Fall, she can increase the damage done to Failed Experiment to make the most of the short time.
Failed Experiment: Hard Mode Guide
Best Characters and Equipment
| Tifa |
Weapon: Mythril Claws7) Armor: Force Bracelet Accessory: Champion Belt |
|---|---|
| Barret |
Weapon: EKG Cannon Armor: Chain Bangle Accessory: Healing Carcanet |
Best Materia to Use
The number of slots in your Weapon may vary depending on your Weapon Level.
Tifa
| Weapon (6 Slots) | |||
|---|---|---|---|
| Armor (4 Slots) | |||
| Summon | |||
Barret
| Weapon (6 Slots) | ||||
|---|---|---|---|---|
| Armor (4 Slots) | ||||
| Summon | ||||
| ★How to Beat Failed Experiment on Hard Mode★ | ||
|---|---|---|
|
|
Ice is Essential
Ice Magic is extremely effective against Failed Experiment on Normal Mode as well, but on Hard Mode, the importance of using Ice has been raised once again. You'll want to try ending this fight quickly by dishing out heavy damage from the start with Ice attacks. Equip Elemental Materia + Ice Materia to Barret's weapon to take out its Appendages quickly. Magnify Materia can also be useful combined with Ice, but since this will limit your healing potential, you might want to keep Magnify attached to your Healing Materia instead.
Equip Headband to Counter Sleep

The Failed Experiment can cause both of your party members to Sleep. Have Headband equipped on at least one party member to make sure it does not happen! You can also equip Subersion linked with Warding Lv.3 to be immune to Sleep if you have the materia slots to spare.
Block against its jumping attack
 Enlarge Enlarge |
→ |  Enlarge Enlarge |
When Failed Experiment jumps onto one of your characters, be sure to hold R1 to guard immediately. This attack will do major damage even when blocked, but if it hits a party member who fails to block it, they'll have a difficult time recovering and getting back into the battle.
Focus on the Appendages and try to end the fight quickly
 Enlarge Enlarge |
→ |  Enlarge Enlarge |
On Hard Mode, Failed Experiment will deal significantly more damage with each attack, and if you play too defensively, this battle can stretch out and wear your party down. Wait for the Appendages to appear, and use Barret's Elemental + Ice attacks to hit hard, while slamming them with Ice Magic. Once you've destroyed the Appendages, target the Heart, which will allow you to Stagger Failed Experiment. If you can deal enough damage while Staggered, you can wrap this fight up quickly.
Unknown Entities will continue harassing you throughout the fight, but by casting Silence on Failed Experiment, you can significantly limit their effectiveness, and won't have to spend too much time destroying them. Focus on hitting Failed Experiment and ignore the little guys for the most part.
Hide behind obstacles during Plasma Discharge
 Enlarge Enlarge |
→ |  Enlarge Enlarge |
Failed Experiment will use its ultimate attack Plasma Discharge to strike almost the entire field in one blow. However, you can avoid this attack by hiding behind the obstacles on the map.
These obstacles are not close to the position from where you start the battle, so you'll have to move closer to these obstacles during the battle in preparation for Plasma Discharge.
Boss Fight Related Articles
Major Story Bosses
| All Major Story Bosses | |
|---|---|
| Chapter 1 | Scorpion Sentinel |
| Chapter 4 | Roche |
| Chapter 5 | Crab Warden |
| Chapter 7 | Airbuster |
| Chapter 8 | Reno Rude |
| Chapter 9 | Hell House |
| Chapter 10 | Abzu |
| Chapter 11 | Ghoul Eligor |
| Chapter 13 | Failed Experiment |
| Chapter 14 | Abzu (2nd Fight) |
| Chapter 15 | The Valkyrie |
| Chapter 16 | Specimen H0512 |
| Chapter 17 | Jenova Dreamweaver Rufus The Arsenal |
| Chapter 18 | Motor Ball Whisper Harbinger Sephiroth |
VR Mission Bosses
| All VR Mission Bosses | |
|---|---|
| Chapter 8 | Shiva |
| Chapter 9 | Fat Chocobo |
| Chapter 13 | Leviathan |
| Secret Boss | Bahamut |
| Superboss | Pride and Joy Prototype |
Story Sub-Bosses
| All Story Sub-Bosses | |
|---|---|
| Chapter 2 | The Huntsman |
| Chapter 3 | The Hoodlums |
| Chapter 4 | Enigmatic Spectre |
| Chapter 12 | Enigmatic Spectre |
| Chapter 17 | M.O.T.H. Unit Brain Pod Swordipede |
Monster Variants & Optional Sub-Bosses
| All Monster Variants & Optional Sub-Bosses | |
|---|---|
| Chapter 3 | Doomrat Cerulean Drake Wrath Hound |
| Chapter 8 | Hedgehog Pie King Mark II Monodrive Venomantis Chromogger |
| Chapter 14 | Rust Drake Tonberry Trypapolis Type-0 Behemoth |
| Chapter 17 | Malboro |
Author

How to Beat Failed Experiment | Boss Fight Guide (Normal & Hard Mode)
Please participate in our site
improvement survey
03/2026
improvement survey
03/2026
Would you assist in
improving Game8's site?
improving Game8's site?

×
We are listening to our users' valuable opinions and discussing how to act on them.
The information collected through this survey will be used for the purpose of improving our services. In addition, the information will only be disclosed a part of a statistic in a format that will not allow identification of personal information.
Begin Survey
Not Now
×
Please rate each item regarding Game8.co's Advertisements.
Amount of Ads
Very Dissatisfied
Somewhat Dissatisfied
Fine
Somewhat Satisfied
Highly Satisfied
Placement of Ads
Timing of Ad Display
Ad Loading Speed
Safeness of Ads
Content of Ads
×
Please rate each item regarding Game8.co's Quality of Articles.
Amount of information
Very Dissatisfied
Somewhat Dissatisfied
Fine
Somewhat Satisfied
Highly Satisfied
Frequency of updates
Speed of new information
Accuracy of articles
Understandibility of articles
Readability of sentences
×
Please rate each item regarding Game8.co's Usability of the Site.
Ease of finding information
Very Dissatisfied
Somewhat Dissatisfied
Fine
Somewhat Satisfied
Highly Satisfied
Loading Speed
Use of Color
Font Size
Visibility of Images
Easy to Understand Layout
×
Please rate each item regarding Game8.co's Message Boards, Comments.
Ease of Writing
Very Dissatisfied
Somewhat Dissatisfied
Fine
Somewhat Satisfied
Highly Satisfied
Readability
Ease in Finding Information
Comment Quality
Comment Quantity
Admin Response
×
Please rate each item regarding Game8.co's Site's new design.
Please rate our site's new design
Very Dissatisfied
Somewhat Dissatisfied
Fine
Somewhat Satisfied
Highly Satisfied
Do you think that the website's design change makes the site easier to use?
Has the new design made it easier for you to find information on the site?
Has the new design improved the overall visual appeal of the site?
How would you rate your overall satisfaction with the new design of the site?
×
How likely are you to recommend Game8 to someone you know?
Very Unlikely
0
1
2
3
4
5
6
7
8
9
10
Very Likely
If you have other opinions regarding potential improvement to the website, please share them with us. We would appreciate your honest opinion.
Note: This is a free response section, so you can proceed without entering anything.
Note: Please be sure not to enter any kind of personal information into your response.
Note: Please be sure not to enter any kind of personal information into your response.
×
Thank You
×
Thank you for participating in our survey! Your answers will help us to improve the quality of our website and services.
We hope you continue to make use of Game8.
We hope you continue to make use of Game8.
Close
Rankings
- We could not find the message board you were looking for.
Gaming News


![Everwind Review [Early Access] | The Shaky First Step to A Very Long Journey](https://img.game8.co/4440226/ab079b1153298a042633dd1ef51e878e.png/thumb)

![Monster Hunter Stories 3 Review [First Impressions] | Simply Rejuvenating](https://img.game8.co/4438641/2a31b7702bd70e78ec8efd24661dacda.jpeg/thumb)
Popular Games

Genshin Impact Walkthrough & Guides Wiki
Honkai: Star Rail Walkthrough & Guides Wiki
Umamusume: Pretty Derby Walkthrough & Guides Wiki
Pokemon Pokopia Walkthrough & Guides Wiki
Resident Evil Requiem (RE9) Walkthrough & Guides Wiki
Monster Hunter Wilds Walkthrough & Guides Wiki
Wuthering Waves Walkthrough & Guides Wiki
Arknights: Endfield Walkthrough & Guides Wiki
Pokemon FireRed and LeafGreen (FRLG) Walkthrough & Guides Wiki
Pokemon TCG Pocket (PTCGP) Strategies & Guides Wiki


Recommended Games
Diablo 4: Vessel of Hatred Walkthrough & Guides Wiki
Fire Emblem Heroes (FEH) Walkthrough & Guides Wiki
Yu-Gi-Oh! Master Duel Walkthrough & Guides Wiki
Super Smash Bros. Ultimate Walkthrough & Guides Wiki
Pokemon Brilliant Diamond and Shining Pearl (BDSP) Walkthrough & Guides Wiki
Elden Ring Shadow of the Erdtree Walkthrough & Guides Wiki
Monster Hunter World Walkthrough & Guides Wiki
The Legend of Zelda: Tears of the Kingdom Walkthrough & Guides Wiki
Persona 3 Reload Walkthrough & Guides Wiki
Cyberpunk 2077: Ultimate Edition Walkthrough & Guides Wiki


All rights reserved
© SQUARE ENIX CO., LTD. All Rights Reserved.
CHARACTER DESIGN:TETSUYA NOMURA/ROBERTO FERRARI
The copyrights of videos of games used in our content and other intellectual property rights belong to the provider of the game.
The contents we provide on this site were created personally by members of the Game8 editorial department.
We refuse the right to reuse or repost content taken without our permission such as data or images to other sites.
Havent played the game yet but im guessing this guy is made by Hojo.