This survey will take about 1 minute.
Your answers will help us to improve our website.
RPG MAKER WITH
Beginner's Guide Part 2: Making Your First NPC!
In RPG MAKER WITH, users create Events so things happen in the game. One of these Events is the NPC, and we will teach you how to make an NPC Event in this guide.
|
Beginner's Guide (Part 1) ←Prev |
Intermediate Guide (Part 1) Next→ |
In RPG MAKER WITH, users create Events so things happen in the game. One of these Events is the NPC, and we will teach you how to make an NPC Event in this guide.
List of Contents
Beginner's Guide (Part 2)
Making Your First NPC!
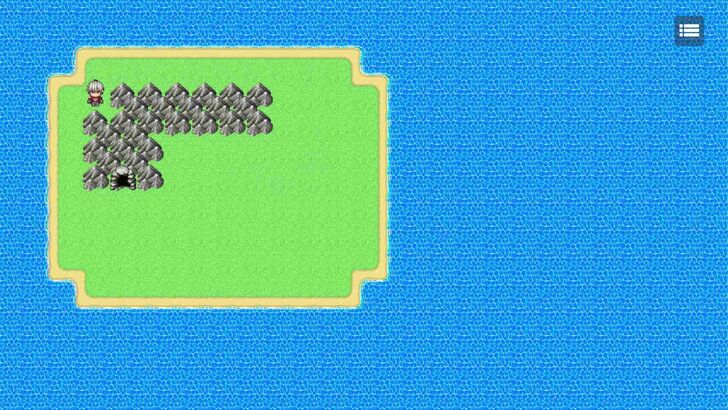
Welcome to part 2 of our RPG MAKER WITH Beginner's Guide! In part 1, we taught you how to create a map. In fact, two maps: An overworld and an interior map for a cave. Now, we will teach you how to connect those maps to each other, as well as how to put your first-ever NPC in the cave.
Connect Your Interior Map to the Overworld
Just because we have a new cave map doesn't mean we'll be able to enter it right from the get-go. We need to connect it to the overworld map first, then vice versa. This will be done using an Event called "Move." Move, as the name implies, will move your player character from one map to another.
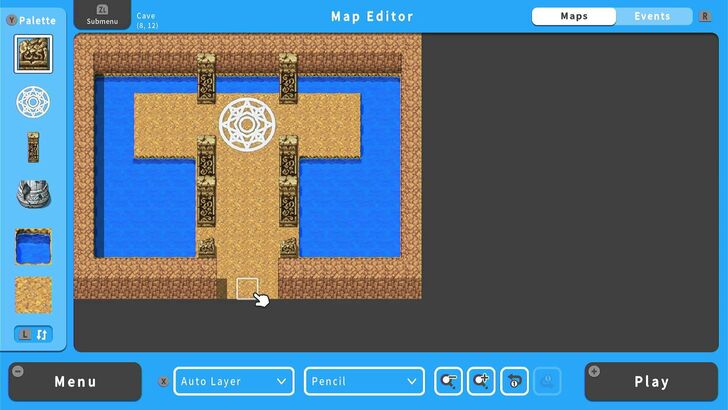
| 1 | 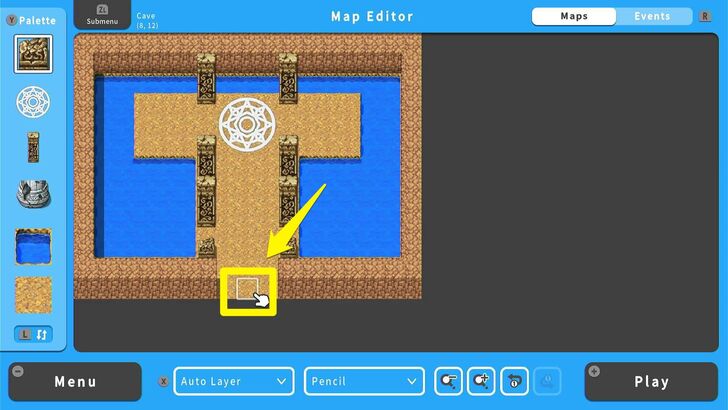 Get the cursor to the entrance we made in the cave map. |
|---|---|
| 2 | 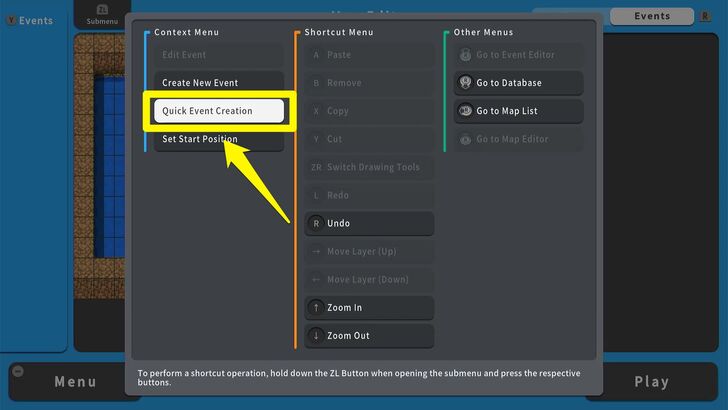 Press the ZL button and select Quick Event Creation. We'll be making use of what's called a "Quick Event" to hasten the process of connecting our cave to the overworld. |
| 3 |  You will be shown five options for quick events. Select "Move." You'll then see two options: Locations and Direction. Select the box under Locations. |
| 4 | 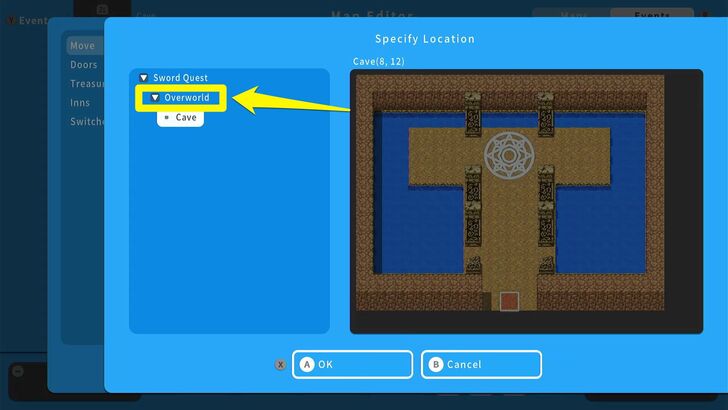 You will be brought to a menu that's similar to the Map List. This is the menu where you will choose the Move event's destination. The map you are in will be selected by default, so make sure to choose the map the Move event will bring your player character to. In this case, let's choose the overworld map. |
| 5 | 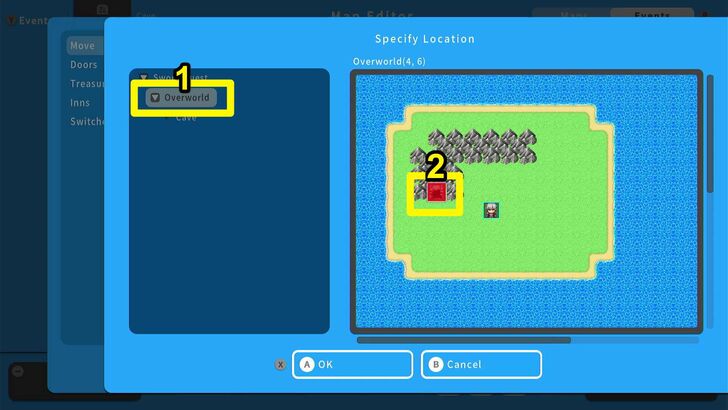 Highlight the overworld map and press A. You will then be able to set on what tile the Move event will transfer your player character to. We want the event to transfer our player character to the cave entrance on the overworld, so choose that tile. |
| 6 | 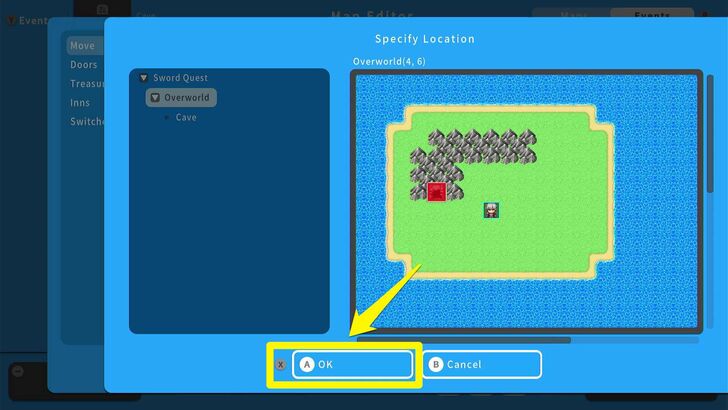 Press the X Button, and hit the A Button to confirm. |
| 7 | 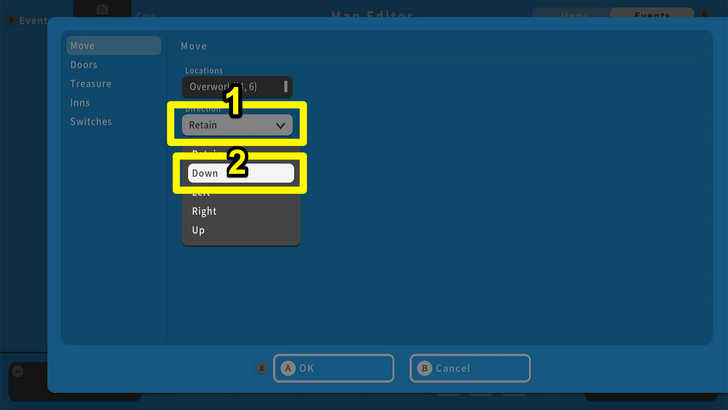 You'll be brought back to the Quick Event menu. Select the box under Direction. This is where you'll set what direction the player character has to be facing for the Move event to trigger. Since the player character will most likely be down up when leaving the cave, we'll choose "Down." |
| 8 | 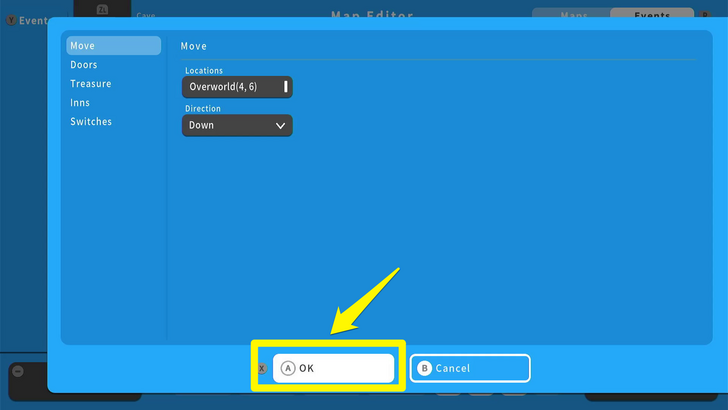 Press the X Button again, then hit A to confirm. |
| 9 | 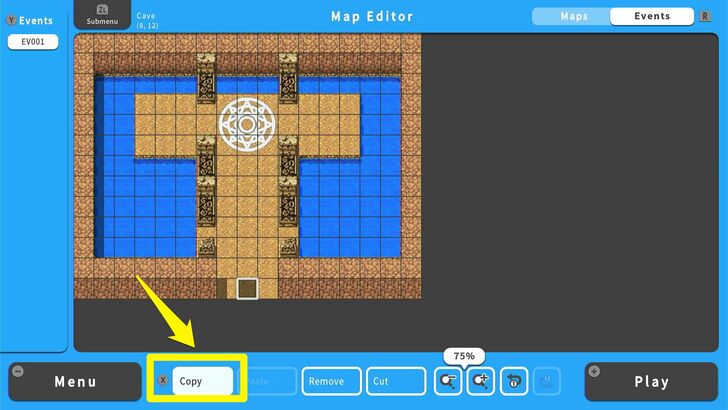 We now have a Move Event that connects the cave to the overworld. Now we need to make a connection from the overworld to the cave. Before that, though, while the tile with your Move event is selected, hit the X Button and select Copy. |
| 10 | 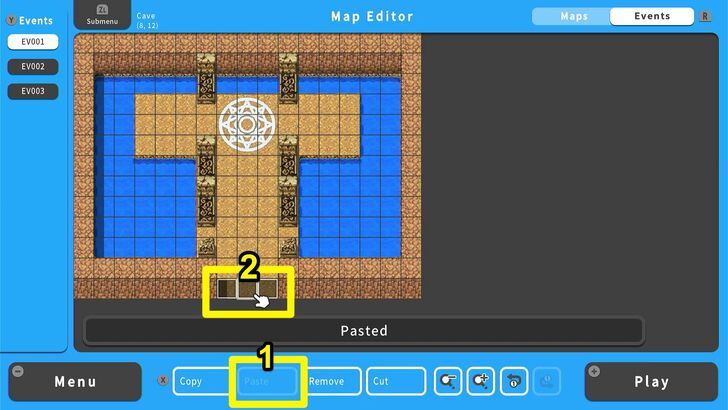 Move your cursor to the left or to the right of the tile with your Move event. The "Paste" option will be available. We are copying and pasting the Move event you made to other tiles at the entrance, so paste them until all three tiles at the entrance have the Move event. |
| 11 | 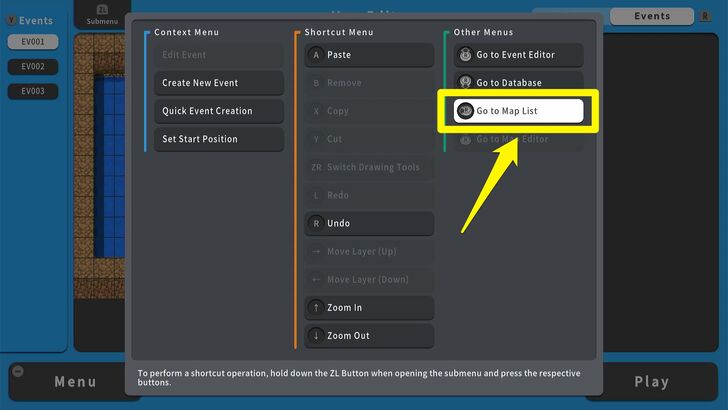 Now let's connect the overworld to the cave. Go to the Map List. |
Aside from "Move," there are other Quick Events you can use such as treasure boxes, inns, and even doors. Quick Events speed up the creation of the most common kinds of Events used in a game, so learn how to use them to hasten the making of your own RPGs. We'll be also making use of some of them in the Intermediate Guide later on.
Make Your First NPC
So we now have a cave that your player character will be able to enter and exit. However, it's empty. It's about time we fixed that.
In this cave, we will put your first-ever NPC into your game. In the process, you will learn how to manually create an Event, use Switches, and edit Event Details. Those terms sound complicated, but we'll break them down in our guide.
| 1 | 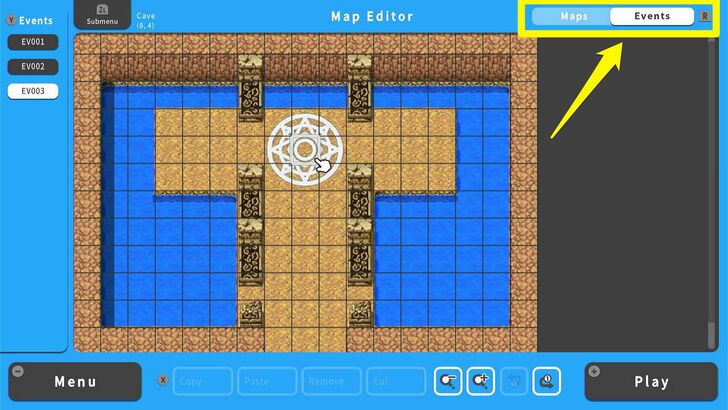 Select your cave map, put the cursor where you want the NPC to be, and toggle Event mode on. |
|---|---|
| 2 | 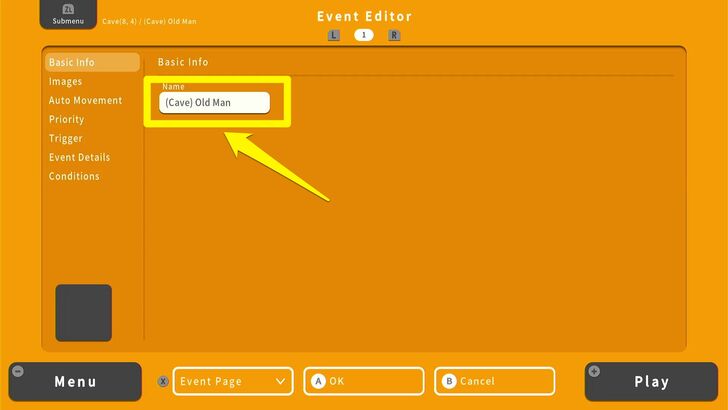 Select the tile you want the NPC to be on by pressing A. This will bring you to the Event Editor, which has more than a few options. For now, all we need to do is select Basic Info and then name our NPC Event. We named ours (Cave) Old Man with "(Cave)" being the map where the Event is located. This is so you can easily identify later on which Event belongs to which map. It's best to make a habit of naming at least the most important events in your game this way so you won't end up losing track of them. |
| 3 |  After naming the event, let's go over to Images. Here, we'll choose what our event will look like on the map. Highlight the square box and choose an appropriate character sprite. We chose the old man in the Sub Character2 sprite sheet within the Character folder. Once you've chosen your sprite, toggle Run Animation off so he will just be standing and not walking in place when we see him in-game. |
| 4 | 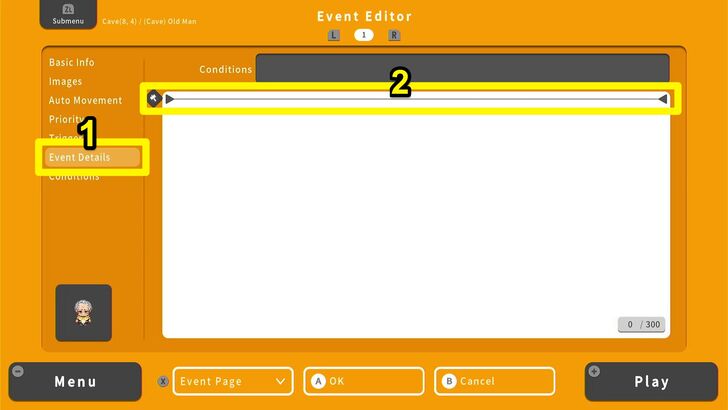 Now let's go down to Event Details. This is where the real fun begins. Select it, and you will go to the Events Details List, where we will be putting down a list of commands that will trigger when we interact with the NPC. Think of this place as where we "program" the Event. While on the Events Details List, press the A Button. |
| 5 | 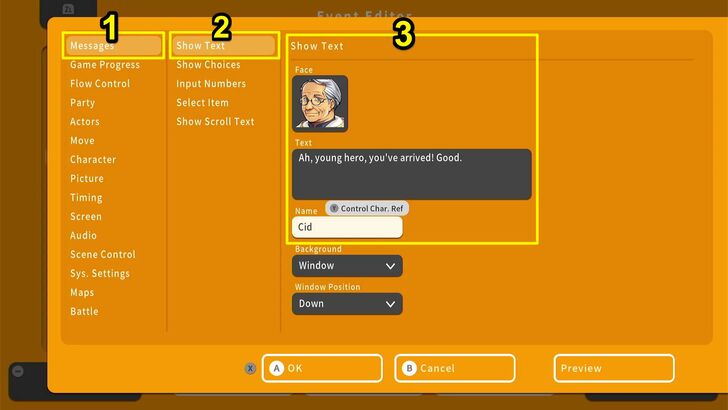 Now, the first thing we want to happen when we interact with the NPC is for him to speak with us. So, we'll have the NPC Event to spout out a Message. Select Messages, Show Text, and then we'll have a few options. Face is the portrait we'll see along with the text. Since it's an NPC, we want to show their face, so pick an appropriate portrait. Underneath the Face box is the Text that will contain the NPC's dialogue. Under that is the Name the NPC will appear with. In our event, we made the NPC give our player character a greeting. |
| 6 | 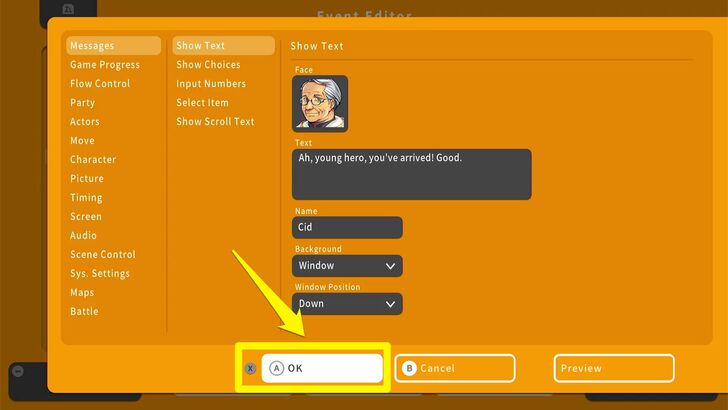 Once you're done filling in the fields for the Show Text command, press the X Button, then confirm all your choices by choosing OK. |
| 7 | 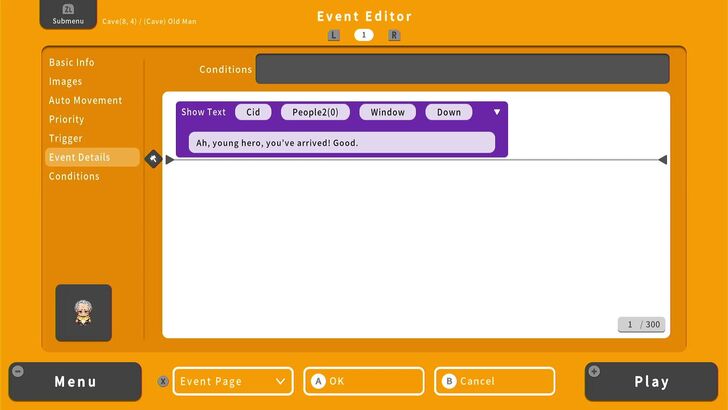 Your Show Text command should show up in the Event Details List like this. Select the space underneath the Show Text command, as we'll be turning on a Switch right after the NPC spouts their first line of dialogue. |
| 8 | 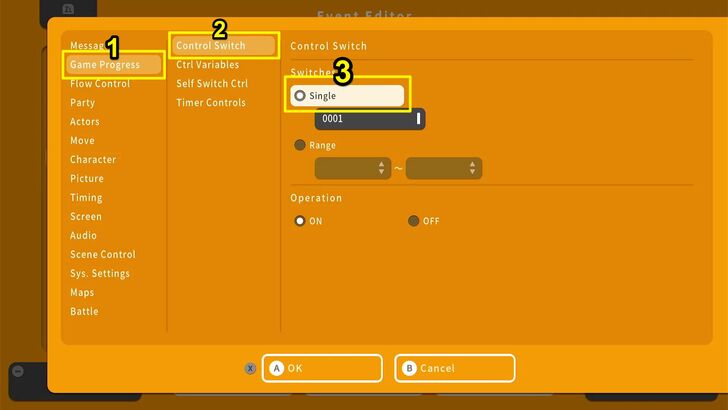 Now, let's add another command: the Switch. To put it simply, a Switch signals to the game that something has happened, and it should use the switch as a condition to let another Event fire off. Navigate to Game Progress, Control Switch, and then Single. Once you're at Single, highlight the box underneath to choose the Switch you want to use. |
| 9 | 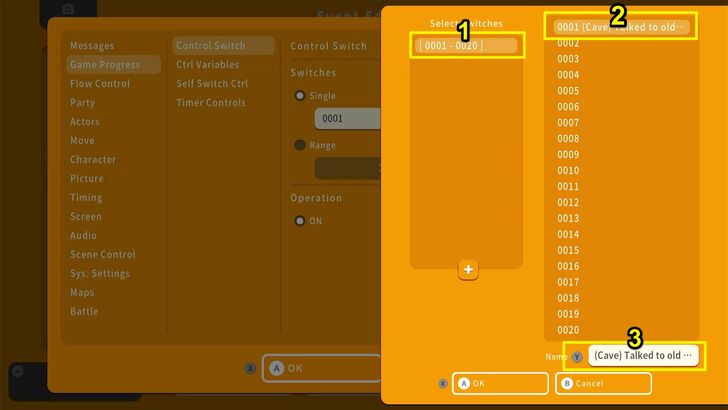 Once you select the box, you will be shown 20 switches. You can use up to 5000 switches in an RPG MAKER WITH game. But for now though, let's select Switch 0001 then press the Y Button to name the switch. We named our switch "(Cave) Talked to old man" with "(Cave)" being the map the NPC event is currently in. Just like with Events, name your Switches with an indication of what map they're used in for ease of tracking when you need to change something in the future. |
| 10 | 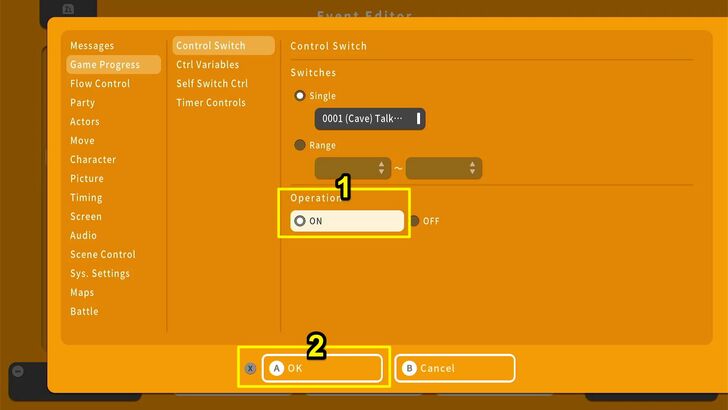 Once you're done selecting and naming your switch, go down to the Operation section and select "On" so as to command the switch to turn on in this event. Press X and confirm. |
| 11 | 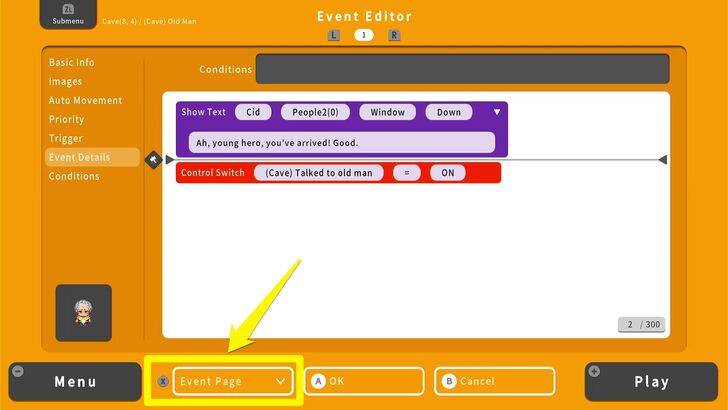 Your NPC Event's first page should look like this. While in the Event Editor, press X and select the drop-down box that says Event Page. |
| 12 | 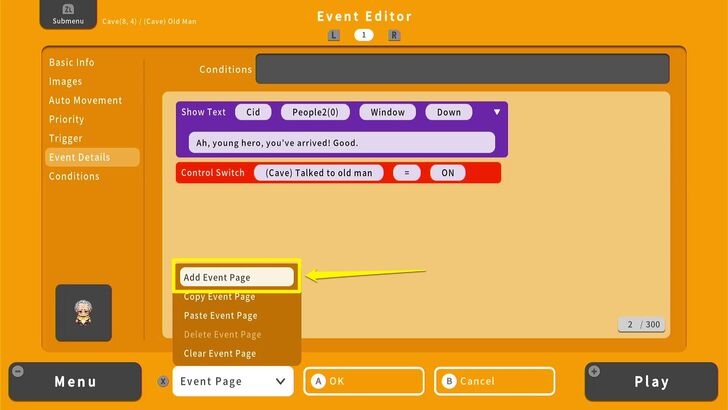 From the drop-down options, select Add New Event Page. |
| 13 | 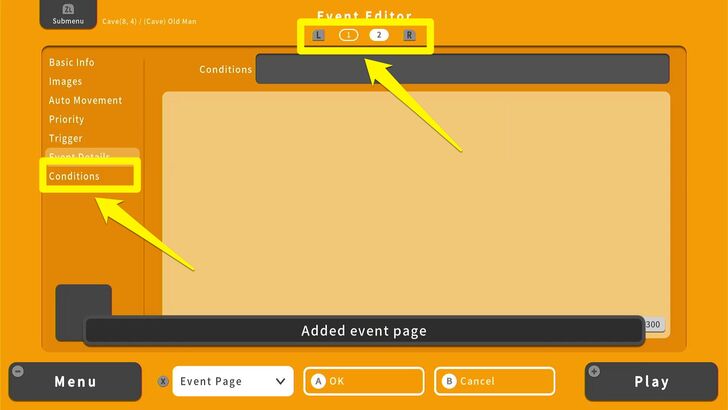 A new Event Page has been made. You can switch between Event Pages by pressing either the R Button or L Button. For now, though, on the second page, let's select Conditions on the left-hand options. |
| 14 | 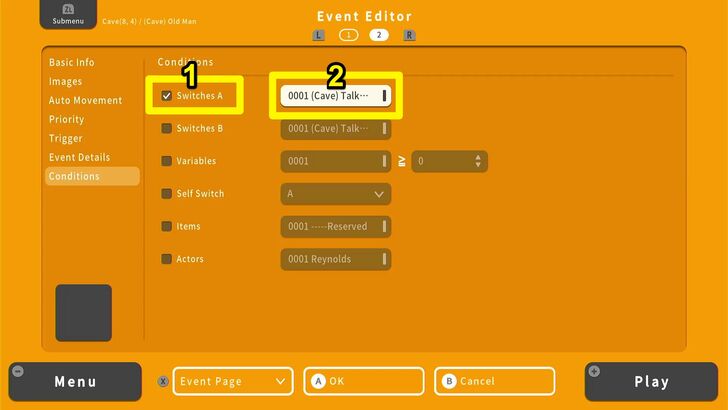 Once there, select the very first option: Conditions A and in the box next to it, select the Switch we named earlier. Now we have set the conditions for Page 2 of our Event to trigger: If the player character talks to the old man for the first time, the old man will reply with a second line of dialogue. |
| 15 | 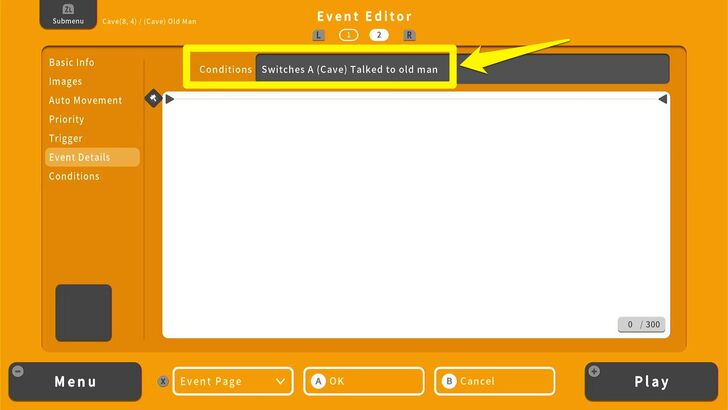 Still on Page 2 of our event, go to Event details. On the top, you should see a box that says Conditions followed by the condition we set in the previous step. |
| 16 | 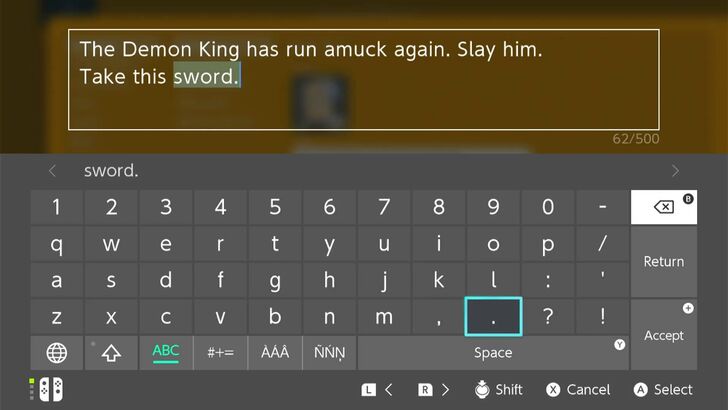 While we're still on the Event Details list for Page 2, add a Show Text command with the same portrait and name we used earlier. But this time, write a second line of dialogue for our NPC. This should be something that simultaneously gives our player character their quest, as well as an indication that they're being given an item. In this case, a sword. |
| 17 | 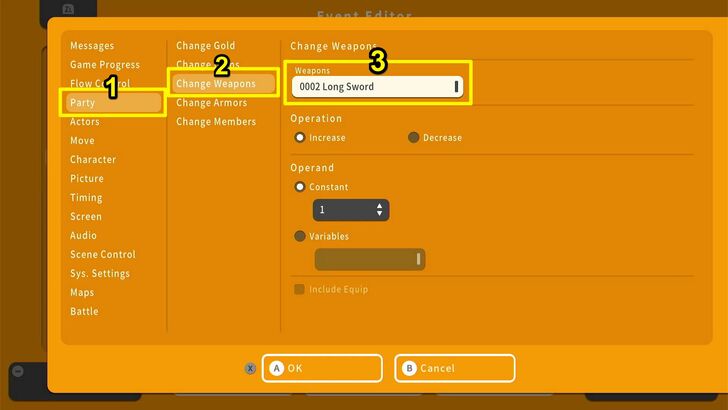 Right under the Show Text command, let's add another command: Change Weapons. This will give the player character a weapon of their choice. RPG MAKER WITH already comes with pre-made weapons, so we decided to have the old man give our player character a "Long Sword." Once you've chosen the sword you want your player character to get, press X and confirm. |
| 18 | 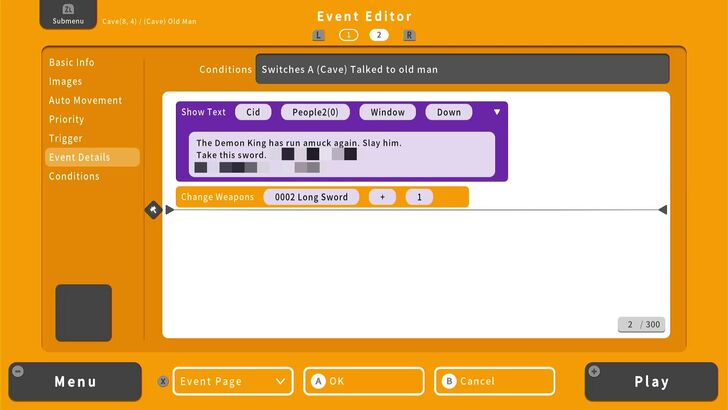 Your Event Details list for Page 2 should look like this. We will have to add a few more commands since our player character just got a sword from the NPC. |
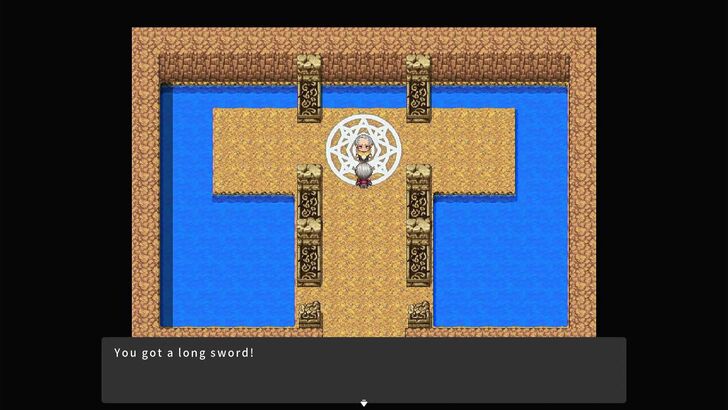
| 19 | 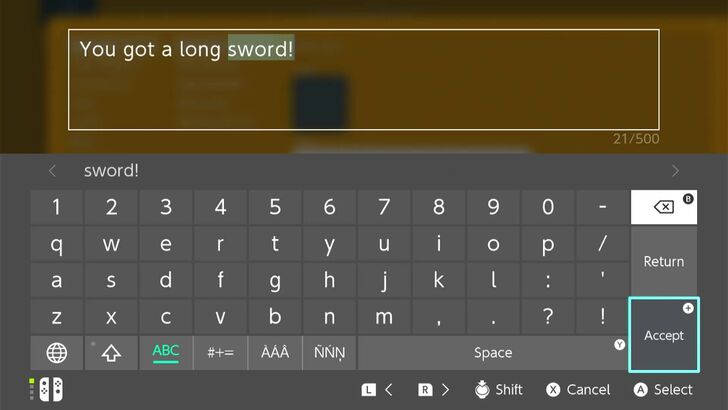 First, let's add a new Show Text command. But this time, it shouldn't have a portrait or name. It will just be an indication that our player character received a Long Sword. |
| 20 | 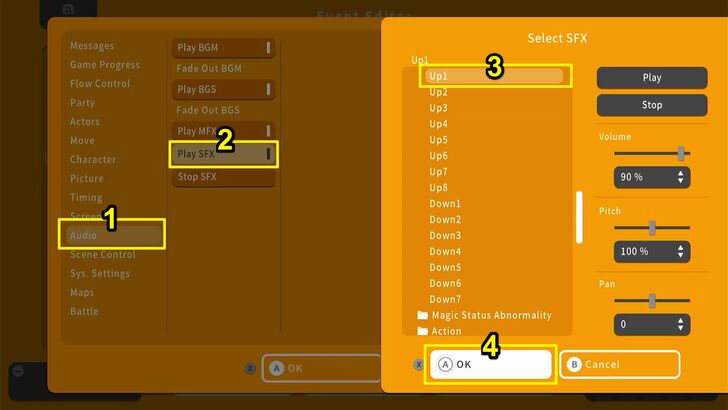 The second command is a sound effect that would play to signal that the weapon was received. Navigate to Audio then Play SFX and choose the sound effect you wish to use. We used "Up1," which is located in the Magic Recovery/Auxillary folder. |
| 21 | 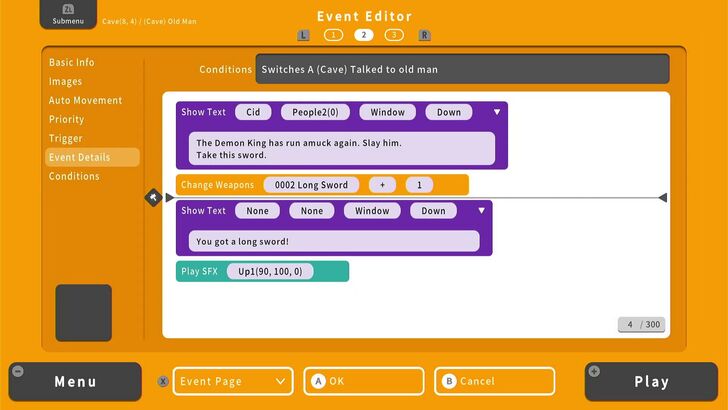 Your Event Details List for Page 2 should look like this. Now we'll have to add two more commands to make sure that the player won't be able to repeat this Event again after it happens (and thus end up having a lot of long swords to sell). |
| 22 | 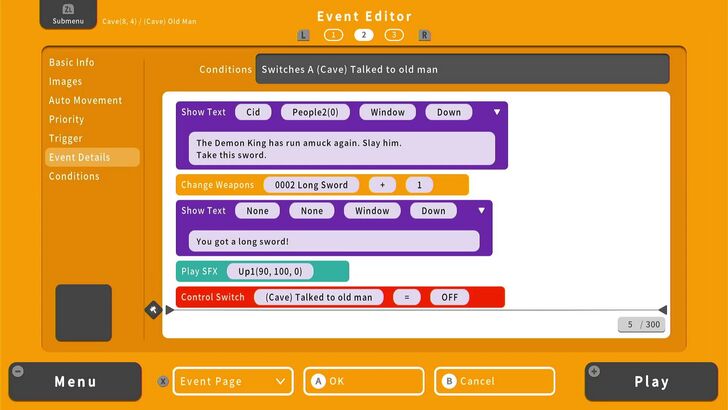 First, let's add a Control Switch command that turns the "(Cave) Talked to old man" Switch off. What this does is right after the player character receives the long sword, the chain of commands that would lead him to get another one won't happen anymore. However, this also means the NPC cannot be interacted with after this. So, we'll have to add a new Event Page and a new Switch. |
| 23 | 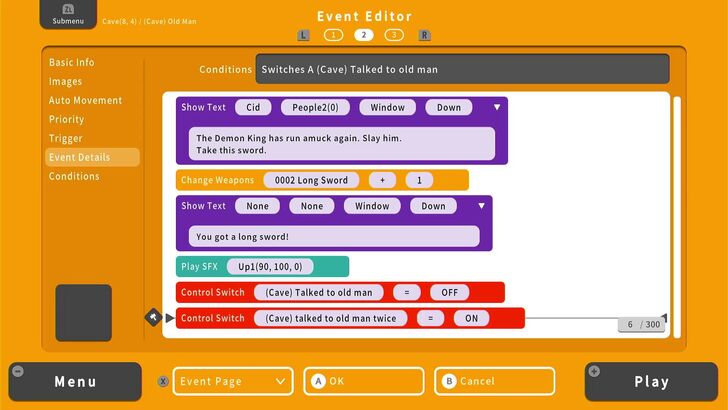 So right under your Control Switch command, let's put in yet another Control Switch command. We used a separate Switch here and named it "(Cave) Talked to old man twice." |
| 24 | 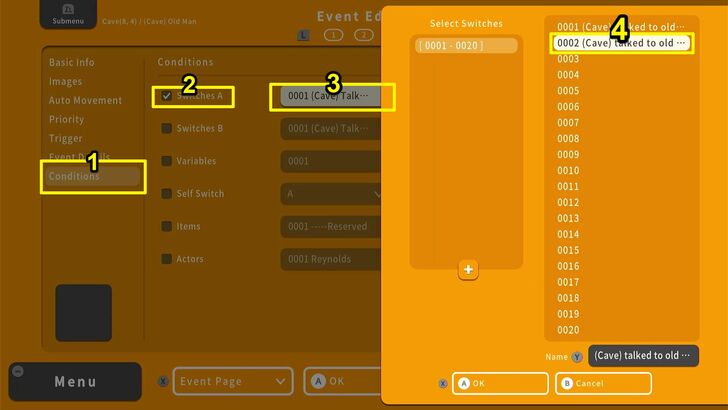 Now, let's add a third Event Page. On that third page, let's set the Conditions A option to the second switch as indicated in the picture. |
| 25 | 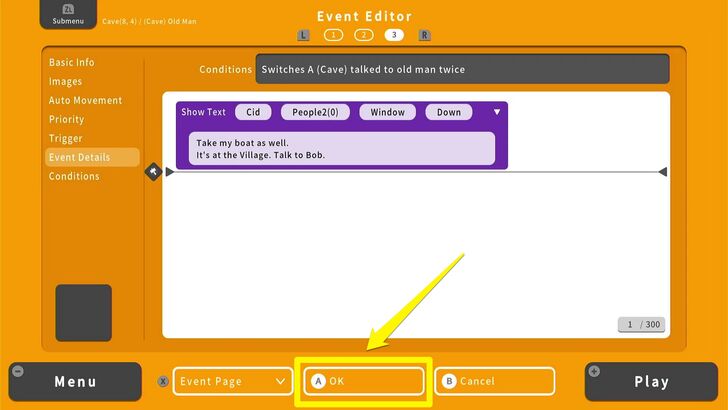 You'll notice that we added a new Show Text command that has the old man say something about a boat and a village, both of which don't exist yet. But they will in due time! For now, this is just the dialogue the old man will say from now on. If you were wondering why NPCs in classic RPGs tend to say the same thing all the time, this is why it happens in games made with RPG MAKER. |
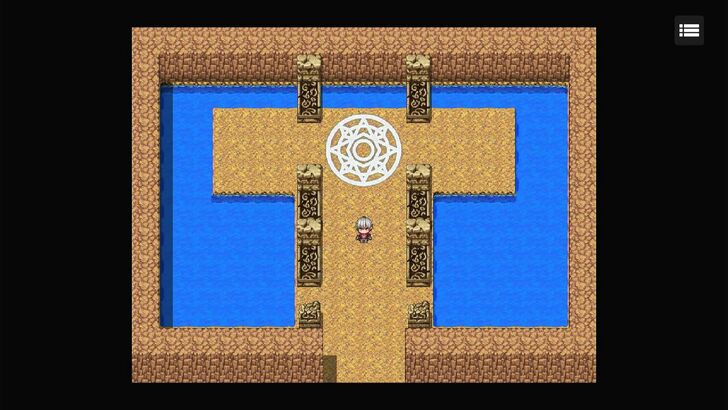
| 26 | 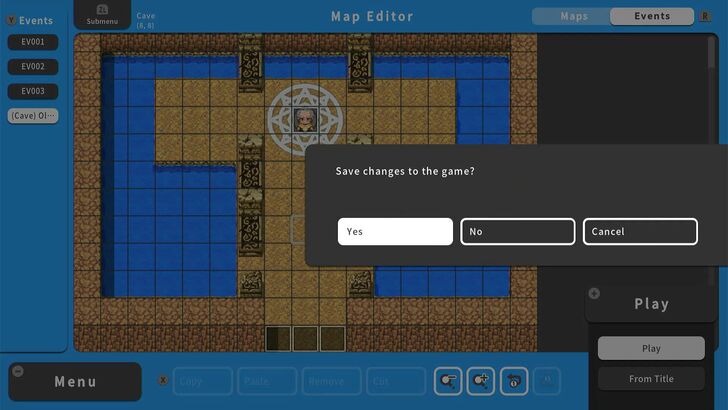 Now let's playtest. What we want to happen is for the old man to say three different dialogue lines, give us a sword with a message and sound effect, and repeat his last dialogue line over and over again. |
| 27 | 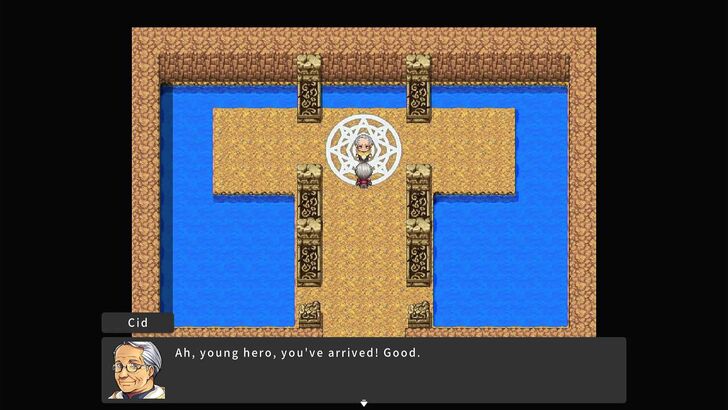 It's looking good so far. The old man said his first line. |
| 28 | 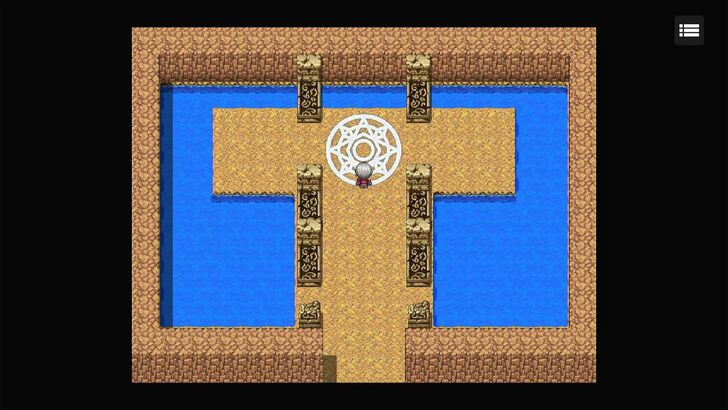 Oh no! He suddenly disappeared. Don't worry; there's a reason for that. |
| 29 | 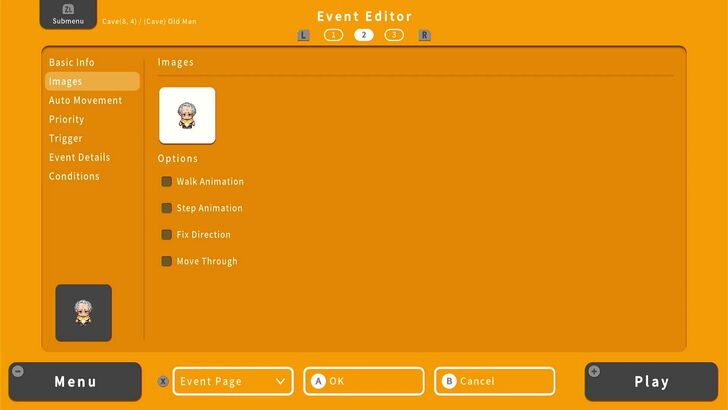 You see, we have to the event's Image for every page within that event. That simply means whenever we make a new event page for an NPC Event, we have to go up to Images and set the appropriate sprite. This also means you can make an NPC do things like transform into monsters, appear dead, or disappear from the game. For now, we just want the old man to stay where he is, so set his sprite for all three Event Pages. |
This is not the only kind of NPC you'll be making for your game. But the commands we put into this NPC's Event Details are the most common ones put into NPCs that give quests or give items to the player character. If you want to find out more about NPC creation, we have an in-depth guide.
Finished Product: An Overworld, a Dungeon, and an NPC

Congratulations! Now we have a working version of your very first RPG. Not only do we have an overworld and an Interior map, but we also have an NPC who gives us a quest and a weapon to boot! Remember, to playtest your game, you just need to press the + Button and save your game when prompted. These are the things we want to look out for in this stage:
- Can you enter the cave?
- Can you exit the cave?
- Does the old man NPC say his first line of dialogue?
- Does the old man NPC stay in place after saying his first line of dialogue?
- Does he say his second line of dialogue?
- Does he give you a long sword?
- Does a message appear after receiving the long sword? Did you hear the sound effect too?
- Does the old man NPC say his third line of dialogue?
If you answered "Yes" to all those questions, then your game is set and you are ready to develop the rest of it. Follow us to the Intermediate Guide, where we will start putting down more locations in your overworld - including a village and a dungeon. You'll even get your own boat in the process, and even something that can take you to the skies.
Building Your Game! Intermediate Guide
RPG MAKER WITH Related Guides
| Core Guides | |
|---|---|
| Beginner's Guide Part 1 | Beginner's Guide Part 2 |
| Tips and Tricks | |
|---|---|
| Map, Event, and Switch Naming Tips | How to Use the Flood Fill Tool |

| Core Guides | |
|---|---|
| Intermediate Guide Part 1 | Intermediate Guide Part 2 |
| Tips and Tricks | |
|---|---|
| How to Make a Switch | How to Use Map Foregrounds and Backgrounds |
| How to Change Event Text Color | |

| Core Guides | |
|---|---|
| Advanced Guide Part 1 | Advanced Guide Part 2 |
Comment
Author
Beginner's Guide Part 2: Making Your First NPC!
Please participate in our site
improvement survey
03/2026
improvement survey
03/2026
Would you assist in
improving Game8's site?
improving Game8's site?

×
We are listening to our users' valuable opinions and discussing how to act on them.
The information collected through this survey will be used for the purpose of improving our services. In addition, the information will only be disclosed a part of a statistic in a format that will not allow identification of personal information.
Begin Survey
Not Now
×
Please rate each item regarding Game8.co's Advertisements.
Amount of Ads
Very Dissatisfied
Somewhat Dissatisfied
Fine
Somewhat Satisfied
Highly Satisfied
Placement of Ads
Timing of Ad Display
Ad Loading Speed
Safeness of Ads
Content of Ads
×
Please rate each item regarding Game8.co's Quality of Articles.
Amount of information
Very Dissatisfied
Somewhat Dissatisfied
Fine
Somewhat Satisfied
Highly Satisfied
Frequency of updates
Speed of new information
Accuracy of articles
Understandibility of articles
Readability of sentences
×
Please rate each item regarding Game8.co's Usability of the Site.
Ease of finding information
Very Dissatisfied
Somewhat Dissatisfied
Fine
Somewhat Satisfied
Highly Satisfied
Loading Speed
Use of Color
Font Size
Visibility of Images
Easy to Understand Layout
×
Please rate each item regarding Game8.co's Message Boards, Comments.
Ease of Writing
Very Dissatisfied
Somewhat Dissatisfied
Fine
Somewhat Satisfied
Highly Satisfied
Readability
Ease in Finding Information
Comment Quality
Comment Quantity
Admin Response
×
Please rate each item regarding Game8.co's Site's new design.
Please rate our site's new design
Very Dissatisfied
Somewhat Dissatisfied
Fine
Somewhat Satisfied
Highly Satisfied
Do you think that the website's design change makes the site easier to use?
Has the new design made it easier for you to find information on the site?
Has the new design improved the overall visual appeal of the site?
How would you rate your overall satisfaction with the new design of the site?
×
How likely are you to recommend Game8 to someone you know?
Very Unlikely
0
1
2
3
4
5
6
7
8
9
10
Very Likely
If you have other opinions regarding potential improvement to the website, please share them with us. We would appreciate your honest opinion.
Note: This is a free response section, so you can proceed without entering anything.
Note: Please be sure not to enter any kind of personal information into your response.
Note: Please be sure not to enter any kind of personal information into your response.
×
Thank You
×
Thank you for participating in our survey! Your answers will help us to improve the quality of our website and services.
We hope you continue to make use of Game8.
We hope you continue to make use of Game8.
Close
Rankings
- We could not find the message board you were looking for.
Gaming News


![Everwind Review [Early Access] | The Shaky First Step to A Very Long Journey](https://img.game8.co/4440226/ab079b1153298a042633dd1ef51e878e.png/thumb)

![Monster Hunter Stories 3 Review [First Impressions] | Simply Rejuvenating](https://img.game8.co/4438641/2a31b7702bd70e78ec8efd24661dacda.jpeg/thumb)
Popular Games

Genshin Impact Walkthrough & Guides Wiki
Honkai: Star Rail Walkthrough & Guides Wiki
Umamusume: Pretty Derby Walkthrough & Guides Wiki
Pokemon Pokopia Walkthrough & Guides Wiki
Resident Evil Requiem (RE9) Walkthrough & Guides Wiki
Monster Hunter Wilds Walkthrough & Guides Wiki
Wuthering Waves Walkthrough & Guides Wiki
Arknights: Endfield Walkthrough & Guides Wiki
Pokemon FireRed and LeafGreen (FRLG) Walkthrough & Guides Wiki
Pokemon TCG Pocket (PTCGP) Strategies & Guides Wiki


Recommended Games
Diablo 4: Vessel of Hatred Walkthrough & Guides Wiki
Fire Emblem Heroes (FEH) Walkthrough & Guides Wiki
Yu-Gi-Oh! Master Duel Walkthrough & Guides Wiki
Super Smash Bros. Ultimate Walkthrough & Guides Wiki
Pokemon Brilliant Diamond and Shining Pearl (BDSP) Walkthrough & Guides Wiki
Elden Ring Shadow of the Erdtree Walkthrough & Guides Wiki
Monster Hunter World Walkthrough & Guides Wiki
The Legend of Zelda: Tears of the Kingdom Walkthrough & Guides Wiki
Persona 3 Reload Walkthrough & Guides Wiki
Cyberpunk 2077: Ultimate Edition Walkthrough & Guides Wiki


All rights reserved
©Gotcha Gotcha Games
The copyrights of videos of games used in our content and other intellectual property rights belong to the provider of the game.
The contents we provide on this site were created personally by members of the Game8 editorial department.
We refuse the right to reuse or repost content taken without our permission such as data or images to other sites.