This survey will take about 1 minute.
Your answers will help us to improve our website.
RPG MAKER WITH
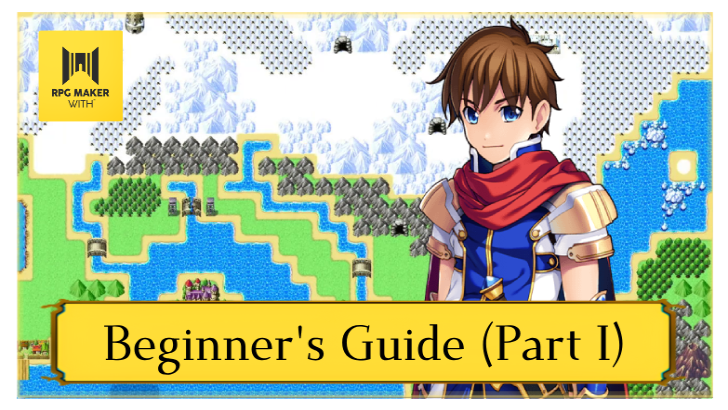
Beginner's Guide Part 1: Getting Started with Your RPG!
RPG MAKER WITH is one of the easiest game-making tools you can use to create the RPG of your dreams. But are you stuck or struggling to make your first game? Follow our beginner's guide to get started in the world of game development!
| - |
Beginner's Guide (Part 2) Next→ |
RPG MAKER WITH is one of the easiest game-making tools you can use to create the RPG of your dreams. But are you stuck or struggling to make your first game? Follow our Beginner's Guide to get started in the world of game development!
List of Contents
Beginner's Guide (Part 1)
Getting Started with Your RPG
Welcome to the world of game creation! If you’re reading this guide, chances are you already have your copy of RPG MAKER WITH and might have even created your first quick game—a simple maze with a locked door, maybe? No matter where you're starting from, we're thrilled to have you on this journey.
As you’ve likely noticed, RPG MAKER WITH offers a wealth of tools and features, which can feel a bit overwhelming at first. But we’re here to help! This series of guides is designed to walk you through using these tools, step-by-step, while also helping you craft your very first (or second) fully-fledged RPG!
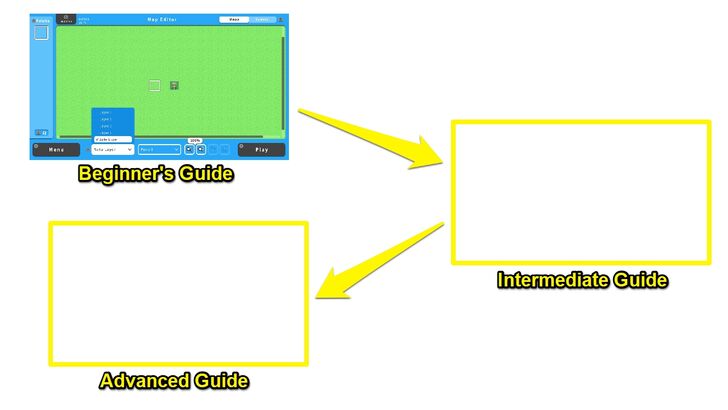
By the end of each guide, you will have a playable (though incomplete) version of your game. But with each level—from the Beginner's Guide to the Intermediate Guide, and finally, the Advanced Guide—your game will grow in complexity. By the time you complete the series, you’ll have a Minimum Viable Product (MVP) version of your game, or the simplest version of your RPG that's complete enough to play from start to finish.
Each guide has steps with links to in-depth articles on how to use the tools discussed, as well as several articles featuring tips and tricks you might find handy during game development.
Here in the Beginner's Guide, we'll teach you how to make your first Maps (an Overworld Map and Interior Map) and your first NPC. Along the way, we'll also teach you the basics of RPG MAKER WITH's UI and the different tools at your disposal.
So, let’s dive in and start creating your first RPG adventure!
Learn How to Use the Editor
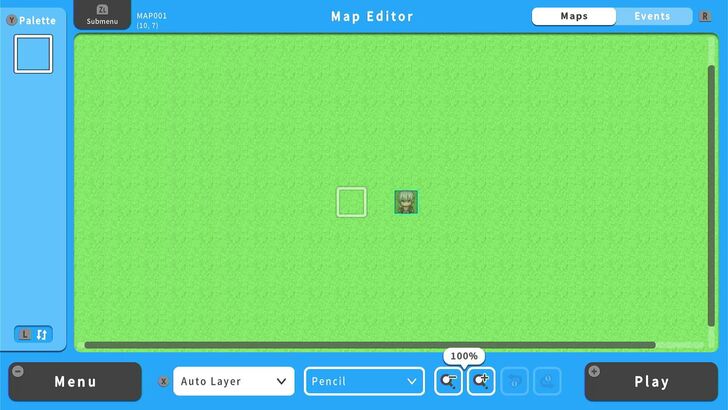
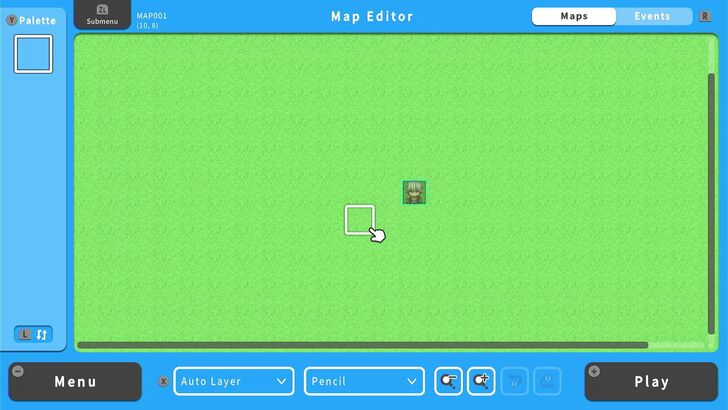
So you've started RPG MAKER WITH and all you're seeing is a grassy field with one guy in it, a UI with lots of tools, and maybe a vague idea of what you want to make (An Overworld? What's that? What's an Interior Map?
). Don't worry, let's get started with the basics: Getting familiar with our Editor!
With so many tools available in the Editor, learning all of them is a gradual process, and we don't want you to get overwhelmed. Just know for now that the Editor has two modes (Map Mode and Events Mode) that you can toggle with the R Button. As their names imply, Map Mode allows you to edit a Map, while Events Mode allows you to add Events to a Map.

What are Events? We will talk about that later in the guide. For now, stay in Map Mode and press the ZL Button. Now you'll see a lot of other Buttons in what's called the Submenu, divided into three columns: Context Menu, Shortcut Map, and Other Menus. We will concern ourselves mainly with the Buttons under the Context Menu and the Other Menus columns.
Don't worry about the other options, as we will teach what they do throughout the guide. If you want to learn them now, though, we have an in-depth article that lays out the different sections of the Editor and what they do.
Draw an Overworld Map
So you started on a grassy field. We'll turn this grassy field into an island surrounded by a big sea. That will be our Overworld, which we will build up as we go along this guide. For now, though, let's focus on one island. We'll refer to it as "Island A."
The Overworld Map is a staple of RPGs, providing players with a sense of scale as they progress through the game. While you could design a game without an Overworld Map, including one is a great way to give your players a broad view of your game world, helping them understand the scale of their journey.
| 1 | 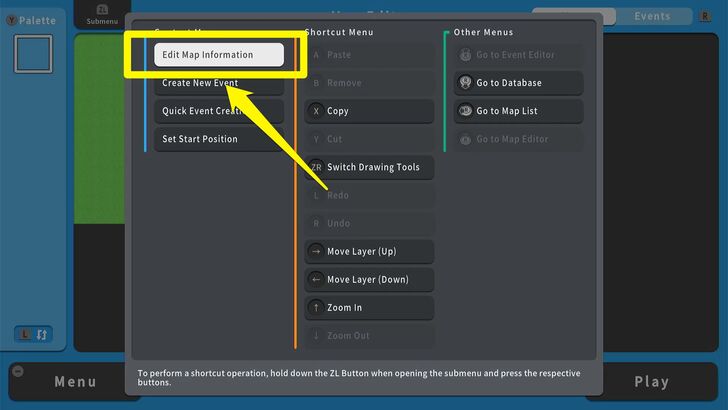 Let's get started on making our Overworld Map by opening the Submenu with the ZL Button and selecting "Edit Map Information." |
|---|---|
| 2 | 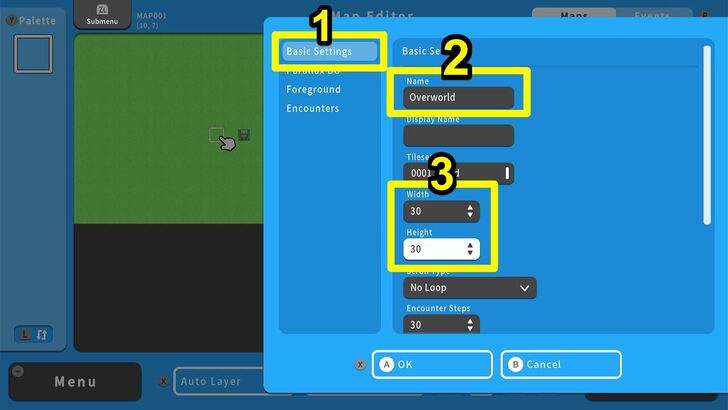 This will bring you to a screen where you can customize the settings for your Map. For now, though, go to Basic Settings, then change the name of your Map (we named ours "Overworld" and the Width and Height to 30. You can set it to any dimensions you want, but 30x30 is already big enough for our project). Leave all the other settings alone for now. |
| 3 | 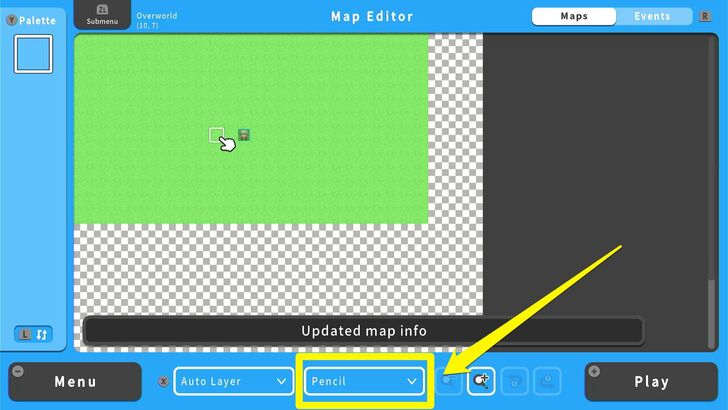 Now you will see that the Map has expanded, but most of it is covered in the checkboard transparency background you would typically see in an image editing software. What we want to do now is press the X Button to access Map Mode's tools. There are two bars: "Auto Layer" and "Pencil." Select Pencil because this will show us the different drawing tools used to make Maps in RPG MAKER WITH. |
| 4 |  Select the Rectangle tool with the A Button and bring your cursor back to the main Map editing screen with the X Button (if your cursor hasn't been brought back there already). Hold down the B Button and drag the rectangle that will form over the grass. This will delete large swathes of the grass from your screen. Do it until there are no more grass Tiles on your screen (don't worry about the little guy in the middle of the Map; he'll be fine). |
| 5 | 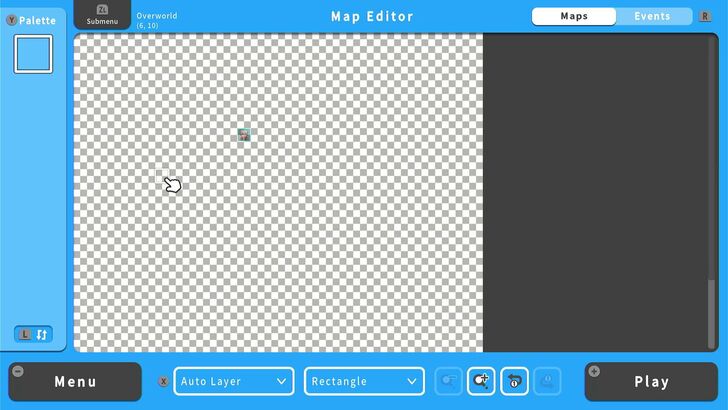 Now that your Map is clear, we are free to draw on it. |
| 6 | 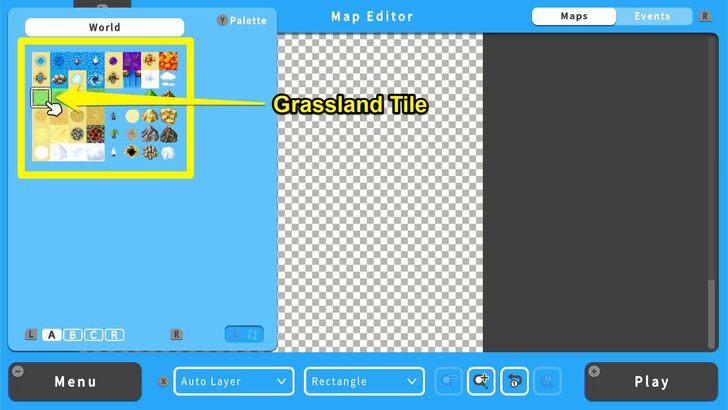 Make sure you're in Map Mode (press the R Button until the indicator on the top right-hand corner of the screen shows "Map"), and press the "Y Button." This will show you the "Tile Palette," from which we will choose a grassland Tile as indicated in the image above. |
| 7 | 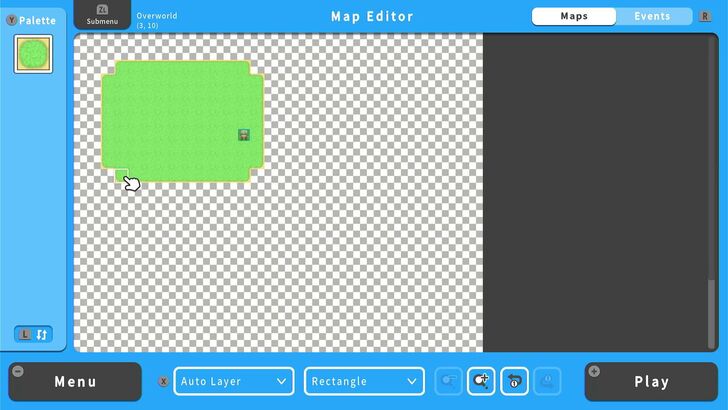 Once you've selected your Tile, make a small island in the top left corner of the Map. This is where most of the action we'll be doing in the Beginner's and Intermediate Guide will take place in, Island A. You may form it in any way you want; we made ours into a big rectangle. |
| 8 | 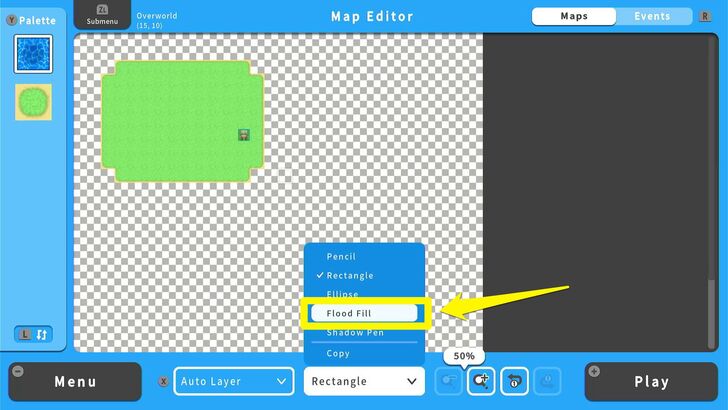 Now what about the transparent sea that currently surrounds our island? Don't worry. We'll use the Flood Fill tool to take care of that. Press the X Button again, get yourself to the Tool Bar, and instead of Rectangle pick "Flood Fill" instead. |
| 9 | 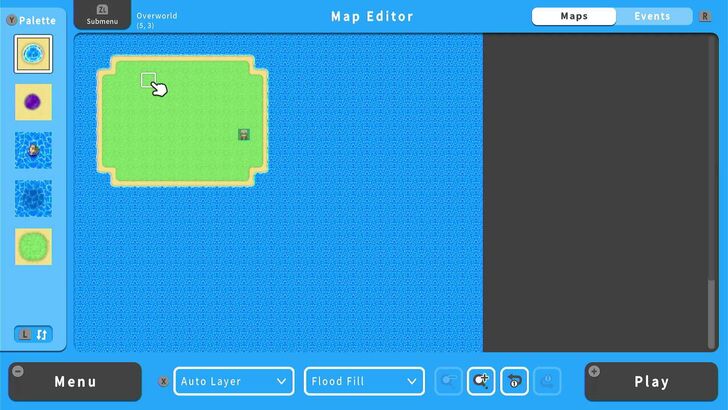 Now get your cursor back to the main Map Editor, pick a water Tile from the Tile Palette, and press the A Button on any part of the transparency grid. The rest of the Map will be filled with water, so Island A will now be surrounded by the sea. Don't worry about all the water. We'll be filling it up with more islands later. |
| 10 | 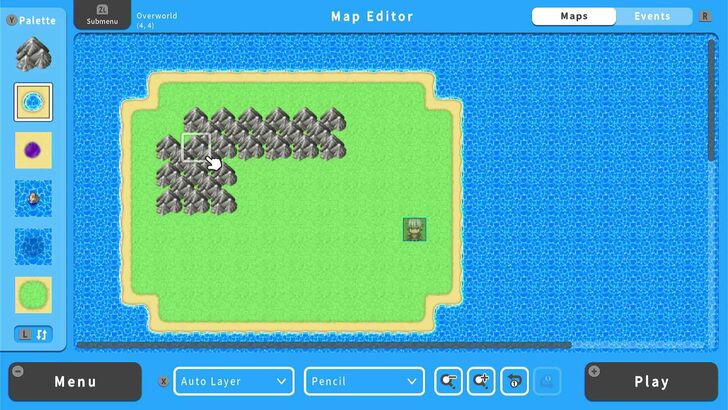 Select the "Pencil" tool from the Tool Bar and get your cursor back to the main Map Editor. We'll now start customizing our little island. Go back to the Tile Palette and select a Mountain Tile or any other Tile you want. We selected a Mountain Tile for this part since we'll be building a cave. Then just lay down mountains with the A Button. They should automatically clip together if you lay them down in groups of four. |
| 11 | 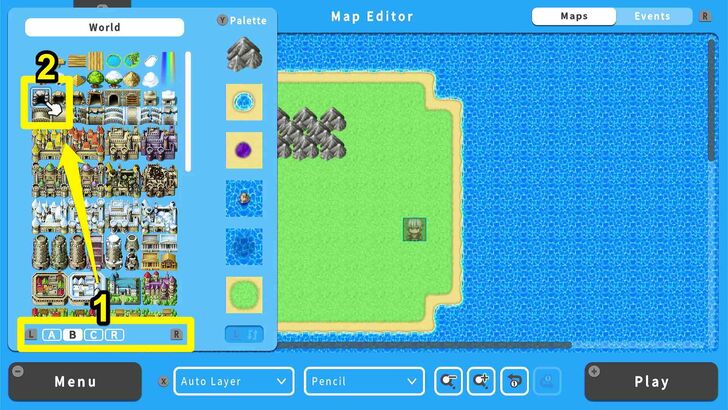 Once your mountains are on the Map, we'll now put in a cave entrance. So go to the Tile Palette again, but this time press the L Button. Now you'll be able to navigate between different categories of the current Tileset we're using. Don't worry about what a Tileset is for now. What you'll want to do first is to navigate to the "B" category and select your desired cave entrance. |
| 12 | 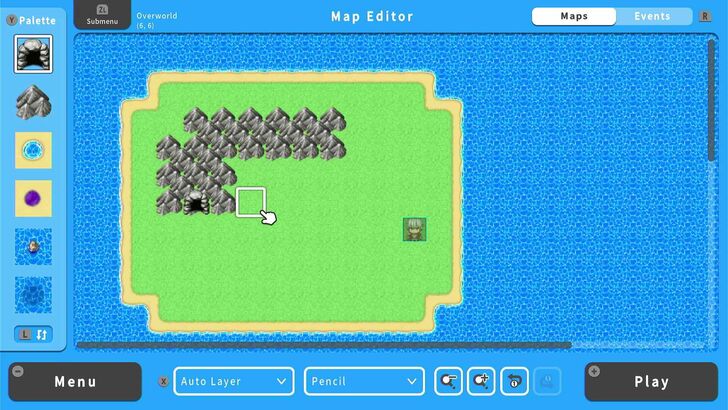 Now we have an Overworld with an island and a cave entrance! Congrats! But your starting character is a bit far from the cave entrance, isn't he? Let's fix that. |
| 13 | 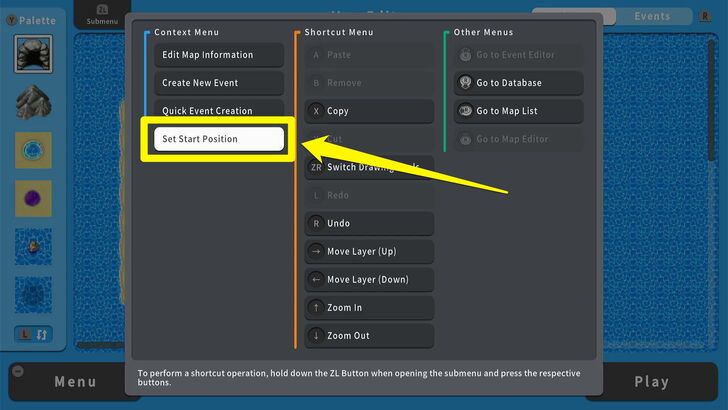 Bring up the Submenu with the ZL Button and select "Set Start Position." |
| 14 | 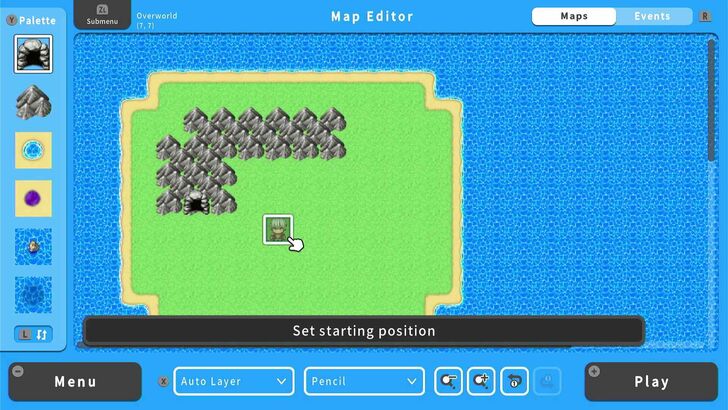 Now you'll be able to select where your player character will start the game in. Let's bring him somewhere near the cave. |
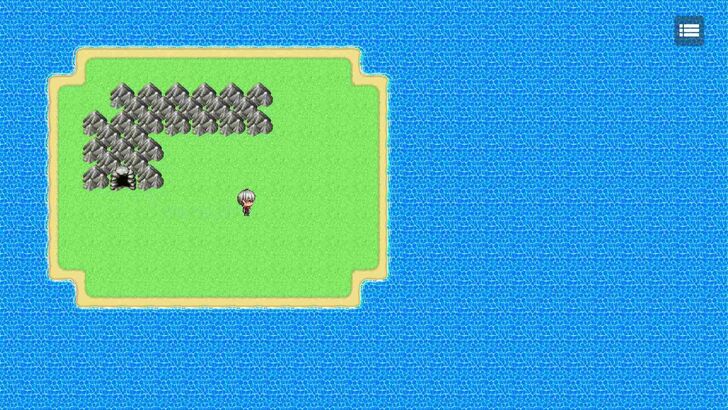
| 15 |  Now you have an Overworld! Press the + Button, allow RPG MAKER WITH to save your game, and you'll be able to play your game at least somewhat. You should be able to move around your Map, though you'll notice that you can't get into your cave. That's fine because we will make a cave Map in the next part of this guide. To go back to the Editor, press the + Button again and select To Editor. |
If you want to learn more about how to draw Overworld Maps with some useful tips, we have a more in-depth guide that helps you make a more complex-looking Overworld Map.
Draw an Interior Map
We now have an overworld that we'll slowly build our RPG on, as well as a little island of our own, complete with a cave. The problem is that we can't actually get into the cave. That's because the cave in this game doesn't "exist" yet. We will have to make a Map for the cave.
That's right - the world of a classic RPG is nothing more but a series of interconnected Maps that convinces our players that it's a living world. In our case, we will connect a bunch of Maps to our Overworld Map, and this cave will be the first of many.
Why are we making a cave again? Because inside will be your very first NPC, who will give you a sword and send you off on your quest. But let's focus on making the cave first. Remember, when you are making an RPG, it helps to always start with the Maps. Maps are the easiest things you can make for an RPG compared to all the other elements, so it is ideal to take care of them first before putting in Events to drive the game forward and, eventually, Enemies for your players to fight.
| 1 | 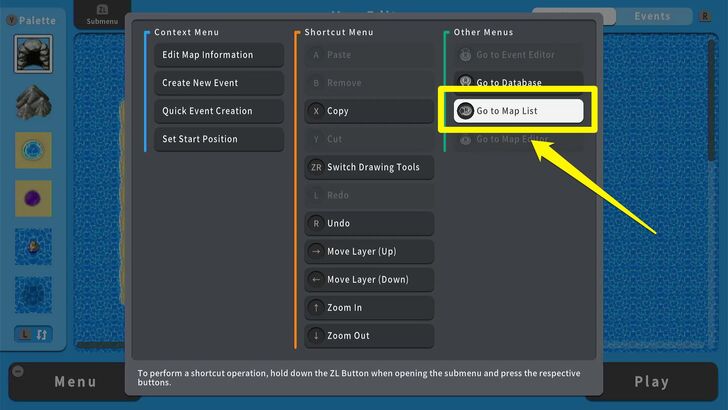 While in Map Mode on the Editor, bring up the Submenu and select Go to Map List. |
|---|---|
| 2 | 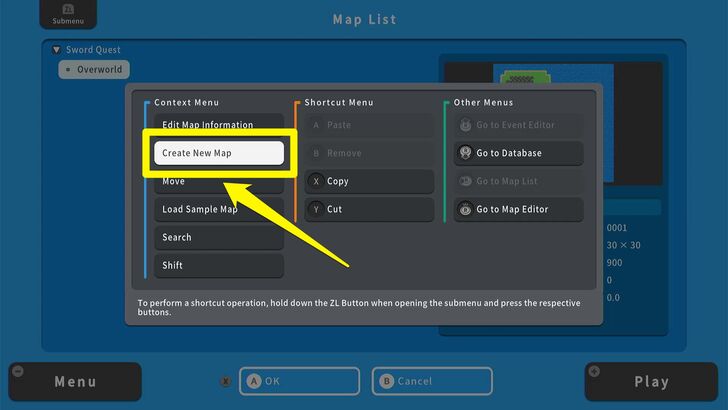 In the Map List, press ZL again to bring up the Map List Submenu, and select Create New Map. |
| 3 | 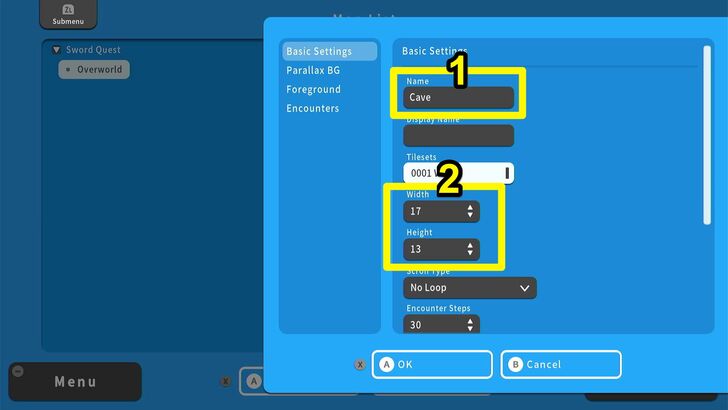 Just like how we edited the Map information for the Overworld, let's name our new name and adjust its width and height. For our purposes, we named our Map "Cave" and set its size to 17x13. The rule of thumb for Interior Maps, especially ones for places like houses and shops, is that you should size them with odd numbers. You will see why in a bit. |
| 4 | 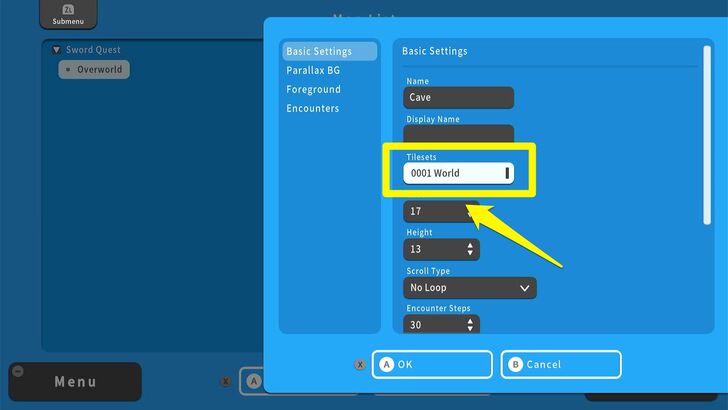 Now let's go over to the Tilesets option. |
| 5 | 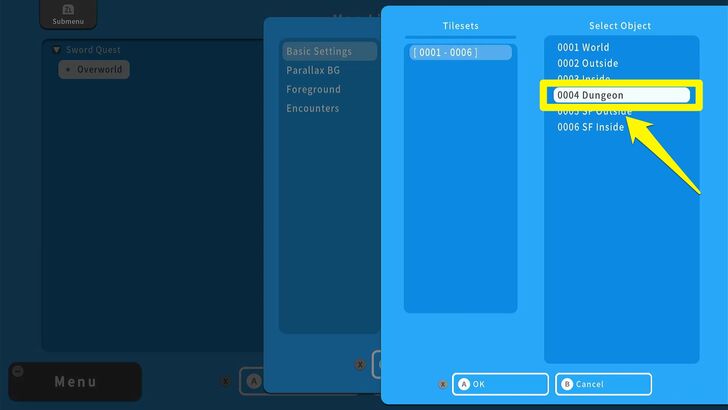 Here, you will see what Tilesets are - sets of Map Tiles that have been organized according to what kind of Map they will be used for. For example, the Tileset we used to make the Overworld was "0001 World." Since we're making a cave, we need a Tileset with those kinds of Tiles. "0004 Dungeon" is perfect for job, so select that. |
| 6 | 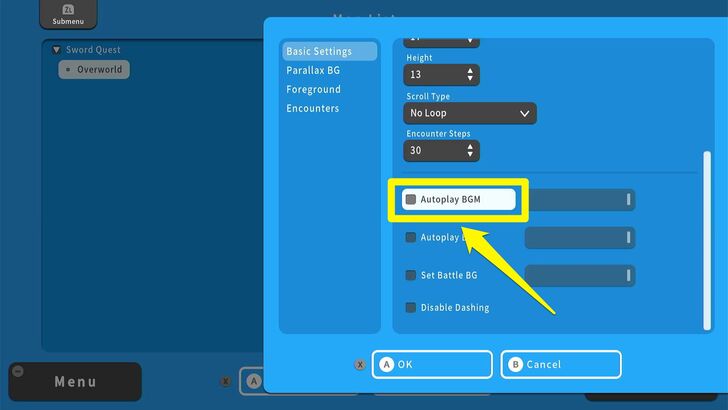 Now back in the Basic Information section, scroll down until you get to Autoplay BGM. This decides whether a BGM starts playing when you enter the Map. We want the cave to have a compelling BGM, so press the A Button to leave this box checked. |
| 7 | 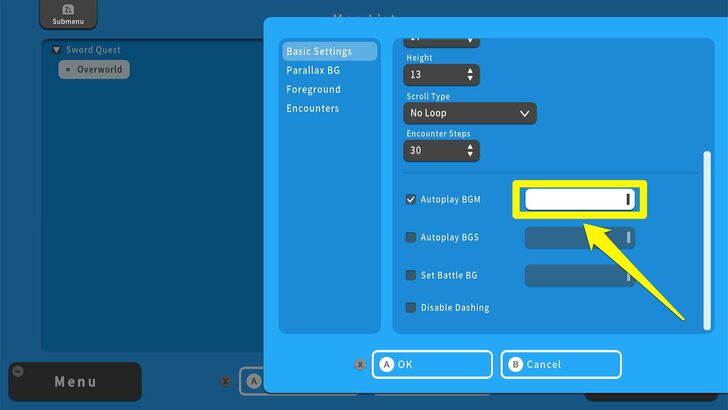 Now we'll have to pick the BGM itself. Navigate to the box next to the Autoplay BGM checkbox and select it with the A Button. |
| 8 | 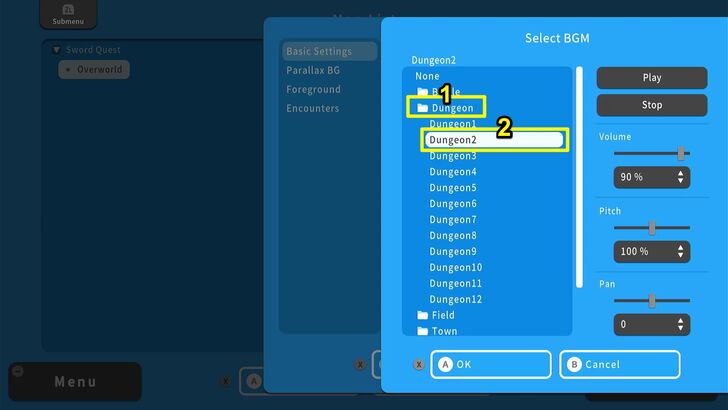 You will now see a bunch of folders containing different kinds of BGMs depending on the context they're supposed to be used for. Of course, you can use any BGM you want, though for our cave we used "Dungeon2" since it evokes the kind of mystique we want in our cave. |
| 9 | 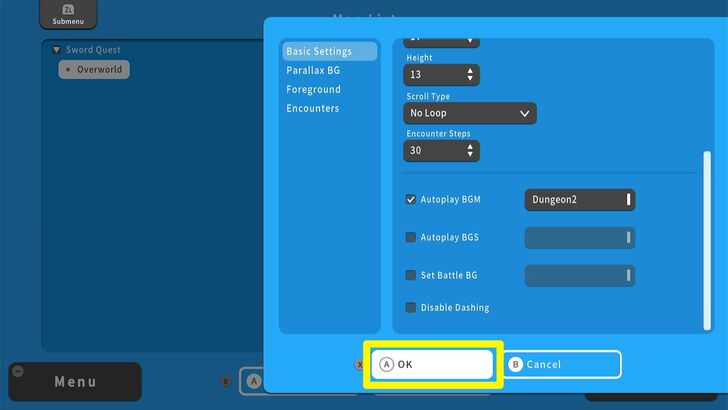 Now that you've selected the BGM, back at the Basic Information section, confirm your choices by pressing the X Button and selecting OK. |
| 10 | 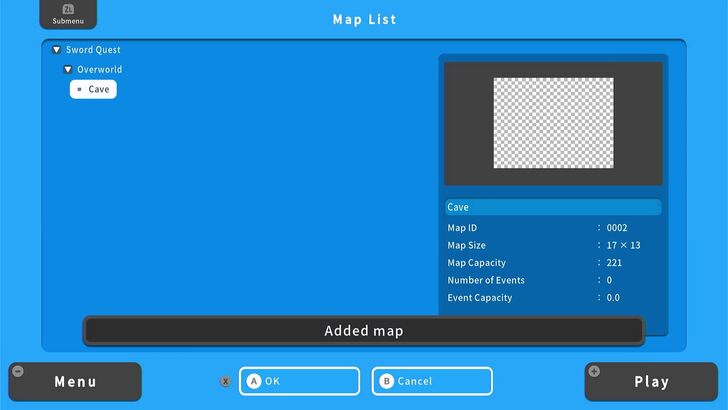 Our new Map is now on the Map list, and it should be foldered under the Overworld. This foldering will be important later. For now, just select the new cave Map. |
| 11 |  Our cave looks rather barren. But the skills you need to fill it up are the same skills you need to draw an Overworld. Toggle Map Mode on and bring up the Tile Palette. |
| 12 | 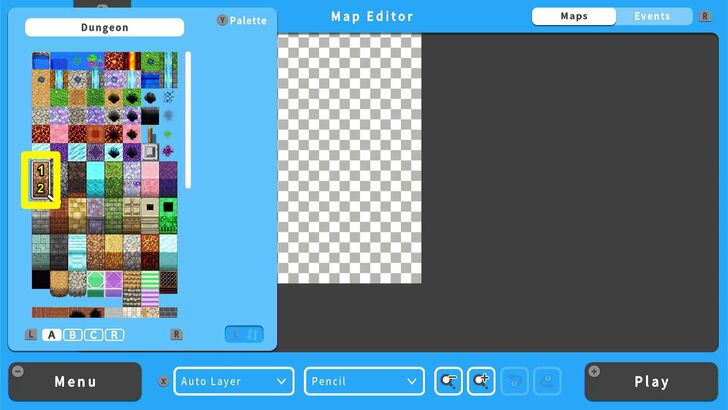 You'll notice that there are certain Tiles in the 0004 Dungeon Tileset that are made of two parts. As indicated in the picture above, 1 is the "top" of the Tile, while 2 is the "wall" of the Tile. We'll want to lay down the top first, so select 1. |
| 13 | 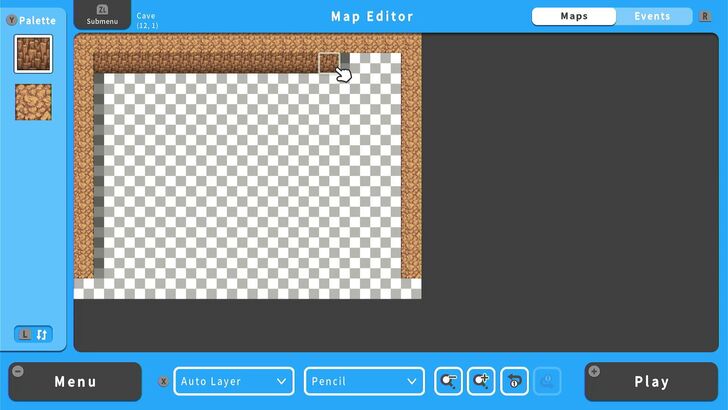 Lay down the top of the Tile along the sides of the Map as shown in the picture. Once that's done, select Tile 2 and start putting it down below the top Tiles you put in the northern part of the Map. This is so your cave has walls. |
| 14 | 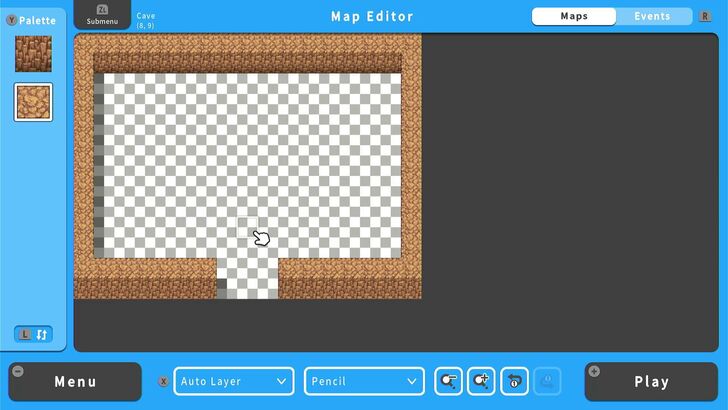 Lay down top and wall Tiles for the bottom corner as well. You'll notice that you're able to make a perfectly symmetrical entrance to your cave. That's because we used odd numbers for its width and height. |
| 15 | 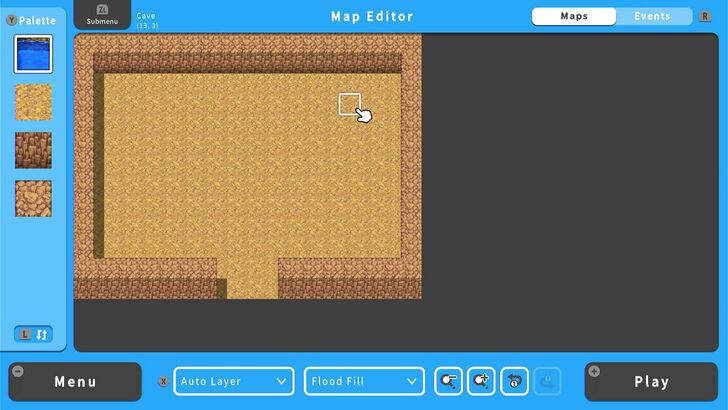 Now select a floor texture from the Tile Palette and put it down so our cave starts looking like a cave. You can use the Flood Fill tool if you want. |
| 16 | 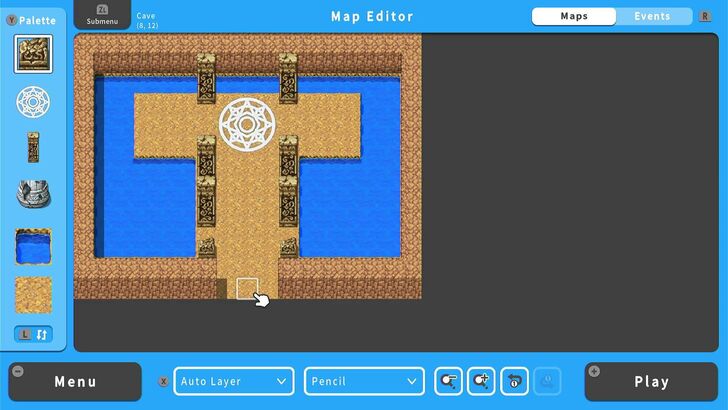 If you play around with the Tileset, you'll be able to fill your cave with all sorts of decorations. For our purposes, we decided to make a T-shaped island surrounded by water, some pillars, and a magic circle in the middle where our first NPC will be standing. When you're done, congratulations! You've made your first Interior Map! |
Just like with the Overworld Map, we have an in-depth guide about how to draw Maps for specific locations, complete with instructions on how to connect them to other Maps.
How to Draw Maps for Specific Locations
Moving On: Making Your First NPC!
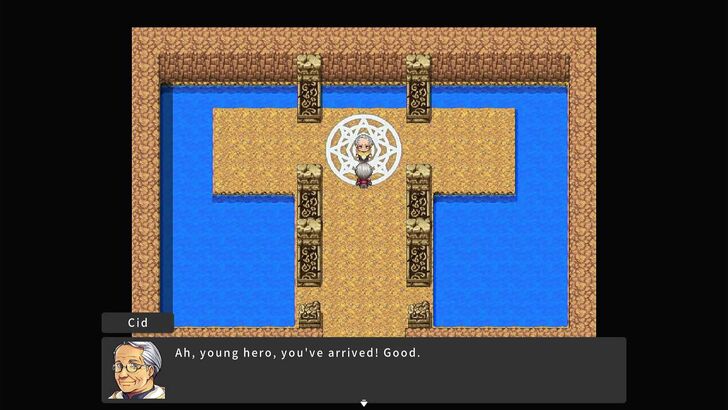
Now that we've got the Overworld and one Interior Map done, it's time to do two things: Connect our two Maps to teach other, then put in the cave the backbone of any classic RPG: the Non-Player Character, or NPC. Our NPC will give the player character not only their quest, but their first weapon: A sword!
In Part 2 of the Beginner's Guide, you will learn how to connect Maps using the "Move" Event, how to make an NPC event, how to use Switches, and how to test out all the work you've put into the game so far.
Making Your First NPC! Beginner's Guide (Part 2)
RPG MAKER WITH Related Guides

| Core Guides | |
|---|---|
| Beginner's Guide Part 1 | Beginner's Guide Part 2 |
| Tips and Tricks | |
|---|---|
| Map, Event, and Switch Naming Tips | How to Use the Flood Fill Tool |

| Core Guides | |
|---|---|
| Intermediate Guide Part 1 | Intermediate Guide Part 2 |
| Tips and Tricks | |
|---|---|
| How to Make a Switch | How to Use Map Foregrounds and Backgrounds |
| How to Change Event Text Color | |

| Core Guides | |
|---|---|
| Advanced Guide Part 1 | Advanced Guide Part 2 |

Comment
Author
Beginner's Guide Part 1: Getting Started with Your RPG!
Please participate in our site
improvement survey
03/2026
improvement survey
03/2026
Would you assist in
improving Game8's site?
improving Game8's site?

×
We are listening to our users' valuable opinions and discussing how to act on them.
The information collected through this survey will be used for the purpose of improving our services. In addition, the information will only be disclosed a part of a statistic in a format that will not allow identification of personal information.
Begin Survey
Not Now
×
Please rate each item regarding Game8.co's Advertisements.
Amount of Ads
Very Dissatisfied
Somewhat Dissatisfied
Fine
Somewhat Satisfied
Highly Satisfied
Placement of Ads
Timing of Ad Display
Ad Loading Speed
Safeness of Ads
Content of Ads
×
Please rate each item regarding Game8.co's Quality of Articles.
Amount of information
Very Dissatisfied
Somewhat Dissatisfied
Fine
Somewhat Satisfied
Highly Satisfied
Frequency of updates
Speed of new information
Accuracy of articles
Understandibility of articles
Readability of sentences
×
Please rate each item regarding Game8.co's Usability of the Site.
Ease of finding information
Very Dissatisfied
Somewhat Dissatisfied
Fine
Somewhat Satisfied
Highly Satisfied
Loading Speed
Use of Color
Font Size
Visibility of Images
Easy to Understand Layout
×
Please rate each item regarding Game8.co's Message Boards, Comments.
Ease of Writing
Very Dissatisfied
Somewhat Dissatisfied
Fine
Somewhat Satisfied
Highly Satisfied
Readability
Ease in Finding Information
Comment Quality
Comment Quantity
Admin Response
×
Please rate each item regarding Game8.co's Site's new design.
Please rate our site's new design
Very Dissatisfied
Somewhat Dissatisfied
Fine
Somewhat Satisfied
Highly Satisfied
Do you think that the website's design change makes the site easier to use?
Has the new design made it easier for you to find information on the site?
Has the new design improved the overall visual appeal of the site?
How would you rate your overall satisfaction with the new design of the site?
×
How likely are you to recommend Game8 to someone you know?
Very Unlikely
0
1
2
3
4
5
6
7
8
9
10
Very Likely
If you have other opinions regarding potential improvement to the website, please share them with us. We would appreciate your honest opinion.
Note: This is a free response section, so you can proceed without entering anything.
Note: Please be sure not to enter any kind of personal information into your response.
Note: Please be sure not to enter any kind of personal information into your response.
×
Thank You
×
Thank you for participating in our survey! Your answers will help us to improve the quality of our website and services.
We hope you continue to make use of Game8.
We hope you continue to make use of Game8.
Close
Rankings
- We could not find the article you were looking for.
- We could not find the message board you were looking for.
Gaming News


![Monster Hunter Stories 3 Review [First Impressions] | Simply Rejuvenating](https://img.game8.co/4438641/2a31b7702bd70e78ec8efd24661dacda.jpeg/thumb)
Popular Games

Genshin Impact Walkthrough & Guides Wiki
Honkai: Star Rail Walkthrough & Guides Wiki
Umamusume: Pretty Derby Walkthrough & Guides Wiki
Pokemon Pokopia Walkthrough & Guides Wiki
Resident Evil Requiem (RE9) Walkthrough & Guides Wiki
Monster Hunter Wilds Walkthrough & Guides Wiki
Wuthering Waves Walkthrough & Guides Wiki
Arknights: Endfield Walkthrough & Guides Wiki
Pokemon FireRed and LeafGreen (FRLG) Walkthrough & Guides Wiki
Pokemon TCG Pocket (PTCGP) Strategies & Guides Wiki


Recommended Games
Diablo 4: Vessel of Hatred Walkthrough & Guides Wiki
Cyberpunk 2077: Ultimate Edition Walkthrough & Guides Wiki
Fire Emblem Heroes (FEH) Walkthrough & Guides Wiki
Yu-Gi-Oh! Master Duel Walkthrough & Guides Wiki
Super Smash Bros. Ultimate Walkthrough & Guides Wiki
Pokemon Brilliant Diamond and Shining Pearl (BDSP) Walkthrough & Guides Wiki
Elden Ring Shadow of the Erdtree Walkthrough & Guides Wiki
Monster Hunter World Walkthrough & Guides Wiki
The Legend of Zelda: Tears of the Kingdom Walkthrough & Guides Wiki
Persona 3 Reload Walkthrough & Guides Wiki


All rights reserved
©Gotcha Gotcha Games
The copyrights of videos of games used in our content and other intellectual property rights belong to the provider of the game.
The contents we provide on this site were created personally by members of the Game8 editorial department.
We refuse the right to reuse or repost content taken without our permission such as data or images to other sites.