How to Make Different Kinds of Monster Encounters
RPG MAKER WITH allows you to create different types of Monster Encounters. Read on to learn more about creating Random and On-Map Monster Encounters.

RPG MAKER WITH allows you to create different types of Monster Encounters. Read on to learn more about creating Random and On-Map Monster Encounters.
List of Contents
How to Make Different Kinds of Monster Encounters
Monster Encounters are an important part of any RPG game. It's where most of the core gameplay happens, contains most of the action, and controls the game's pacing.
In RPG MAKER WITH, we can set your game to Random Encounters similar to Final Fantasy 6, where you encounter enemies based on how many steps you take on a map. Or you can make On-Map Encounters like in the Fear and Hunger series, where you have to touch enemies on the map to get into battle with them.
Depending on your choice of Encounter type, you will affect how players will be motivated to finish your game, how they're rewarded throughout your game, and how they will ultimately like your game.
How to Make Random Encounters
| 1 | 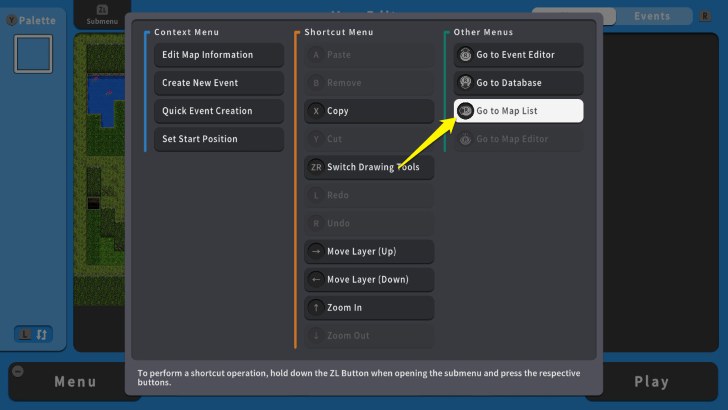 To set a random encounter, select a map where enemies will randomly spawn. Press the ZL Button and select " Go to Map List." |
|---|---|
| 2 | 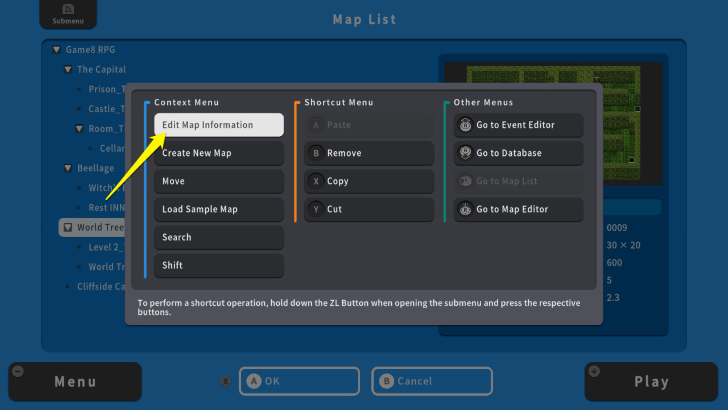 Here we selected the dungeon, "World Tree Level 1." Press the ZL Button again and select "Edit Map Information." |
| 3 | 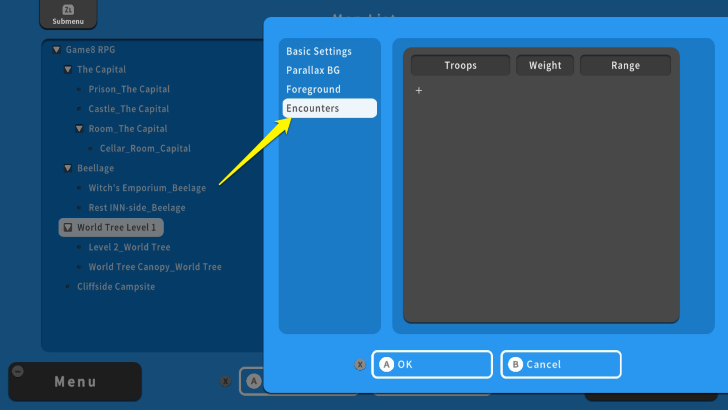 Move your cursor to "Encounters" to set the frequency and enemy types appearing in this map. We will add two monster groups for this dungeon. |
| 4 | 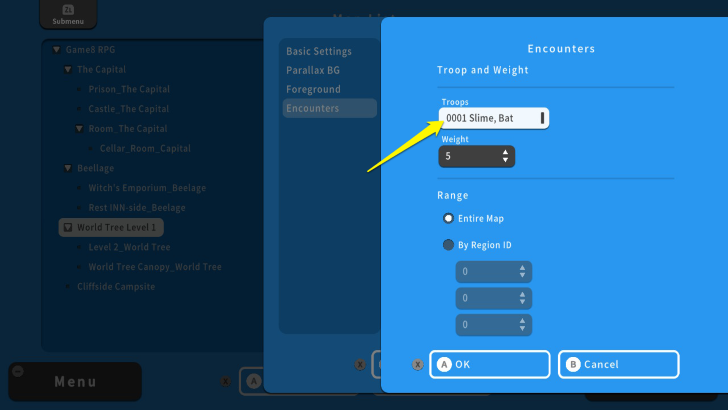 For the first monster group, we will add "0001 Slime, Bat" in the text box under the "Troops" option. |
| 5 | 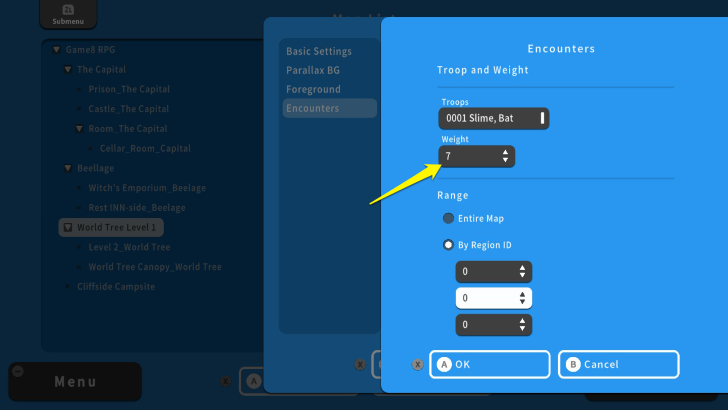 The Weight affects the chance of battling enemies. You will have increased chance of fighting monsters with high Weight value. For this example, we will set this monster group's Weight to 7. |
| 6 | 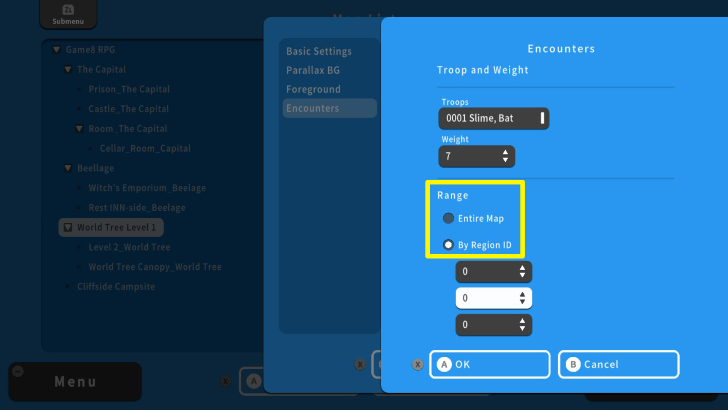 You can also set the Encounter Range in two ways. Encounter Range is the area within the map where you can fight a monster. The first one is "Entire Map," which makes the monster Troop appear inside your chosen map without restrictions. The second is "By Region ID." |
| 7 | 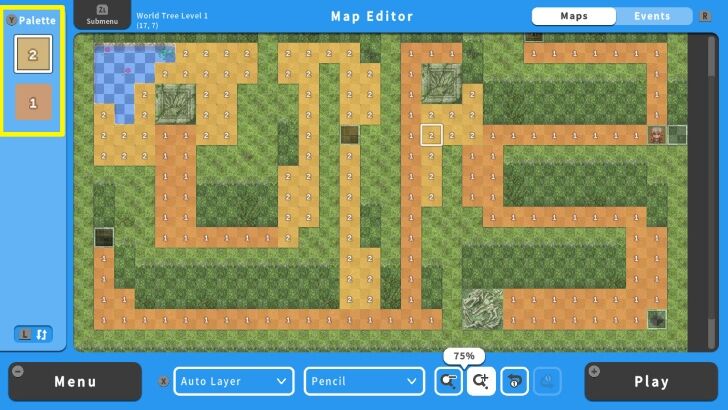 This is what Region ID looked like in the "Map Editor." Notice that we assigned Region IDs 1 and 2 for the two monster Troops we want to randomly encounter on this map. |
| 8 | 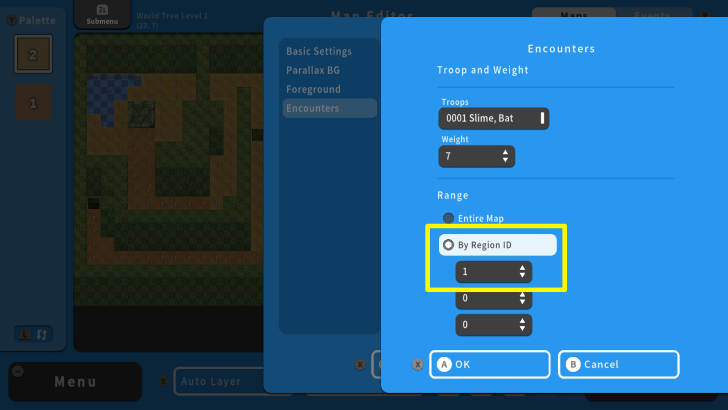 You can assign Region ID on your Map Editor via the "Tile Palette." For this example, we set "0001 Slime, Bat" to appear in tiles assigned with Region ID 1. |
| 9 | 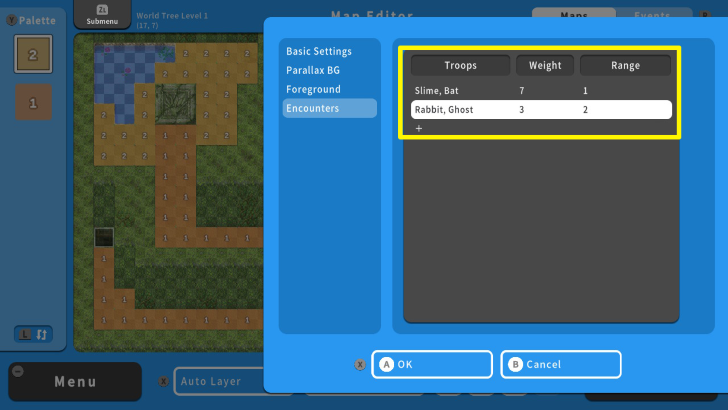 We also set the second monster group, "Rabbit, Ghost". Its weight is 3, which makes this enemy appear less frequent than "Slime, Bat." We also assigned this enemy to Region ID 2. This means that you only have a chance to encounter "Rabbit, Ghost" in tiles assigned with Region ID 2. |
| 10 | 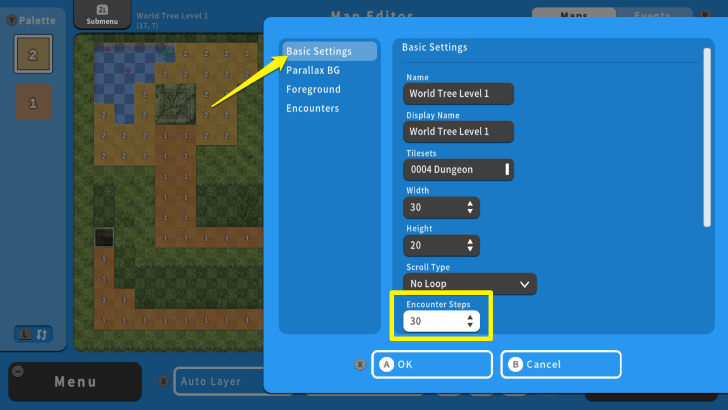 You can also set the average Steps before you encounter a monster. To do this, go to "Basic Settings" and move your cursor to "Encounter Steps." Once done, press the X Button and select OK. For this example, we set it to 30. This means that a player might randomly encounter an enemy after taking an average of 30 steps on the map. |
| 11 | 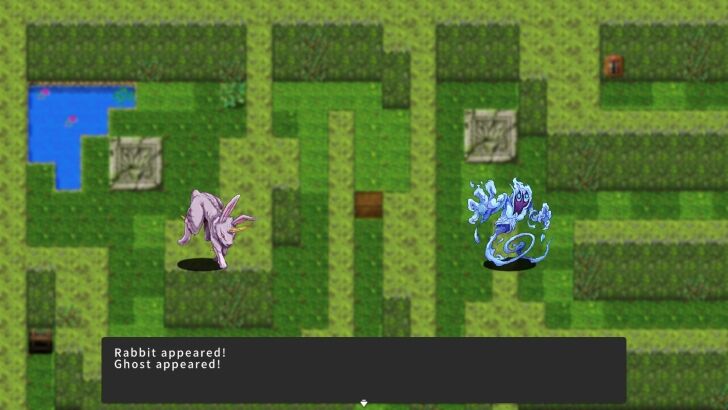 Congratulations! You set a Random Encounter on your map. |
How to Make On-Map Encounters
| 1 | 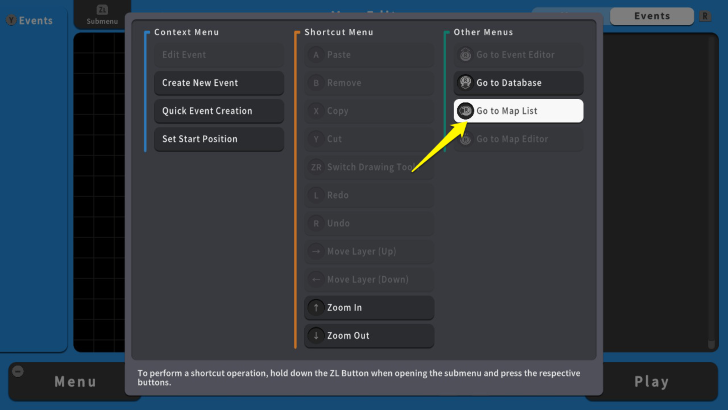 An On-map Encounter is a game mechanic where you can see the monsters on the map. To set an On-map Encounter, select a map where enemies will spawn. Press the ZL Button and select "Go to Map List." |
|---|---|
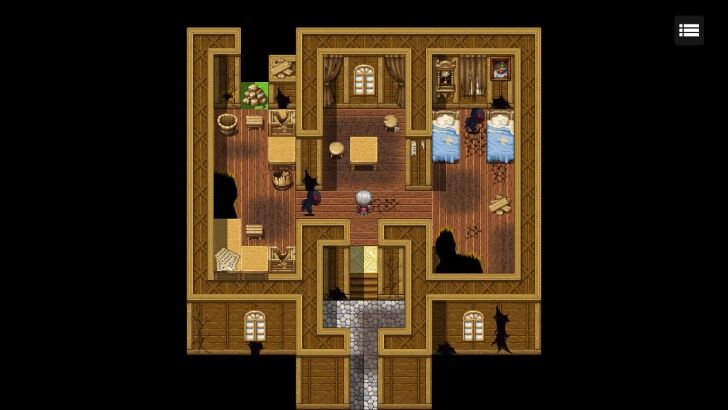
| 2 | 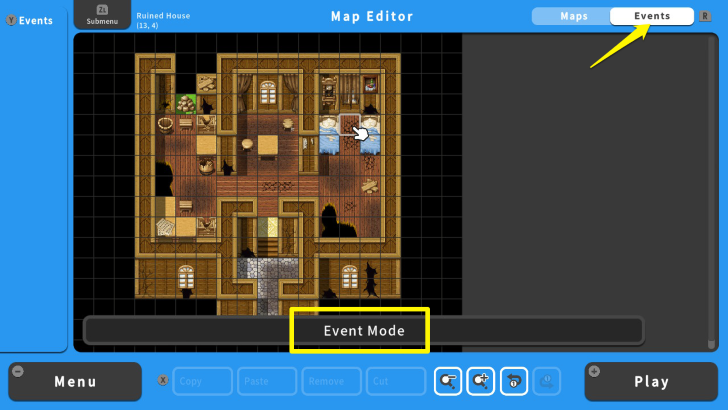 Here we selected a Sample Map, "Ruined House." Press the A Button to go to the "Map Editor." Then press the R Button to switch to "Event Mode." |
| 3 |  Select a specific tile where you want your enemy to appear. For this example, we will set two monsters inside the Ruined House. |
| 4 | 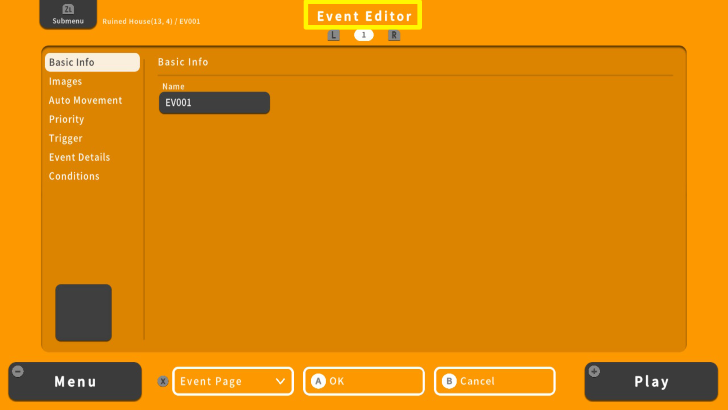 After selecting a specific tile, press the A Button. This will lead you to the "Event Editor." |
| 5 | 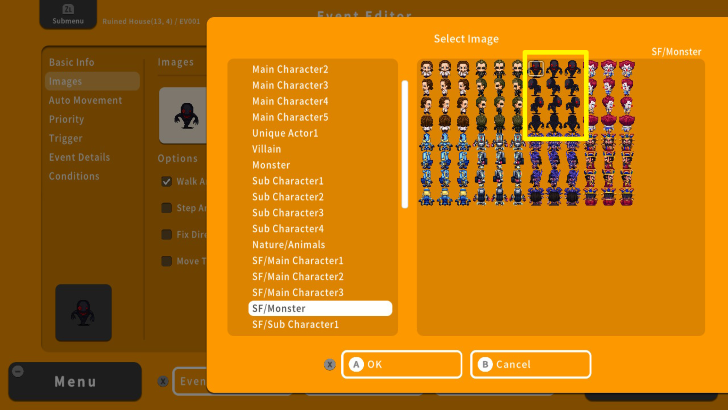 Go to "Images and select the monster's appearance by pressing the A Button on the empty box. For this example, we selected a monster from the "SF/Monster" folder. |
| 6 |  Once set, move your cursor to "Auto Movement." You can set the movement of your enemy here. |
| 7 | 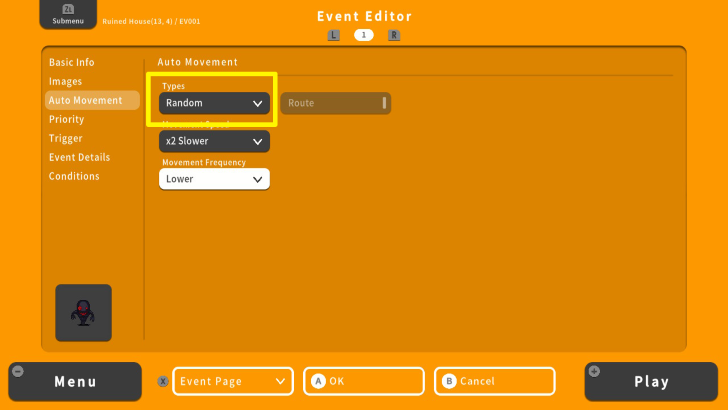 For these enemies, we will set their movement "Types" to "Random." These enemies will randomly wander on the map. |
| 8 | 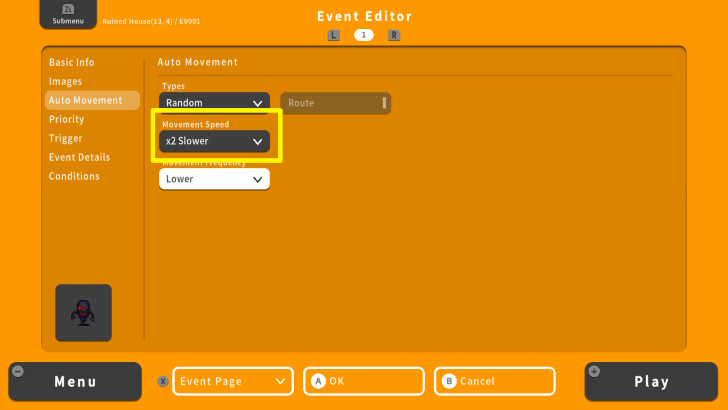 Set the "Movement Speed" to "x2 Slower." This means that these enemies will have their Movement Speed two times slower than your character's. |
| 9 | 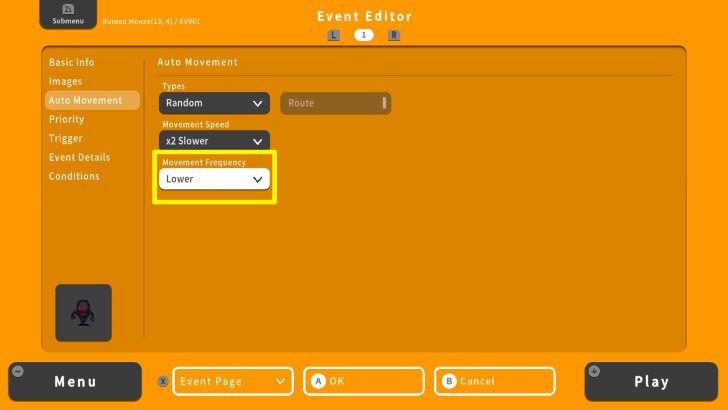 You can also set how frequent your enemy moves on the map. Select "Movement Frequency" and set it to "Lower." In this case, these enemies will move less frequently. |
| 10 | 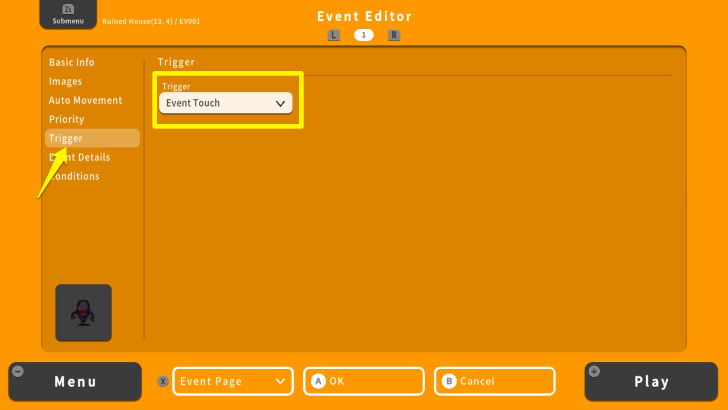 Now, we need to set their Event Triggers. Move your cursor to "Trigger" and set it to "Event Touch." The enemy battle will start if your character walks into the event. |
| 11 | 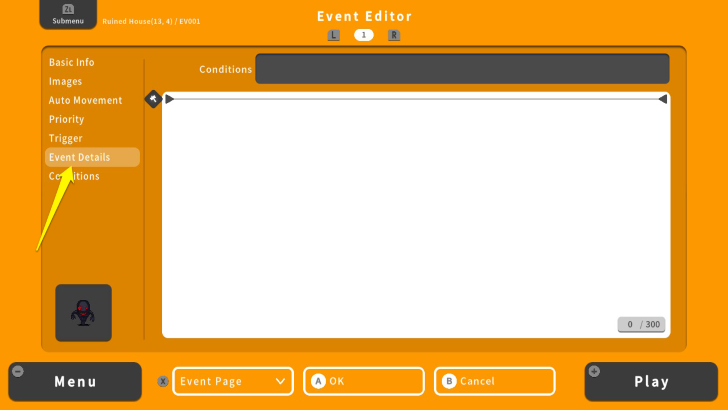 Go to the "Event Details" option and press the A Button. This will allow you to select specific commands. From here, select "Scene Control." |
| 12 | 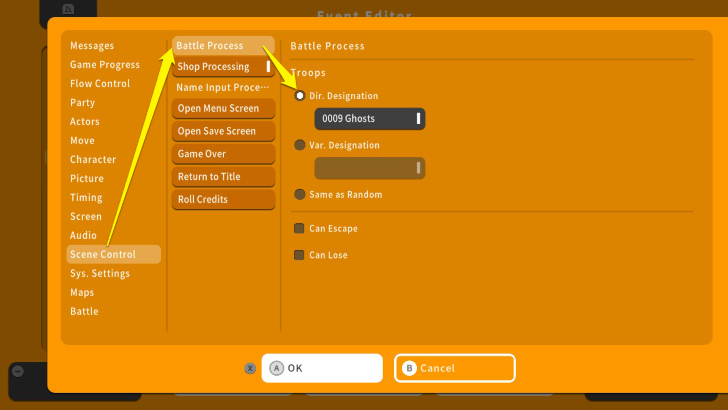 Select "Battle Process." Then select "Dir. Designation" and choose your monster Troop. Once done, press the X Button and select OK. For this example, we set it to "0009 Ghosts." |
| 13 | 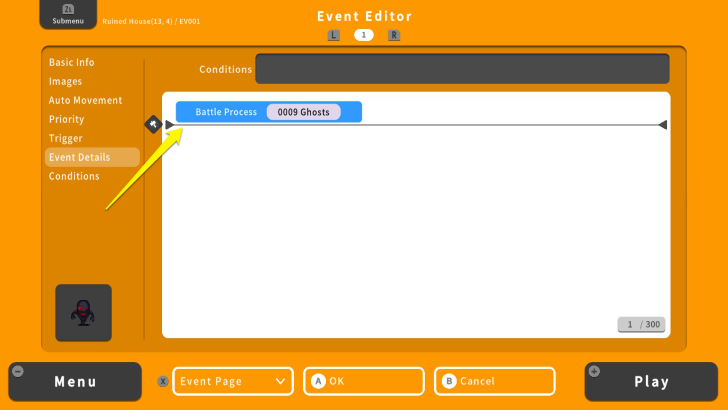 In the Event Details screen, move your cursor under the "Battle Processing" command and press the A Button. |
| 14 |  Select "Game Progress" and "Self Switch Ctrl." Select "A" and make sure the Operation is "ON." |
| 15 | 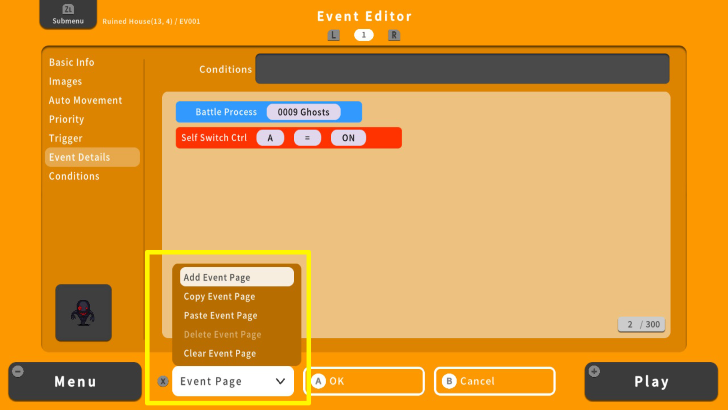 Press the X Button and select "Add Event Page." This is where we will put the Condition to make the monster disappear on the map after you defeated it. |
| 16 | 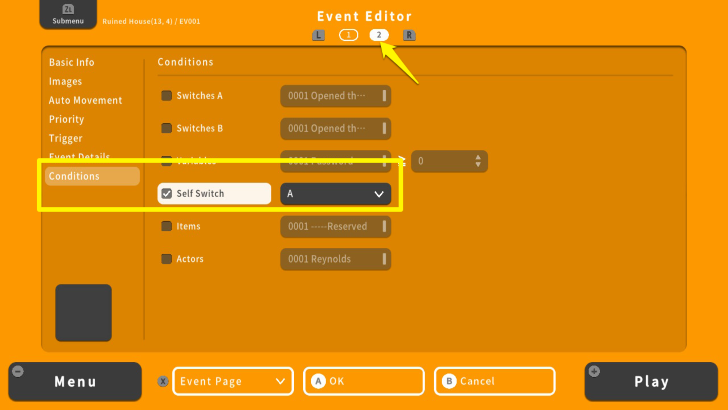 Press the X Button to return to the Event Editor. Here, move your cursor to "Conditions." Check "Self Switch" and make sure it is set to "A". Make sure you are on the second Event Page. Once done, press the X Button and select OK. |
| 17 | 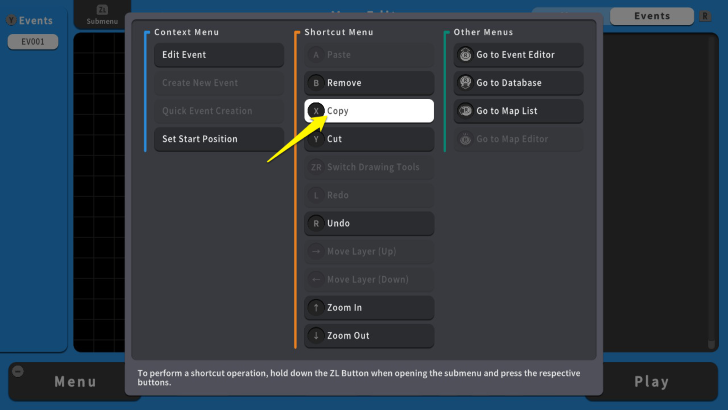 Since we are adding two enemies, we can just copy the monster we made earlier. Move your cursor to your monster, press the ZL Button, and select "Copy." |
| 18 | 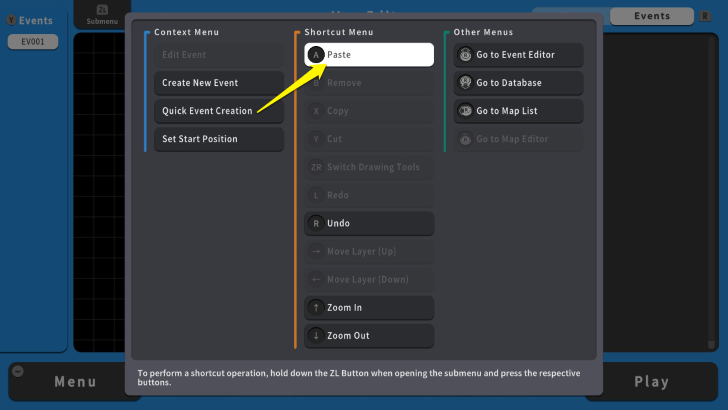 Once you selected a location for the second monster, press the ZL Button again and select "Paste." |
| 19 | 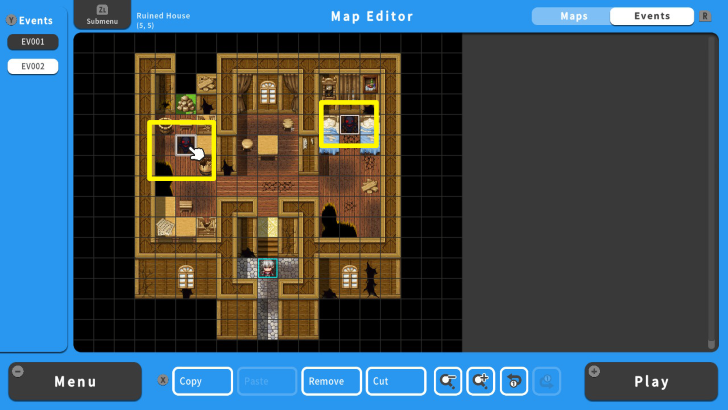 Congratulations! You made an On-map Encounter. To ensure your On-Map enemy event is working, you can playtest it by pressing the + Button. Make sure to save your progress as well. |
Monster Encounter Tips
Setting Monsters to Chase You
Aside from creating On-Map Monster Encounters, you can also set your them to chase you on the map.
| 1 |  Follow up to the step 6 of On-Map Encounters section, then do these steps. On the "Auto Movement" menu, set the type to "Custom." |
|---|---|
| 2 | 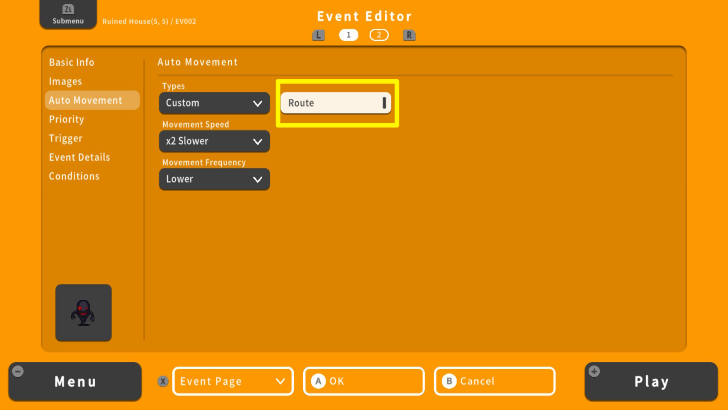 Select "Route" and press the A Button. |
| 3 | 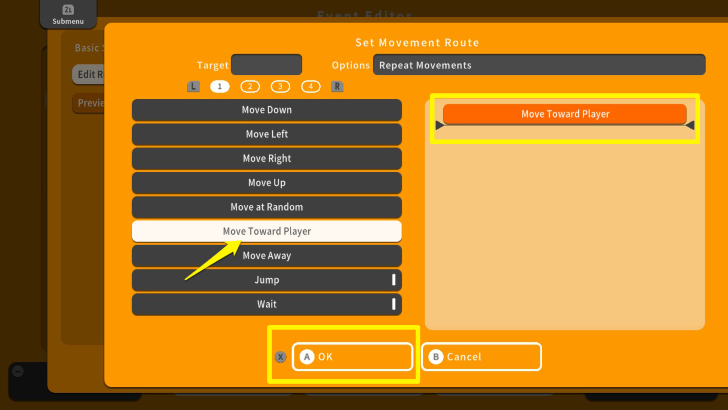 Select "Edit Route" and choose "Move Toward Player." Press the X Button and select OK. This will cause your enemy monsters to chase you on the map. From here, you can continue with Step 8 of the On-Map Encounters section. |
RPG MAKER WITH Related Guides
| Core Guides | |
|---|---|
| Beginner's Guide Part 1 | Beginner's Guide Part 2 |
| Tips and Tricks | |
|---|---|
| Map, Event, and Switch Naming Tips | How to Use the Flood Fill Tool |

| Core Guides | |
|---|---|
| Intermediate Guide Part 1 | Intermediate Guide Part 2 |
| Tips and Tricks | |
|---|---|
| How to Make a Switch | How to Use Map Foregrounds and Backgrounds |
| How to Change Event Text Color | |

| Core Guides | |
|---|---|
| Advanced Guide Part 1 | Advanced Guide Part 2 |
Comment
Author

How to Make Different Kinds of Monster Encounters
Rankings
- We could not find the message board you were looking for.
Gaming News


Popular Games

Genshin Impact Walkthrough & Guides Wiki
Honkai: Star Rail Walkthrough & Guides Wiki
Arknights: Endfield Walkthrough & Guides Wiki
Umamusume: Pretty Derby Walkthrough & Guides Wiki
Wuthering Waves Walkthrough & Guides Wiki
Pokemon TCG Pocket (PTCGP) Strategies & Guides Wiki
Abyss Walkthrough & Guides Wiki
Zenless Zone Zero Walkthrough & Guides Wiki
Digimon Story: Time Stranger Walkthrough & Guides Wiki
Clair Obscur: Expedition 33 Walkthrough & Guides Wiki


Recommended Games
Fire Emblem Heroes (FEH) Walkthrough & Guides Wiki
Pokemon Brilliant Diamond and Shining Pearl (BDSP) Walkthrough & Guides Wiki
Diablo 4: Vessel of Hatred Walkthrough & Guides Wiki
Super Smash Bros. Ultimate Walkthrough & Guides Wiki
Yu-Gi-Oh! Master Duel Walkthrough & Guides Wiki
Elden Ring Shadow of the Erdtree Walkthrough & Guides Wiki
Monster Hunter World Walkthrough & Guides Wiki
The Legend of Zelda: Tears of the Kingdom Walkthrough & Guides Wiki
Persona 3 Reload Walkthrough & Guides Wiki
Cyberpunk 2077: Ultimate Edition Walkthrough & Guides Wiki


All rights reserved
©Gotcha Gotcha Games
The copyrights of videos of games used in our content and other intellectual property rights belong to the provider of the game.
The contents we provide on this site were created personally by members of the Game8 editorial department.
We refuse the right to reuse or repost content taken without our permission such as data or images to other sites.