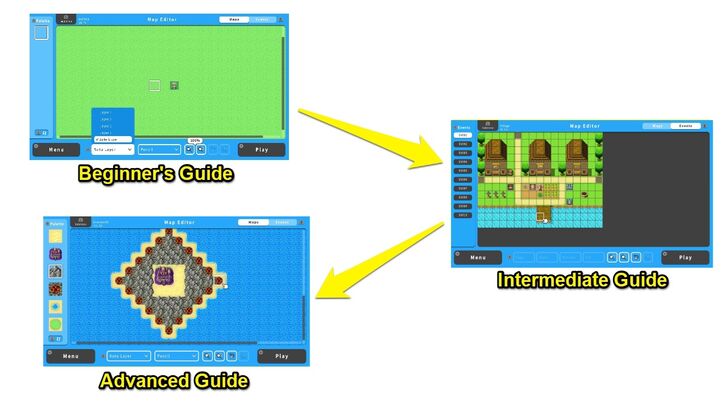
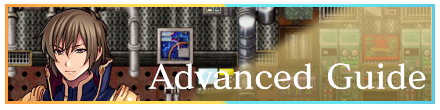
Advanced Guide Part 1: Making the Boss' Lair!
Classic RPGs always have a lair for the final boss, and in this guide we will teach you how to make one in your game with RPG MAKER WITH. Read on to learn how to make a boss lair complete with traps and puzzles.

|
Intermediate Guide (Part 2) ←Prev |
Advanced Guide (Part 2) Next→ |
Classic RPGs always have a lair for the final boss, and in this guide we will teach you how to make one in your game with RPG MAKER WITH. Read on to learn how to make a boss lair complete with traps and puzzles.
List of Contents
Advanced Guide (Part 1)
Making the Boss' Lair!
In the Intermediate Guide, we created a dungeon where your player characters will be able to strengthen themselves and prepare for the final challenge of your game: The demon king's castle! Now the time has come for us to not only make the demon king's castle, but also to start adding enemies into our game.
Making maps and putting in features like traps is the easy part, which is why they're all here in Part 1. Part 2 of the Advanced Guide will tackle implementing enemies in the game, creating the final boss battle, and an ending.
We've already made the third island in our game: Island C, which hosts the demon king's castle. The castle itself can only be accessed via air (which makes the airship the player will gain from the dungeon necessary). Once the player's party gets there, let's give them a warm welcome by creating a sprawling boss lair full of traps and puzzles.
Using a Sample Map for the Boss' Lair

Since we've already created a dungeon of our own, we will look at a feature that comes with RPG MAKER WITH: Sample Maps. Using a Sample Map for your boss' Lair can save time and effort, especially when you are starting out.
For example, we will use the "Demon Lord’s Castle" maps for creating the Demon King's Lair. Using a Sample Map reduces the time spent on designing maps and helps you focus on setting up events instead.
| 1 | 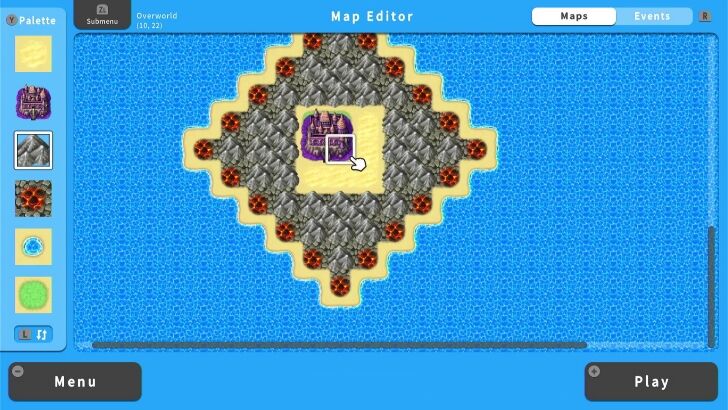 If you have the boss' lair on your overworld map, we can create the actual dungeon by using Sample Maps. |
|---|---|
| 2 | 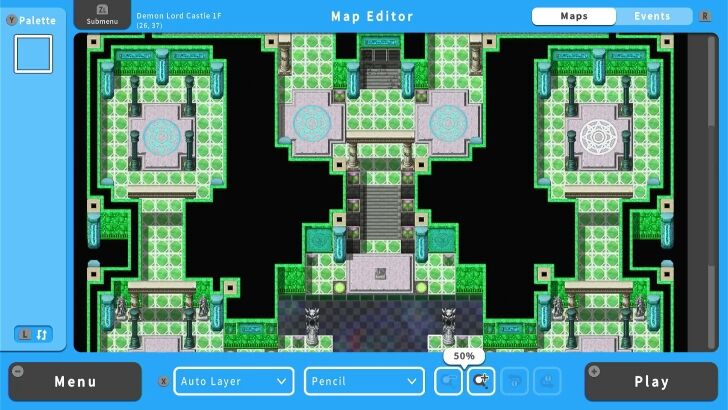 Go to Map List and select Load Sample Map. Here, choose Demon Lord Castle 1F. Locate this map's entrance and connect it to the overworld map by using the Transfer Event. Make sure to use this event again so that players can enter the boss dungeon from the overworld map. |
| 3 | 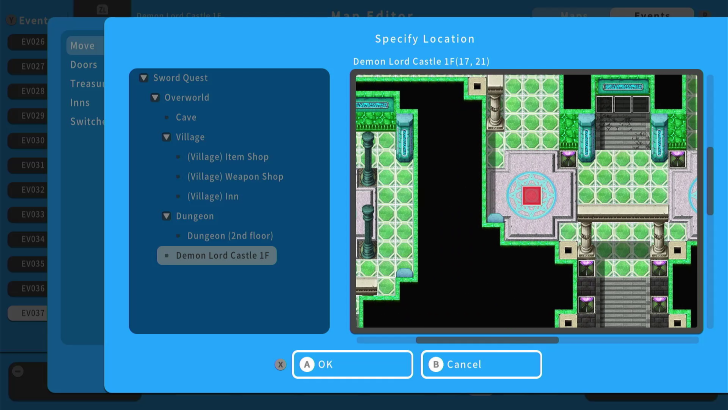 The upper part of the Demon Lord Castle 1F is inaccessible by walking, so we will set a Transfer Event to connect the lower and upper parts of the map. As we have done earlier, we need to use the "Move" Event for both locations to ensure players can move between them. |
| 4 | 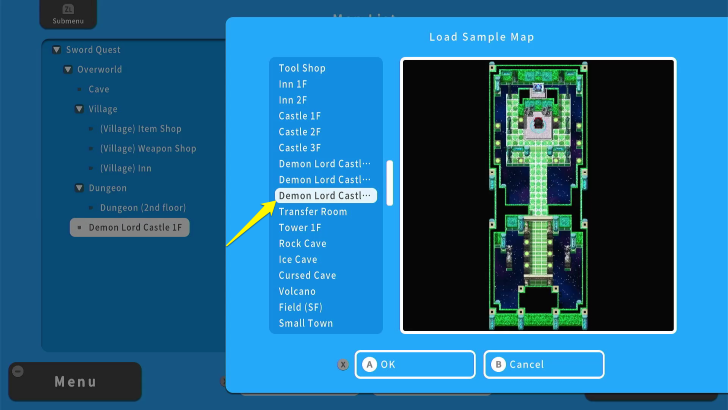 After setting the Transfer Event to connect locations within and outside the Demon Lord Castle 1F, we will set the second level for the dungeon. Open the Map List again. This time, select Demon Lord Castle 3F. |
| 5 | 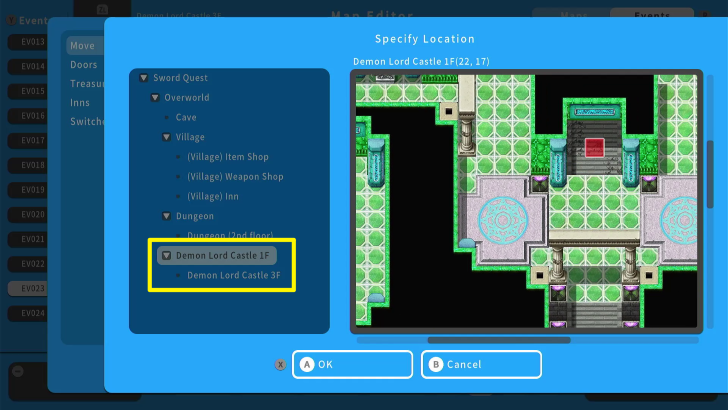 Load the Demon Castle 3F map and locate its entrance. After finding its entrance, use the "Move" Event to connect it to Demon Lord Castle 1F. Use the Transfer Event again so that players can move back and forth between these two maps. |
| 6 | 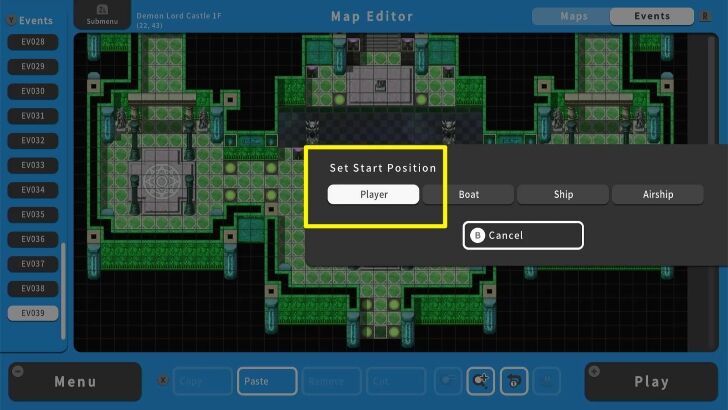 Before playtesting the Boss' Lair, make sure to set your character's Start Position. This allows you to set where the character will spawn once you play the game. Here, we set the starting position close to the Demon Lord Castle 1F's entrance. |
| 7 | 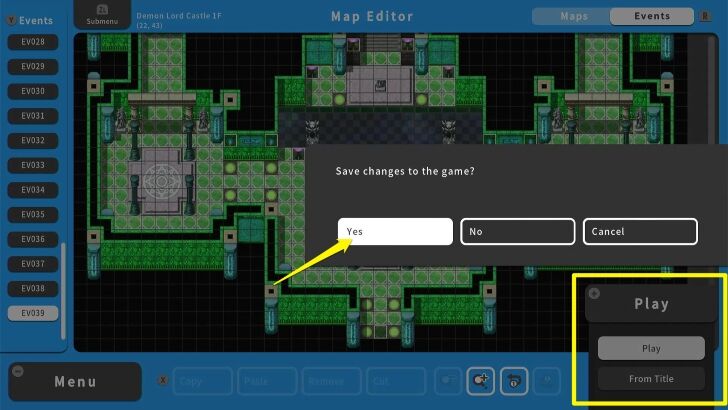 Once done, press the + Button and select Play. Make sure to save your progress before playing the game. |
| 8 | 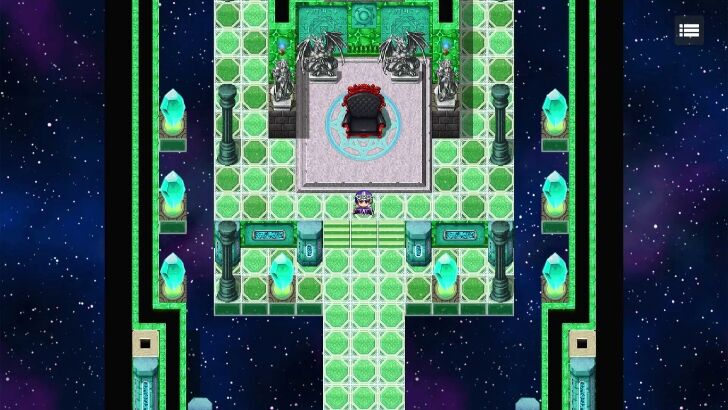 Congratulations! You made a boss lair. Make sure to check if the "Move" Event is working properly. |
You can use Sample Maps to create places other than dungeons like villages, towns, and even entire overworlds! You just need to put in the effort to populate the maps with interesting events and enemies. You can also use Sample Maps to learn how to create maps of your own, especially if you are just starting out with creating RPG MAKER games.
How to Create Traps
Traps provide a level of challenge by forcing the player to strategize how to approach a dungeon. For instance, the spike traps in the demon king’s castle will force players to tread carefully while exploring this dungeon.
Aside from providing a challenge, you can use traps to influence how players explore a dungeon. For example, you can place traps around a treasure chest, forcing players to explore the dungeon and find ways to deactivate them. Thus, traps are an important part of any dungeon to add more challenge to players and change their approach to complete it.
| 1 |  Traps are a typical part of dungeons. After we finish creating our boss' lair, we will set up traps against players who venture into this dungeon. |
|---|---|
| 2 | 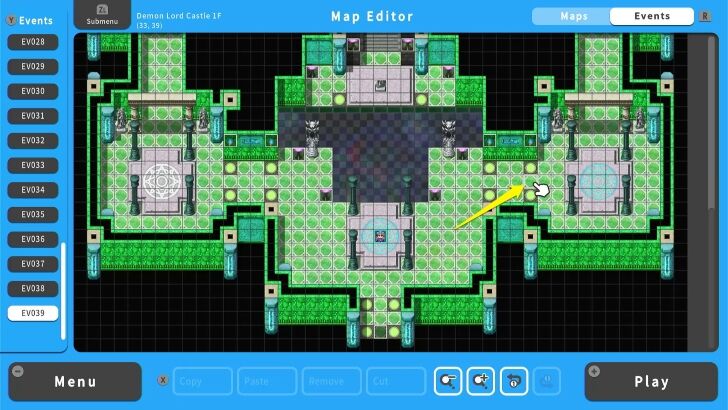 Select a location where your trap will appear. For this example, we will place a spike trap for players passing through this tile. |
| 3 | 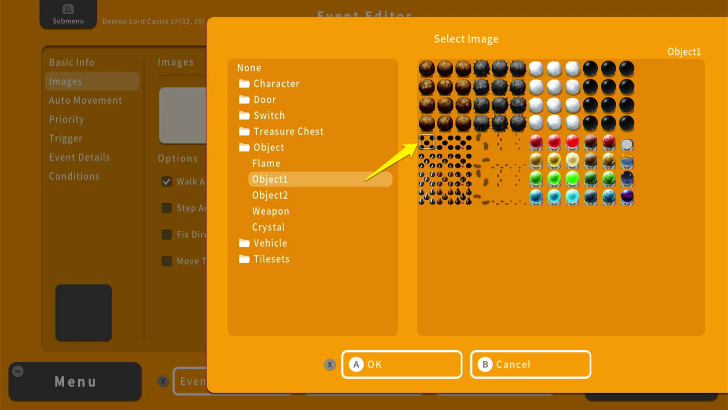 Make sure that your map is set to Event Mode. Press the A Button and it will lead you to the Event Editor. Here, we set the image of the spike trap and set it to Fix Direction. |
| 4 | 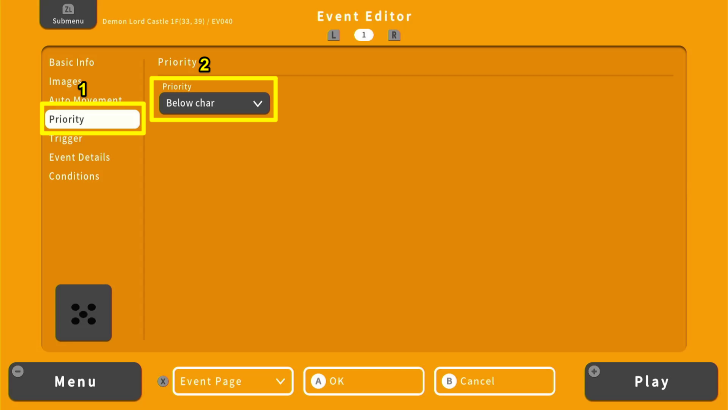 After that, set the Priority to Below Character. This will render the event to appear underneath the player and NPCs, which is useful for spike traps. |
| 5 | 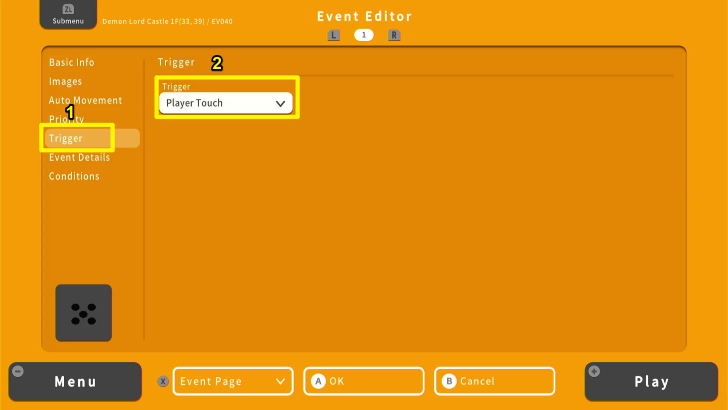 Set the Trigger to Player Touch. This will ensure that the event will trigger once the player touches or bumps with the event. |
| 6 | 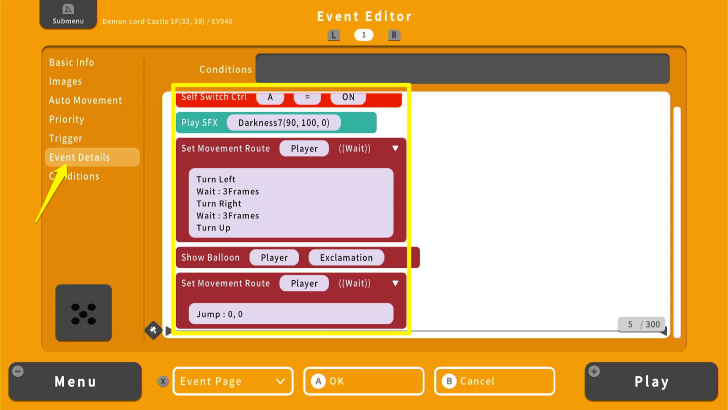 Go to Event Details and set Self Switch A. After that, set a sound effect for your spike trap. You should also set two Movement Route commands. Between these Movement Route commands is the Show Balloon command, where player characters will show an exclamation point upon activation of the event. |
| 7 | 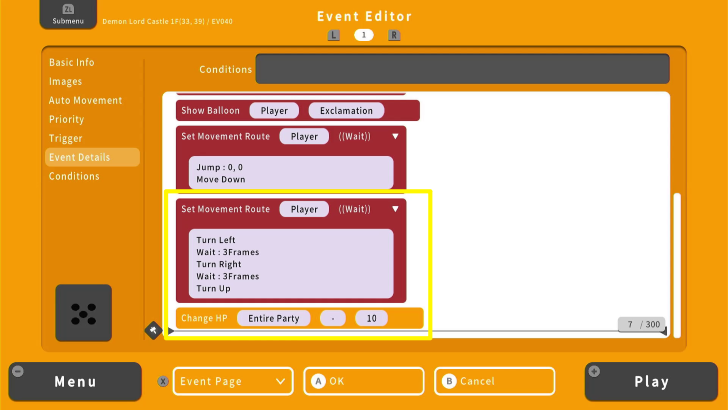 Copy the first Movement Route command and paste it under the second one with the Jump and Move Down command. After that, set the Change HP command to minus 10. This will cause players to lose 10 HP after they activate the spike trap event. You can increase or decrease the damage depending on your choice. |
| 8 |  Add another Event Page. Set the image to a protruding spike. The Priority and the Trigger options are the same as on the first Event Page. Lastly, go to Conditions and check the Self Switch we used on the first Event Page. After that, your trap is set. |
| 9 | 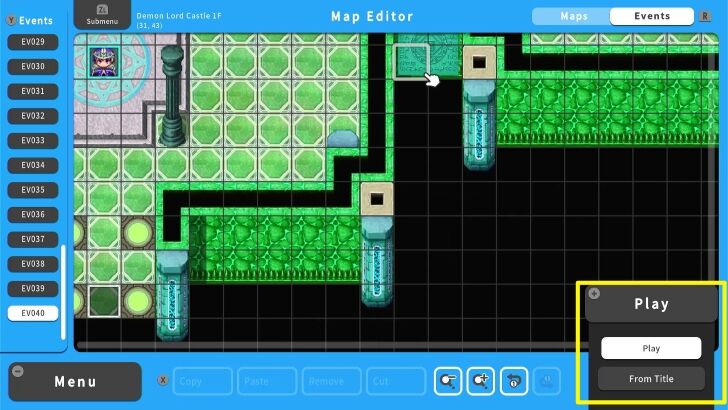 Press the + Button to playtest your trap. Make sure to save your progress before playing the game. |
| 10 |  Congratulations! You made a spike trap for your dungeon. You can copy this event and spread it throughout the dungeon to provide some challenge to any adventurers entering this location. |
How to Make a Boss Dungeon With Traps
How to Make a Puzzle
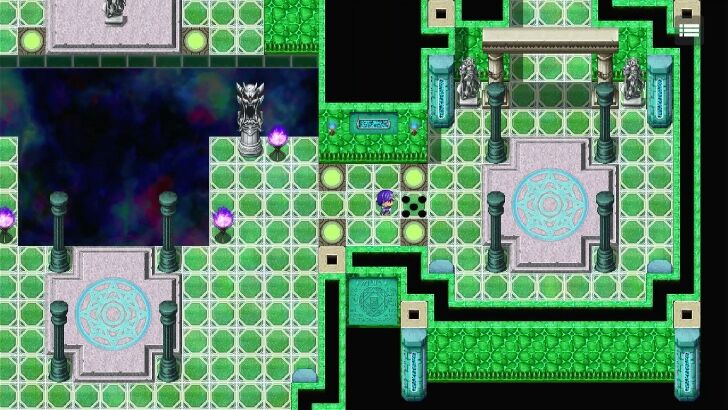
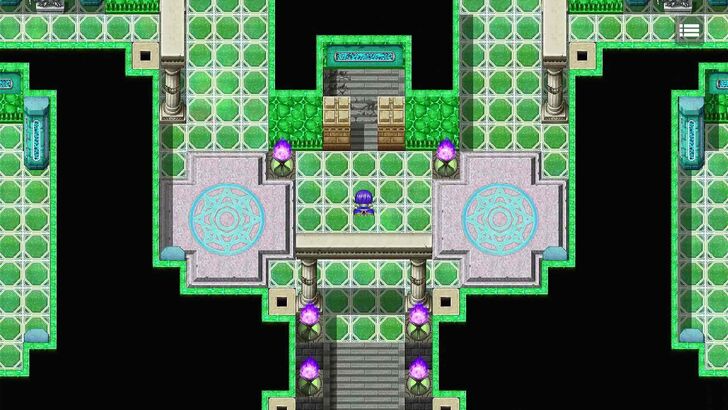
Aside from traps, there's another way you can keep the player's party away from the final boss - puzzles. We will make a basic puzzle in the Demon King's Lair, where the player character will have to destroy three stones in order to progress to the Lair's second floor. We will do that by means of using Variables.
| 1 | 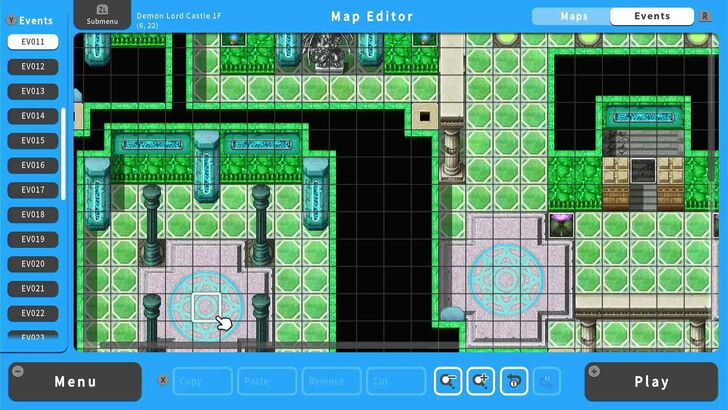 First, let's work on the rocks we will have to smash in order to progress through the game. Pick a spot that you think players will have to explore the dungeon in order to find it. |
|---|---|
| 2 | 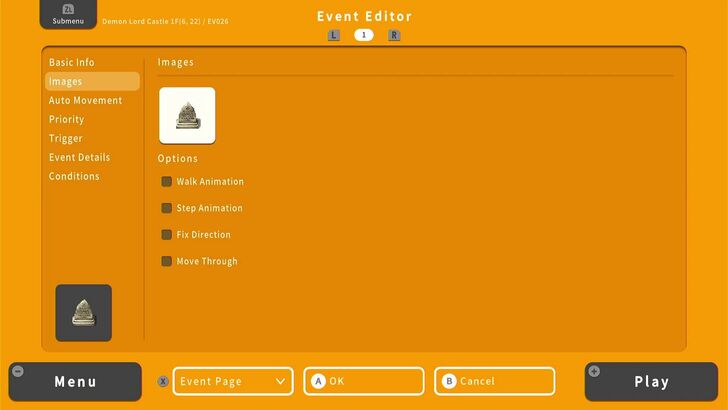 Pick an appropriate rock shape for the Event's sprite. |
| 3 | 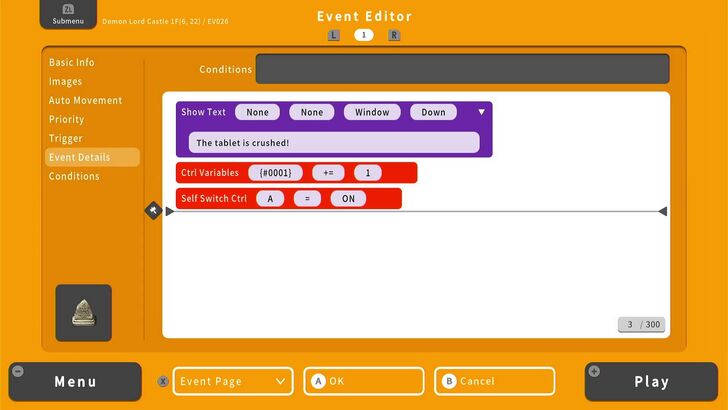 For the first Event Page, add a show message command that confirms the player smashed the stone, followed by a Control Variables command and a Self Switch. |
| 4 | 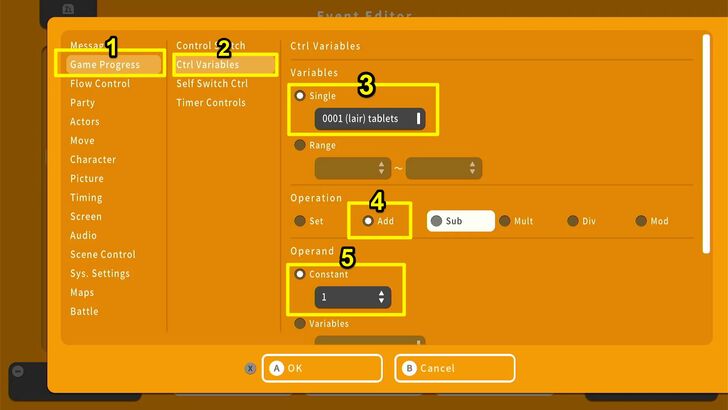 To use a Control Variables command, go to Game Progress, select Ctrl. Variables, then under Single select the Variable you want to use. Variables are like Switches in that you can name them and use them for other events that will also use variables, and we named our variable "(lair) tablets" with Lair being the map the variable is used in. Then, toggle whether you want to do with the number every time the Event is triggered, and set that number under Constant. In our case, we set it so that every time a rock is smashed, the Variable increases by 1. |
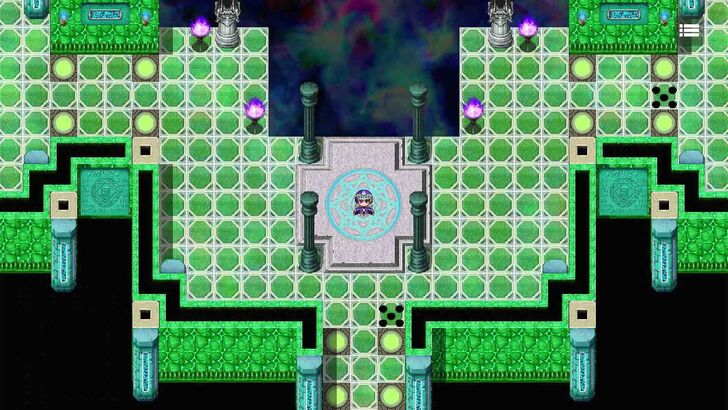
| 5 | 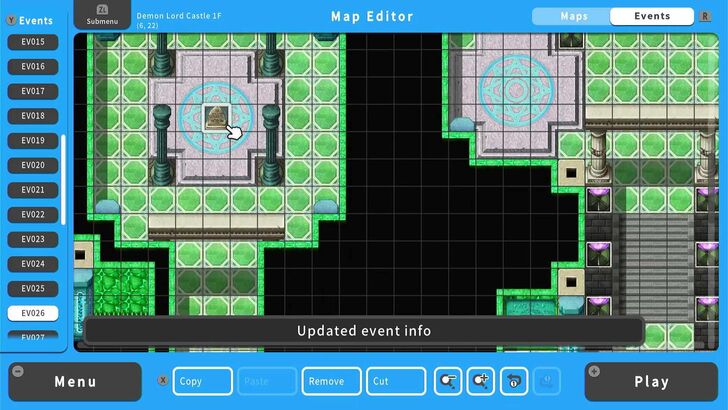 Our tablet is complete. |
| 6 | 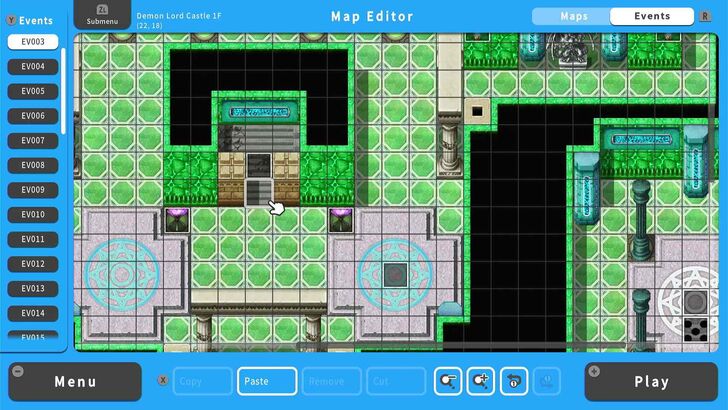 Now let's make the barrier. Choose where you want to place the barrier. |
| 7 | 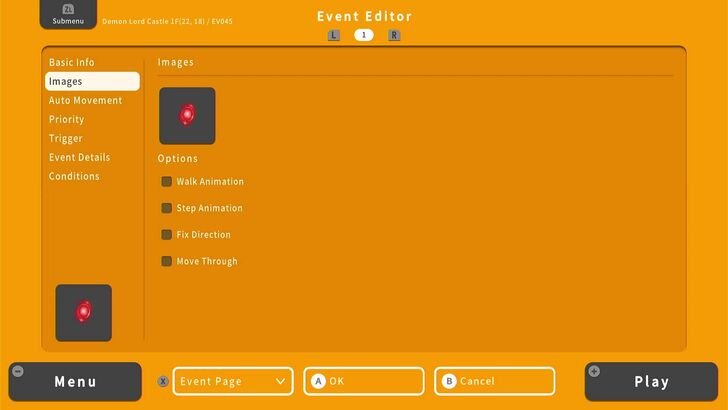 Give the barrier an appropriate appearance on the map. |
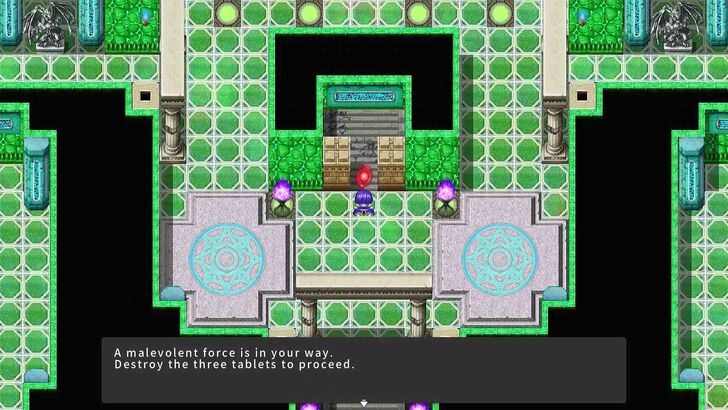
| 8 | 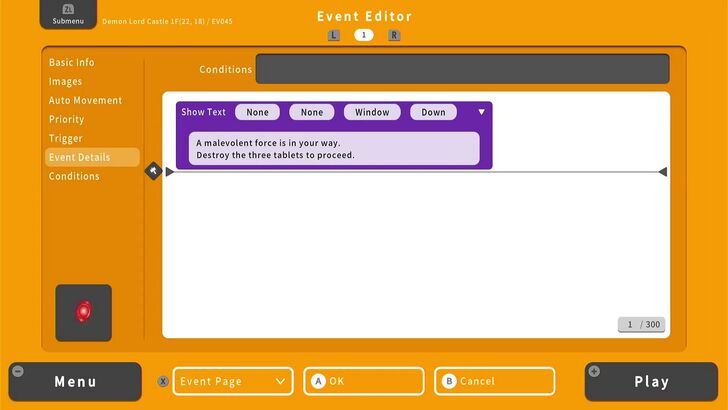 In its first Event Page, make a Show Message command that will tell the player the instructions to solve the puzzle (destroy three tablets). |
| 9 | 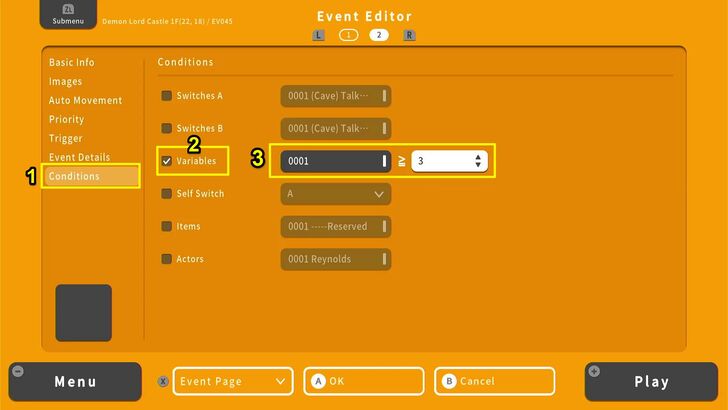 Create a second Event Page, but instead of a Switch like we usually do, let's use a Variable instead. Set it to the Variable we've been using so far for all the tablets, and set the count to 3. So that when all three barriers are destroyed, the barrier disappears. |
| 10 |  Double-check the Condition of your second Event Page by looking at the top of the Event Details List. You should see a Variable condition similar to the one pictured above. |
If you follow all the steps correctly, your player character will come upon the barrier and be unable to get through if they haven't smashed all the tablets. But once they do, the barrier should disappear.
Variables can be used in many ways. You can use them to count how many times a certain action has been done (which could fulfill a quest). You can also use them to set passwords and codes for locked doors. You can even use them to make changing weather effects and even let your players gamble gold in-game.
Variables, like Switches, allow you to make complex operations that can increase the fun of your RPG.
Advanced Playtesting
Before we continue and implement enemies in our game, let's take a quick detour and go over what we have so far: Acave with a quest-giving NPC, a village with recruitable party members, shops, inns, and another important NPC, a dungeon full of loot and monsters, and the lair of the final boss complete with traps and puzzles.
Even a small game like ours already has more than a few moving parts. So it would make sense for us to make sure all those parts are moving correctly. We've tackled basic playtesting back in the Beginner's Guide, so in the Advanced Guide, it's fitting to do something a little bit more "advanced" than that: Toggling switches.
Playtesting by Toggling Switches
| 1 | 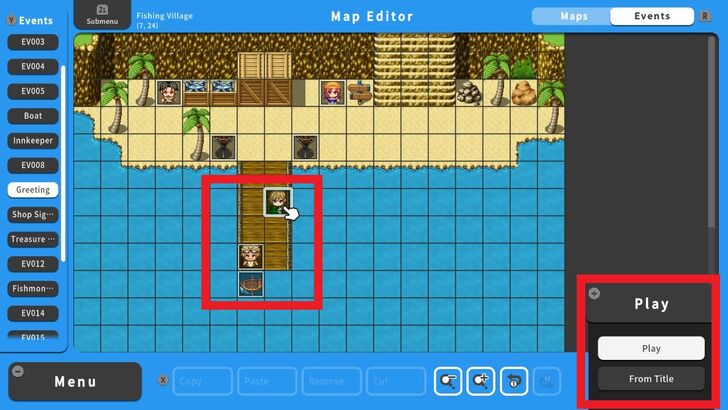 To start our playtest, we'll open the map with the vehicle access event and adjust our character's starting position. In the "Event Editor" screen press the ZL Button and select "Set Start Position." Press the + Button and select "Play." |
|---|---|
| 2 | 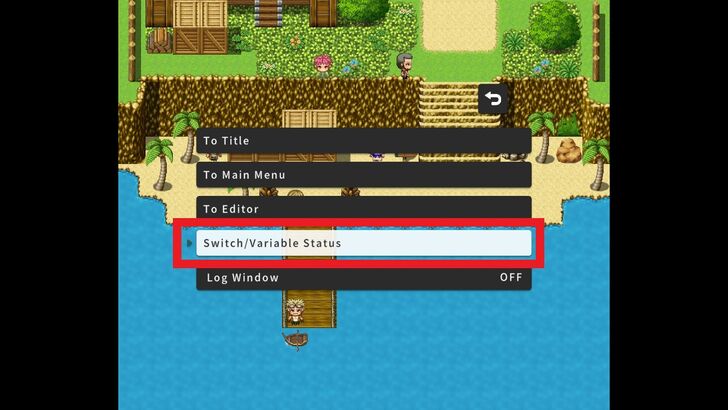 On the playtest screen, press the + Button. The Main Menu will appear. Select "Switch/Variable Status". A Menu containing Switches and Variables will appear. "S" stands for Switches while "V" stands for Variables. |
| 3 | 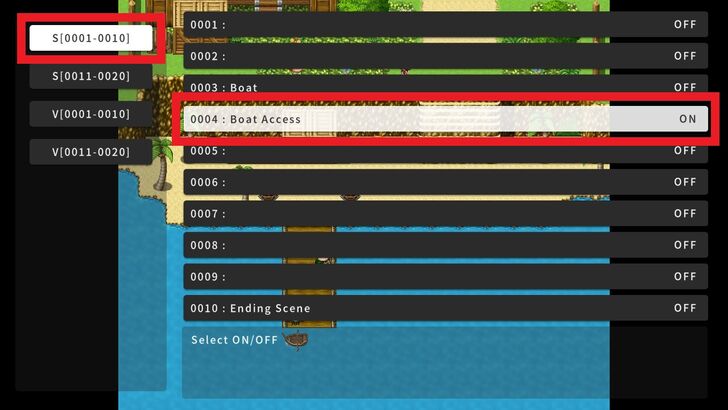 The purpose of our first playtest is to test the switch that will activate a disappearing NPC Event so that we can access the boat freely. Let's turn the Boat Access switch ON. |
| 4 | 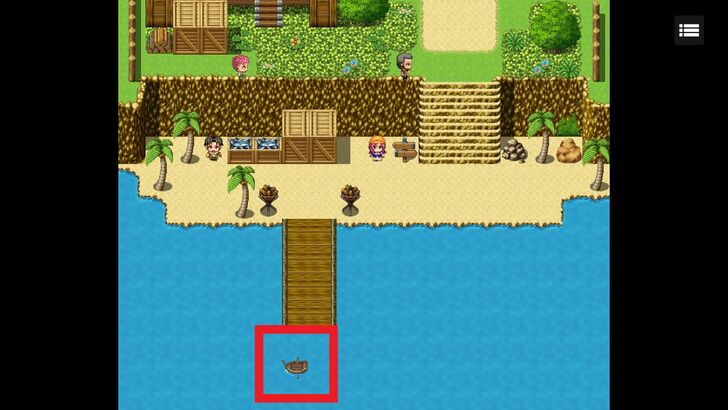 Voila! The NPC has disappeared and we can now use the boat freely. |
Aside from turning on Switches like the one for the old man in the cave, you can also use the Switch/Variable Status feature to test Variables such as the rock puzzle we did earlier. Try to use this feature whenever you playtest to save time as you go through your game to test your Events and spot bugs.
Moving On: Making Enemies and the Final Boss
We're now at the final stretch of your RPG-making journey! With all the key maps and events in your game done, it's time to put in enemies for your players to fight and a final boss to face off with to end the game. Read our guide to find out how to do all of that, as well as how to make an ending cutscene.
Making the Boss' Lair! Advanced Guide (Part 1)
RPG MAKER WITH Related Guides
| Core Guides | |
|---|---|
| Advanced Guide Part 1 | Advanced Guide Part 2 |
| Core Guides | |
|---|---|
| Beginner's Guide Part 1 | Beginner's Guide Part 2 |
| Tips and Tricks | |
|---|---|
| Map, Event, and Switch Naming Tips | How to Use the Flood Fill Tool |

| Core Guides | |
|---|---|
| Intermediate Guide Part 1 | Intermediate Guide Part 2 |
| Tips and Tricks | |
|---|---|
| How to Make a Switch | How to Use Map Foregrounds and Backgrounds |
| How to Change Event Text Color | |
Comment
Author
Advanced Guide Part 1: Making the Boss' Lair!
Rankings
- We could not find the message board you were looking for.
Gaming News
![Neverness to Everness (NTE) Review [Beta Co-Ex Test] | Rolling the Dice on Something Special](https://img.game8.co/4414628/dd3192c8f1f074ea788451a11eb862a7.jpeg/show)


Popular Games

Genshin Impact Walkthrough & Guides Wiki
Honkai: Star Rail Walkthrough & Guides Wiki
Arknights: Endfield Walkthrough & Guides Wiki
Umamusume: Pretty Derby Walkthrough & Guides Wiki
Wuthering Waves Walkthrough & Guides Wiki
Pokemon TCG Pocket (PTCGP) Strategies & Guides Wiki
Abyss Walkthrough & Guides Wiki
Zenless Zone Zero Walkthrough & Guides Wiki
Digimon Story: Time Stranger Walkthrough & Guides Wiki
Clair Obscur: Expedition 33 Walkthrough & Guides Wiki


Recommended Games
Fire Emblem Heroes (FEH) Walkthrough & Guides Wiki
Pokemon Brilliant Diamond and Shining Pearl (BDSP) Walkthrough & Guides Wiki
Diablo 4: Vessel of Hatred Walkthrough & Guides Wiki
Super Smash Bros. Ultimate Walkthrough & Guides Wiki
Yu-Gi-Oh! Master Duel Walkthrough & Guides Wiki
Elden Ring Shadow of the Erdtree Walkthrough & Guides Wiki
Monster Hunter World Walkthrough & Guides Wiki
The Legend of Zelda: Tears of the Kingdom Walkthrough & Guides Wiki
Persona 3 Reload Walkthrough & Guides Wiki
Cyberpunk 2077: Ultimate Edition Walkthrough & Guides Wiki


All rights reserved
©Gotcha Gotcha Games
The copyrights of videos of games used in our content and other intellectual property rights belong to the provider of the game.
The contents we provide on this site were created personally by members of the Game8 editorial department.
We refuse the right to reuse or repost content taken without our permission such as data or images to other sites.