Intermediate Guide Part 2: Building a Dungeon!
Dungeons are an integral part of any RPG, as they are the hubs where your players can fight enemies, loot treasure, and go face-to-face with bosses. Read on to learn how to build a dungeon for your game in RPG MAKER WITH!

|
Intermediate Guide (Part 1) ←Prev |
Advanced Guide (Part 1) Next→ |
Dungeons are an integral part of any RPG, as they are the hubs where your players can fight enemies, loot treasure, and go face-to-face with bosses. Read on to learn how to build a dungeon for your game in RPG MAKER WITH!
List of Contents
Intermediate Guide (Part 2)
Building a Dungeon
In the last part of our Intermediate Guide, we made a village with goods and services. Now, we're going to make a dungeon where our characters will be able to level up, earn gold to buy new items and equipment, and ultimately get another vehicle that will bring them to the Demon King's Lair.
But before that, since you've already made a good deal of stuff in your game so far, you may be wondering what is the goal of the game you are making. For that, we need to establish a goal and a way to get there, and we will be able to do that by making an outline.
An outline can be a simple list of key places within your game that leads from the beginning all the way to the end. To demonstrate, here's the outline for the game we are making in this guide.
- The Hero is tasked by the Old Man in the Cave to slay the Demon King. He gets a sword.
- The Hero goes to the Village to recruit party members and get a boat.
- The Party goes to the Dungeon to get an Airship.
- The Party heads to the Demon King's Lair and defeats him.
- The Party heads back to the Cave to report their victory over the Demon Lord.
This is a simple outline for a simple game such as the one we are making at the moment. Bigger games, meanwhile, will need bigger outlines. Your outline can take the form of a simple list, though it might also take the form of a spreadsheet or even a PowerPoint presentation.
Just remember to always keep in mind the Key Locations in your game as well as the characters and story. Because whenever you start making a game, it's always a good practice to start with the Maps first before everything else. You may have noticed that we always started with making the maps for the overworld, cave, and village before putting anything in them.
Now, let's create a dungeon for our players.
How to Create a Dungeon
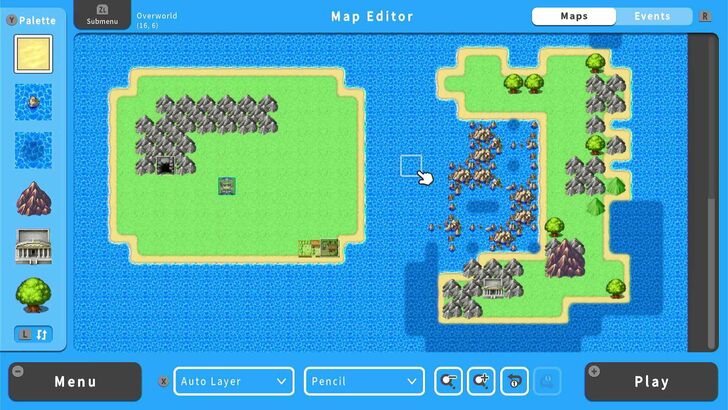
Before we create a dungeon, let's create the island it will be on: Island B. We created Island B in a way that the player would have to sail to the top of the island and proceed to the dungeon from there. That way, when we start putting monster encounters into the game, they'll have to get through this island before getting to the dungeon itself.
You'll also notice that we designed choke points that would ensure no matter what the player did, they would have to land on top of the island. We also made it so that the choke points would look somewhat natural (while giving the island a more sinister look compared to Island A).
At the end of the path, they will find a marble building that will also be the entrance to the dungeon.
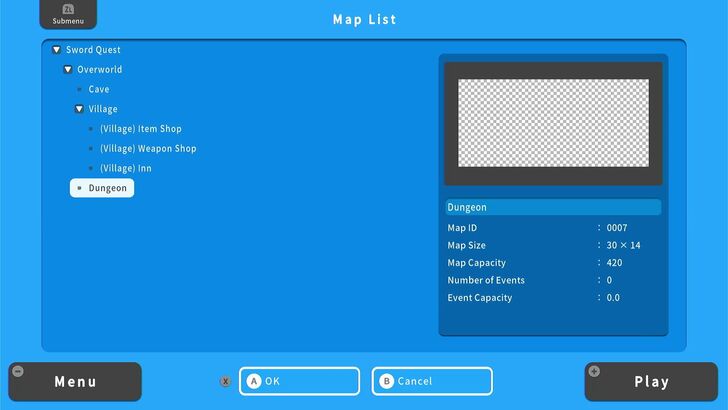
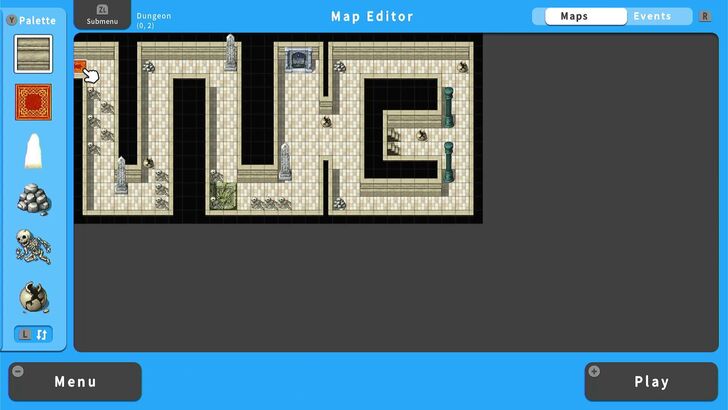
Since the dungeon will be a location directly accessible from the overworld, create while highlighting the overworld map in the Map List screen. We sized our dungeon 30x13, but you can make a bigger dungeon if you want.
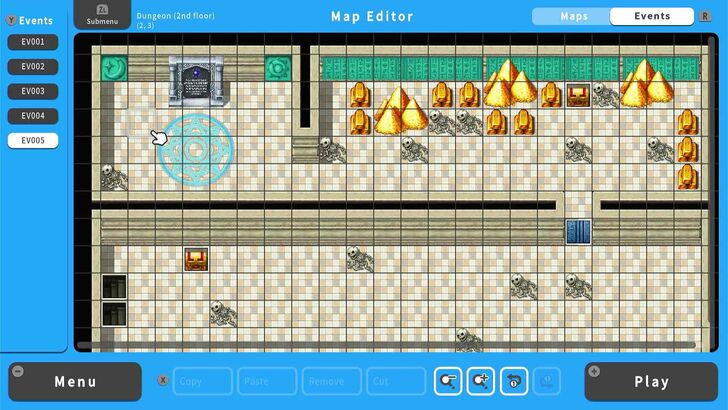
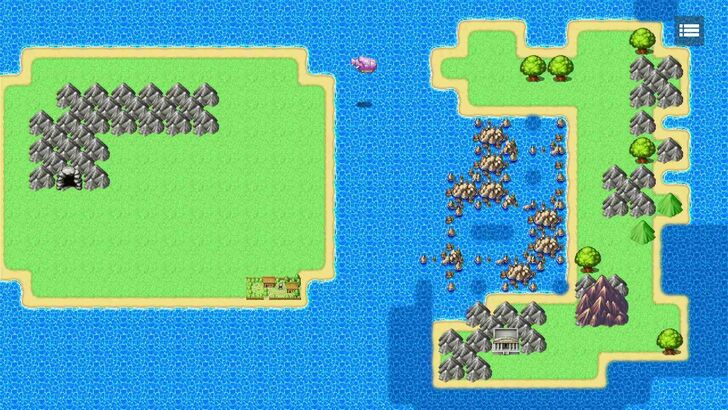
The first floor of our dungeon is a maze that will maximize the time the player will spend walking around (thus increasing their chances of encountering monsters). At the end are stairs that will bring them to the second floor. We used the Dungeon Tileset and decorated it similar to a tomb, so we will populate it with the appropriate monsters. Make sure to connect your dungeon to the overworld map and vice versa.
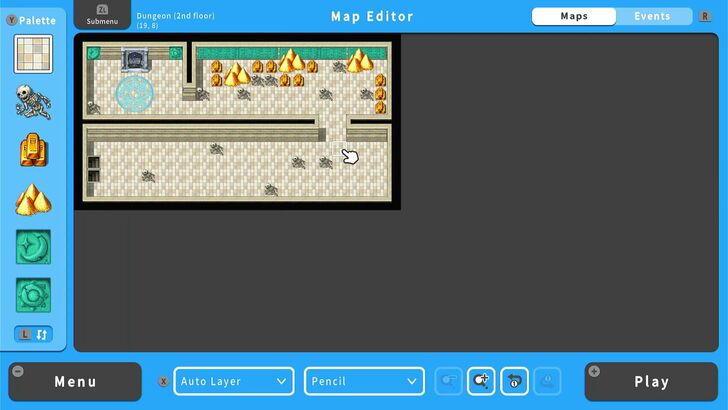
The second floor, meanwhile, is divided into two parts - the entryway, and the vault. We placed stairs at the bottom left, which you will connect to stairs on the first floor and vice versa. Between the entryway and the vault is a wall with a hole in the middle, where we will place a locked door our player character will have to unlock with an item (a key).
Make Treasure Chests
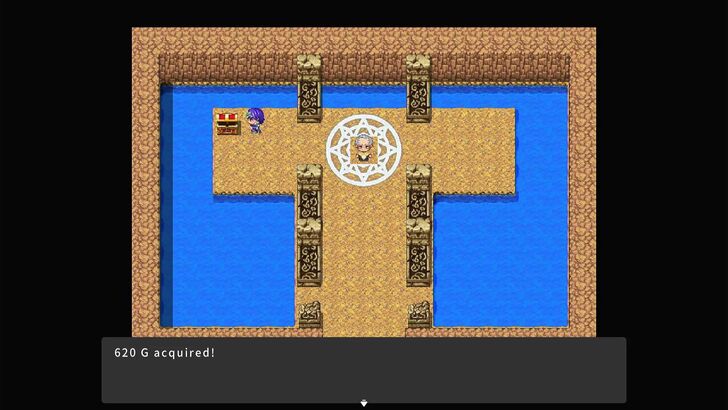
The player character will have to get that key by opening a treasure chest. So, for now, let's take a detour into making treasure chests and how they work.
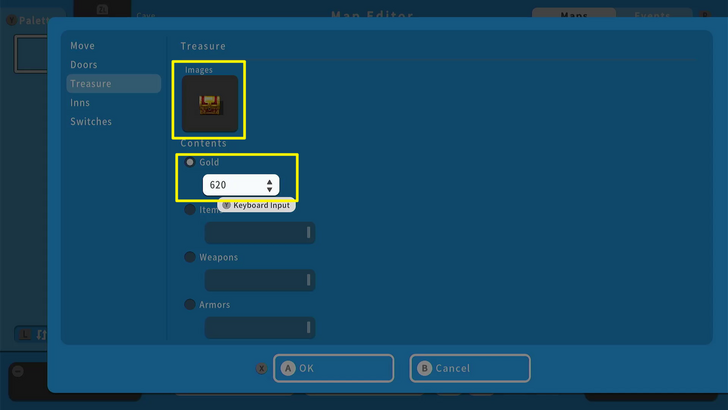
The simple method to putting treasure chests in game is by using the Create a Quick Event option from the Submenu and selecting Treasure. From there, we can set the treasure chest to either give out a fixed amount of gold or a certain item.
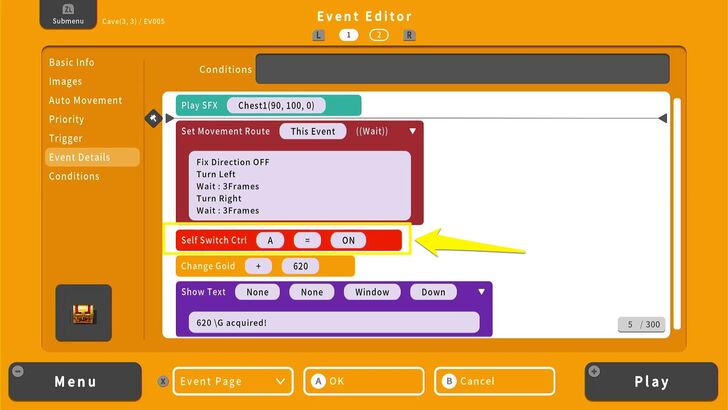
If you take a look inside the treasure chest event after it's made, you will see that it uses a Self Switch. We've already used a Self Switch before in our guide for one-off events, and the treasure chest is the perfect example of that. Once the Self Switch is turned on, it will trigger its second event page, which will show that it's already open and cannot be interacted with any further.
So if you find yourself making your own treasure chests or making one-off events that will not need to trigger other events in your game, then consider using a Self Switch instead.
Make a Locked Door

Locked doors provide players with challenge and a sense of progression and accomplishment. This obstacle encourages players to explore, fight enemies, and solve puzzles to obtain items to unlock a door. For instance, a player will have to fight enemies or avoid traps, while looking for the treasure chest containing a key. Once players unlock a door, this provides a sense of accomplishment, which improves the gameplay experience.
| 1 | 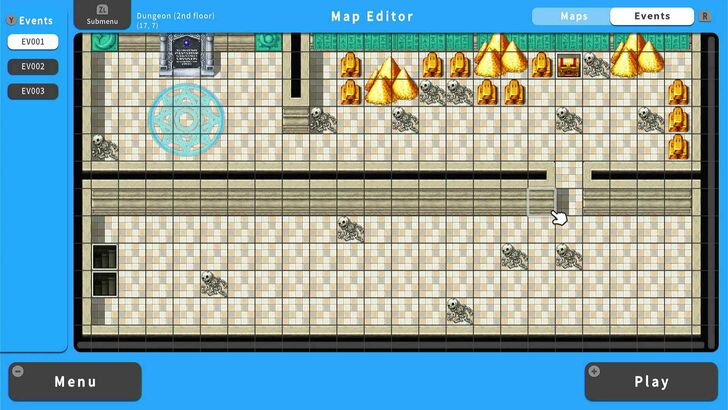 While creating the map for your Locked Door Event, make sure to place the door in a narrow part of the map, where players cannot pass by its sides. For instance, you can put a locked door along the walls to ensure that this is the only path to a particular location on your map. |
|---|---|
| 2 | 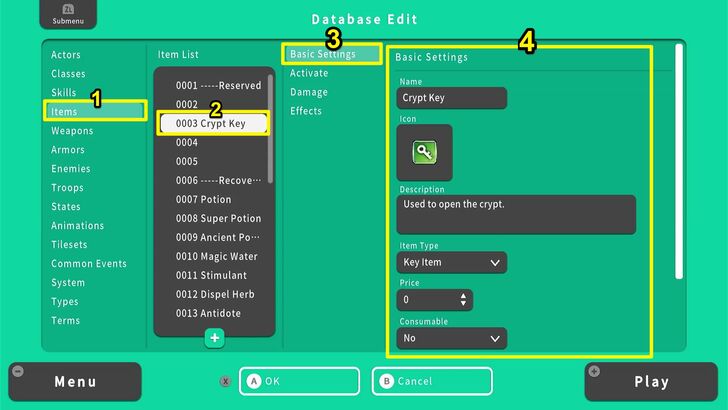 Before creating the Locked Door event, you should first create the key for opening the locked door. Open your Database and select Items. From here choose an empty slot from the Item List. Go to Basic Settings to set its name, image, and item type. |
| 3 | 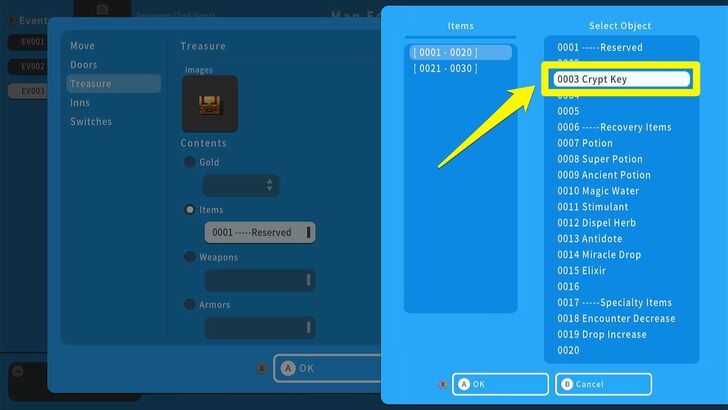 Once you created the key, the next step is to set the treasure chest that will contain this item. Select the location for your treasure chest. After that, go to Quick Event Creation and select Treasure. Set the contents to Items and select the key we made previously. After doing this, the treasure chest will contain your key. |
| 4 | 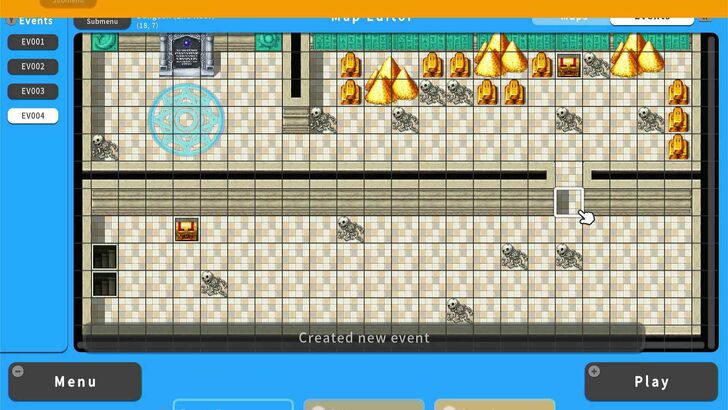 Now, we can create the Locked Door Event. The first thing to do is select where you want the Locked Door to appear. |
| 5 | 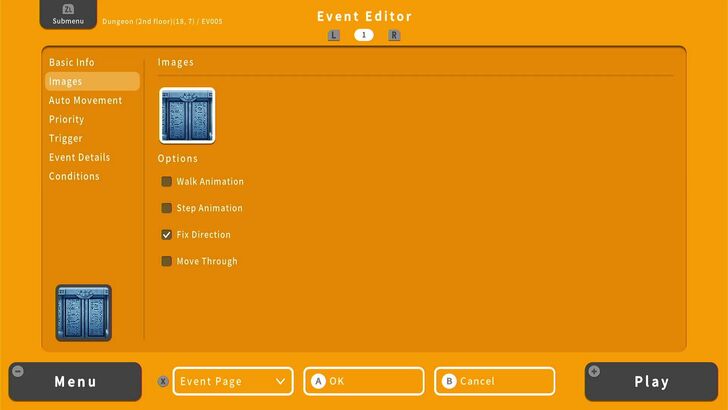 Set your Map Editor to Event Mode. Open your Event Editor and select Images. Here, you can set the image for your locked door. |
| 6 | 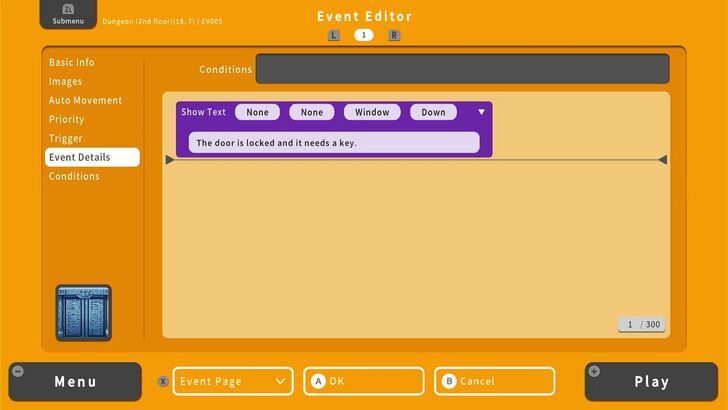 After setting the image, go to the Event Details option. Use the Show Text command and set the message, informing the player that this door is locked. |
| 7 | 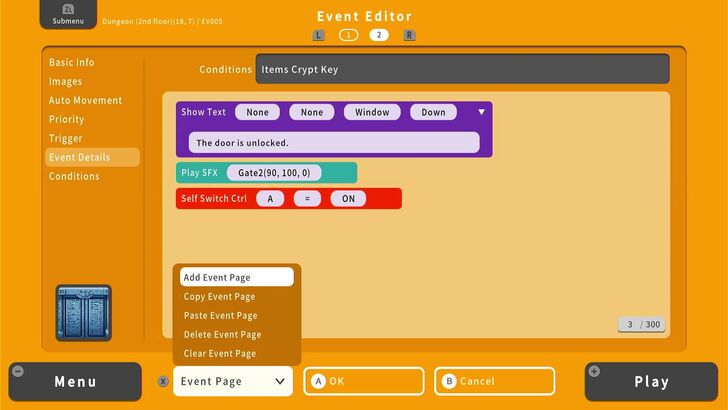 Create another event page by selecting the Add Event Page option. Here, use the show text command again, indicating that the door is unlocked. You can also add a sound effect when a player opens this locked door. After that, go to Conditions and check the Items option. Here set the item to the key. Back to the Event Details, set the Self Switch to ON. |
| 8 | 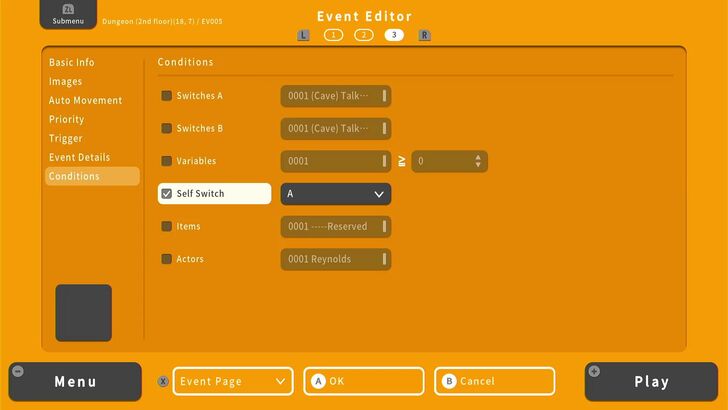 Create the third event page. Here, we will only need to select Conditions and check Self Switch. Make sure the Self Switch is similar to the one we used earlier, which is Self Switch A. In doing so, the door will disappear once unlocked. |
| 9 |  Playtest your Locked Door Event by pressing the + Button. Save your progress as well. Before taking the key from your treasure chest, approach your locked door and test if it will display the correct dialogue for players without the key. |
| 10 | 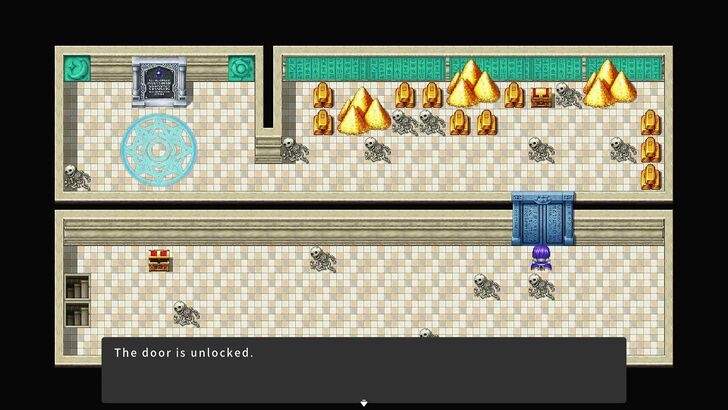 If the dialogue for locked door is correct, obtain the key and test whether the door will open and display the text for opening the door. |
Congratulations! You made a locked door. This event will help you create a sense of challenge and encourage exploration for your players.
Use a Yes/No Player Option
A Yes/No Player option gives players a sense of agency and decision-making based on their actions. This improves player immersion, making them feel more accountable for the choices they have made throughout the game. In this guide, we will create an NPC who will provide a choice to obtain a vehicle and get out of the dungeon.
| 1 | 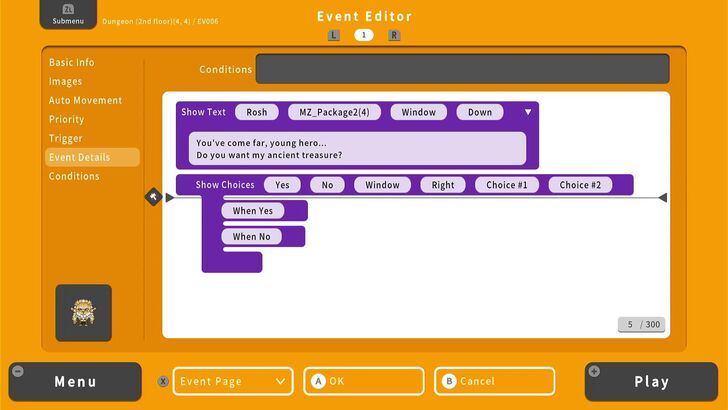 At the end of a dungeon, select the location for your NPC and open the Event Editor. Go to Event Details and use a Show Text command to congratulate the player for reaching this NPC and a question about their reward. Also, add the Show Choice command to set the options for players. Here, the NPC will ask the player if they want his treasure. |
|---|---|
| 2 | 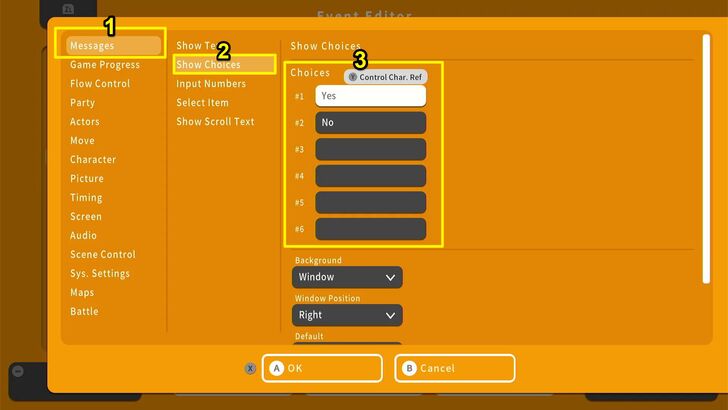 The Show Choice command is also under the Messages option. Make sure there is a "yes" option and "no" option among the choices. |
| 3 | 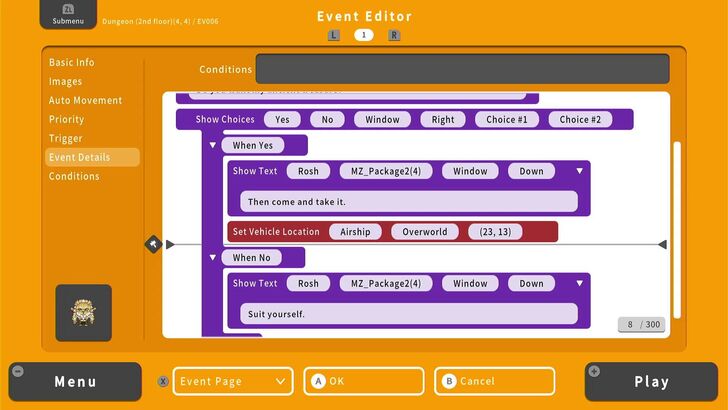 Under the Yes option, we will set a dialogue for accepting the NPCs offer and the event for giving the reward. In this case, if the player accepts the NPC's treasure, a vehicle will appear on the overworld map. On the other hand, the No option will only contain a dialogue responding to the refusal of the player. |
| 4 | 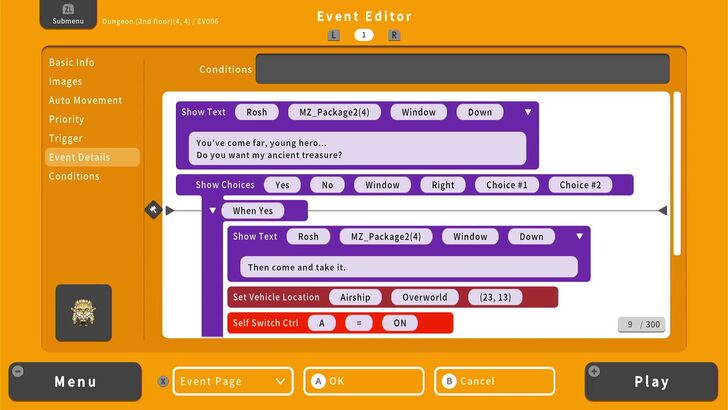 Add a Self Switch under the Yes option. The Self Switch event is located at the Game Progress option. This switch will trigger the condition set in the next event page. |
| 5 | 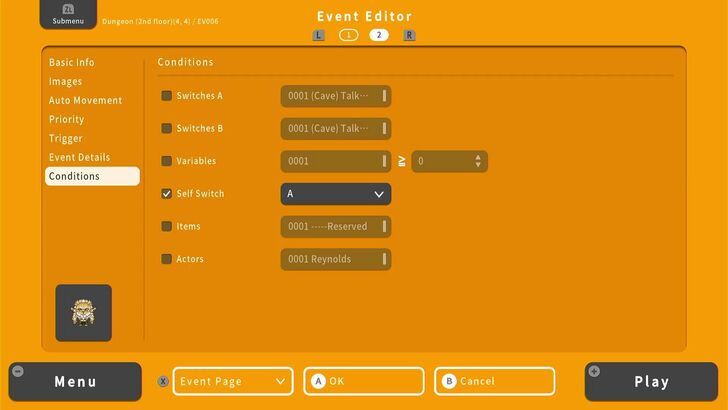 Create a second event page, and set the image of the NPC. After that, select Conditions and check the Self Switch option. Set this to the Self Switch we used earlier, which is Self Switch A. This will ensure that the event will not happen again once the player accepts the NPC's treasure. |
| 6 | 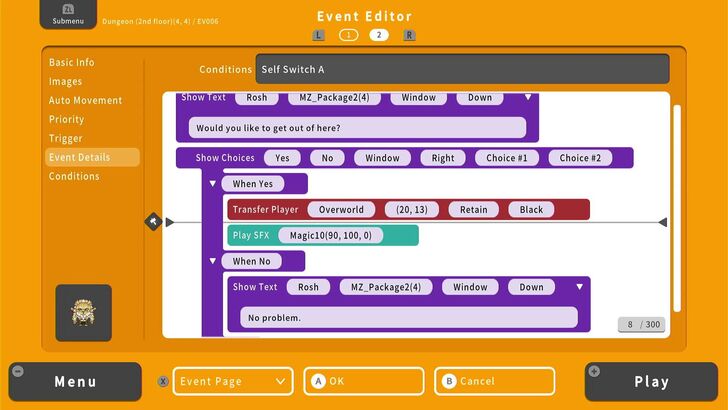 You can also add another Yes/No option for the players to get out of the dungeon. Under the Yes option, use the Transfer Player command under the Move option and select a location on the overworld map. The No option will only show a dialogue acknowledging the player's refusal to leave the dungeon. Instead of walking back towards the entrance and fighting enemies again along the way, the NPC can provide the player an option to leave the dungeon. |
| 7 | 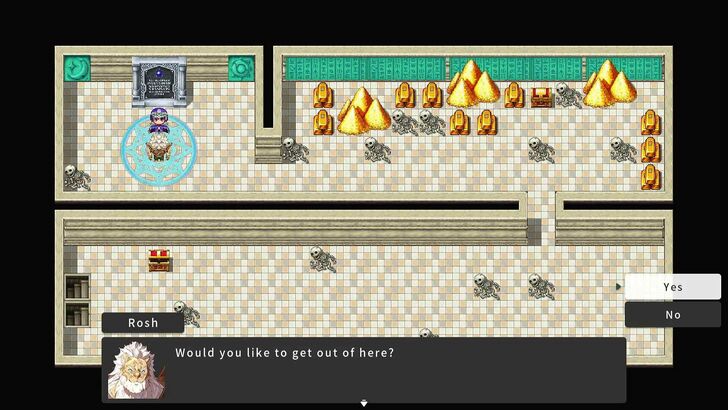 Just like we did earlier, check the dialogues and events by playtesting the game. Make sure to test the two options and check whether the event associated with them will happen in the game. |
| 8 | 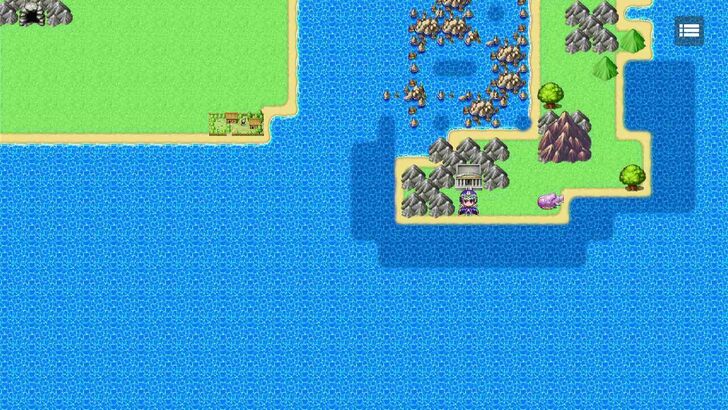 Here, the player successfully obtained the NPC's treasure (his Airship) and got out of the dungeon after selecting the Yes option. |
Congratulations! You made a Yes/No player option. This will help you give players more ways to impact the game's story and events. Make sure to use this event in different situations, like the option to rescue an NPC or avoid an enemy battle, to make your game more engaging to players.
How to Make a Yes/No Player Option
Finished Product: A Village, a Dungeon, and a New Island
Congratulations! From one island with a cave, you now have two islands complete with a village full of goods, services, and NPCs, as well as a dungeon you can fill with treasure and obtain an airship that will allow you to head over to the Demon King's Lair.
In the Advanced Guide, we will make that lair complete with traps and two kinds of puzzles. We will also begin implementing monsters in the game, put in the demon king himself as the ultimate boss, and create our game's ending.
Making the Final Boss' Lair! Advanced Guide (Part 1)
RPG MAKER WITH Related Guides
All Intermediate Guide Articles
| Core Guides | |
|---|---|
| Intermediate Guide Part 1 |
Intermediate Guide Part 2 |
| Tips and Tricks | |
|---|---|
| How to Make a Switch | How to Use Map Foregrounds and Backgrounds |
| How to Change Event Text Color | |
| Core Guides | |
|---|---|
| Beginner's Guide Part 1 | Beginner's Guide Part 2 |
| Tips and Tricks | |
|---|---|
| Map, Event, and Switch Naming Tips | How to Use the Flood Fill Tool |
| Core Guides | |
|---|---|
| Advanced Guide Part 1 | Advanced Guide Part 2 |
Comment
Author
Intermediate Guide Part 2: Building a Dungeon!
Rankings
- We could not find the message board you were looking for.
Gaming News


Popular Games

Genshin Impact Walkthrough & Guides Wiki
Honkai: Star Rail Walkthrough & Guides Wiki
Arknights: Endfield Walkthrough & Guides Wiki
Umamusume: Pretty Derby Walkthrough & Guides Wiki
Wuthering Waves Walkthrough & Guides Wiki
Pokemon TCG Pocket (PTCGP) Strategies & Guides Wiki
Abyss Walkthrough & Guides Wiki
Zenless Zone Zero Walkthrough & Guides Wiki
Digimon Story: Time Stranger Walkthrough & Guides Wiki
Clair Obscur: Expedition 33 Walkthrough & Guides Wiki


Recommended Games
Fire Emblem Heroes (FEH) Walkthrough & Guides Wiki
Pokemon Brilliant Diamond and Shining Pearl (BDSP) Walkthrough & Guides Wiki
Diablo 4: Vessel of Hatred Walkthrough & Guides Wiki
Super Smash Bros. Ultimate Walkthrough & Guides Wiki
Yu-Gi-Oh! Master Duel Walkthrough & Guides Wiki
Elden Ring Shadow of the Erdtree Walkthrough & Guides Wiki
Monster Hunter World Walkthrough & Guides Wiki
The Legend of Zelda: Tears of the Kingdom Walkthrough & Guides Wiki
Persona 3 Reload Walkthrough & Guides Wiki
Cyberpunk 2077: Ultimate Edition Walkthrough & Guides Wiki


All rights reserved
©Gotcha Gotcha Games
The copyrights of videos of games used in our content and other intellectual property rights belong to the provider of the game.
The contents we provide on this site were created personally by members of the Game8 editorial department.
We refuse the right to reuse or repost content taken without our permission such as data or images to other sites.