This survey will take about 1 minute.
Your answers will help us to improve our website.
RPG MAKER WITH
Intermediate Guide Part 1: Building a Village!
In classic RPGs, Towns and Villages help players buy items, rest up at an inn, and buy equipment. In RPG MAKER WITH, you can put a village in you own game too. Read on to learn how.
|
Beginner's Guide (Part 2) ←Prev |
Intermediate Guide (Part 2) Next→ |
In classic RPGs, Towns and Villages help players buy items, rest up at an inn, and buy equipment. In RPG MAKER WITH, you can put a village in you own game too. Read on to learn how.
List of Contents
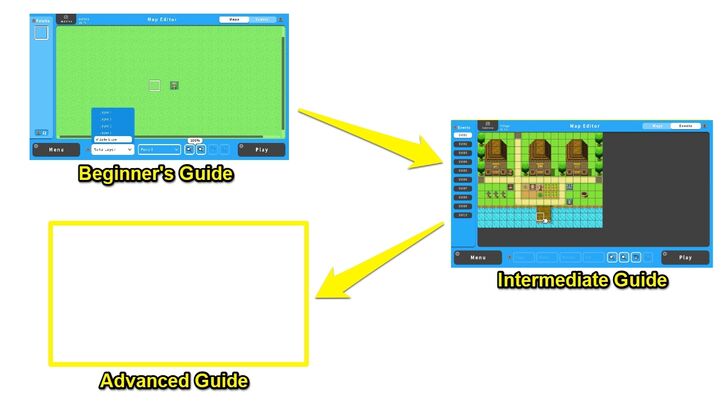
Intermediate Guide (Part 1)
Building a Village
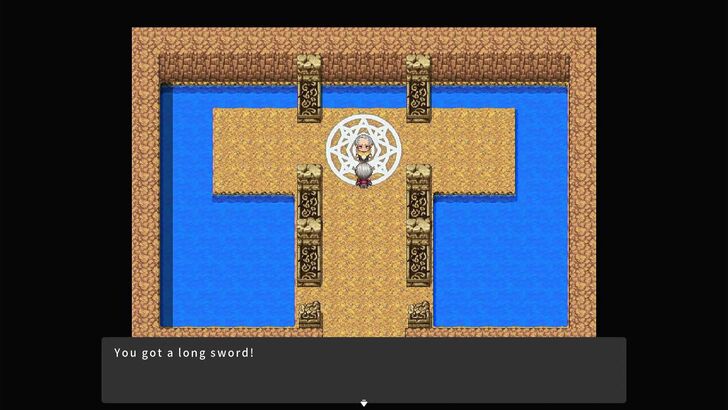
In our Beginner's Guide, we learned how to make a game complete with two maps and an NPC - complete with the beginnings of a quest and even a sword from an old man in a cave.
Now, it seems that our game is looking a bit empty. We will fix that by building our own village on the island, complete with three shops, recruitable party members, and another old man who will give us our very own boat.
Make Your Main Character and Party Members
Before everything, though, you may have been wondering: "How do I change the guy we're controlling in the game?" Or, more specifically, how do I make the main character of my game?
So before we make our village, let's take a detour into the Database and start setting our main characters. We'll make one main character who the player will start out as, as well as two characters he will be able to recruit later in the village.
| 1 | 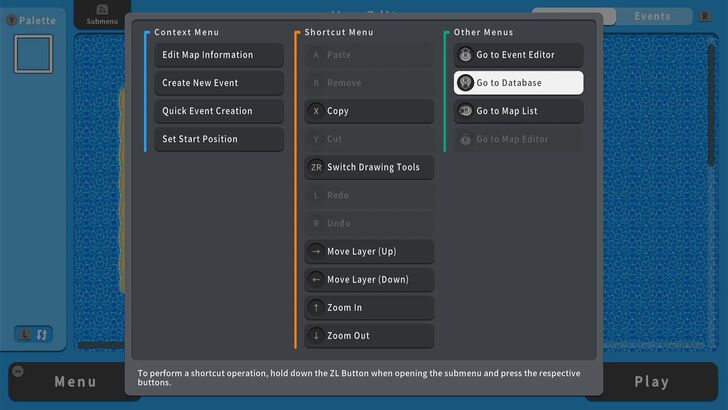 While in the Editor, let's bring up the Submenu and choose Go to Database. |
|---|---|
| 2 |  In the database, let's go over to Actors then navigate our way to the + sign. As you can see, RPG MAKER WITH already comes with 8 characters we can put in our game, but we'll want to make our own characters too. |
| 3 | 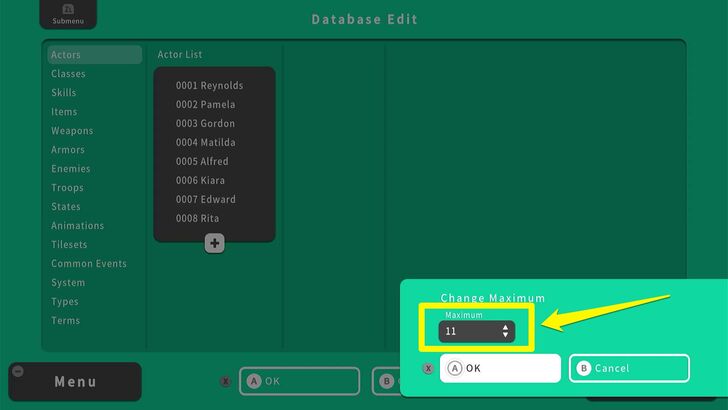 Once you select the + Button, you'll see the Change Maximum counter. Here's where we set how many characters we want in our database in total. Since we need to make 3 characters, we will bump this counter up from 8 to 11. |
| 4 | 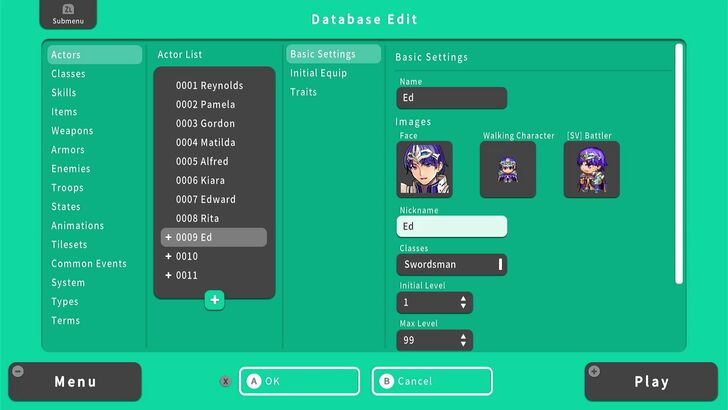 Now let's talk about what to customize. Navigate to a blank entry in the list and you'll see the Basic Settings tab to the right. Here, you can set your main character's name, portrait, in-game sprite, and appearance in battle. We can also set his nickname, class, minimum and max levels, and profile. For now, let's just name him "Ed" and set his class to Swordsman. RPG MAKER WITH comes with pre-made classes, but you can create classes of your own. |
| 5 | 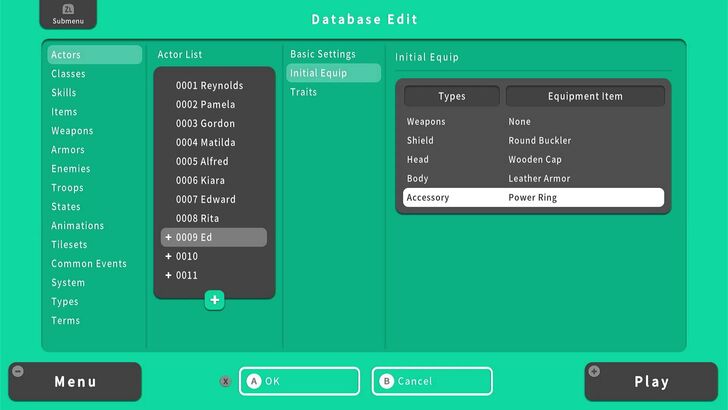 From Basic Settings, let's go to the Initial Equip tab and set his starting equipment. You'll notice that we didn't give Ed a sword since he'll get one later from the old man. Like classes, RPG MAKER WITH comes with its own set of pre-made items, but you will be able to make items and equipment of your own. |
| 6 | 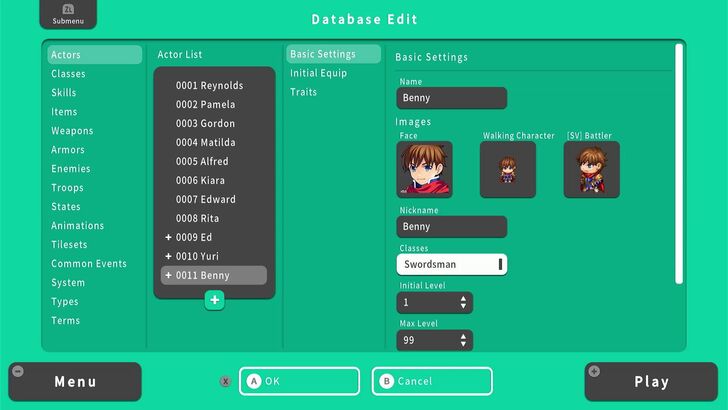 Just like with Ed, we made two other characters: Yuri the Priestess and Benny the Magic Swordsman. |
| 7 | 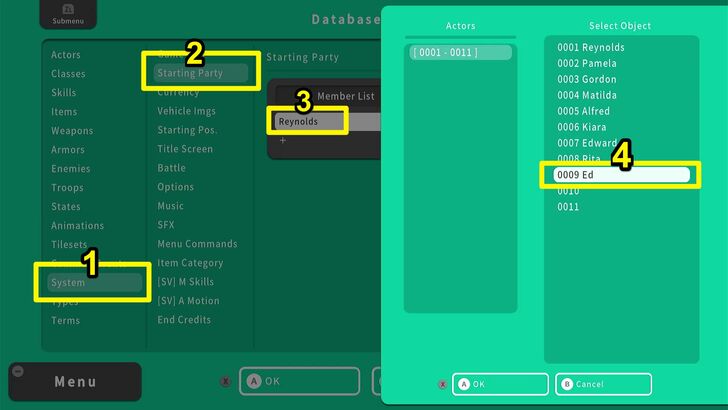 Let's set Ed as the only member of our starting party. While you are in the Database, go to System, Starting Party, and then you'll see the Members' List. Only Reynolds is in there (the adventurer that we'd been controlling up to this point). Select his entry and you'll see a list of other party members. Replace him with Ed. |
| 8 | 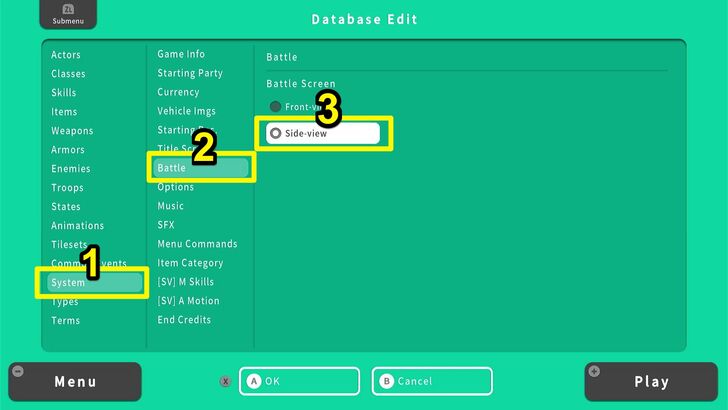 To see your characters' battle sprites, let's stay in the System menu and go down to Battle. Here, we'll be able to choose whether we want battles to be in First Person (like in Mother, Shin Megami Tensei) or Side-View (the classic Final Fantasy games). |
| 9 | 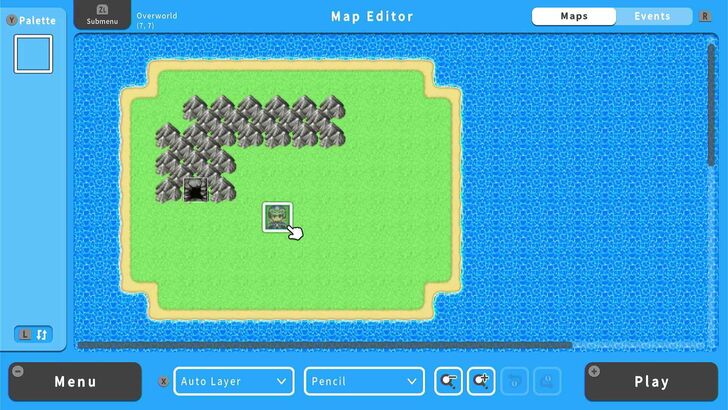 Now let's go back to the Editor. If we did all the steps correctly, we should see Ed instead of Reynolds on the map. |
Your starting party is important as it helps dictate not only the early part of your game's story but its pacing as well.
For example, Ed is a Swordsman and deals powerful physical attacks to his foes while having so-so magical ability. He'll need the help of a Magic Swordsman or a Sorcerer to make up for this deficiency, and he can meet those kinds of characters later on in the story. Until then though, he'll have to pick his battles and maybe even run away from magic casters.
So always give some thought to who will be in your starting party. Better make sure they're likable because the player will spend the most time with them early on in your game.
Also try imagine the game’s progression from the player’s point of view. For example, the player has a swordsman in their initial party but later comes across a healer. Once they come across a boss that is immune to physical attacks, they have to look for a mage or wizard that can do magic attacks.Make sure that the progression in terms of getting party members is logical, as well as the kind of skills they get as they level up.
Creating Your Main Character and Party Members
Create a Village
Now that you have a starting party, let's continue building our game by building a Village. Villages, towns, and cities are an important part of RPGs, as they give players not only the chance to rest and buy items and equipment but also talk with important NPCs in-game to progress the story.
In our case, we'll make a village where the main characters can buy equipment and items, rest (for a small fee), and talk with an old man named Bob who will give them a boat to cross the seas with.
| 1 | 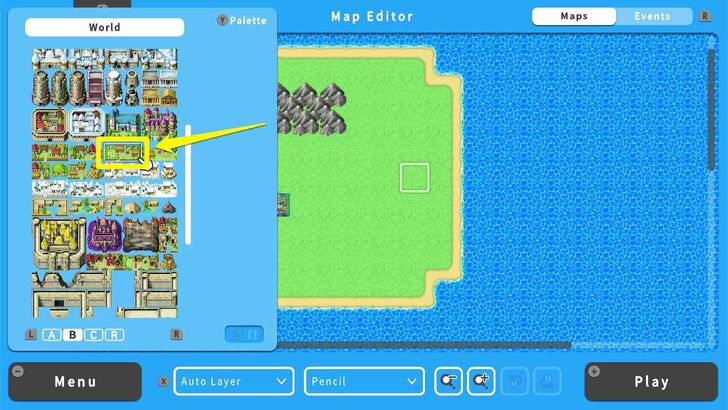 Let's lay down a few tiles to indicate where the village is on the Overworld. Go into Map Mode, bring up the Tile Palette with the Y Button, and pick out a tile that suits the look of your village. We picked out this tile here from Segment B since it would be a small village on the coast, not a castle or anything bigger. |
|---|---|
| 2 | 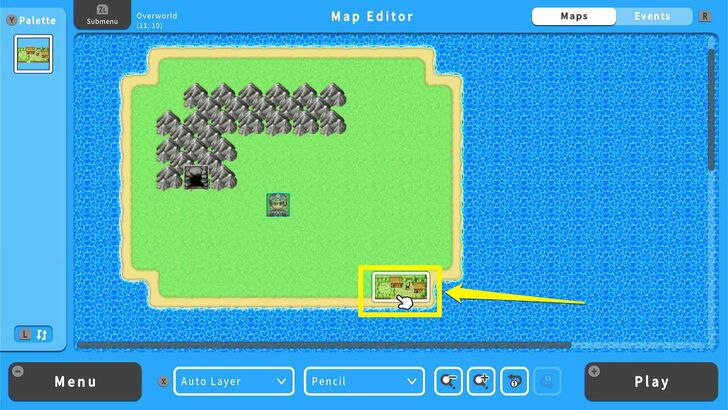 Let's lay down the tiles for the village. Afterward, go to the Map List and, while highlighting the entry for the overworld Map, create a new one. This way, our "Village" map is on the same level as the Cave map as an interior map that's directly accessible from the overworld. Maintaining this hierarchy is important to keep your maps organized, as we will soon see. |
| 3 | 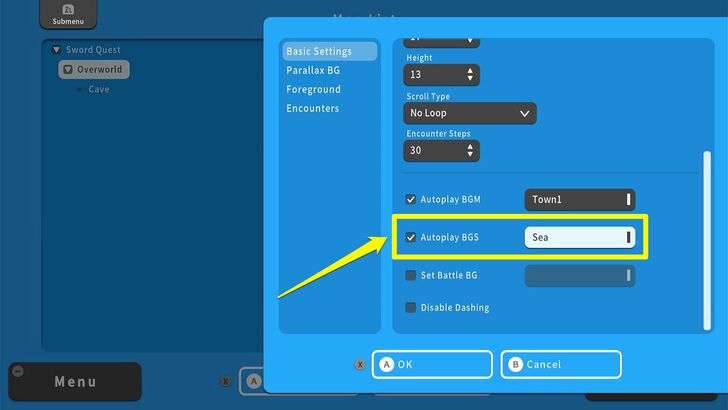 Once you've set the name, dimensions, and BGM for your new village, head down to the Autoplay BGS section and set the background sound to "Sea." It will only be fitting as the village is on the coast. To stop the village's BGS from playing while the player is in the overworld edit the overworld Map's Information and toggle on its Autoplay BGS option as well, but set no music. |
| 4 | 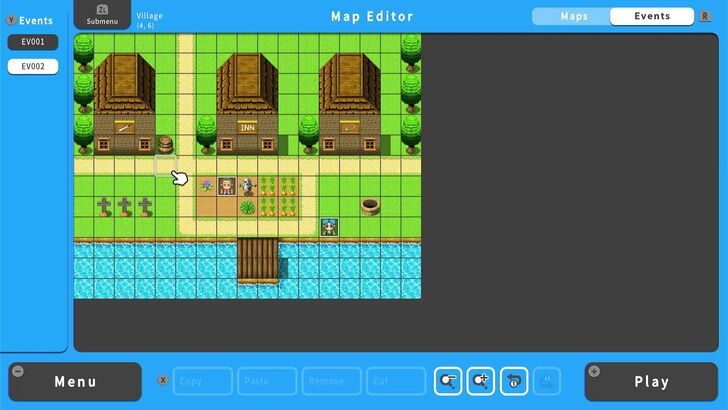 In your new Village map, decorate it as you see fit. In our map, we created three buildings, as well as a small jetty. To make the place seem more crowded, we also made two NPCs with dialogue. |
| 5 | 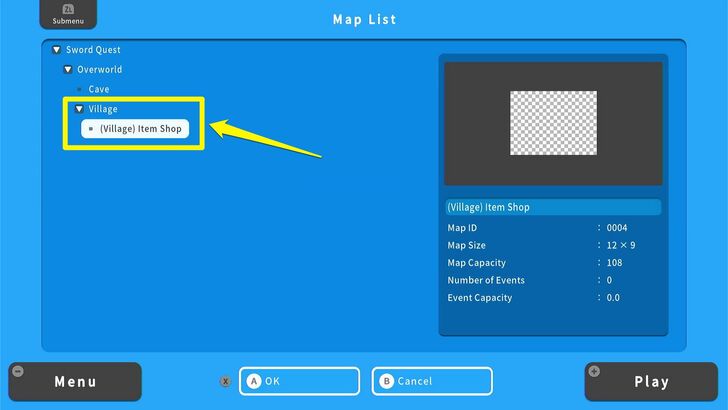 Let's create the interiors of your Village map. While highlighting the Village in the Map List, create a new map. A new map should be made underneath the Village map like in the picture below. Also, make sure to choose the "0003 Inside" tileset so you can put down interior decorations and objects. |
| 6 | 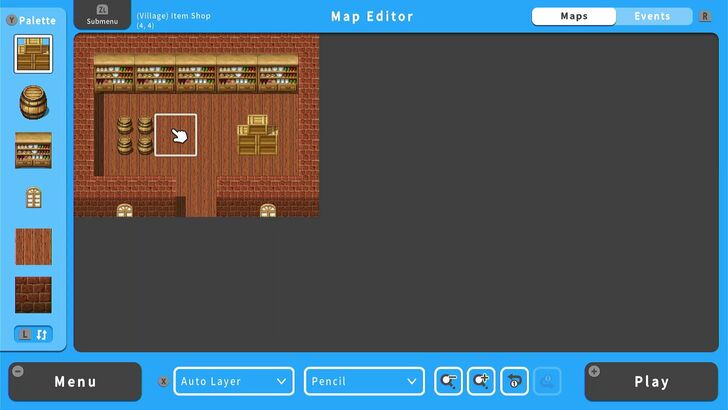 Create your interior map and decorate accordingly. An Item Shop (as pictured above) should feature items and look like a store. An inn should have beds (perhaps as many as you have party members). A weapons store should have weapons displayed on the walls, maybe an anvil or two. |
| 7 | 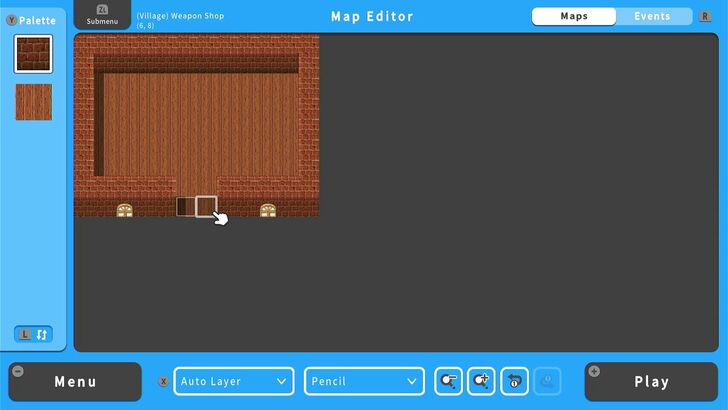 To ease the making of similar-looking interiors, we recommend you to first make a blank template of the interior map and then copy and paste them within the Map List. |
| 8 | 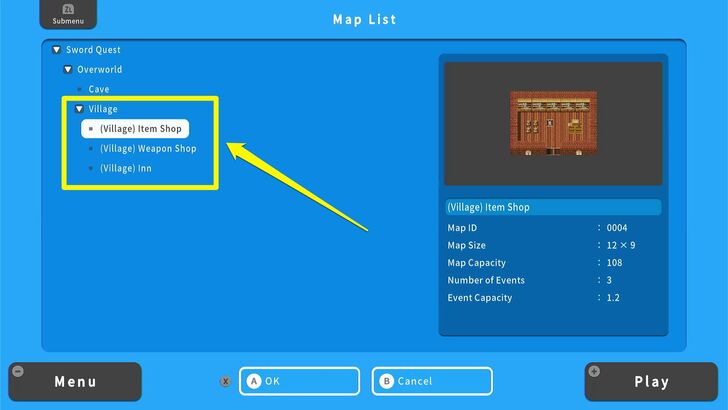 Just head to the Map List, highlight one of your maps, bring up the Submenu with ZL, and then select Copy. Then highlight the Village map's entry in the Map List, bring up the Submenu again, and select Paste. This is so the pasted copy of the map ends up under the Village map and not under the other map you copied. |
| 9 | 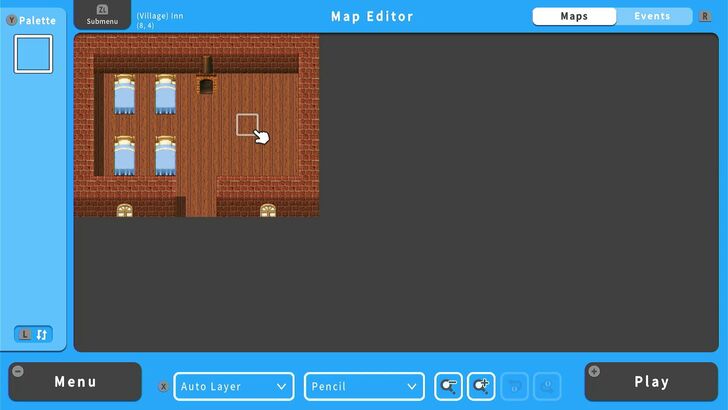 Make sure to use the "Move" Quick Event to connect these interior maps to your village. Place the destinations directly in front of the buildings these maps are supposed to be "inside" of. |
There are many ways to create a village, and this is just one of them. However, the principles remain the same: Create a map, decorate it, and connect it to a bigger map with Move. You can make Shops, Inns, and even NPC homes and other services this way.
Create Inns and Shops
Now that we've created a village complete with interiors, it's time for us to make those interiors be of actual use to our players. This is achieved by placing NPC Events in the interior maps for these locations, offering different kinds of useful services to our characters such as items, lodging, and even new weapons.
| 1 | While in the Editor, let's go over to the Map List and switch to an interior map like the map we made for our Inn. Select the spot where you want to place the inn's Innkeeper. |
|---|---|
| 2 | 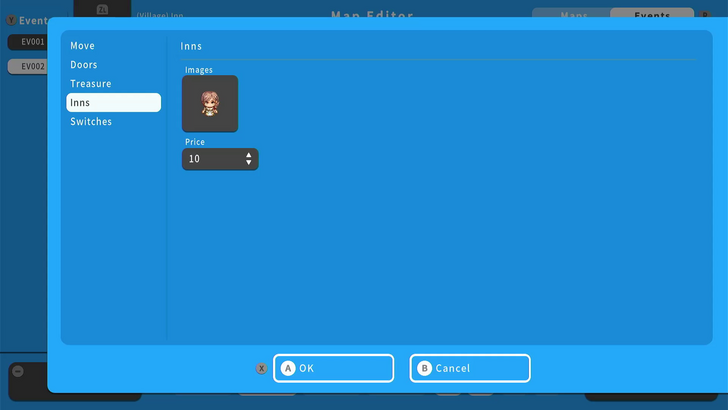 Bring up the Submenu and create a new Quick Event. Navigate to Inn and you will be able to choose how the Innkeeper's sprite looks as well as the price for a night's stay. |
| 3 | 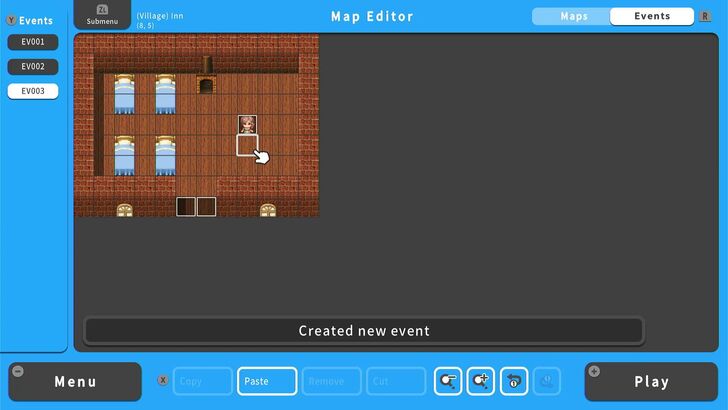 The Innkeeper is now here. |
| 4 | 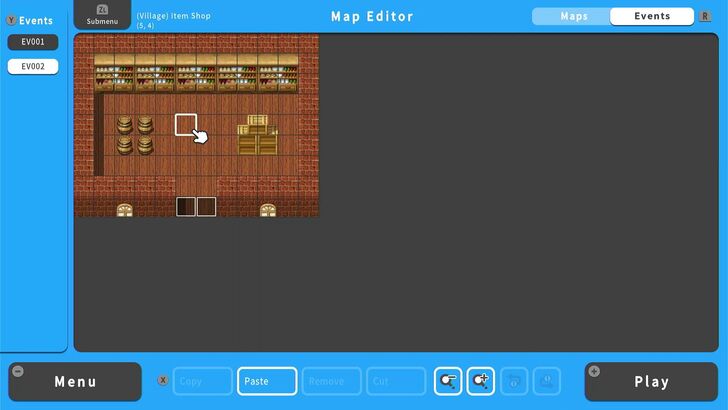 Let's make a Shopkeeper next. It's a bit more involved than making an Innkeeper, but let's start by going to our shop map and choosing where the Shopkeeper will be standing. There, let's make a new Event complete with an appropriate merchant sprite. |
| 5 | 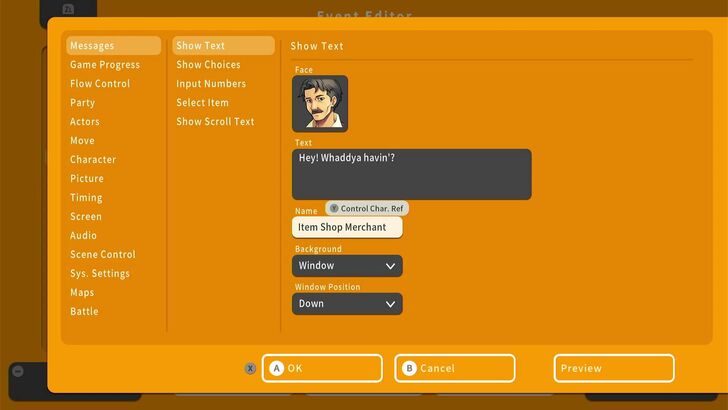 In the Event Details list, let's first make a Show Text command that will contain the merchant's greetings every time we talk to them. |
| 6 | 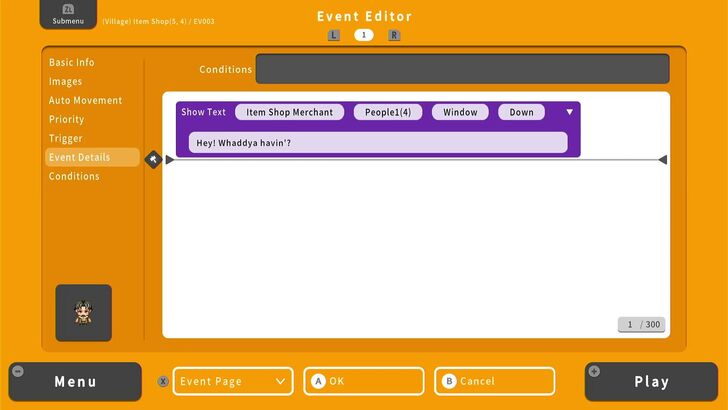 Under the text box, let's add a new command: Shop Processing. |
| 7 | 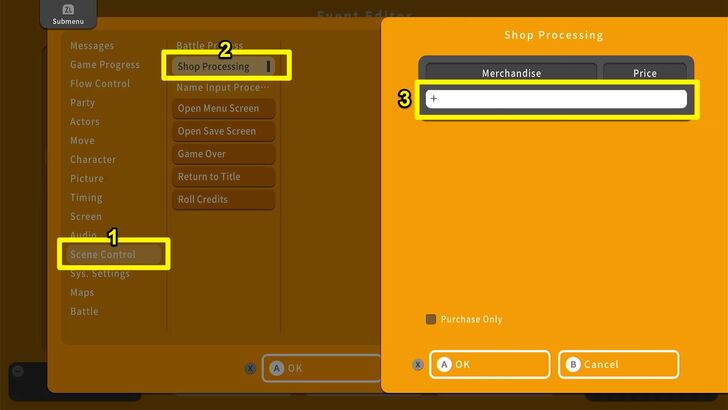 In the Event Details list, select the gap under the text box. In the menu for a new command, go to Scene Control and then Shop Processing. You will then be shown a blank list that you can fill with items the merchant will sell. Select one of the blank spaces with the A Button. |
| 8 | 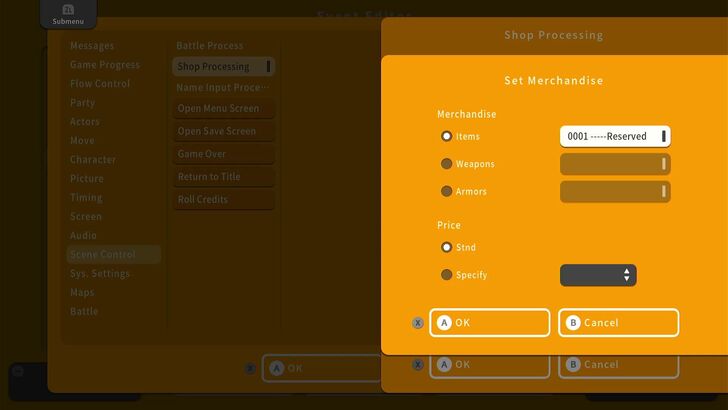 Here, we can choose which item we would like to put in, be it an Item, a Weapon, or a piece of Armor. We can also choose to either have the item's price be Standard (as set for the Item when it was created) or put in your own price for it. |
| 9 | 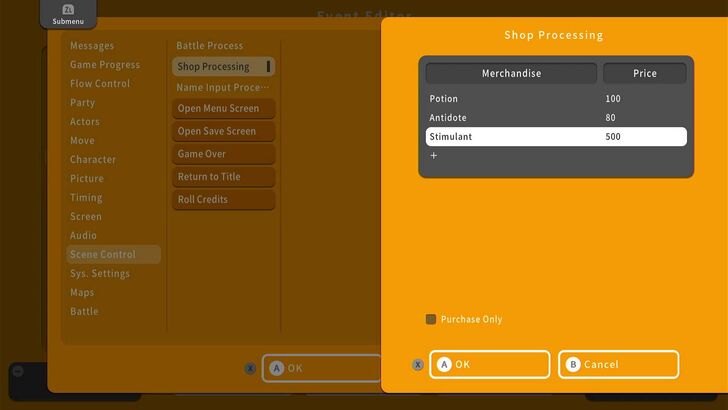 Fill the list of items until we have a Potion and an Antidote. You can add other items if you want to, however. |
| 10 | 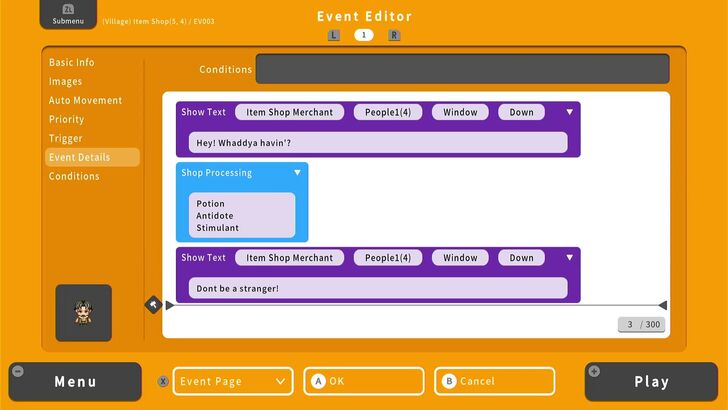 Once you've confirmed your choices, hit X and the A Button to confirm. Right under the Shop Processing command, let's put in a Show Message command that will show whenever we're done interacting with the shop. |
| 11 | 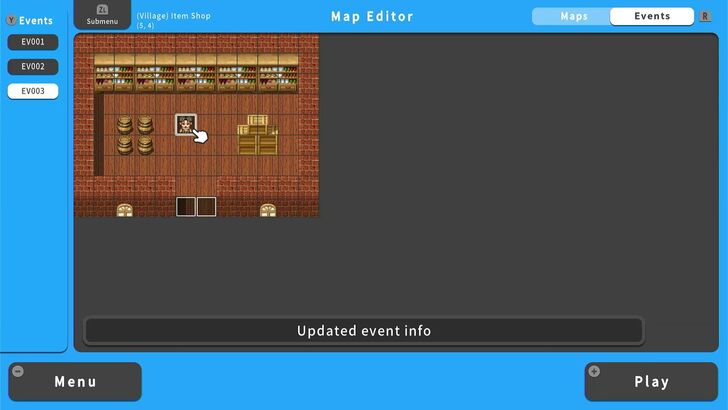 Now we have a merchant NPC in our shop. |
| 12 | 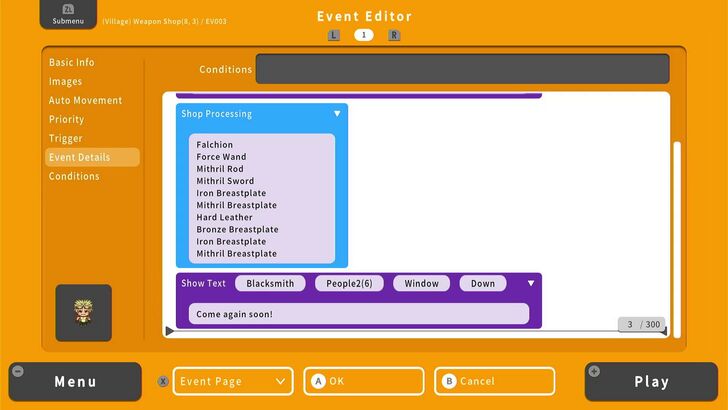 Do the same process for the Weapons Shopkeeper. But this time, fill the Shop Processing list with Weapons and Armor instead. RPG MAKER WITH comes with pre-made equipment you can customize to your liking. You can make your own weapons as well. |
| 13 |  Now let's make sure that our players will be able to visit the shops you've made. In the Village map, turn on Map Mode in the Editor and put down a black square where the door of your building would be. |
| 14 | 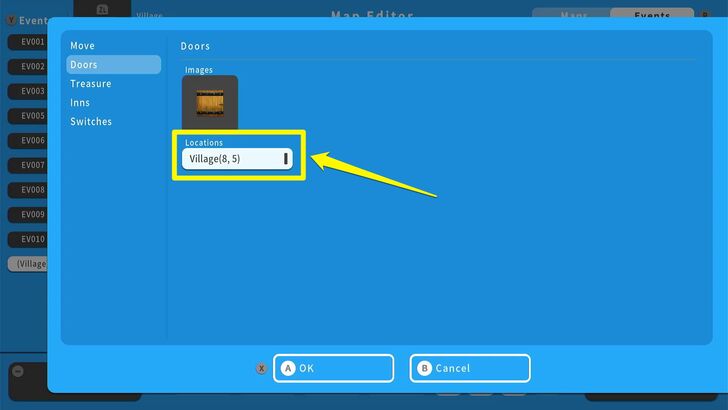 While on that tile, make a Door Quick Event. This is just like the Move Event, with the only difference being that we have an interactable door. Let's select the box under "Locations" |
| 15 | 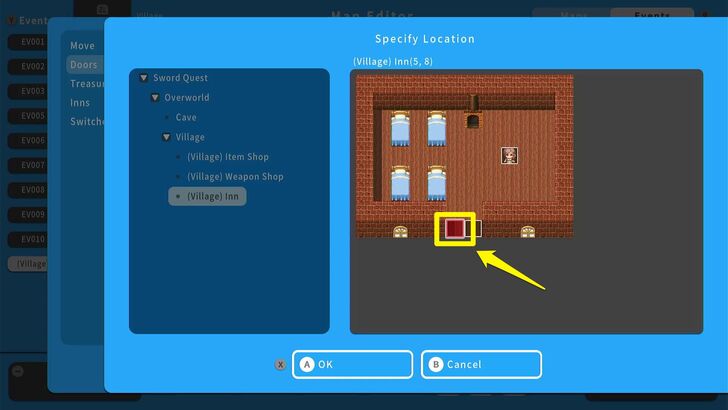 Like with the Move command, let's select the destination of our door. In this case, we put it at the entrance of the Inn. |
| 16 | 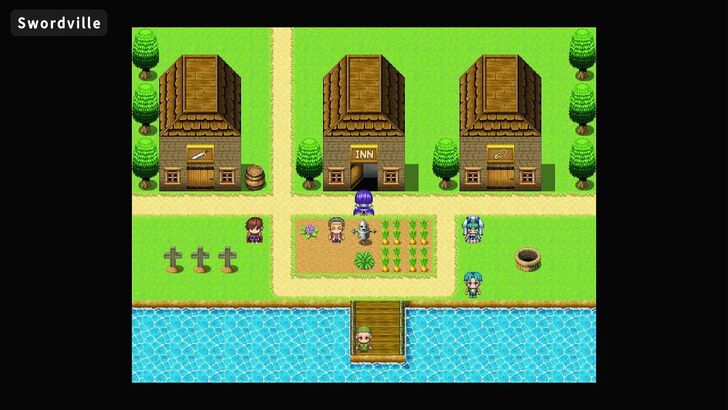 Once your character interacts with a door, it will open up and lead them into the shops we just created. |
Shops and services are important in RPGs because they give player characters not only the supplies they need to continue playing the game (such as health and mana potions), but also the motivation to continue playing (farming enemies for cash to buy the most expensive weapon or armor in the shop).
Make sure to place shops and inns where they would make sense to be, so your players won't be too far from civilization and supplies. In classic RPGs, they are usually located before and after major dungeons, either within towns or stand-alone buildings.
Create a Party Recruitment Event
Now that we've made our Village and put down shops, let's put in two other reasons why the player character should visit this place: Recruitable party members. We've already created recruitable party members earlier on in the guide, so now we will work on putting them into the game.
| 1 | 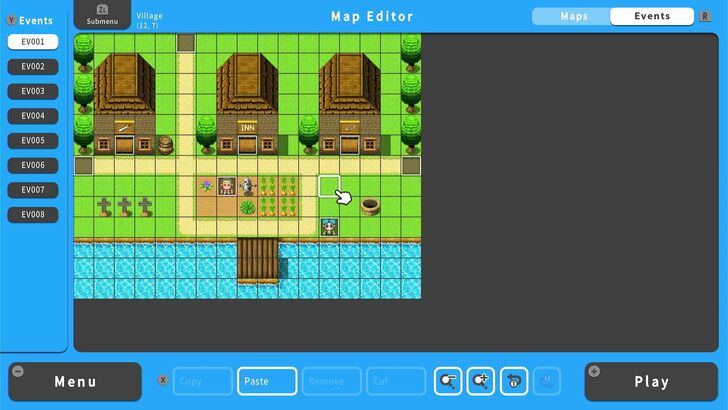 Select the tile where you want to place your potential party member. |
|---|---|
| 2 | 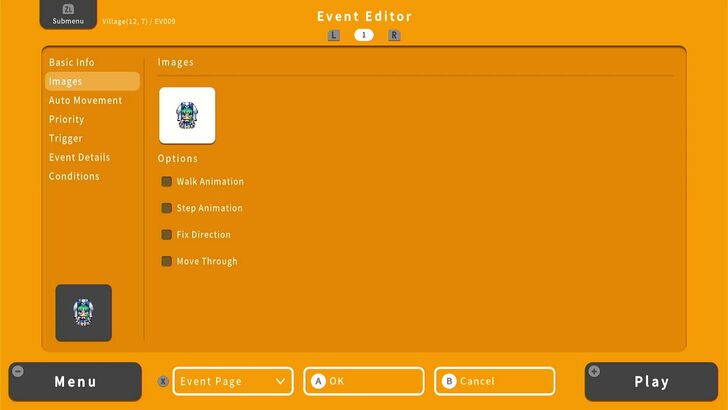 When making the NPC Event, make sure that the sprite you'll use will match the sprite of the character you want to be recruited into your player character's party. That way, the player can recognize them on the map. |
| 3 | 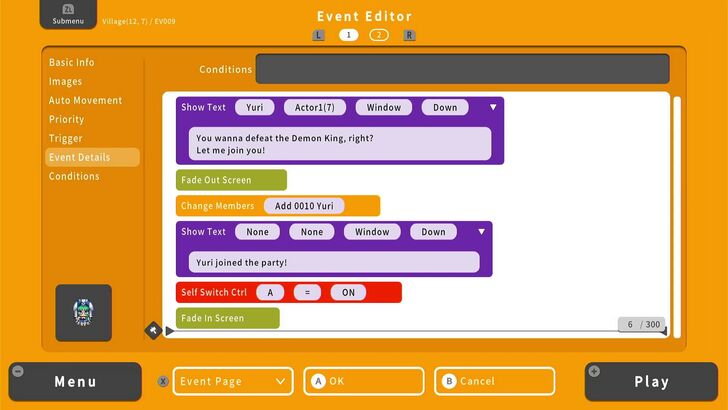 As for the commands that should go into the Event Details List, start with a Show Message command that gives a greeting, followed by a Fade Out command accessible via the Screen section whenever you input a new command. Then we used the Change Members command, followed by a Show Message command that says the character has joined the player's party. We then used a Self Switch to prevent the Event from repeating, then a Fade In screen command. We will show how to do the Change Members and Self Switch commands. |
| 4 | 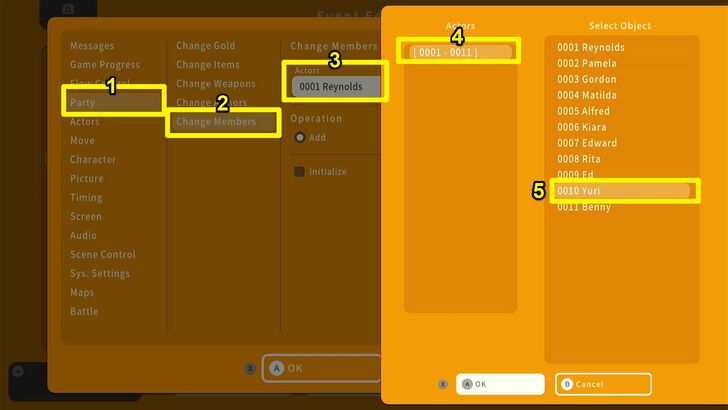 To do the Change Members command, while inside the Event Details List, make a new command and choose Party then select Change Members. You will then be asked which character would be added by the command, so choose the character you want. |
| 5 |  Meanwhile, a Self Switch is like a regular switch, but it only works for that particular instance. It's a great alternative to switches if you're only triggering one-off Events you feel don't need to take up the space of a regular Switch (again, you can only have a max of 5000 switches per game). Enter a new command in the Details List, select Game Progress, then Self Switch Ctrl. |
| 6 | 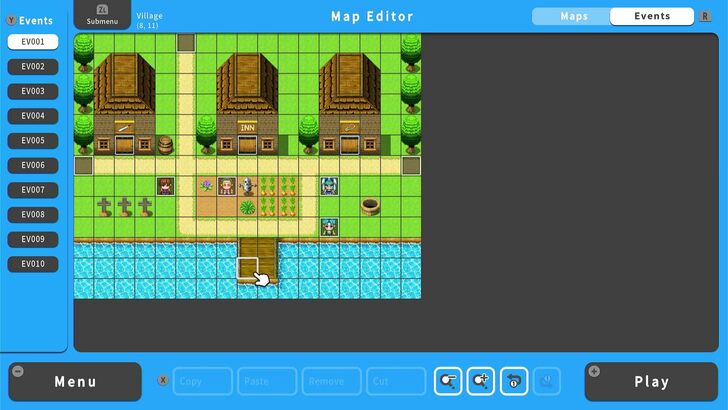 Do the same for Benny, and you will have two recruitment Events in town that will lead you to get two new characters. |
There are many ways to set up party recruitment throughout your game. Aside from meeting them in town, you can write an Event in a way where once you defeat the enemy, they become recruitable. Or maybe you can recruit them based on fulfilling certain conditions (saving their daughter from bandits, getting a mysterious item for them, paying them a certain sum of gold).
As long as it's in an Event, you can manipulate a recruitment Event into being a major part of the story you are trying to tell with your game.
How to Create a Party Recruitment Event
Get a Vehicle
So now we have a village complete with buildings, NPCs, services, and even story-related Events. Now Island A is starting to become rather too small for our game, so we'll have to give our players the means to leave it. This is where a Vehicle comes in.
Vehicles like boats, ships, and even airships are all staples of classic RPGs. They offer faster travel and help the main character's party avoid random encounters on the map too. Some vehicles even have interiors, which you can probably set up on your own with some clever Event editing.
But for now, let's work on the basics. The old man NPC we had our players talk to at the Cave said there would be an NPC who would give us a boat. So let's create that NPC.
| 1 | Pick the tile you want to put the boat NPC down on. |
|---|---|
| 2 | 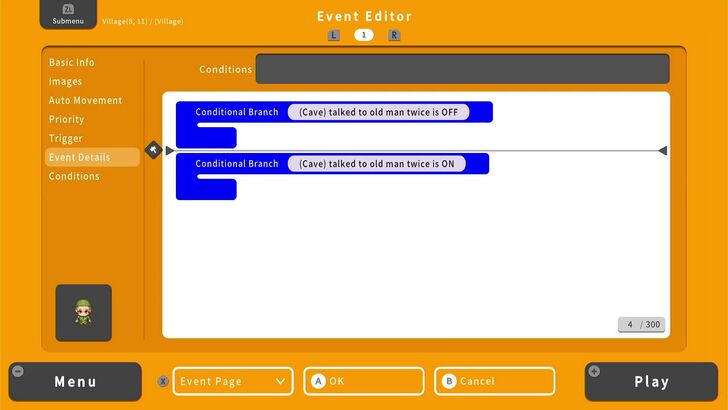 Now we'll have to set down commands called Conditional Branches. Since we don't want the NPC to give us the boat without us talking with the old man in the cave first, we will need two commands: One for whether or not the "(Cave) talked to the old man twice" switch is on, and one for whether or not it's off. The branch for when it's turned off should come first. |
| 3 | 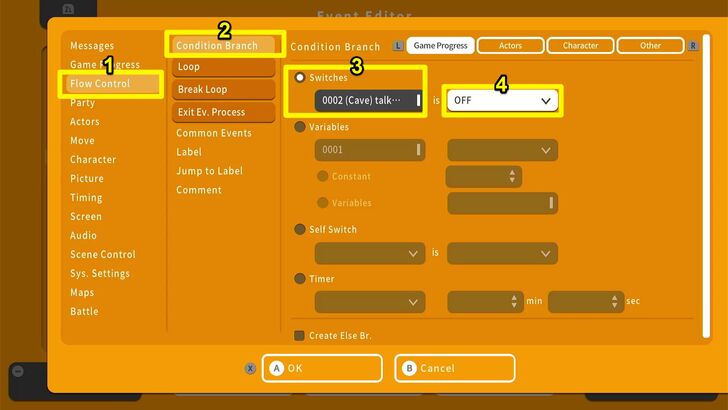 To make Conditional Branch commands, make a command in the Event List, head to Flow Control, then pick Condition Branch. From there, just pick the Switch you are using and the condition (whether it would check if the Switch is On or Off). |
| 4 |  Within these Condition Switches, let's put in two Show Message Commands for both the On and Off states. The Off state's Show Message command would have the NPC wonder about fishing, but give the player a hint as to where to go to get the boat (in case they go to the village first). For the On state, the man will confirm to us that he does have the boat. |
| 5 | 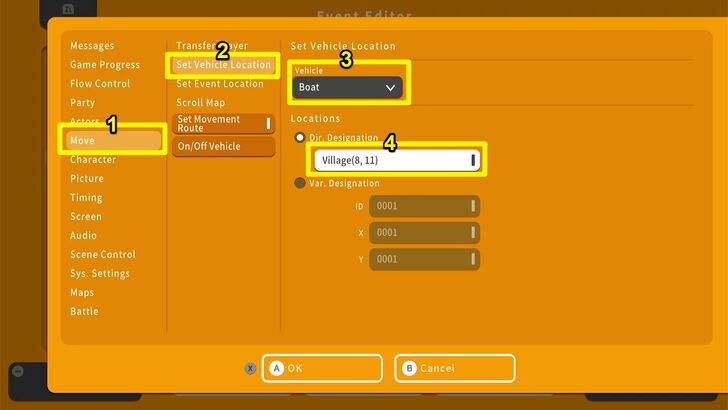 Right under the Show Message command for the On state, let's use a new command: Set Vehicle Location. Go to Move, then select Set Vehicle Location. You will then get to choose what kind of vehicle will be placed at the spot you want. Then, under Dir. Destination, select the box. |
| 6 |  You will then be asked where you want the vehicle to be placed after the Event. For our purposes, let's put the boat just outside the village, on the water. Be careful not to put it on the ground or anything or else it won't move an inch when our player rides it. |
| 7 | 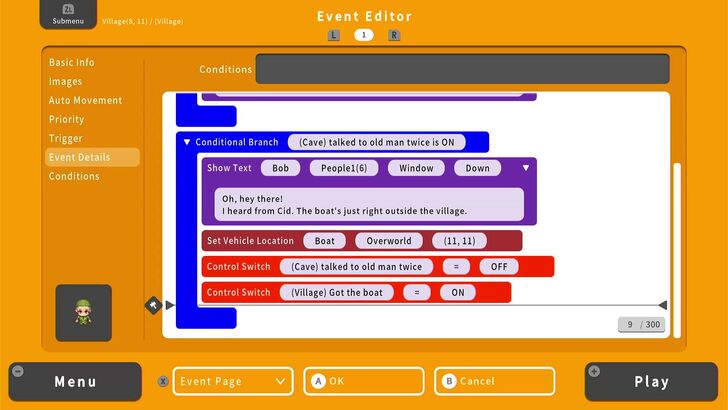 Before we create a new page, let's turn off the "(Cave) talked to old man twice" Switch with a switch command and turn on an entirely new one - "(Village) Got the Boat". |
| 8 | 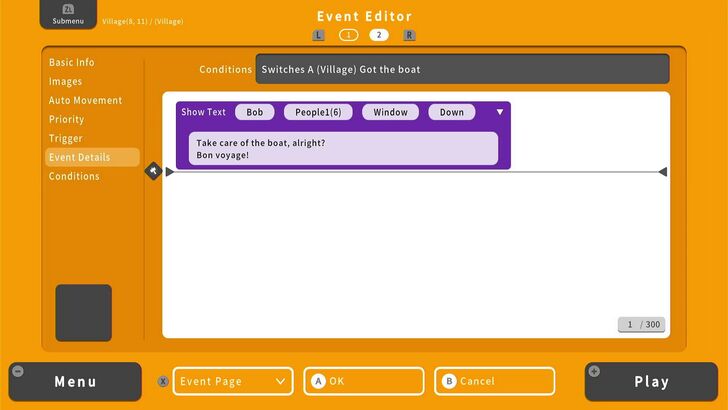 Make a new Event page with the Got the Boat switch as its condition, then put in a Show Message command that will have the NPC say a new line of dialogue (which they will say from there on in). Remember to set a sprite for this Event Page as well. |
| 9 | 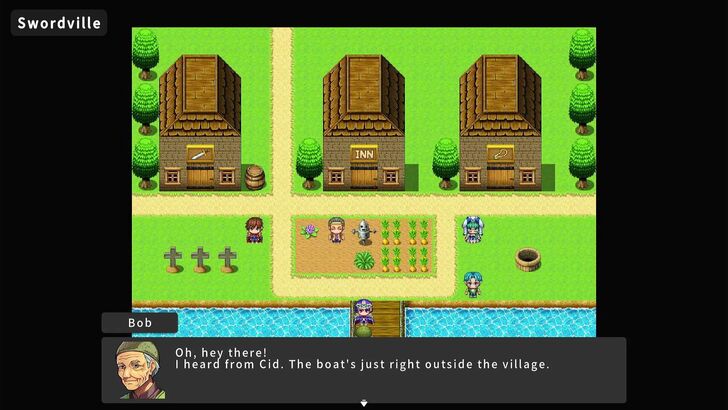 Let's playtest this by talking with the NPC before and after we go talk with the old man in the Cave. If he responds correctly, then the steps you took are correct so far. |
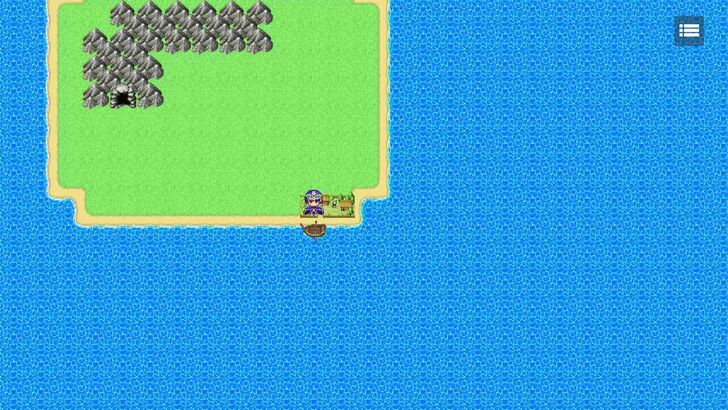
| 10 | Once you've talked with the boat NPC after talking with the old man in the Cave twice, check outside the village for your boat. It should be right there, and you'll have the means to get to Island B. |
Vehicles are simply another way of progression in an RPG, and they even have a hierarchy of sorts. Boats can only traverse shallow water, while Ships can sail through deeper water, and Airships can fly across land, water, and mountains. Most RPGs dole out vehicles at certain points of the story, offering players limited but still handy travel options.
So make sure to dole out vehicles carefully to make sure your players won't break your game's continuity too early on!
Moving On: Building a Dungeon!
Now that we have a Village up and running, it's time for us to move away from Island A and create a new Island: Island B! This island will host a Dungeon where our player party will face monsters and obtain a brand new vehicle that they'll use to reach the Demon King. All that and more in part 2 of our Intermediate Guide!
Building A Dungeon! Intermediate Guide (Part 2)
RPG MAKER WITH Related Guides
All Intermediate Guide Articles
| Core Guides | |
|---|---|
| Intermediate Guide Part 1 |
Intermediate Guide Part 2 |
| Tips and Tricks | |
|---|---|
| How to Make a Switch | How to Use Map Foregrounds and Backgrounds |
| How to Change Event Text Color | |
| Core Guides | |
|---|---|
| Beginner's Guide Part 1 | Beginner's Guide Part 2 |
| Tips and Tricks | |
|---|---|
| Map, Event, and Switch Naming Tips | How to Use the Flood Fill Tool |
| Core Guides | |
|---|---|
| Advanced Guide Part 1 | Advanced Guide Part 2 |
Comment
Author
Intermediate Guide Part 1: Building a Village!
Please participate in our site
improvement survey
03/2026
improvement survey
03/2026
Would you assist in
improving Game8's site?
improving Game8's site?

×
We are listening to our users' valuable opinions and discussing how to act on them.
The information collected through this survey will be used for the purpose of improving our services. In addition, the information will only be disclosed a part of a statistic in a format that will not allow identification of personal information.
Begin Survey
Not Now
×
Please rate each item regarding Game8.co's Advertisements.
Amount of Ads
Very Dissatisfied
Somewhat Dissatisfied
Fine
Somewhat Satisfied
Highly Satisfied
Placement of Ads
Timing of Ad Display
Ad Loading Speed
Safeness of Ads
Content of Ads
×
Please rate each item regarding Game8.co's Quality of Articles.
Amount of information
Very Dissatisfied
Somewhat Dissatisfied
Fine
Somewhat Satisfied
Highly Satisfied
Frequency of updates
Speed of new information
Accuracy of articles
Understandibility of articles
Readability of sentences
×
Please rate each item regarding Game8.co's Usability of the Site.
Ease of finding information
Very Dissatisfied
Somewhat Dissatisfied
Fine
Somewhat Satisfied
Highly Satisfied
Loading Speed
Use of Color
Font Size
Visibility of Images
Easy to Understand Layout
×
Please rate each item regarding Game8.co's Message Boards, Comments.
Ease of Writing
Very Dissatisfied
Somewhat Dissatisfied
Fine
Somewhat Satisfied
Highly Satisfied
Readability
Ease in Finding Information
Comment Quality
Comment Quantity
Admin Response
×
Please rate each item regarding Game8.co's Site's new design.
Please rate our site's new design
Very Dissatisfied
Somewhat Dissatisfied
Fine
Somewhat Satisfied
Highly Satisfied
Do you think that the website's design change makes the site easier to use?
Has the new design made it easier for you to find information on the site?
Has the new design improved the overall visual appeal of the site?
How would you rate your overall satisfaction with the new design of the site?
×
How likely are you to recommend Game8 to someone you know?
Very Unlikely
0
1
2
3
4
5
6
7
8
9
10
Very Likely
If you have other opinions regarding potential improvement to the website, please share them with us. We would appreciate your honest opinion.
Note: This is a free response section, so you can proceed without entering anything.
Note: Please be sure not to enter any kind of personal information into your response.
Note: Please be sure not to enter any kind of personal information into your response.
×
Thank You
×
Thank you for participating in our survey! Your answers will help us to improve the quality of our website and services.
We hope you continue to make use of Game8.
We hope you continue to make use of Game8.
Close
Rankings
- We could not find the message board you were looking for.
Gaming News


![Everwind Review [Early Access] | The Shaky First Step to A Very Long Journey](https://img.game8.co/4440226/ab079b1153298a042633dd1ef51e878e.png/thumb)

![Monster Hunter Stories 3 Review [First Impressions] | Simply Rejuvenating](https://img.game8.co/4438641/2a31b7702bd70e78ec8efd24661dacda.jpeg/thumb)
Popular Games

Genshin Impact Walkthrough & Guides Wiki
Honkai: Star Rail Walkthrough & Guides Wiki
Umamusume: Pretty Derby Walkthrough & Guides Wiki
Pokemon Pokopia Walkthrough & Guides Wiki
Resident Evil Requiem (RE9) Walkthrough & Guides Wiki
Monster Hunter Wilds Walkthrough & Guides Wiki
Wuthering Waves Walkthrough & Guides Wiki
Arknights: Endfield Walkthrough & Guides Wiki
Pokemon FireRed and LeafGreen (FRLG) Walkthrough & Guides Wiki
Pokemon TCG Pocket (PTCGP) Strategies & Guides Wiki


Recommended Games
Diablo 4: Vessel of Hatred Walkthrough & Guides Wiki
Fire Emblem Heroes (FEH) Walkthrough & Guides Wiki
Yu-Gi-Oh! Master Duel Walkthrough & Guides Wiki
Super Smash Bros. Ultimate Walkthrough & Guides Wiki
Pokemon Brilliant Diamond and Shining Pearl (BDSP) Walkthrough & Guides Wiki
Elden Ring Shadow of the Erdtree Walkthrough & Guides Wiki
Monster Hunter World Walkthrough & Guides Wiki
The Legend of Zelda: Tears of the Kingdom Walkthrough & Guides Wiki
Persona 3 Reload Walkthrough & Guides Wiki
Cyberpunk 2077: Ultimate Edition Walkthrough & Guides Wiki


All rights reserved
©Gotcha Gotcha Games
The copyrights of videos of games used in our content and other intellectual property rights belong to the provider of the game.
The contents we provide on this site were created personally by members of the Game8 editorial department.
We refuse the right to reuse or repost content taken without our permission such as data or images to other sites.