This survey will take about 1 minute.
Your answers will help us to improve our website.
RPG MAKER WITH
How to Make a Boss Dungeon With Traps
You can design intricate dungeons and devious traps in RPG MAKER WITH to ensure that your players face thrilling challenges at every turn. Read to learn more about creating dungeons and traps and how they work.
You can design intricate dungeons and devious traps in RPG MAKER WITH to ensure that your players face thrilling challenges at every turn. Read to learn more about creating dungeons and traps and how they work.
List of Contents
How to Make a Boss Dungeon and Traps
Using Sample Maps as Templates for Boss Dungeons
If you're starting out with RPG MAKER WITH and don't know how to design your own boss dungeons, you can use sample maps. These maps help you prototype your game and get it to a working state until you can design maps on your own.
How to Draw Maps for Specific Locations
In this guide, we are going to create a two-level boss dungeon with sample maps. Let's start by using sample maps, press the ZL Button, and select Go to Map List.
| 1 | 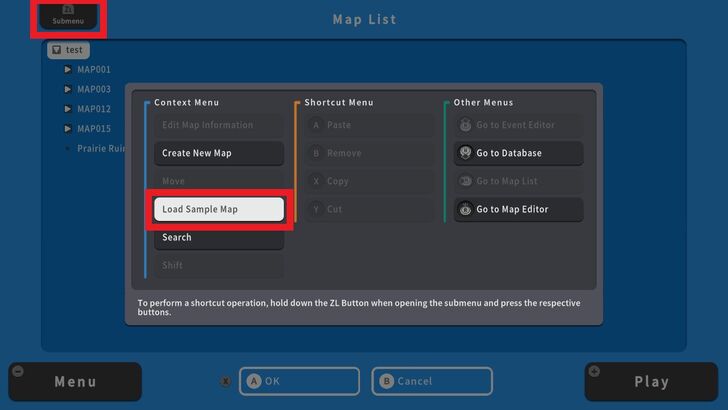 The Map List contains the maps that you are currently using in your game. To load and add a sample map, press the ZL Button and select Load Sample Map. |
|---|---|
| 2 | 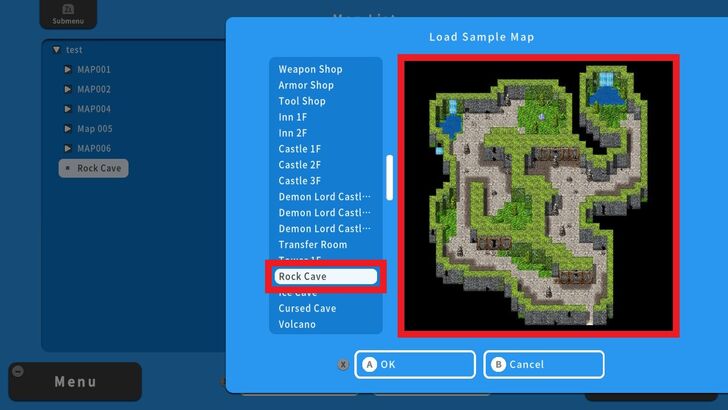 A list of sample maps will appear. For this example, we are going to select Rock Cave as our dungeon level 1. Press Ok and your sample map will appear in the Map List. |
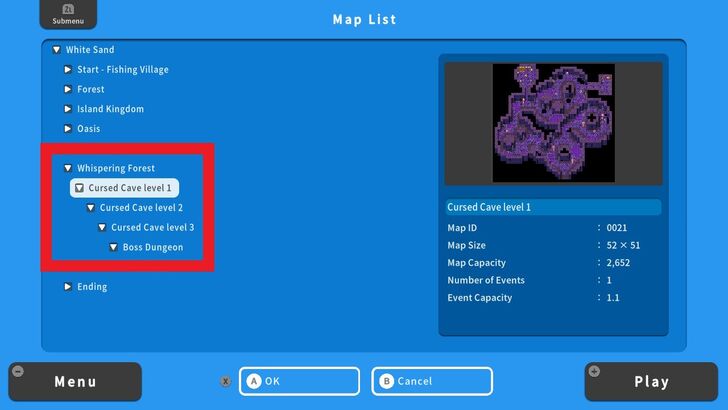
| 3 | 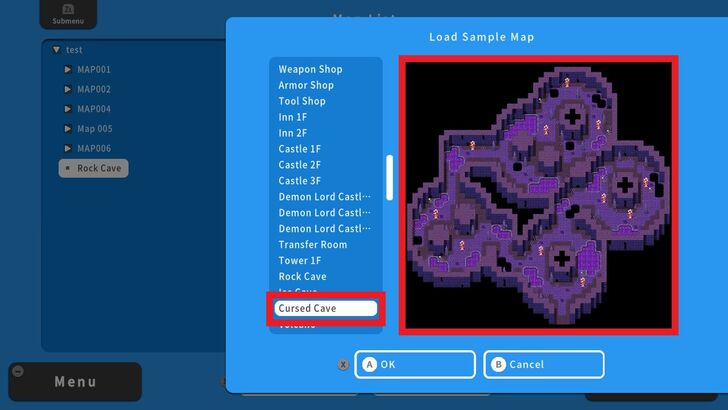 Next, we're going to use another sample map as dungeon level 2. Place the cursor in the sample map, press the ZL Button, and select Load Sample Map. For this example, we're using Cursed Cave as our dungeon level 2. |
| 4 | 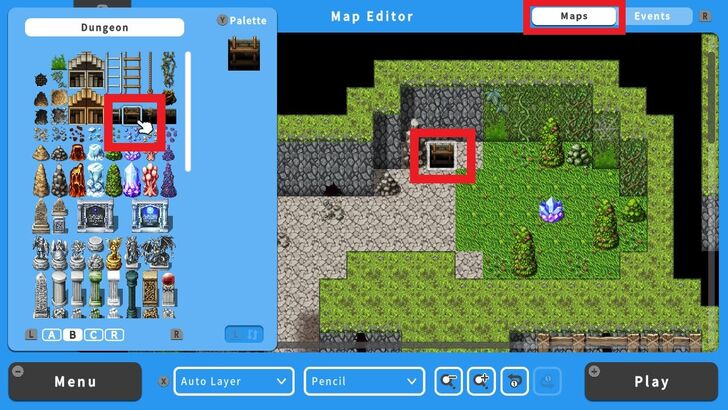 Now we're going to connect the Rock Cave and Cursed Cave maps using a Move Event. From the Map Editor screen, we'll select a Ladder and set it on the map. This particular tile is where the Move Event will occur. |
| 5 | 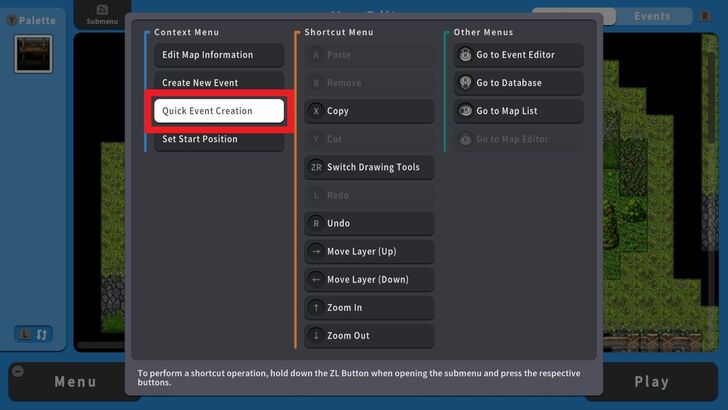 Next, press the R Button to switch to the Event Editor screen. Press the ZL Button and select Quick Event Creation. |
| 6 | 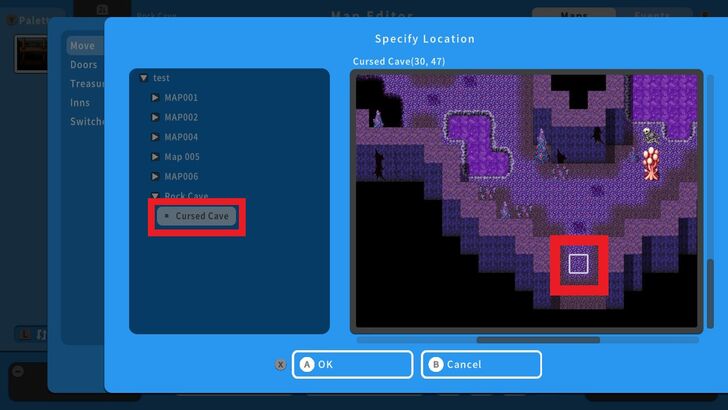 Select Move and under Locations, choose the desired map. In this example, we chose Cursed Cave and selected a tile inside this map. This will be the character's starting point in this map. |
| 7 | 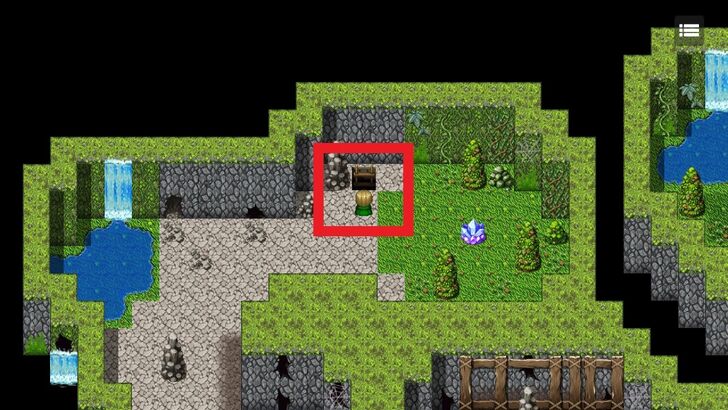 Let's do a playtest. |
| 8 | 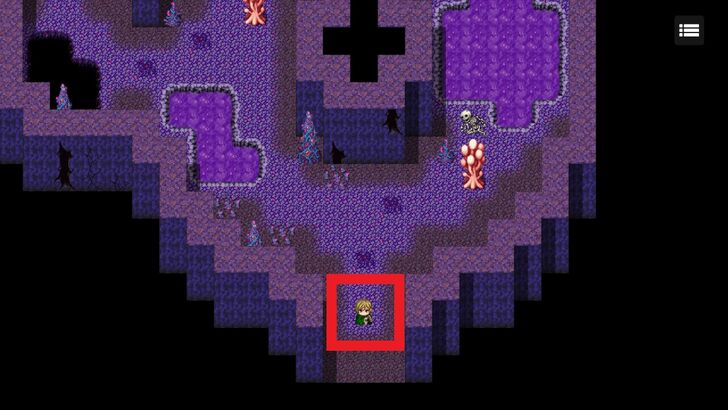 Success! Our map transitions work perfectly. |
| 9 | 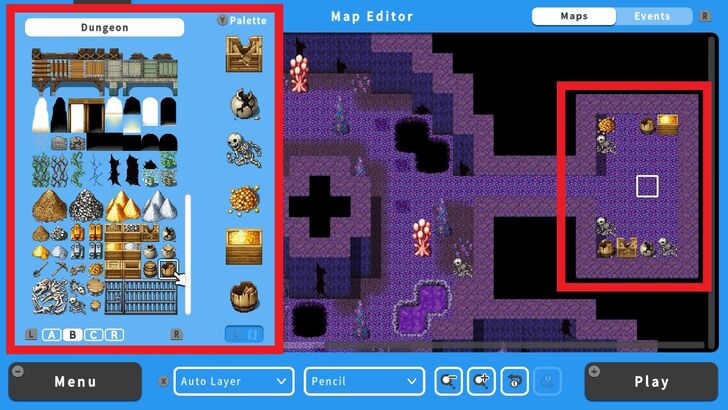 Let us now select a section of the map where the Boss Battle will be held. For this example, we edited the map and created a small alleyway leading to the Boss room and decorated it using RPG MAKER WITH's library of available objects for decoration. |
| 10 | 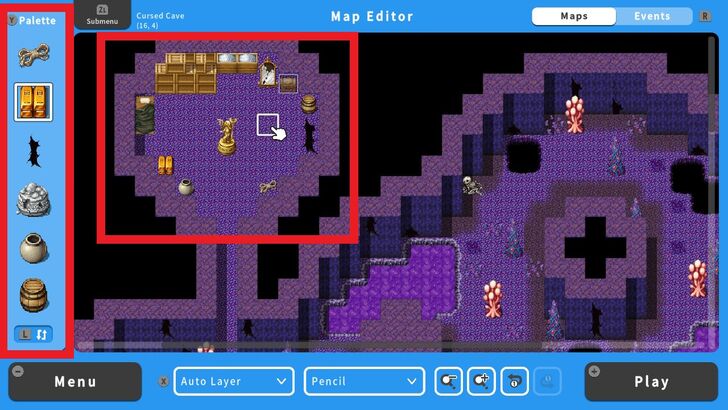 To create Healing sections within a dungeon, consider setting up small, safe areas where players can recover after intense mob battles or to get ready before a Boss battle. These Healing sections can be designed as hidden alcoves or rooms within the dungeon that offer a moment of respite. You can place Treasure Chests containing Healing items or potions inside these areas to reward players for their exploration and survival. |
How to Create Different Kinds of Traps
Use the Event Editor on Objects
When creating dungeons, it's always a good idea to set devious traps that will force players to be more careful while they're in there. Traps will also test their decision-making skills, as they can put them at risk of damage or death for a chance to obtain valuable rewards.
We will make two kinds of traps for the dungeon we just made: a Spike Trap that takes away some of a party's HP and a One Hit K.O. rolling boulder trap.
Creating a Spike Trap Using a Self Switch
| 1 | 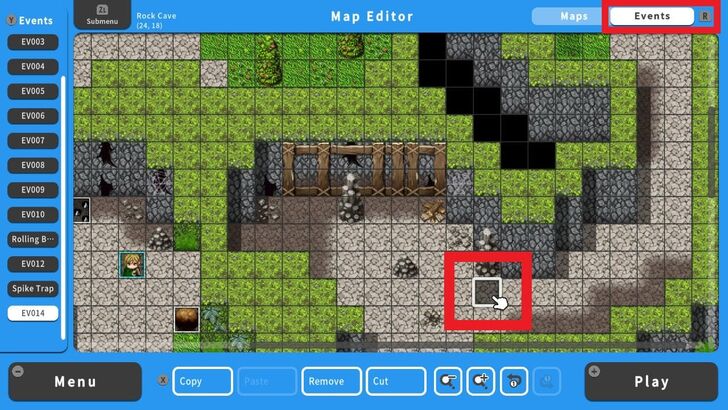 From the Event Editor screen, select a tile where the Spike Trap will be set. |
|---|---|
| 2 | 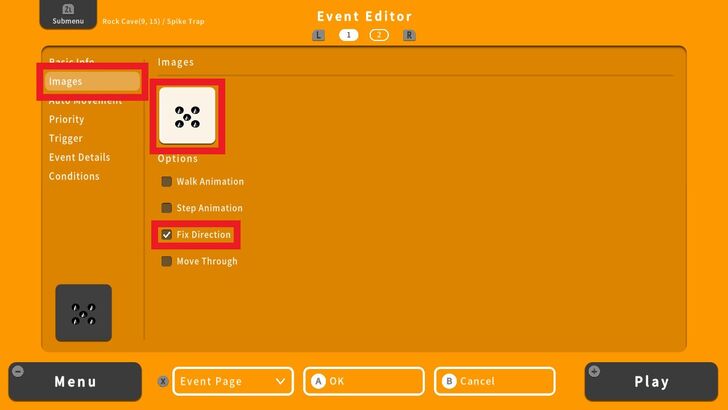 Enter the Basic Info, select an Image and check Fix Direction. For this example, we selected a Spike Trap image with protruding spikes from Object 1. |
| 3 |  Next go to Priority and set it to Below Char. |
| 4 | 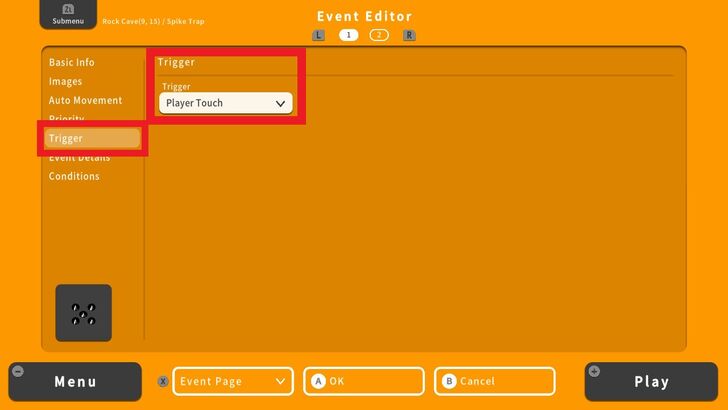 Go to Trigger and set to Player Touch. This means that the Event will start if the player touches the tile. |
| 5 |  Head to Event Details, set a Self Switch Control, choose an SFX, and Set Movement Route using the directions in the photo above. |
| 6 | 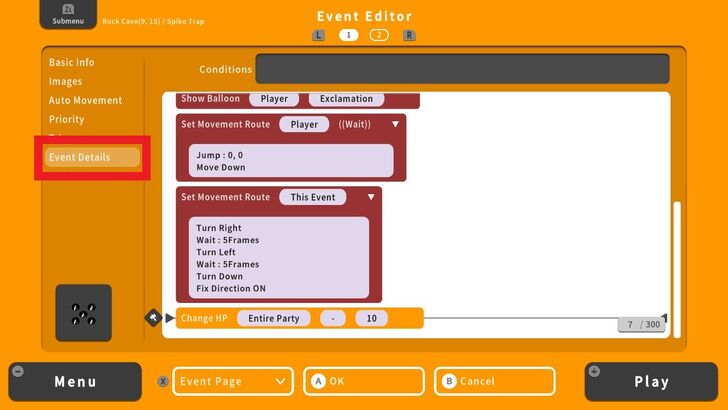 Add the Show Balloon command, which is accessible under the Character tab. Under it, enter two separate Set Movement Route commands using the directions indicated in the photo above. |
| 7 | 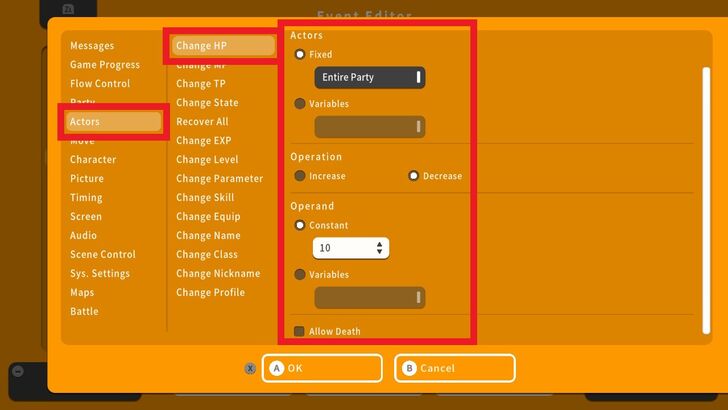 Add another command line and go to Actors and choose Change HP. Modify the settings in this tab. For this example, we set the spike damage to 10. |
| 8 | 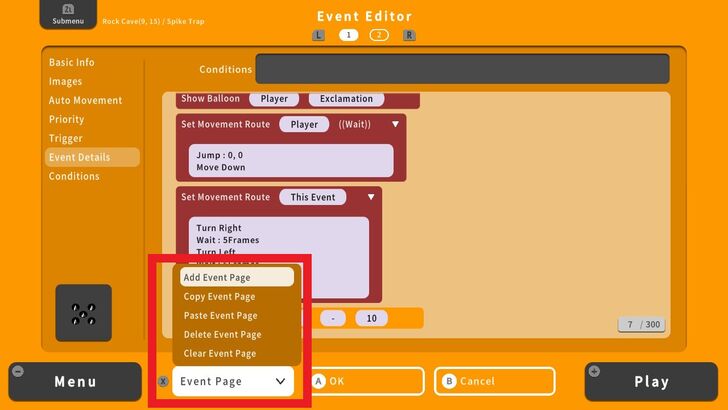 Press the X Button and Add Event Page. Switch to the next Event page by pressing the R Button. |
| 9 | 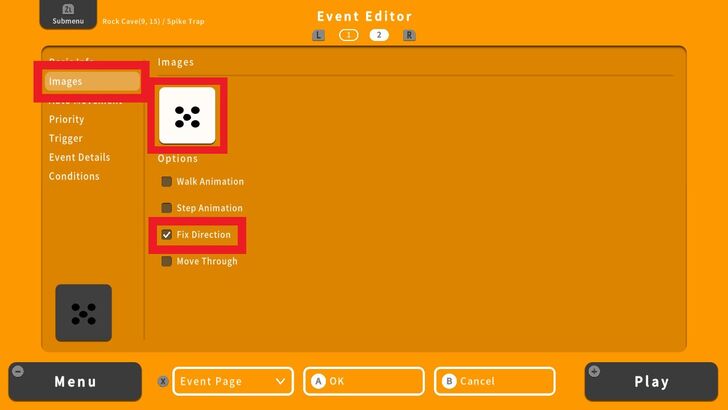 In the second Event page, go to Images, select a Spike Trap image without any protruding spikes and check Fix Direction. |
| 10 | 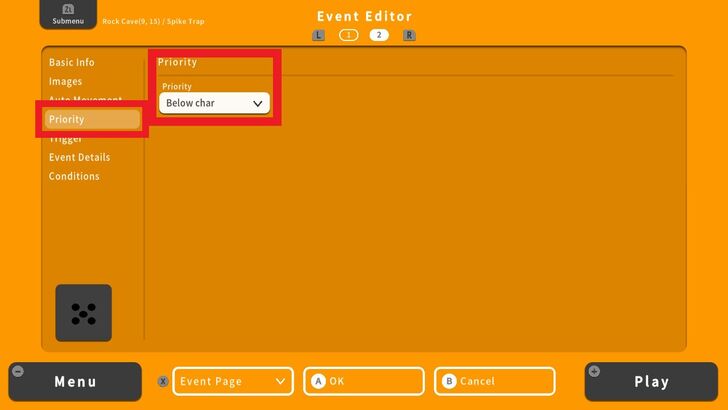 Go to Priority and select Below Char. |
| 11 | 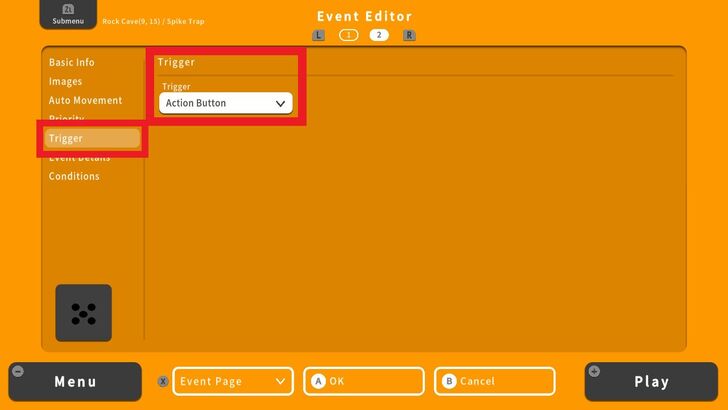 Next, go to Trigger and select Action Button. |
| 12 |  Finally, go to Conditions and check the appropriate Self Switch letter. Press Ok and a Spike Trap is now created. |
| 13 | 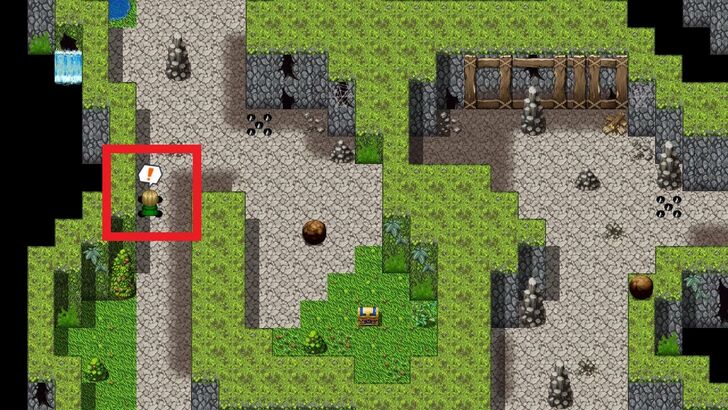 Let's run a playtest. We'll see if our character will receive damage when hit by a Spike Trap. For this example, our character's HP is set to 544. |
| 14 | 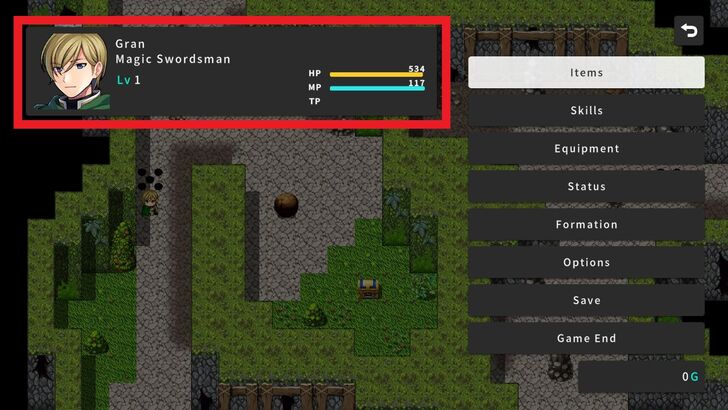 Success! The Spike Trap damaged our character and reduced his HP to 534. The exclamation mark balloon that comes out above his head also shows the player that he's been damaged. |
Creating a One-Hit K.O Boulder Trap by Customizing Object Path
| 1 | 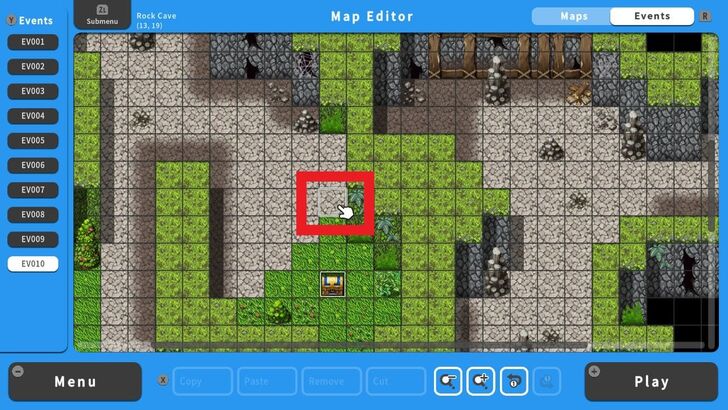 From the Event Editor screen, select a tile that will be the starting position for our Rolling Boulder. |
|---|---|
| 2 | 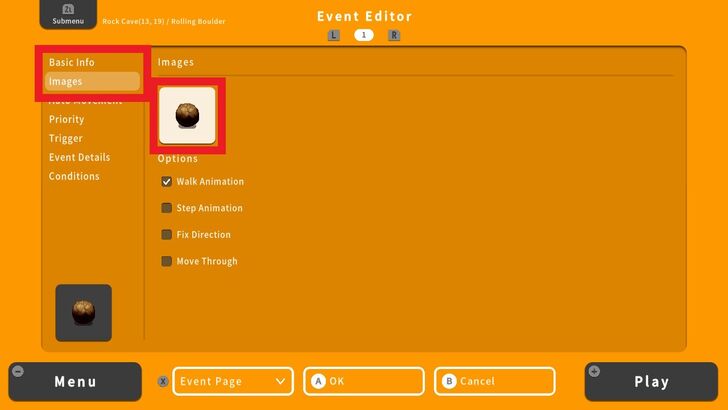 Enter the Basic Info and select an Image. For this example, we selected a Boulder image from Object 1. |
| 3 | 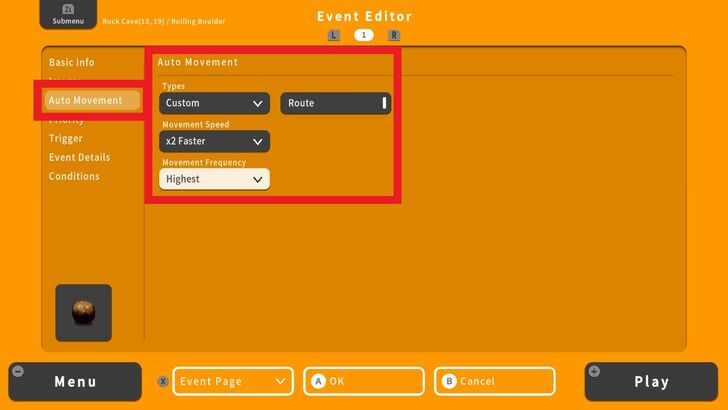 Next go to Auto Movement and select Custom under Types. Adjust the Movement Speed and Movement Frequency. For this example, we've set the Movement Speed to 2x Faster and the Movement Frequency to Highest. Afterward, select Route to open a new window to define the movement path. |
| 4 | 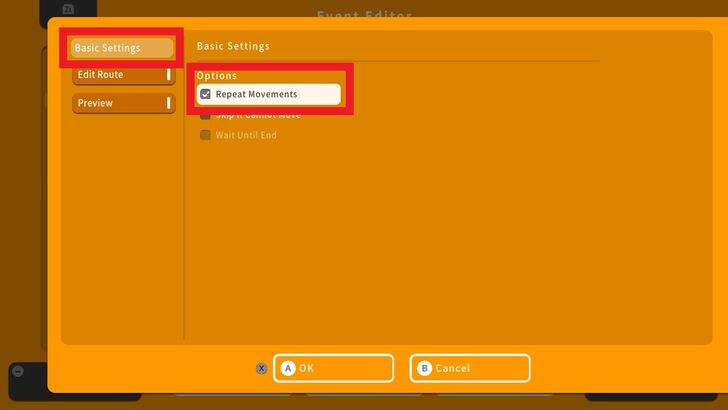 Check Repeat Movements under Basic Settings. |
| 5 | 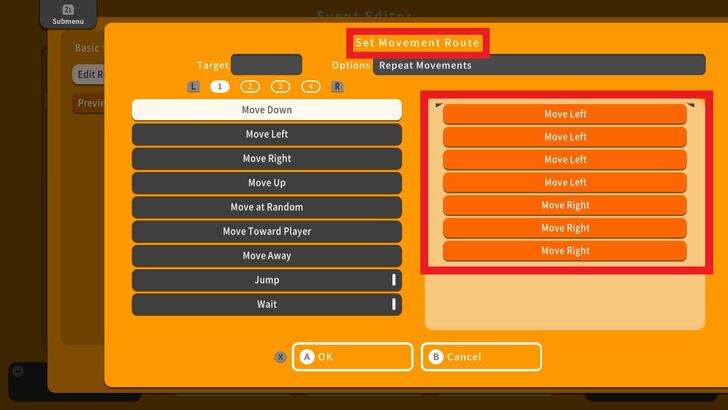 Next, go to Edit Route and set the object's movement route. In this example, the object will move 4 tiles to the left and 4 tiles to the right and will repeat this sequence. You may use the Preview function to view the object's trajectory. |
| 6 | 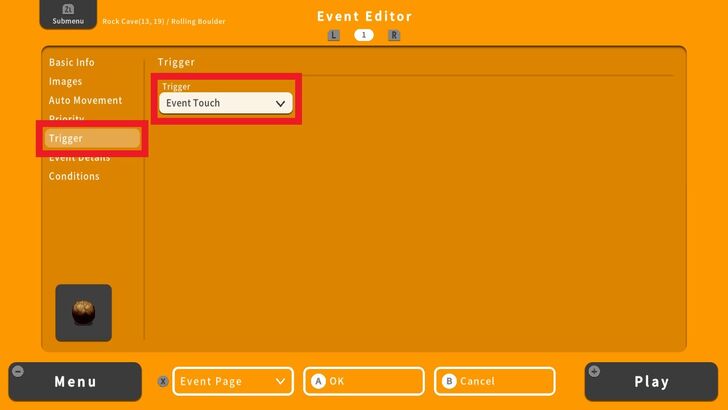 Now, go to Trigger and select Event Touch. This means that the conditions inside this object will activate if it touches our main character. |
| 7 | 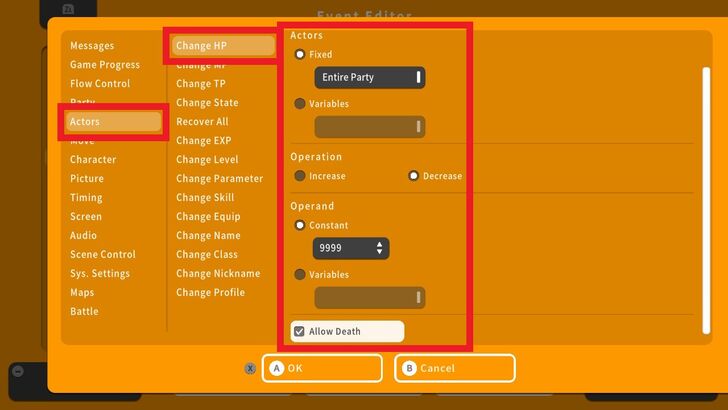 Navigate to Event Details, then select Actors and choose Change HP. Pick your main character under the Fixed option and set the Operation to Decrease. Enter a value for the Constant. This number determines the damage inflicted by the object if it makes contact with a character. For this example, we've set the damage to 9999 and enabled Allow Death to ensure that the game will be over if this object hits the player. |
| 8 | 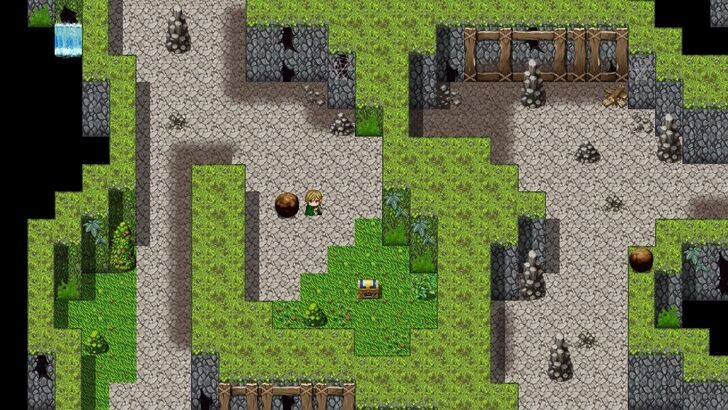 Let's run a playtest and have the main character collide with the boulder to see how the Event plays out. |
| 9 | 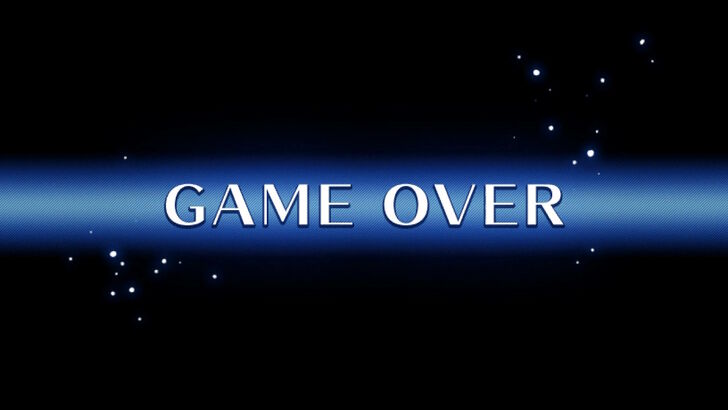 Game Over! Our boulder is working perfectly. |
Tips on Designing Boss Dungeons
Vary Dungeon Map Design and Add Multiple Levels
Avoid making your dungeon a simple straight path. Include multiple rooms, branching pathways, multiple levels, and dead ends to encourage exploration. Use puzzles, traps, or keys to unlock certain areas.
Gradually Increase the Difficulty by Adjusting Enemy Encounters
Gradually increase the difficulty of enemies and challenges as the player progresses through the dungeon, building up to the boss fight. For example, in the earlier levels, such as Dungeon Level 1, there might be a lower chance of encountering enemies, but that chance should increase as the player ventures deeper into the dungeon.
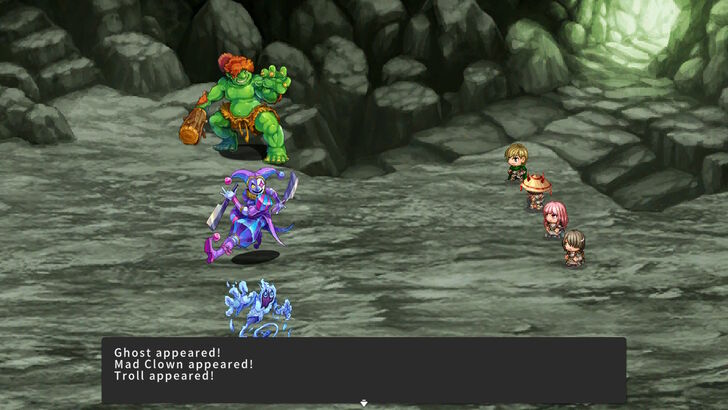
How to Make Different Kinds of Monster Encounters
Make Use of Environmental Hazards and Traps
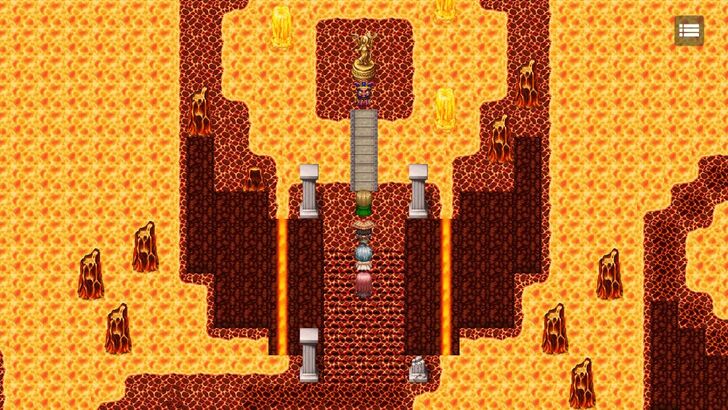
Incorporate traps like spikes, crumbling floors, or elemental dangers. For example, you can make use of lava or poison tiles, requiring players to carefully navigate the environment, avoid damage, or find ways to neutralize these threats as they progress through the dungeon.
RPG MAKER WITH Related Guides
| Core Guides | |
|---|---|
| Advanced Guide Part 1 | Advanced Guide Part 2 |
| Core Guides | |
|---|---|
| Beginner's Guide Part 1 | Beginner's Guide Part 2 |
| Tips and Tricks | |
|---|---|
| Map, Event, and Switch Naming Tips | How to Use the Flood Fill Tool |
| Core Guides | |
|---|---|
| Intermediate Guide Part 1 | Intermediate Guide Part 2 |
| Tips and Tricks | |
|---|---|
| How to Make a Switch | How to Use Map Foregrounds and Backgrounds |
| How to Change Event Text Color | |
Comment
Author
How to Make a Boss Dungeon With Traps
Please participate in our site
improvement survey
03/2026
improvement survey
03/2026
Would you assist in
improving Game8's site?
improving Game8's site?

×
We are listening to our users' valuable opinions and discussing how to act on them.
The information collected through this survey will be used for the purpose of improving our services. In addition, the information will only be disclosed a part of a statistic in a format that will not allow identification of personal information.
Begin Survey
Not Now
×
Please rate each item regarding Game8.co's Advertisements.
Amount of Ads
Very Dissatisfied
Somewhat Dissatisfied
Fine
Somewhat Satisfied
Highly Satisfied
Placement of Ads
Timing of Ad Display
Ad Loading Speed
Safeness of Ads
Content of Ads
×
Please rate each item regarding Game8.co's Quality of Articles.
Amount of information
Very Dissatisfied
Somewhat Dissatisfied
Fine
Somewhat Satisfied
Highly Satisfied
Frequency of updates
Speed of new information
Accuracy of articles
Understandibility of articles
Readability of sentences
×
Please rate each item regarding Game8.co's Usability of the Site.
Ease of finding information
Very Dissatisfied
Somewhat Dissatisfied
Fine
Somewhat Satisfied
Highly Satisfied
Loading Speed
Use of Color
Font Size
Visibility of Images
Easy to Understand Layout
×
Please rate each item regarding Game8.co's Message Boards, Comments.
Ease of Writing
Very Dissatisfied
Somewhat Dissatisfied
Fine
Somewhat Satisfied
Highly Satisfied
Readability
Ease in Finding Information
Comment Quality
Comment Quantity
Admin Response
×
Please rate each item regarding Game8.co's Site's new design.
Please rate our site's new design
Very Dissatisfied
Somewhat Dissatisfied
Fine
Somewhat Satisfied
Highly Satisfied
Do you think that the website's design change makes the site easier to use?
Has the new design made it easier for you to find information on the site?
Has the new design improved the overall visual appeal of the site?
How would you rate your overall satisfaction with the new design of the site?
×
How likely are you to recommend Game8 to someone you know?
Very Unlikely
0
1
2
3
4
5
6
7
8
9
10
Very Likely
If you have other opinions regarding potential improvement to the website, please share them with us. We would appreciate your honest opinion.
Note: This is a free response section, so you can proceed without entering anything.
Note: Please be sure not to enter any kind of personal information into your response.
Note: Please be sure not to enter any kind of personal information into your response.
×
Thank You
×
Thank you for participating in our survey! Your answers will help us to improve the quality of our website and services.
We hope you continue to make use of Game8.
We hope you continue to make use of Game8.
Close
Rankings
- We could not find the message board you were looking for.
Gaming News


![Everwind Review [Early Access] | The Shaky First Step to A Very Long Journey](https://img.game8.co/4440226/ab079b1153298a042633dd1ef51e878e.png/thumb)

![Monster Hunter Stories 3 Review [First Impressions] | Simply Rejuvenating](https://img.game8.co/4438641/2a31b7702bd70e78ec8efd24661dacda.jpeg/thumb)
Popular Games

Genshin Impact Walkthrough & Guides Wiki
Honkai: Star Rail Walkthrough & Guides Wiki
Umamusume: Pretty Derby Walkthrough & Guides Wiki
Pokemon Pokopia Walkthrough & Guides Wiki
Resident Evil Requiem (RE9) Walkthrough & Guides Wiki
Monster Hunter Wilds Walkthrough & Guides Wiki
Wuthering Waves Walkthrough & Guides Wiki
Arknights: Endfield Walkthrough & Guides Wiki
Pokemon FireRed and LeafGreen (FRLG) Walkthrough & Guides Wiki
Pokemon TCG Pocket (PTCGP) Strategies & Guides Wiki


Recommended Games
Diablo 4: Vessel of Hatred Walkthrough & Guides Wiki
Fire Emblem Heroes (FEH) Walkthrough & Guides Wiki
Yu-Gi-Oh! Master Duel Walkthrough & Guides Wiki
Super Smash Bros. Ultimate Walkthrough & Guides Wiki
Pokemon Brilliant Diamond and Shining Pearl (BDSP) Walkthrough & Guides Wiki
Elden Ring Shadow of the Erdtree Walkthrough & Guides Wiki
Monster Hunter World Walkthrough & Guides Wiki
The Legend of Zelda: Tears of the Kingdom Walkthrough & Guides Wiki
Persona 3 Reload Walkthrough & Guides Wiki
Cyberpunk 2077: Ultimate Edition Walkthrough & Guides Wiki


All rights reserved
©Gotcha Gotcha Games
The copyrights of videos of games used in our content and other intellectual property rights belong to the provider of the game.
The contents we provide on this site were created personally by members of the Game8 editorial department.
We refuse the right to reuse or repost content taken without our permission such as data or images to other sites.