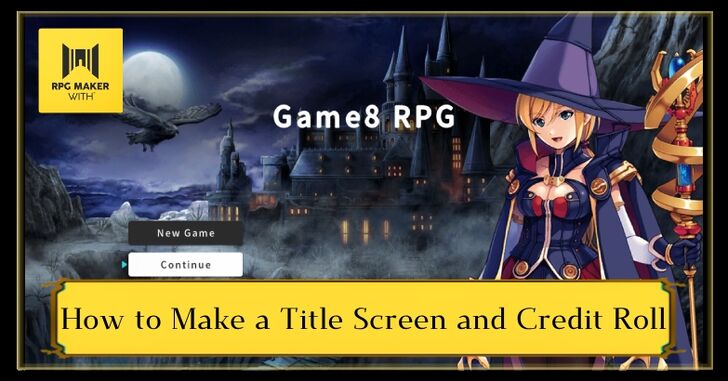
How to Make a Title Screen and Credit Roll
A Title Screen plays an important part in an RPG, as it serves as the player's first interaction with the game, offering options to begin their adventure or customize settings to their liking. Read our guide to learn how to create a Title Screen and Credit Roll.
A Title Screen plays an important part in an RPG, as it serves as the player's first interaction with the game, offering options to begin their adventure or customize settings to their liking. Read our guide to learn how to create a Title Screen and Credit Roll.
List of Contents
Why Make a Title Screen and Credit Roll?
A Title Screen plays an important part in an RPG, as it serves as the player's first interaction with the game, offering options to begin their adventure or customize settings to their liking. Meanwhile, the Credit Roll provides a meaningful conclusion to the game, offering thanks and recognition to the people who helped make it.
In RPG MAKER WITH, you can design and customize the Title Screen and Credit Roll with ease. It may even help you get started with your game if you haven't made one yet alreaady.
How to Make a Title Screen and Credit Roll
Creating a Title Screen
| 1 |  To edit or create your "Title Screen," press the ZL Button and select "Go to Database." |
|---|---|
| 2 | 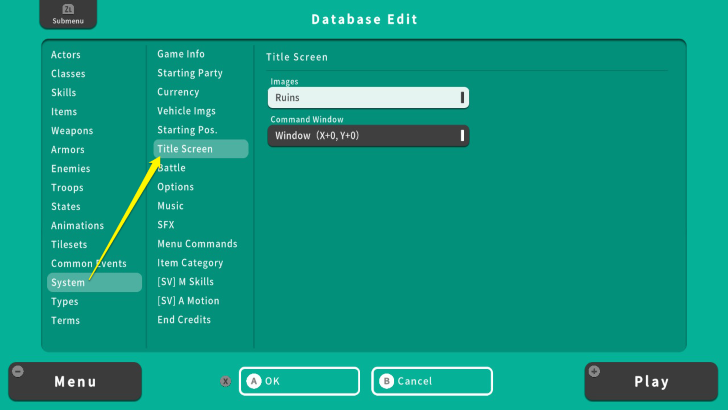 From the Database screen, select "System" then "Title Screen." |
| 3 |  The default image in RPG MAKER WITH is "Ruins." You can also add an "Actor" as a second image. Once done, press the X Button and select OK. For this example, we set the image to "World Tree" and "Unique Actor1" for the second image. |
| 4 | 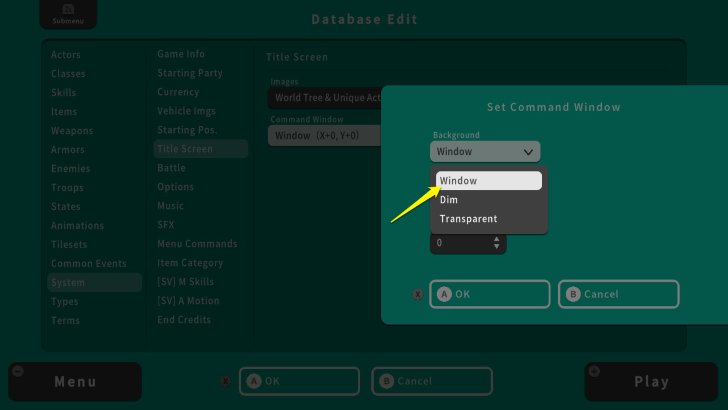 The "Set Command Window" influences how the "New Game," "Continue," and "Option" appear on the Title Screen. For the "Background," we will set it to "Window." |
| 5 |  You can also set the direction of the Command Window. Setting positive values to "Offset X" shifts the Command Window to the right, while negative values shift it to the left. Setting positive values to "Offset Y" shifts the Command Window upward, while negative values shifts it downward. For this example, we set -500 to Offset X to shift the Command Window to the left. We left the Offset Y untouched to keep its default vertical position. |
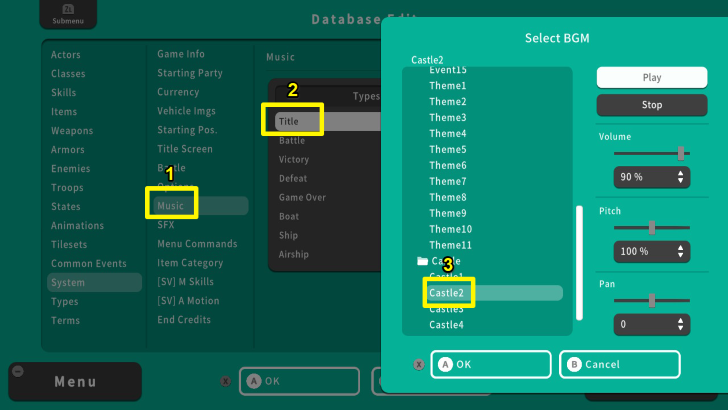
| 6 | 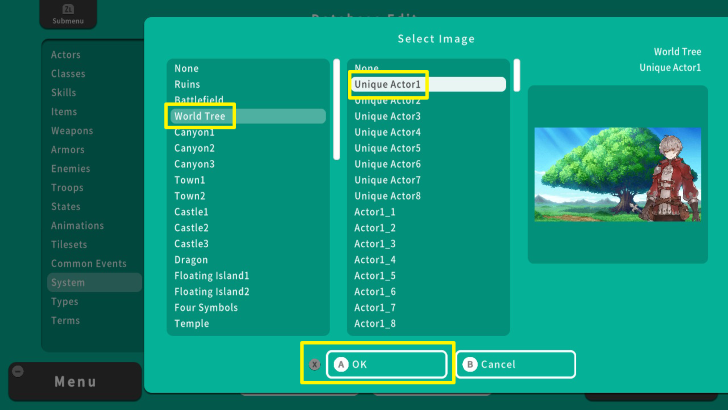 You can also set the Title Screen's music. From the System Menu, select "Music" and move your cursor to "Title." |
| 7 | 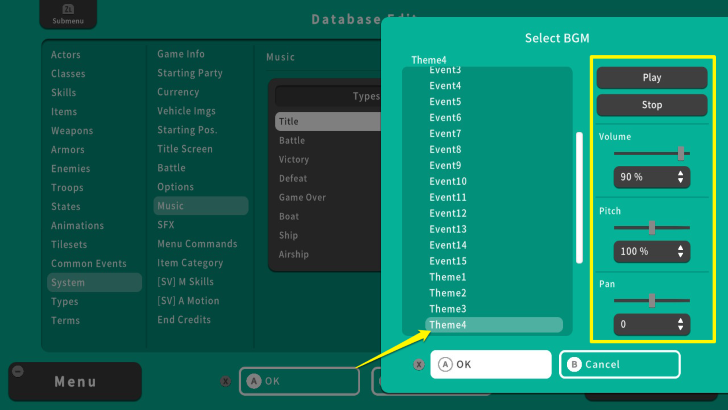 Here you can select the music and edit its "Volume," "Pitch," and "Pan." After selecting and editing the music, press the X Button and select OK. We set the music to "Theme4." |
| 8 | 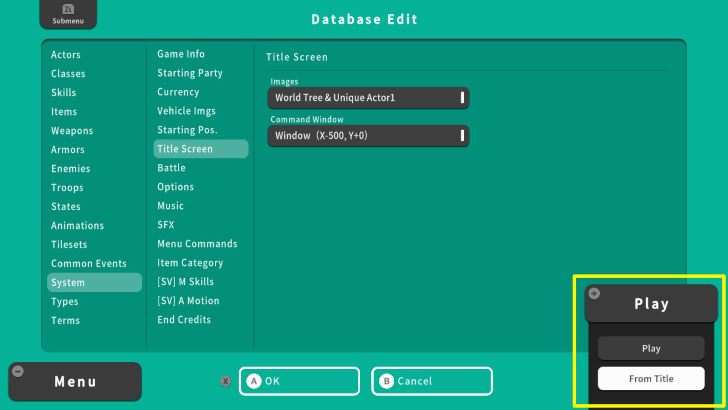 Playtest the game by pressing the + Button and selecting "From Title." |
| 9 | 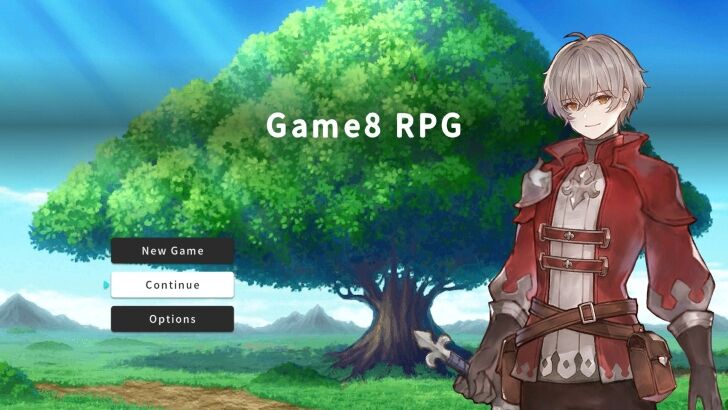 Congratulations! You created your Title Screen! |
Creating a Credit Roll
| 1 | 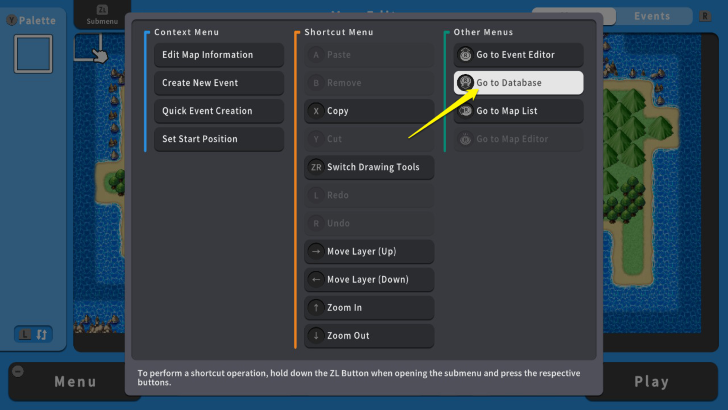 To edit or create your "Credit Roll," press the ZL Button and select "Go to Database." |
|---|---|
| 2 |  From the Database screen, select "System" then "End Credits." |
| 3 | 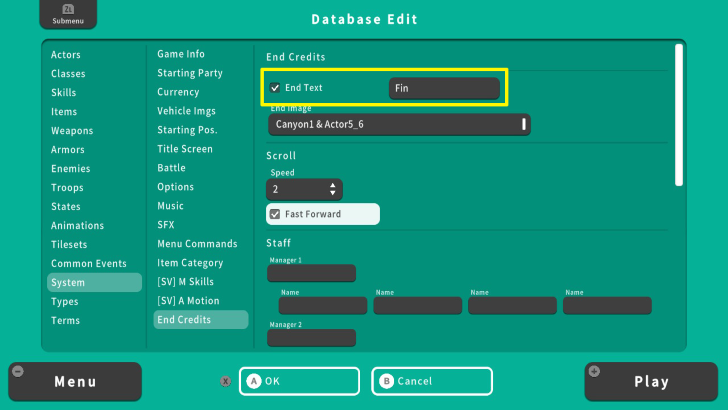 The first option to edit is the "End Text." For this example, we checked the End Text and set it to "Fin." |
| 4 | 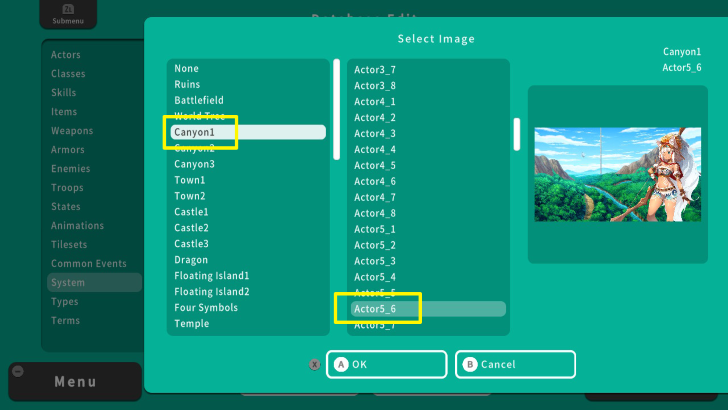 Next one is "End Image." Just like the Title Screen, you can set two images for the Credit Roll. Once done, press the X Button and select OK. For this example, we set it to "Canyon1" and "Actor5_6." |
| 5 | 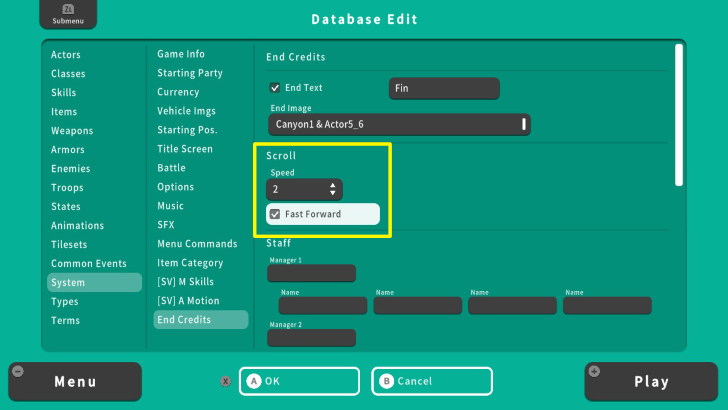 For the "Scroll" option, you can set its "Speed" and whether players can "Fast Forward" the Credit Roll. We set the speed to 2 and checked the Fast Forward option. |
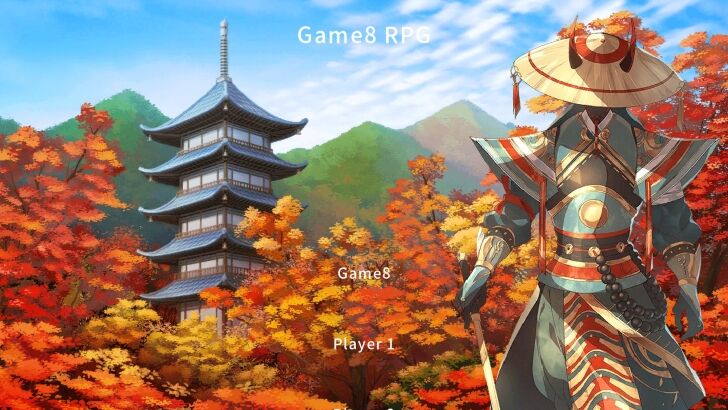
| 6 | 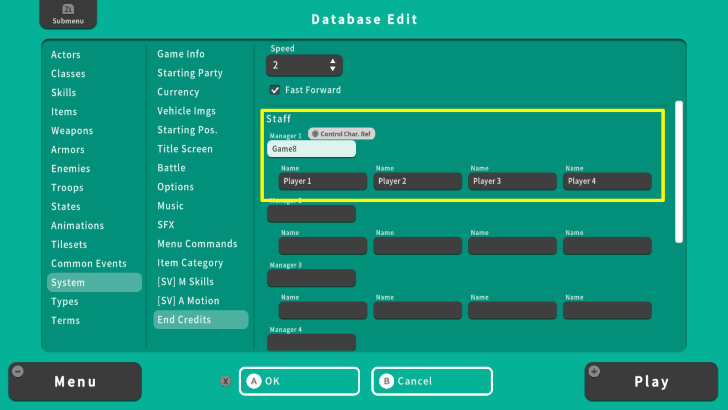 The "Staff" option allows you to put the names of the people involved in this game. You are allowed to set up six managers, each having four assistants. We set Game8 as the manager and Players 1-4 as assistants as an example. |
| 7 | 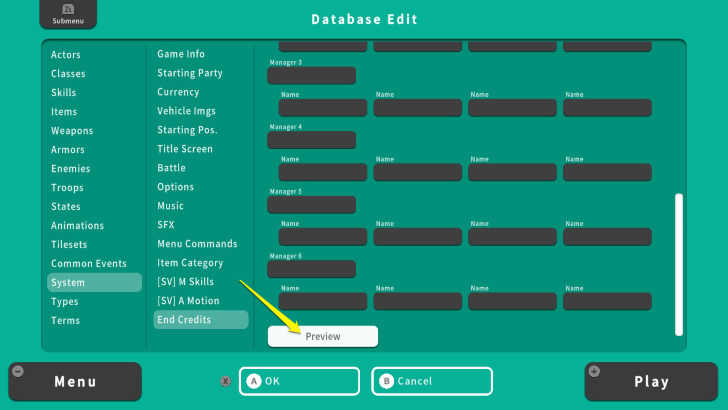 Once done, scroll at the bottom of the "End Credits" Menu to "Preview" your Credit Roll. |
| 8 | 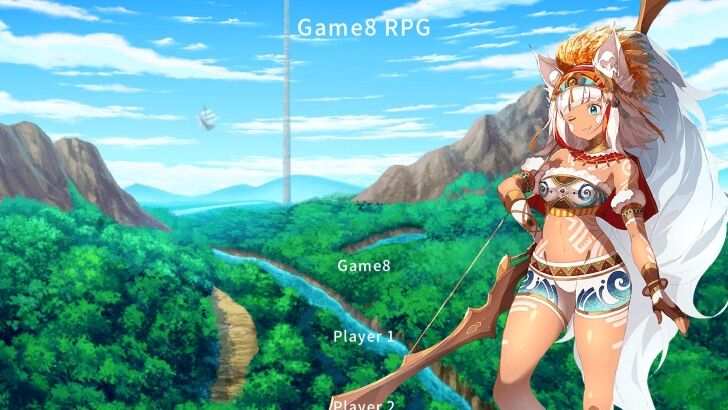 Congratulations! You made a Credit Roll of your game! |
Creating Title Screen and Credit Roll Tips
Set the Game's Mood via Music
Setting the right music can entice your players to play your game. For example, your adventure RPG game's Title Screen will work better with upbeat BGM. Meanwhile, a horror game needs eerie music to fit its narrative.
Though this is just a Title Screen, it is important because we need to set the impression for our players. Having mismatched Title Screen and BGM might discourage them from playing your game.
How To Make Different Kinds of Monster Encounters
Use Credit Roll Images Wisely
You can use a Credit Roll's image to convey more information about your game.
For example, perhaps there is an inaccessible area in your game, but your player already finished it. You can set an intriguing Background image and character, teasing future access to this area to keep your player's interest. Thus, you can make Credit Rolls more interesting for your players.
RPG MAKER WITH Related Guides

| Core Guides | |
|---|---|
| Beginner's Guide Part 1 | Beginner's Guide Part 2 |
| Supplementary Guides | |
|---|---|
| How to Draw an Overworld Map | How to Draw Maps for Specific Locations |
| How to Make an NPC | How to Playtest for Beginners |
| How to Use Tilesets | How to Use Sample Maps |
| Map Layers Explained | How to Use Shortcut Keys |
| How to Make a Title Screen and Credit Roll | How to Set In-Game Terms |
| How to Set System Options | |
| Tips and Tricks | |
|---|---|
| Map, Event, and Switch Naming Tips | How to Use the Flood Fill Tool |

| Core Guides | |
|---|---|
| Intermediate Guide Part 1 | Intermediate Guide Part 2 |
| Tips and Tricks | |
|---|---|
| How to Make a Switch | How to Use Map Foregrounds and Backgrounds |
| How to Change Event Text Color | |

| Core Guides | |
|---|---|
| Advanced Guide Part 1 | Advanced Guide Part 2 |

Comment
Author

How to Make a Title Screen and Credit Roll
Rankings
- We could not find the message board you were looking for.
Gaming News


Popular Games

Genshin Impact Walkthrough & Guides Wiki
Honkai: Star Rail Walkthrough & Guides Wiki
Arknights: Endfield Walkthrough & Guides Wiki
Umamusume: Pretty Derby Walkthrough & Guides Wiki
Wuthering Waves Walkthrough & Guides Wiki
Pokemon TCG Pocket (PTCGP) Strategies & Guides Wiki
Abyss Walkthrough & Guides Wiki
Zenless Zone Zero Walkthrough & Guides Wiki
Digimon Story: Time Stranger Walkthrough & Guides Wiki
Clair Obscur: Expedition 33 Walkthrough & Guides Wiki


Recommended Games
Fire Emblem Heroes (FEH) Walkthrough & Guides Wiki
Pokemon Brilliant Diamond and Shining Pearl (BDSP) Walkthrough & Guides Wiki
Diablo 4: Vessel of Hatred Walkthrough & Guides Wiki
Super Smash Bros. Ultimate Walkthrough & Guides Wiki
Yu-Gi-Oh! Master Duel Walkthrough & Guides Wiki
Elden Ring Shadow of the Erdtree Walkthrough & Guides Wiki
Monster Hunter World Walkthrough & Guides Wiki
The Legend of Zelda: Tears of the Kingdom Walkthrough & Guides Wiki
Persona 3 Reload Walkthrough & Guides Wiki
Cyberpunk 2077: Ultimate Edition Walkthrough & Guides Wiki


All rights reserved
©Gotcha Gotcha Games
The copyrights of videos of games used in our content and other intellectual property rights belong to the provider of the game.
The contents we provide on this site were created personally by members of the Game8 editorial department.
We refuse the right to reuse or repost content taken without our permission such as data or images to other sites.