Advanced Guide Part 2: Making Enemies and the Final Boss!
Enemies should go last whenever making an RPG because of the time it takes to balance them. In the final part of our series on making your first RPG, we will teach you how to make enemies, put them in your game along with the final boss, and make an ending for your game.

|
Advanced Guide (Part 1) ←Prev |
- |
Enemies should go last whenever making an RPG because of the time it takes to balance them. In the final part of our series on making your first RPG, we will teach you how to make enemies, put them in your game along with the final boss, and make an ending for your game.
List of Contents
Advanced Guide (Part 2)
Making Enemies and the Final Boss!
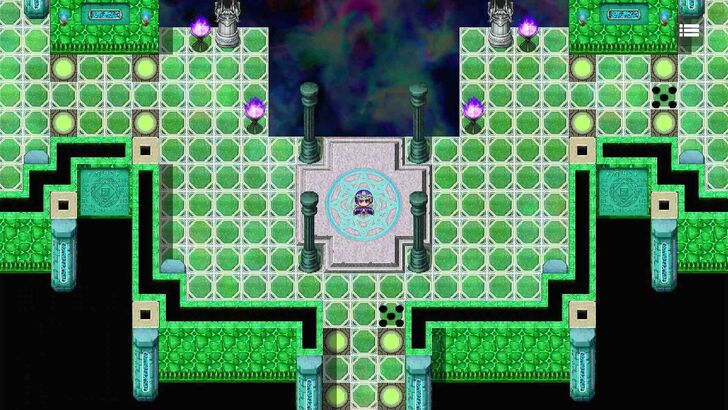
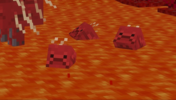
Here it is. We are at the final leg of our guide to RPG MAKER WITH. We already have the final boss' lair, with puzzles and traps. Now here comes the part of making an RPG that's the last but not the least - implementing enemies in the game.
Enemies are a consistent source of EXP, gold, and gameplay for players. Not only do they make players feel like they've earned whatever rewards they get at the end of dungeons or fights, but they also make sure that your players won't burn through your game quickly. This is especially the case if you are using Random Enemy encounters in your games.
We'll work on implementing enemies into our game first, then set up the final boss and our player's final fight with them. Once that's done, we will then set up the game's ending.
Creating Enemies for Your Game

We can't have enemies in the game if we haven't made them yet. So, like with main characters, we will also create Enemies via the game's Database. The process of creating enemies itself is easy; it's the process of balancing them that will be fairly involved.
Balancing your enemies makes sure that they're not too tough for your players to fight (so they don't give up playing) or too weak to fight (so your players won't get bored). In classic RPGs, the starting area is usually full of weak enemies, and these enemies become more and more powerful as they progress to later areas of the game.
We will teach you how to add enemies to the game, and then how to edit their stats so you can make sure they are fair to fight when your players encounter them.
Adding Enemies to the Database
Just like adding characters to the game, enemies are added the same way: Through the Database, where we will set their name, sprite, stats, and even how much EXP and gold they drop once defeated.
| 1 | 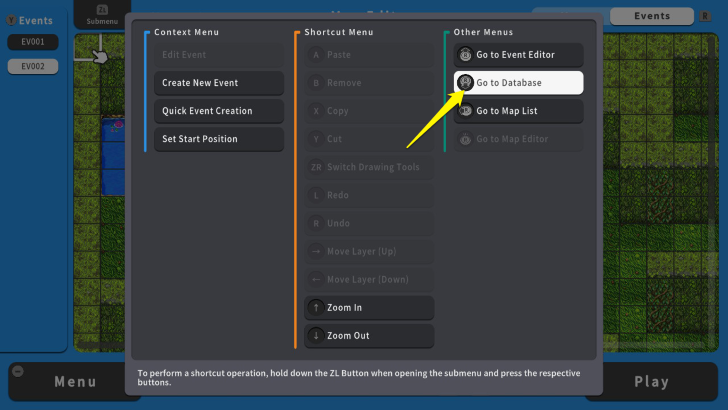 To create enemy characters and monsters, press the ZL Button and select "Go to Database." |
|---|---|
| 2 | 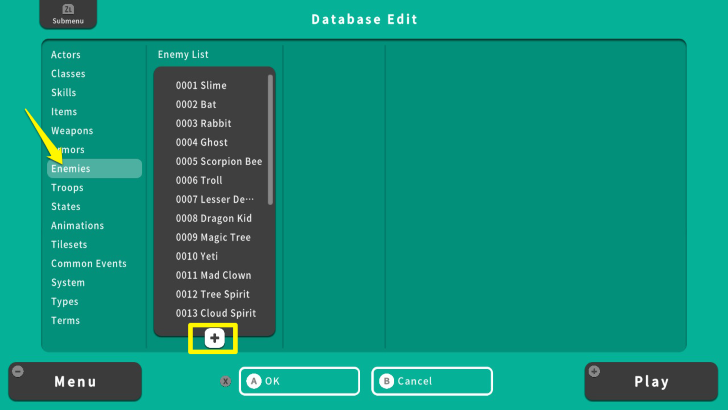 Move your cursor to "Enemies" and select the + Icon under the "Enemy List." |
| 3 | 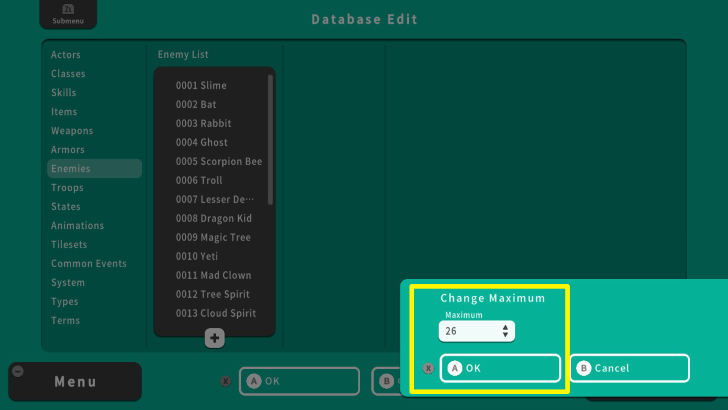 Press the A Button twice and press the Y Button to adjust the maximum number of enemies. In this case, change it to "26." After that, press the X Button and select OK. |
| 4 |  Check the Enemy List again and select "+ 0026." |
| 5 | 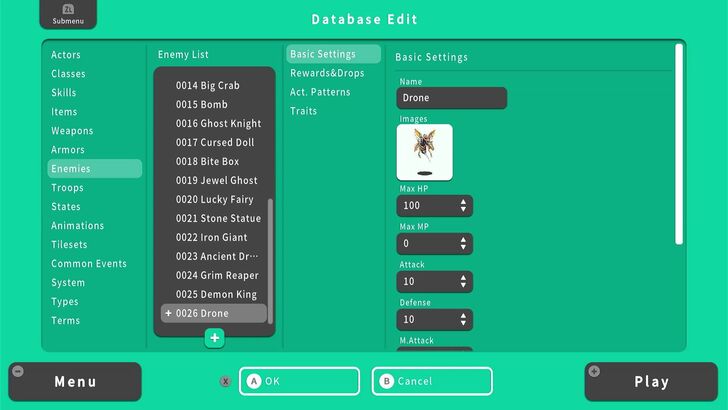 Let's start creating an enemy by editing the Basic Settings section. Here, we named our enemy "Drone" and gave them the image of a bee. Leave the Drone's stats alone for now. |
| 7 | 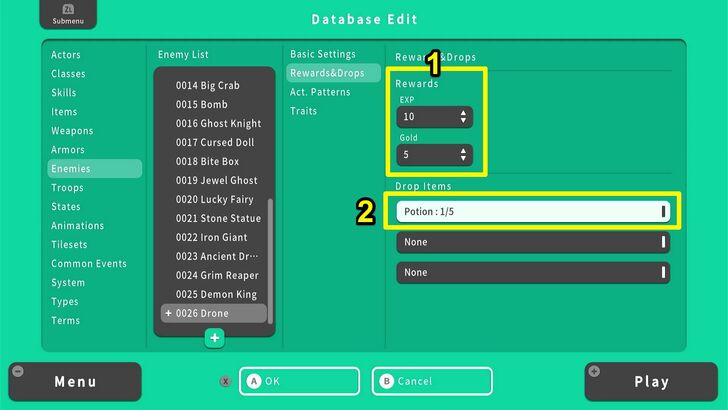 Below the Basic Settings section is Rewards & Drops section. Here is where you set how much EXP and gold the monster will give once defeated, as well as the chances of it dropping a specific item. Since "Drone" is meant to be a low-level enemy, we set its EXP and Gold drops accordingly. Once you are done setting the EXP and Gold, go down to the Drop Items section. |
| 8 | 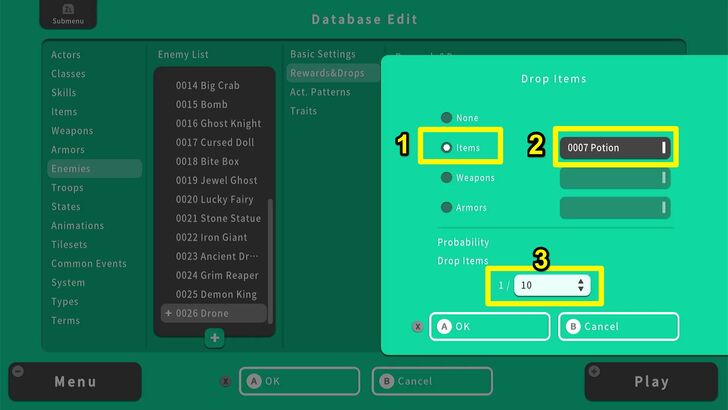 Here, you can specify what kind of item the enemy will drop, as well as the chances of it dropping every time you beat it. Here, for example, we set it so that the Drone will drop a potion once every 10 times it is fought. |
Setting Enemies' Stats
Now that we've created our enemy, it's time to adjust its stats. Since the Drone is meant to be a low-level opponent for our characters to fight, then it will have to have low stats so it's easy for our players to fight.
| 1 | 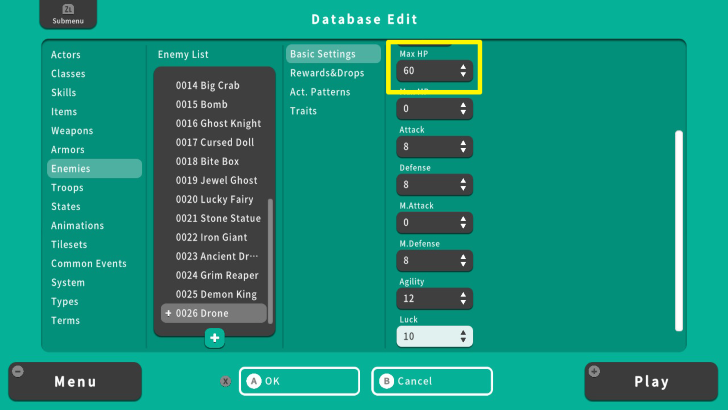 For this example, we will create an enemy for low-level characters. First, set the maximum hit points of this enemy to 60. "Max HP" indicates how much an enemy can withstand attacks. |
|---|---|
| 2 |  Set the "Max MP" of this enemy to 0. Since this enemy will not use a magic attack, there is no point in adding MP. However, you might set Max MP for some enemies, especially the spellcasters. |
| 3 |  Set the "Attack" to 8. This is the damage the enemy will deal against your characters. |
| 4 | 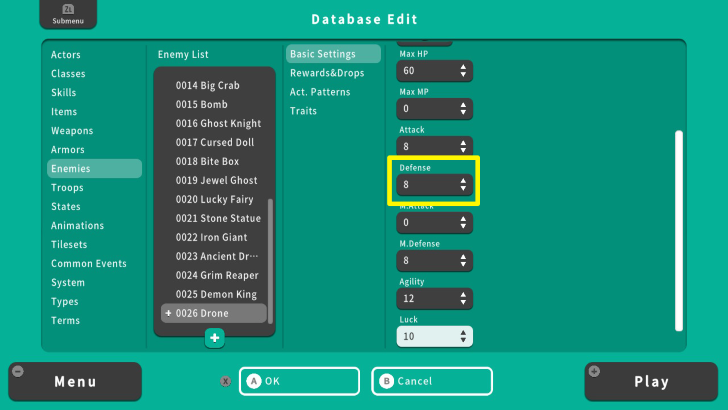 Set the "Defense" to 8 as well. This will reduce the damage dealt by your characters to this enemy. For instance, if your character has an Attack value of 15 and the enemy's Defense is 8, subtract these values, and your character's final damage will be 7. |
| 5 | 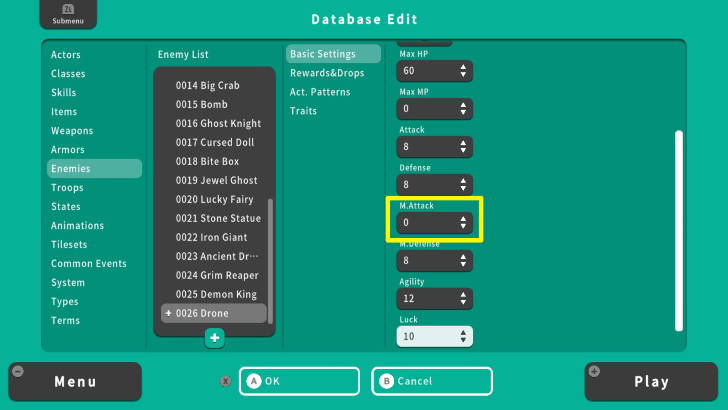 Set the "M. Attack" to 0. Since this enemy does not have spells and MP, they do not need to have a magic attack. |
| 6 | 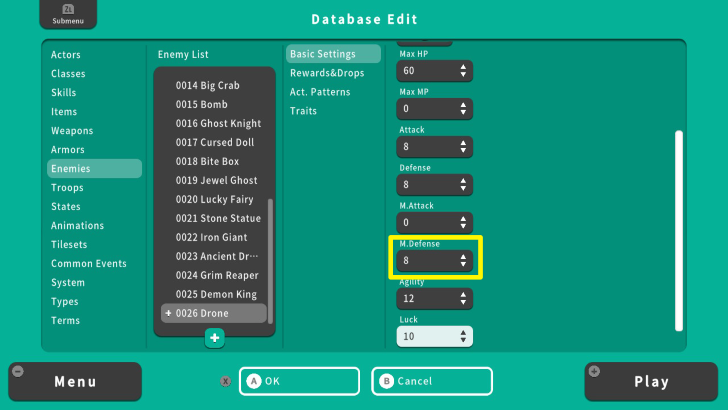 Set the "M. Defense" to 8. This will reduce the magic damage dealt by your characters to this enemy. For example, If your character has 12 magic attacks and the enemy's magic defense is 8, the final magic damage will only be 4. |
| 7 | 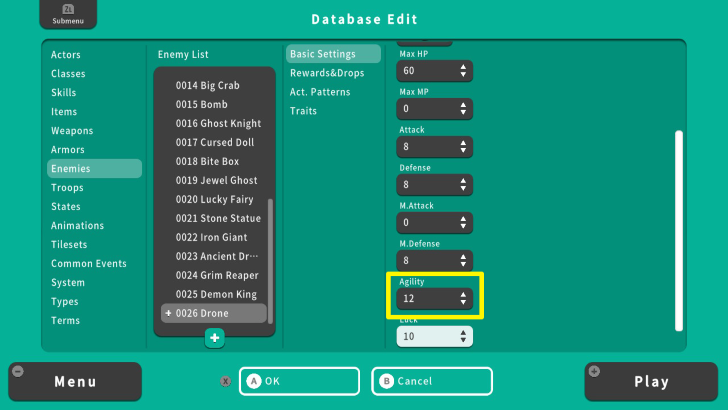 Set the "Agility" to 12. In this case, if your character has 10 Agility, then this enemy will act first during that turn because of its 12 Agility value. |
| 8 | 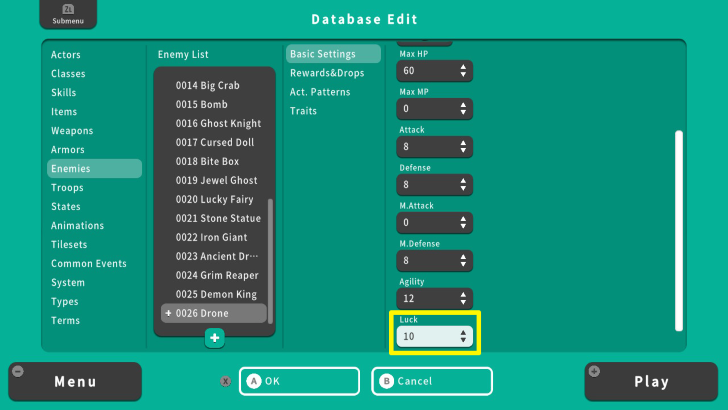 Set the "Luck" to 10. This stat influences the chance of receiving status ailments. An enemy with high luck has a higher chance of resisting status ailments. |
There are other things you can set for enemies in your game. You can set their behavior, which decides what kind of attacks and actions they'll use in battle. You can also set their Traits in case you want them to have special buffs or resistances against certain attacks.
This way, your enemies can be as easy or as difficult to fight as you want. However, it will be up to you whether or not the fight will be fair (in terms of balancing enemy stats and your players' abilities) or rewarding (in terms of EXP, Gold, and item drops).
Implementing Enemies in Your Game
How to Set Enemy Groups
Now it's time to populate your game with enemies and make sure we'll be able to encounter them. We do this by creating enemy groups or "Troops" as they're called in RPG MAKER WITH. We'll group enemies together, set the background we'll fight them in, and then manipulate the chances of our players running into them during exploration.
| 1 | 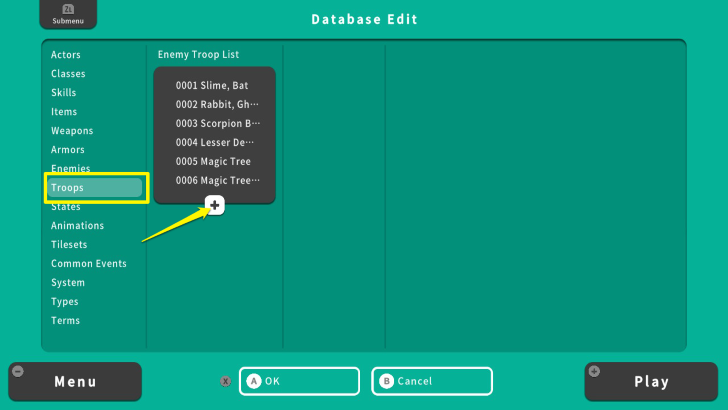 First, pull up the Database and navigate to the Troops section. Once there, select the + Icon. |
|---|---|
| 2 | 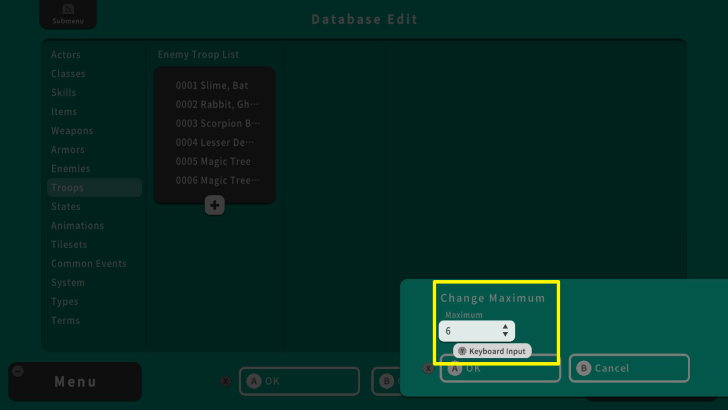 Press the A Button twice and then press the Y Button.Change the value of Maximum from 6 to 7. |
| 3 |  Once you changed the value to 7, press the X Button and select OK. This will add one enemy group to the "Enemy Troop List." |
| 5 | 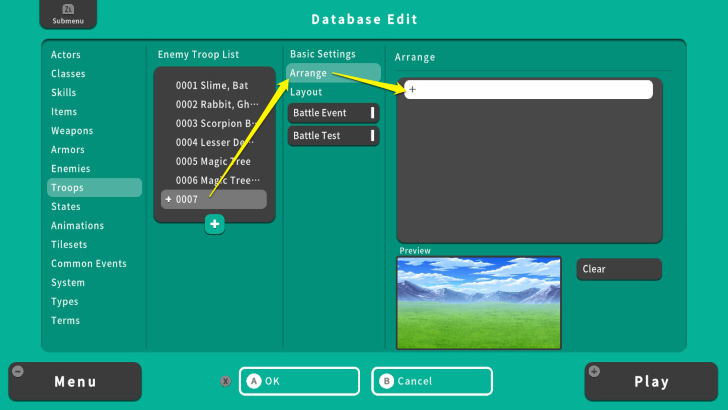 Select the new blank entry we've made and navigate to the Arrange section. Here, we will pick what enemies will be in the Troop. Select the + Icon. |
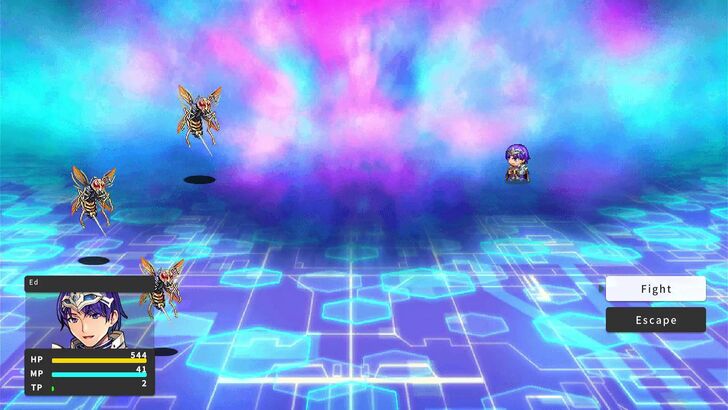
| 6 | 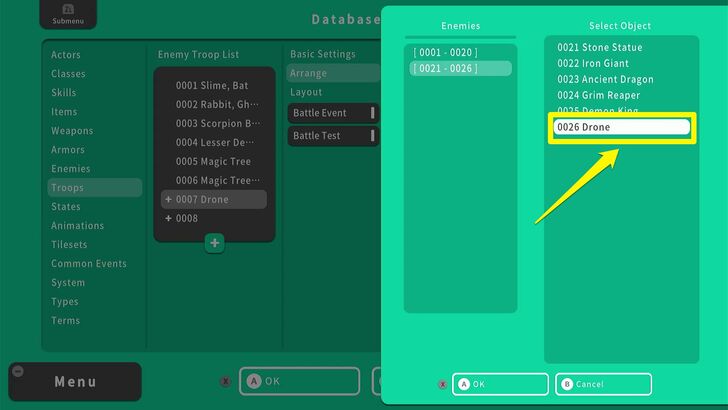 A list will pop up from the side and ask you to choose an enemy. In this case, we will choose the "Drone" enemy we just made. |
| 7 | 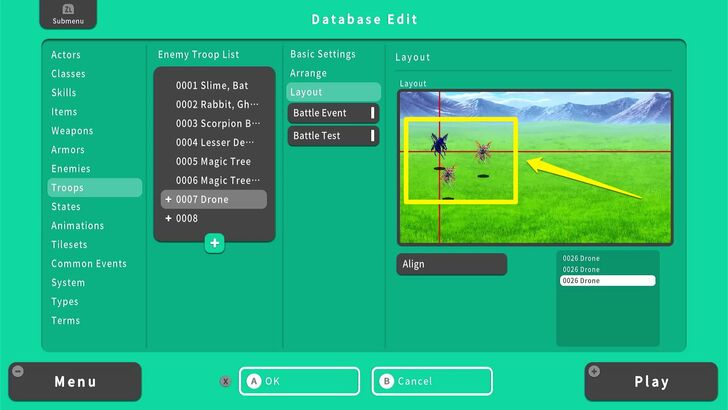 When the enemy pops up in the preview screen, you can manually arrange them. Since we set our battles to Side View instead of Front View, we have to push our Drones to the left so there would be space for our party members on the right. |
| 8 | 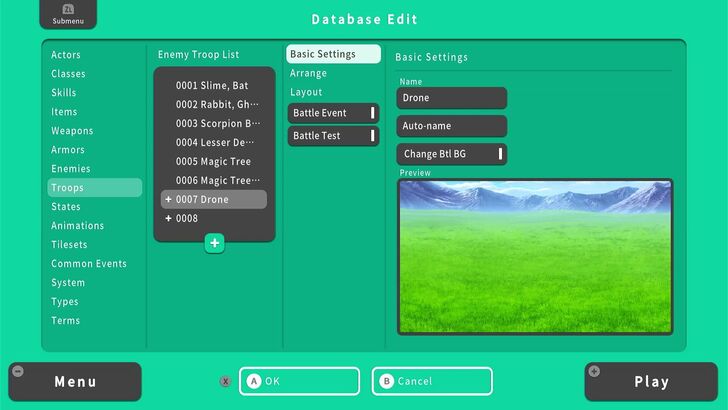 Go up to the Basic Settings section. There, you can name your Troop. We named our Troop "Drone." |
| 9 | 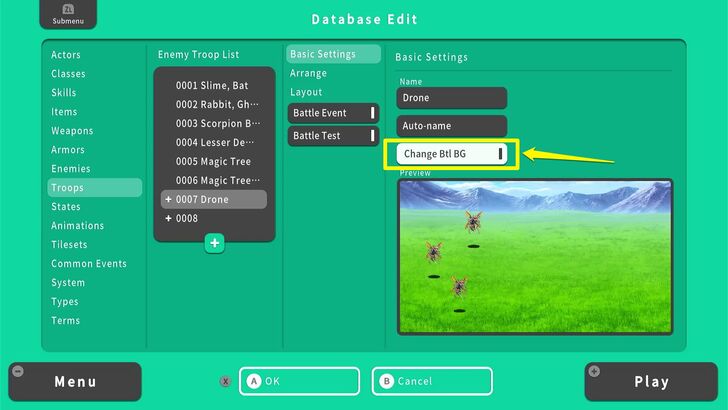 Still while in the Basic Settings section, select Change Btl BG to change the background and foreground your players will fight this Troop in. |
| 10 | 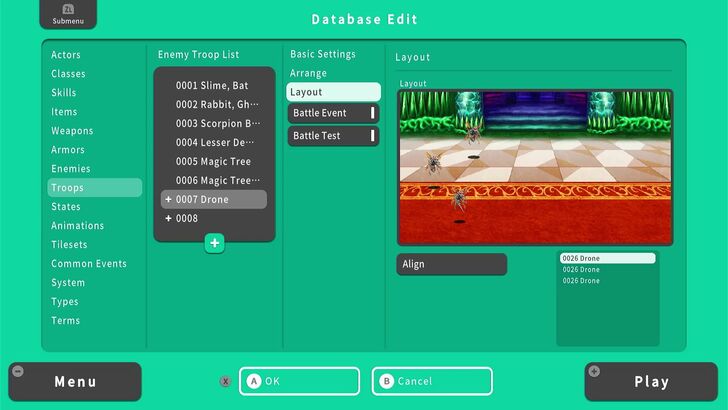 Once you've changed it, the Troop is ready to be used as an Encounter. |
How to Set Up Enemy Encounters
Now that we've made our enemy Troops, we are one step closer to implementing enemies in our game. The simplest way to do it is by heading back to the Map List and editing the Map Information of all the maps we want to have our players fight enemies in.
| 1 | 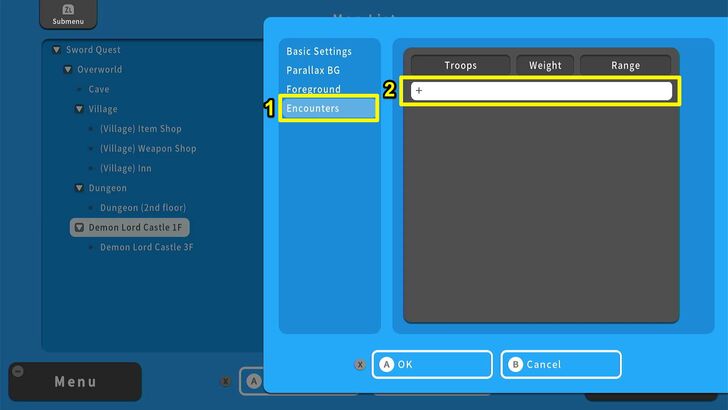 Go to the Map List and select a map you want to have enemy encounters in. Edit their Map Information and scroll down to the Encounters section. To the right, you will see a blank list that we will fill with enemy Troops. Select a blank entry on the list. |
|---|---|
| 2 | 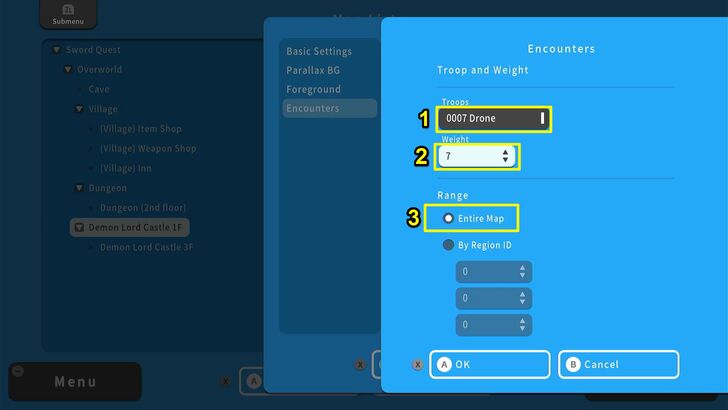 A new dialogue box will pop up from the side and it is here that you can pick what Troop will be encountered on the map, as well as its encounter weight, and whether it can be encountered throughout the map or in a specific area (via a Region ID). For our purposes, we selected the Drone troop we made earlier, adjusted the weight to 7, and selected Entire Map. The Weight of a Troop will affect the chances it will be encountered by the player. The higher the number, the higher the chances it will be fought instead of other Troops. |
| 3 | 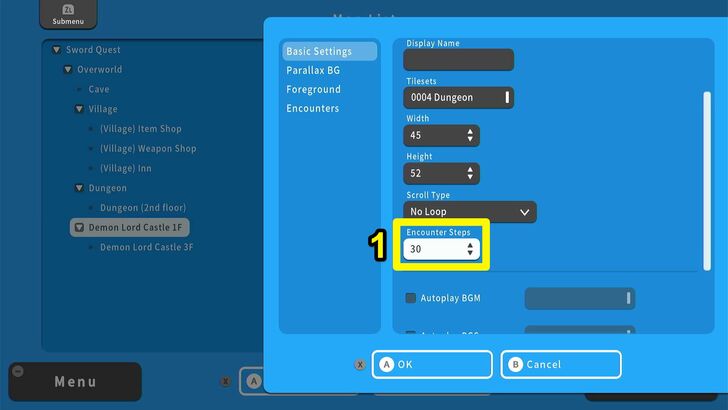 Once that's done, go to the Basic Settings section and scroll down to Encounter Steps. This sets how many steps the player will have to take on the map before encountering an enemy. You can also scroll further down and set the background music for battles with the Set Battle BG setting. |
From here, you can start implementing enemies on all the maps you want to have encounters in, using either default Troops or Troops you made. Remember to playtest and balance the stats of your enemies to make sure your players won't find the fights in your game too challenging or too easy.
Random enemy encounters are the staple of classic RPGs, but you can also do on-map Encounters where players will see enemies on the map and have a chance to avoid them. Pick what encounter system you think would be the best for the kind of RPG you are making.
How to Make Different Kinds of Monster Encounters
Creating the Final Boss
Now that we have enemies implemented in the game, it's time to cap it off by putting in the Final Boss. Bosses serve as significant challenges to test player's skills and strategies in battles. In most cases, the bosses mark the end of a dungeon or a storyline. Defeating a boss provides a sense of player accomplishment by providing unique items or revealing important plot points.
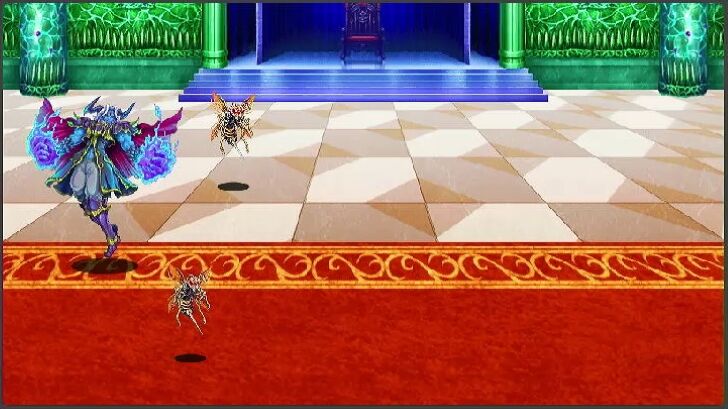
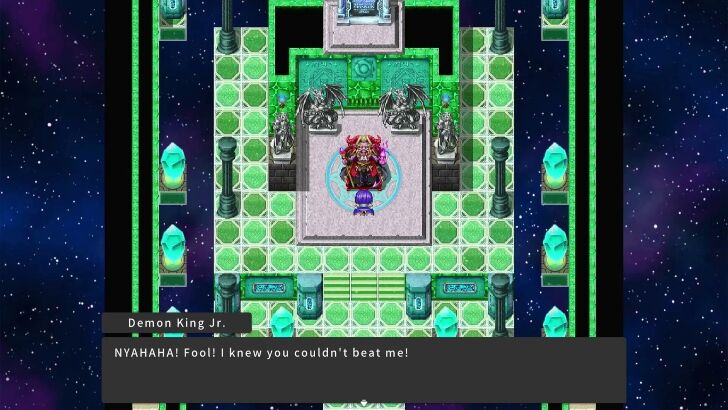
In our case, that boss will be Demon King Jr., and defeating him will lead to the end of our game. You can use the pre-existing enemies in the Database as your boss in RPG MAKER WITH. However, Demon King Jr. will be partly custom-built for this guide.
| 1 |  To create a new boss, open your Database and select Enemies. Here, add one enemy to the Enemy List and edit its Basic Settings. You can change the boss' name, image, and stats here. |
|---|---|
| 2 | 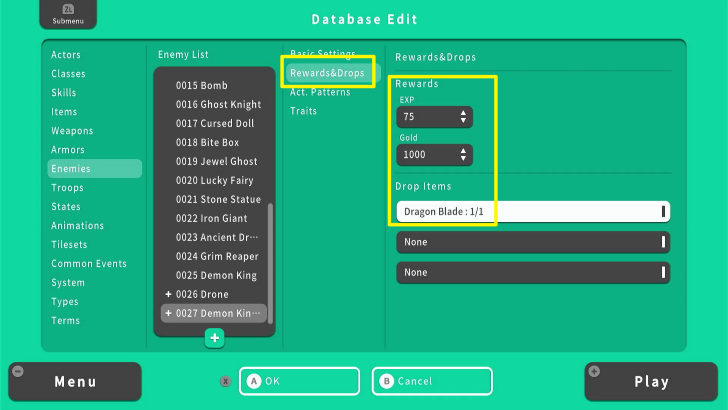 After that, go to Rewards and Drops. Set the EXP, gold, and item drop of your boss. |
| 3 | 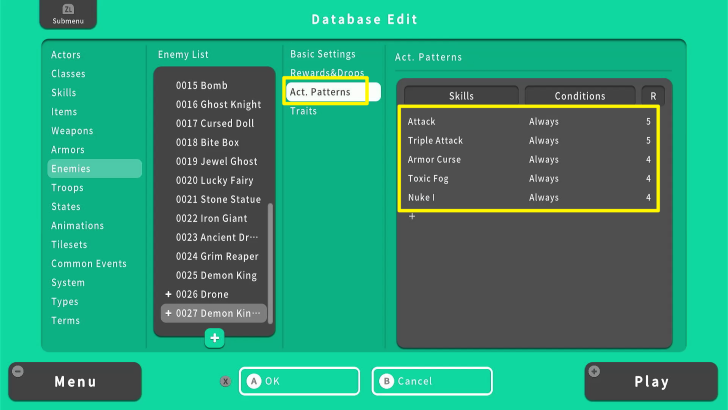 Once you set the boss drops, you can head to Act. Patterns, where you can set your boss' behavior. Ensure their powerful skills are less frequent to make the boss battle fair. |
| 4 | 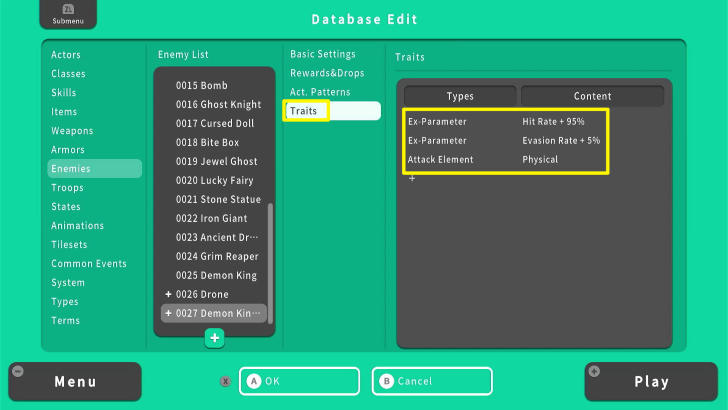 You can also further modify your boss by going to the Traits section. Here, you can change its attack element, vulnerabilities, etc. Once done, your boss is ready. However, we still need to make its troops. |
| 5 | 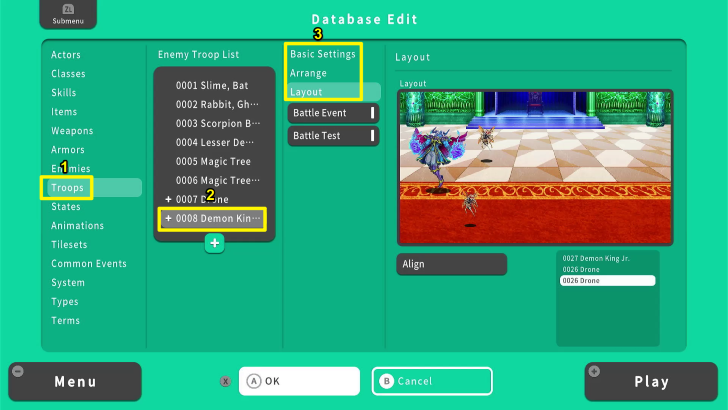 You can set your boss' minions by going to Troops. Here you can rename the troop, add minions, and arrange their positions in battle. Make sure to edit your troop information on Basic Settings, Arrange, and Layout. |
| 6 | 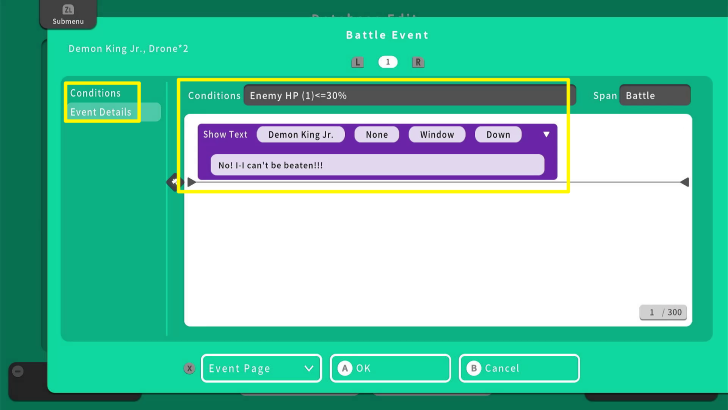 After that, you can add in-game events during the boss battle. Head to Battle Event to set the event and the conditions for triggering it. Here, the boss will display a dialogue once its HP drops below 30%. |
| 7 | 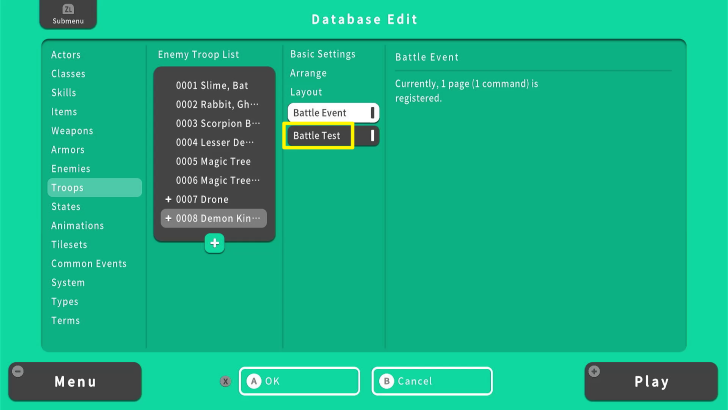 Congratulations! You added a boss and its Troop to the Database. Use the Battle Test option to evaluate and balance your boss's battle. |
Making the Final Boss Battle
Now that we've made the Final Boss, it's time to set the stage for the battle with them. In classic RPGs, the boss speaks a line of dialogue or two before the fight begins. Maybe a cutscene happens.
This is what we will do with our final boss, Demon King Jr. We will use Events to set his dialogue, as well as the outcome of the battle with him.
| 1 | 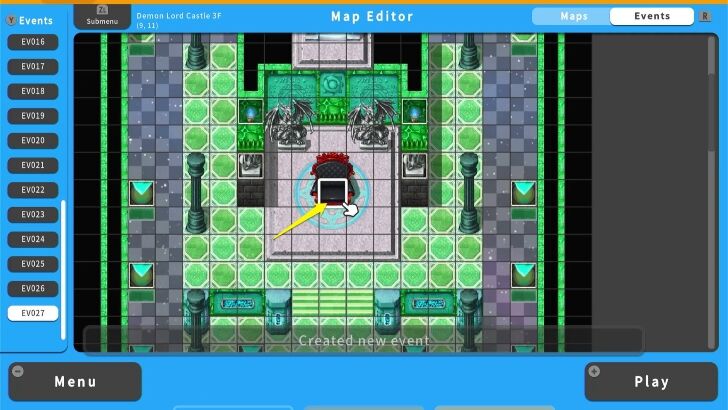 Now that we have added the boss and its troop to the Database, we can move forward with the on-map event for the boss battle. First, select the location where you want the boss to appear on your map. |
|---|---|
| 2 | 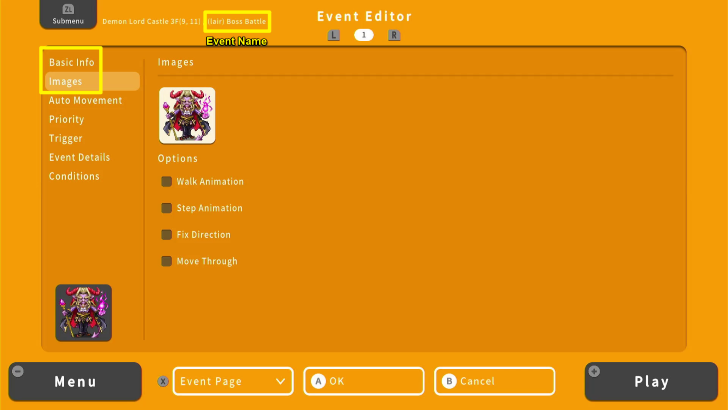 Once selected, open the Event Editor. Rename this event via the Basic Info option, then set the image of your boss in the Images option. |
| 3 | 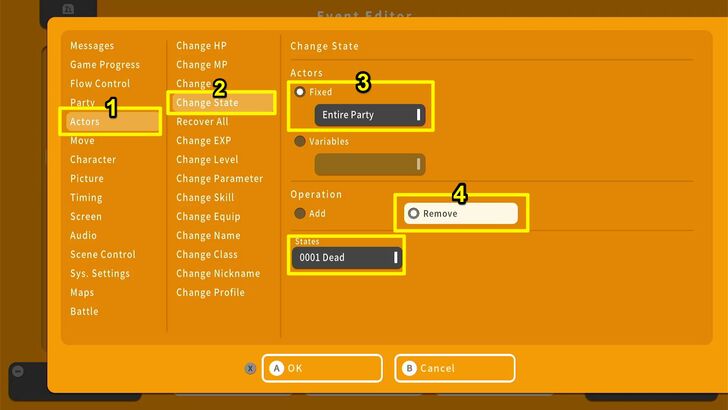 Go to Event Details and add dialogue to your boss. Then use the Battle Process command to set what will happen if you win or lose the battle. Go to Scene Control, then choose Battle Process, and then choose the Troop you want to use for the boss battle under Dir. Designation. In our case, we already made a Troop for Demon King Jr. so choose him. Then, toggle the Can Lose option so that the player can be defeated without being thrown into the Game Over screen. |
| 4 | 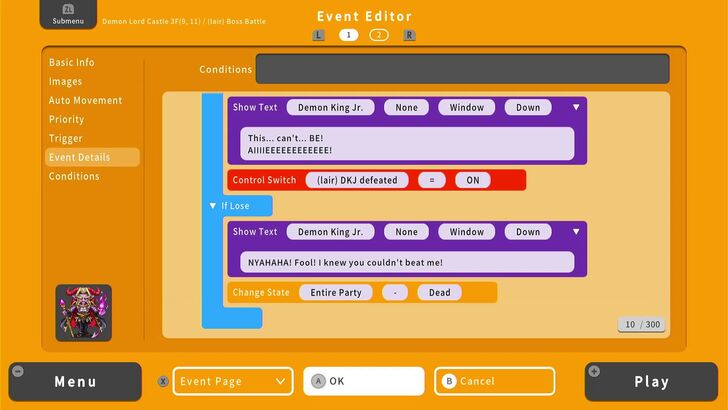 You can set different dialogues, depending on the outcome of your battle via the Battle Process command. You can also set what happens to you or the boss, depending on the battle's outcome. For this example, the boss will disappear after being defeated via the Control Switch. If the boss wins the battle, the entire party will still survive since we removed the "Dead"state. |
| 5 | 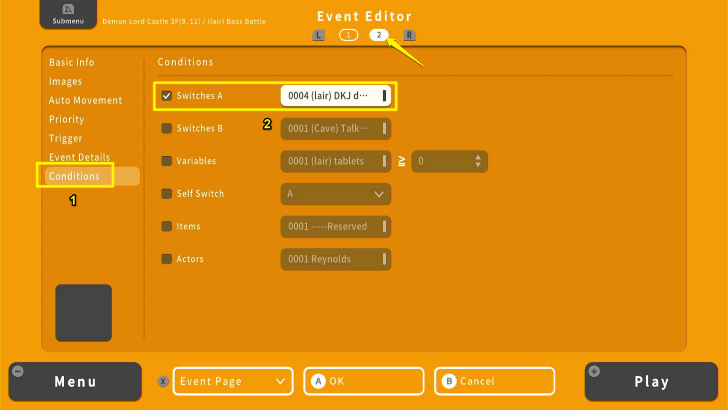 Make sure to create a second Event Page. Under the Conditions option, set the Control Switch previously used in the first event page. In this boss battle event, the Switch used is "(lair) DKJ defeated." We will also use this switch to trigger the ending later. |
| 6 | 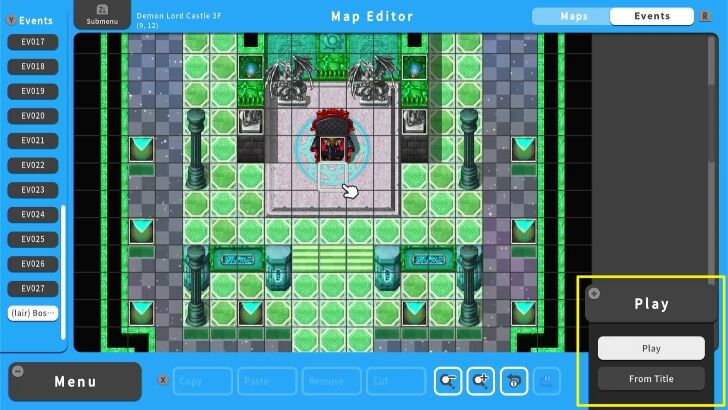 Once done, Playtest your game by pressing the + Button. Make sure to save your progress. If we lose to Demon King Jr., we should still be able to survive the encounter with 1 HP left. |
| 7 | 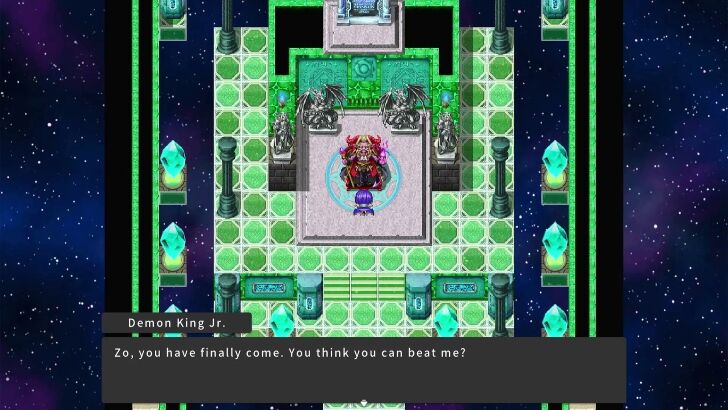 Success! We survived the encounter despite losing to the boss. |
You can also turn off the "Can Lose" state so that the player will immediately be brought to the Game Over screen. However, make sure that you've established a system that reminds the player to save regularly (such as save points). This way, the player will not end up forgetting to save and losing to the boss (losing their progress in the process).
How to Make an Ending
After making our game, here we are - the ending. The sequence that will cap off our RPG. Every RPG has to end somewhere, and our game will end here. We'll show you one of the ways to do that - an Autorun Event. It's a regular event, but it triggers automatically once you enter the map it's been created in.
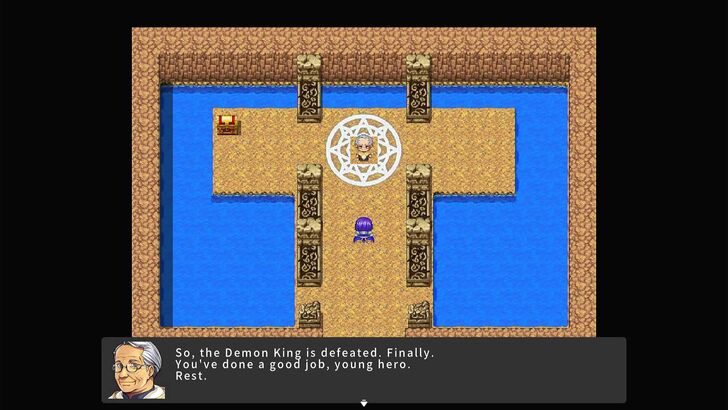
Autorun Events allow you to create cutscenes, and we will create a short one between our player character and the old man in the cave. After defeating the Demon King, the player is supposed to go back to the cave, here they will be congratulated. The game will then end and bring them back to the title screen.
| 1 | 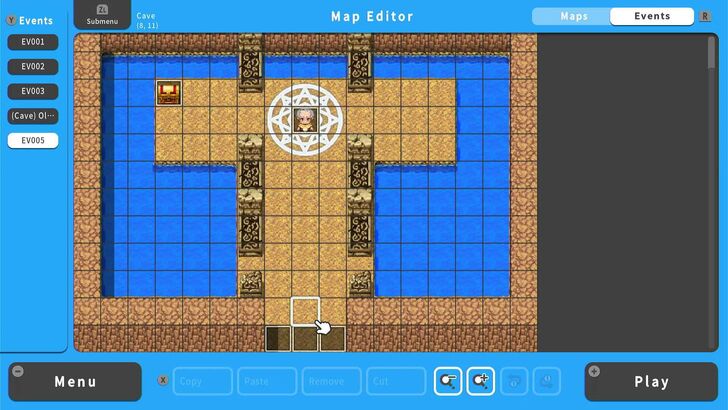 First, let's head to the map we want the event to happen in and create a new event. |
|---|---|
| 2 | 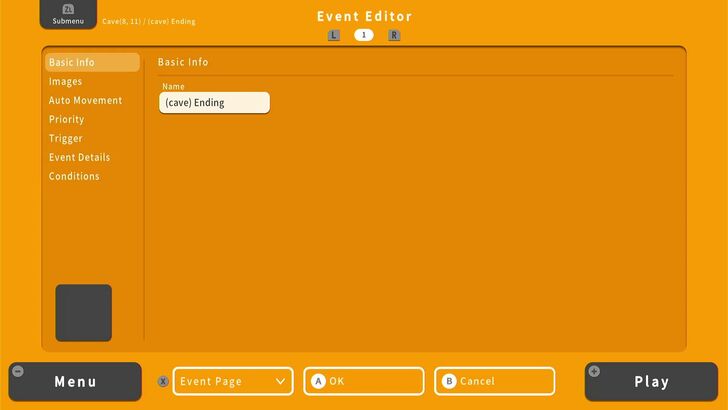 Name it accordingly. Then, in the Images section, leave the image empty but toggle on Walk Animation. |
| 3 | 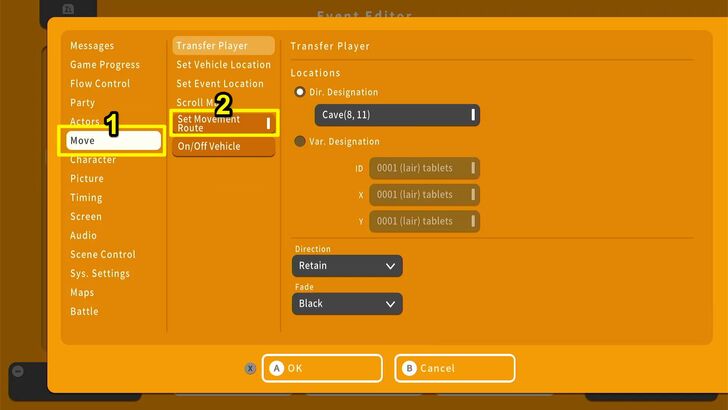 The first command we will put in the Details List is Set Movement Route. We will make the player character walk from the entrance of the cave toward the old man. |
| 4 | 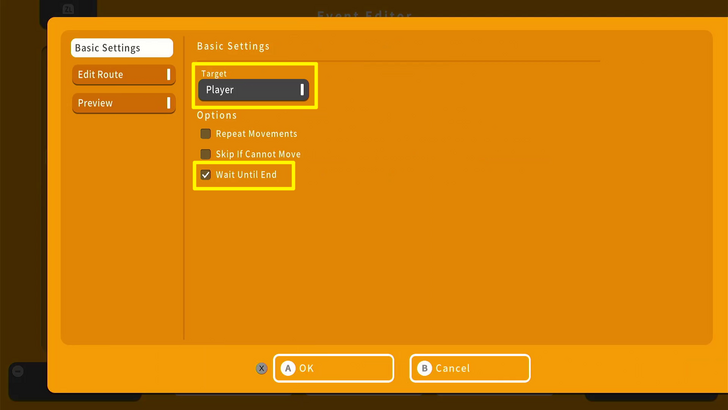 A new window will pop up. In the Basic Settings section, make sure the player is selected under Target and Wait Until End. |
| 5 | 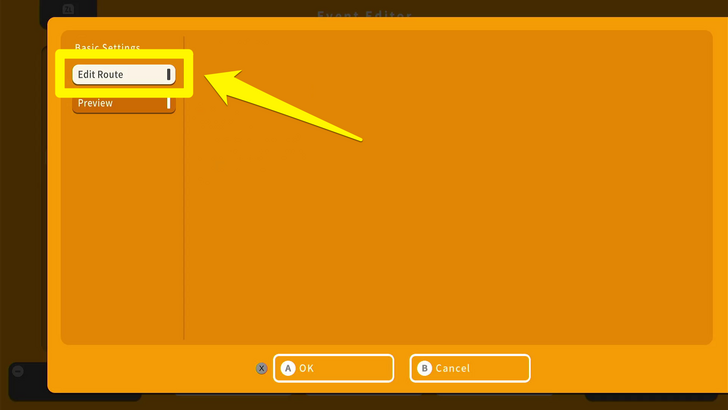 Now, select Edit Route. This will bring up another window. |
| 6 | 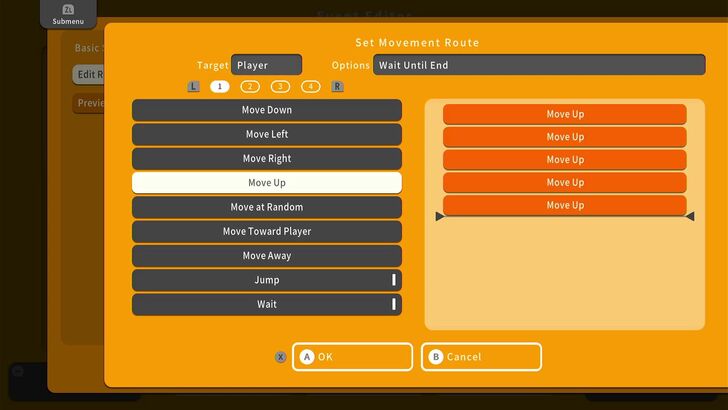 Here, we will set the direction the Player Character will walk in. Since we just want them to walk across the cave to the old man, we only need them to Move Up five times. |
| 7 | 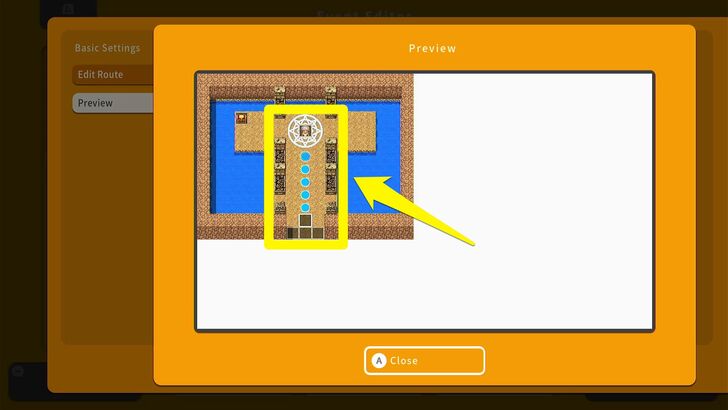 Once we confirm our route, select the Preview option to see how the route will go through the cave. The Preview will help you spot corrections. |
| 8 |  Once we've confirmed all the details for the movement direction, let's pick background music for the cutscene. We picked "Castle2" in the Castle folder since it sounded victorious, but you may pick whichever one you prefer. |
| 9 | 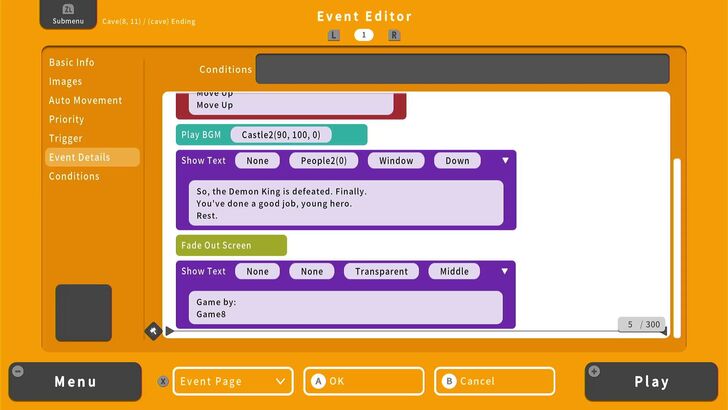 After the BGM, let's add some dialogue from the old man. Right afterward, put in a Fade Out Screen command, followed by a Show Message command with a transparent window. This is where you can put in the epilogue if you have one, or a "Thank You" message to players. |
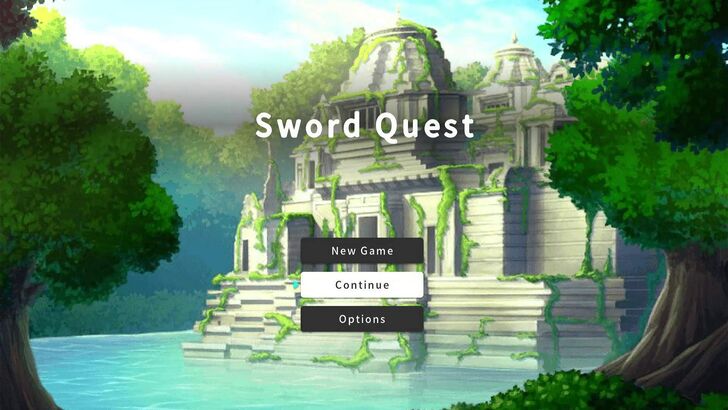
| 10 | 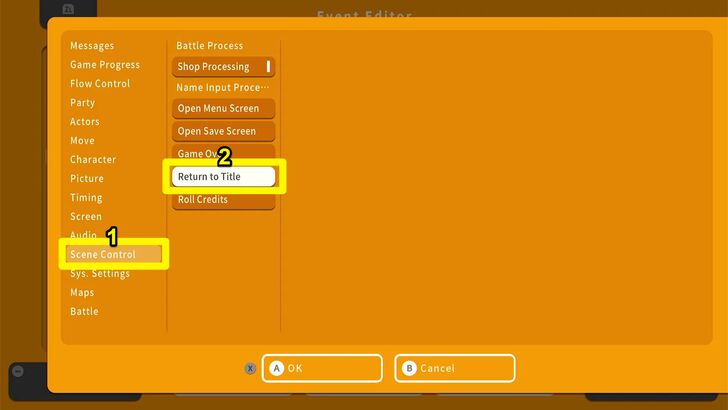 Then, for the final command, use Return to Title to bring the player back to the game's Main Menu.. |
Finished Product: Your First RPG!
Congratulations! You've finished your first-ever game on RPG MAKER WITH. Though it was a small game, it doesn't mean you shouldn't try expanding it. Or maybe you should make a new project and use the lessons you learned to make an even bigger RPG.
We've got many articles talking about not only what kind of game genres you can do with RPG MAKER WITH, but also how to reach out to other game creators like yourself! Your development of this game may have ended, but your journey as a game developer may have just begun.
RPG MAKER WITH Related Guides
| Core Guides | |
|---|---|
| Advanced Guide Part 1 | Advanced Guide Part 2 |
| Core Guides | |
|---|---|
| Beginner's Guide Part 1 | Beginner's Guide Part 2 |
| Tips and Tricks | |
|---|---|
| Map, Event, and Switch Naming Tips | How to Use the Flood Fill Tool |
| Core Guides | |
|---|---|
| Intermediate Guide Part 1 | Intermediate Guide Part 2 |
| Tips and Tricks | |
|---|---|
| How to Make a Switch | How to Use Map Foregrounds and Backgrounds |
| How to Change Event Text Color | |
Comment
Author
Advanced Guide Part 2: Making Enemies and the Final Boss!
Rankings
- We could not find the message board you were looking for.
Gaming News
![Animal Crossing: New Horizons Review [Switch 2] | Needlessly Crossing Over to a New Generation](https://img.game8.co/4391759/47d0408b0b8a892e453a0b90f54beb8a.png/show)

Popular Games

Genshin Impact Walkthrough & Guides Wiki
Honkai: Star Rail Walkthrough & Guides Wiki
Arknights: Endfield Walkthrough & Guides Wiki
Umamusume: Pretty Derby Walkthrough & Guides Wiki
Wuthering Waves Walkthrough & Guides Wiki
Pokemon TCG Pocket (PTCGP) Strategies & Guides Wiki
Abyss Walkthrough & Guides Wiki
Zenless Zone Zero Walkthrough & Guides Wiki
Digimon Story: Time Stranger Walkthrough & Guides Wiki
Clair Obscur: Expedition 33 Walkthrough & Guides Wiki


Recommended Games
Fire Emblem Heroes (FEH) Walkthrough & Guides Wiki
Pokemon Brilliant Diamond and Shining Pearl (BDSP) Walkthrough & Guides Wiki
Diablo 4: Vessel of Hatred Walkthrough & Guides Wiki
Super Smash Bros. Ultimate Walkthrough & Guides Wiki
Yu-Gi-Oh! Master Duel Walkthrough & Guides Wiki
Elden Ring Shadow of the Erdtree Walkthrough & Guides Wiki
Monster Hunter World Walkthrough & Guides Wiki
The Legend of Zelda: Tears of the Kingdom Walkthrough & Guides Wiki
Persona 3 Reload Walkthrough & Guides Wiki
Cyberpunk 2077: Ultimate Edition Walkthrough & Guides Wiki


All rights reserved
©Gotcha Gotcha Games
The copyrights of videos of games used in our content and other intellectual property rights belong to the provider of the game.
The contents we provide on this site were created personally by members of the Game8 editorial department.
We refuse the right to reuse or repost content taken without our permission such as data or images to other sites.